Martus offers a flexible path for creating a budget for a new budget cycle. A new budget can be created from scratch, from another budget, or from a combination of budget and actuals.
Before proceeding, identify which budget you want to copy into the new fiscal year. Go to Planner > Summary or Planner > Worksheets to review your current budgets.Set the Budget Year
- Go to Planner > Planner Setup > Set Budget Year.
- Select the year for the new budget and click Set as Budget Year.

Start the Budget
- Go to the Budget Management tab.
- Click Create Budget. The Year for the new budget is displayed.

Choose your Method
You have the following methods, with advanced options available.
- Copy Budget - Create a new budget based on a budget from any year.
- Copy Budget and Load Actuals - Create a new budget based on a budget from any year, and load actuals from the prior year or the current year, or load 12-month trailing actuals, or create an annualized budget from actuals.
- Empty Budget - Create a new, completely empty budget, without any worksheets. This is most commonly used to create a pre-allocation budget.

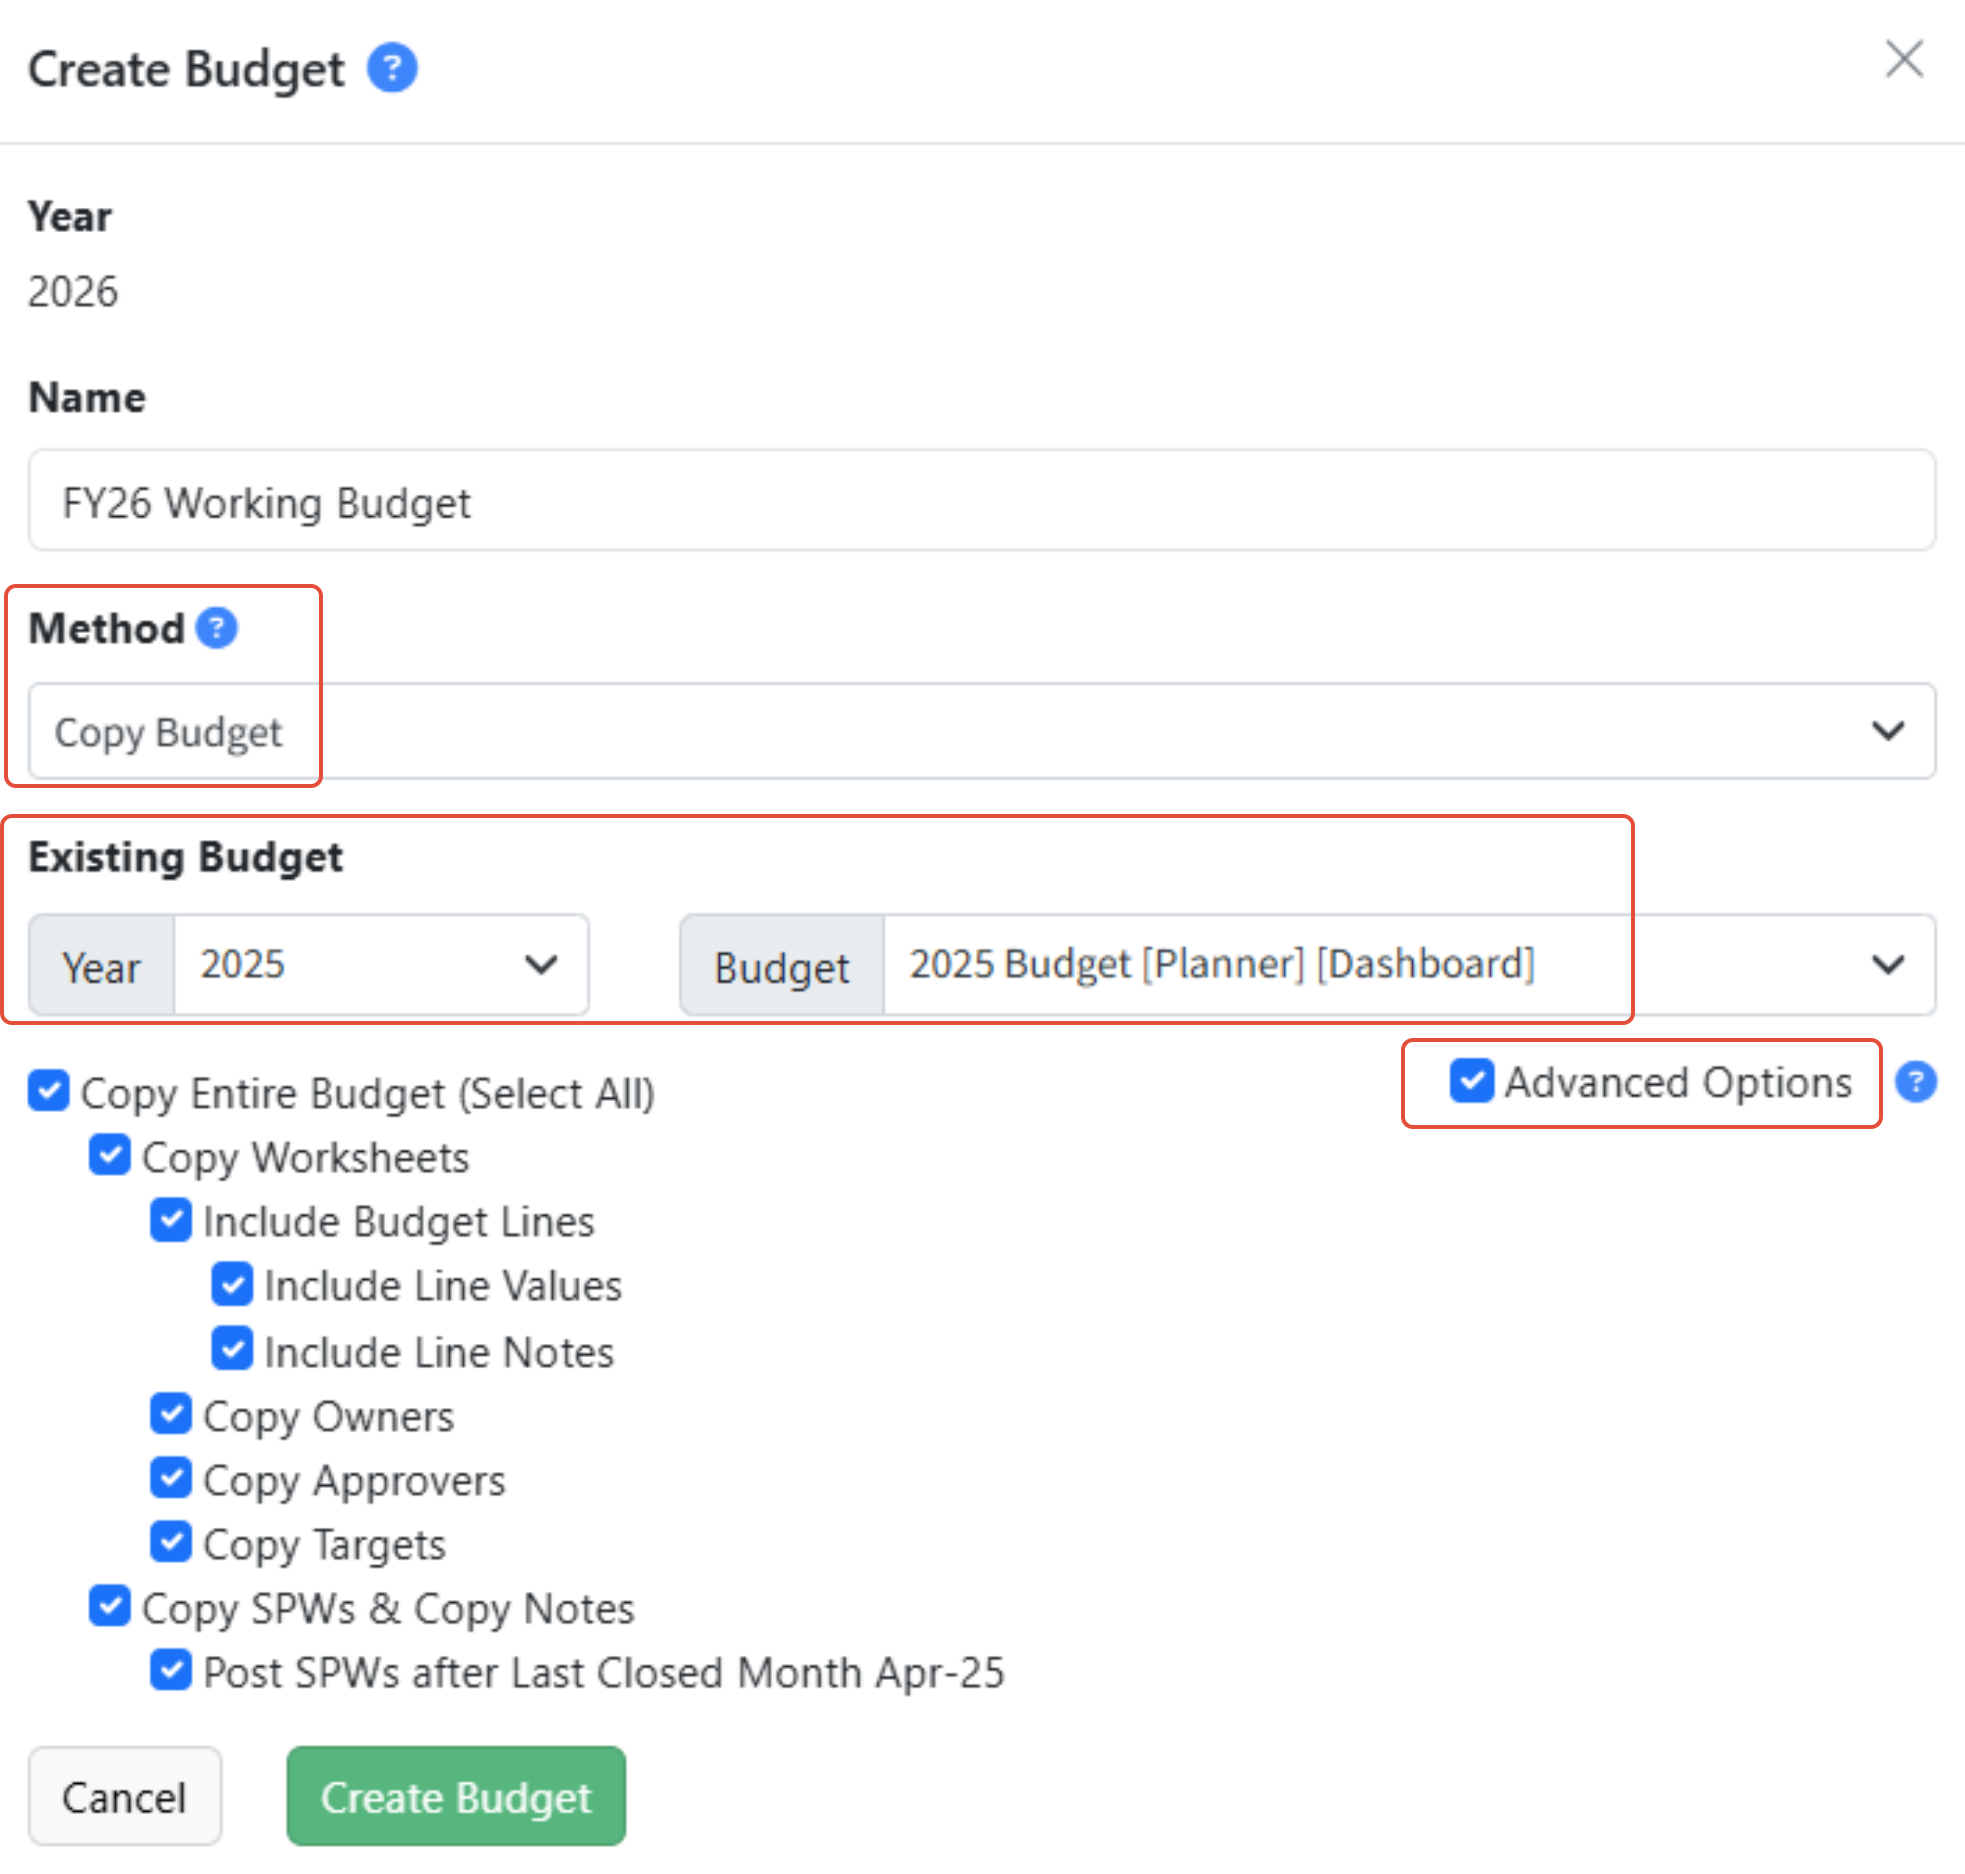
Copy Budget - Step-by-Step
Create a new budget based on a budget from any year.
- Enter a Name for the new budget.
- Select Copy Budget from the Method dropdown.
- Select the Existing Budget Year and Budget from the dropdowns.
- Click Advanced Options to refine the elements to be copied. These are described in detail below.
- Click Create Budget.
Copy Budget and Load Actuals - Step-by-Step
Create a new budget based on a budget from any year, and load actuals from the prior year or the current year, or load 12-month trailing actuals.
- Enter a Name for the new budget.
- Select Copy Budget and Load Actuals from the Method dropdown.
- Select the Existing Budget Year and Budget from the dropdowns.
- Select the option desired from Load Actuals:
- XXXX Actuals - Load actuals from the XXXX year. This may include prior and current year actuals. Current year actuals through the Default Month set in Martus will be loaded.
- 12-Month Trailing Actuals - Load actuals from the previous 12 months. Actuals for the current year through the Default Month set in Martus will be loaded, with actuals from the prior year loaded following the Default Month.
- Annualized Budget - Select the Source (Actuals, Budget, Actuals + Budget, or 12-Month Trailing) and the Months (Starting Month and Ending Month). The average of the actuals spent or budget amounts for the months selected is then distributed to all months of the budget equally.
- Click Advanced Options to refine the elements to be copied. These are described in detail below.
- Click Create Budget.


Setting Annualized Budget Options - Select the Source (Actuals, Budget, Actuals + Budget, or 12-Month Trailing) and the Months (Starting Month and Ending Month). The average of the actuals spent or budget amounts for the months selected is then distributed to all months of the budget equally.

Empty Budget - Step-by-Step
Create a new, completely empty budget, without any worksheets. This is most commonly used to create a pre-allocation budget. Advanced options are not available when creating an empty budget.
- Enter a Name for the new budget.
- Select Empty from the Method dropdown.
- Select the Budget Type from the dropdown.
- Normal - Create a normal budget with no worksheets.
- Pre-Allocation - Create a budget with no worksheets to be used as a pre-allocation budget.
- Click Create Budget.

Advanced Options
The following Advanced Options can be selected when creating a new budget. Child selections are only available if the parent is also selected.
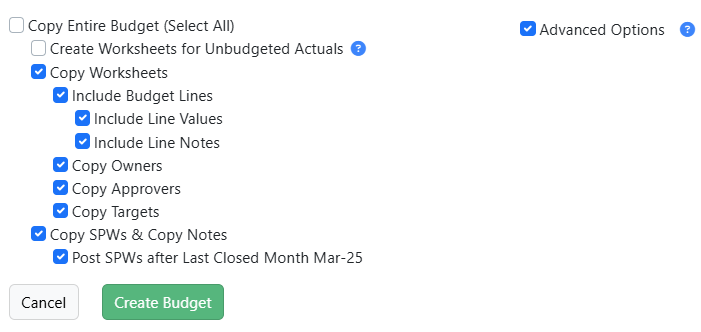
- Copy Entire Budget (Select All)- Copies all components of the budget and also copies and posts the SPWs after the Default Month.
- Create Worksheets for Unbudgeted Actuals - Create worksheets where actuals do not match an existing worksheet, and are therefore unbudgeted
- Copy Worksheets- Copy the same set of worksheets.
- Include Budget Lines- Copy the same lines in the worksheets.
- Include Line Values - Copy the budget values on the lines.
- Include Line Notes - Copy the line notes on the budget values.
- Copy Owners - Copy the worksheet owners.
- Copy Approvers - Copy the worksheet approvers.
- Copy Targets - Copy the worksheet targets.
- Include Budget Lines- Copy the same lines in the worksheets.
- Copy SPWs & Copy Notes- Copy the SPWs with values and the SPW Notes.
- Post SPWs after Default Month MMM-YY - Post the SPWs after the Default Month set in Martus.
Complete the New Budget Setup
- Go to Dashboard > Updater and confirm the job has completed successfully.
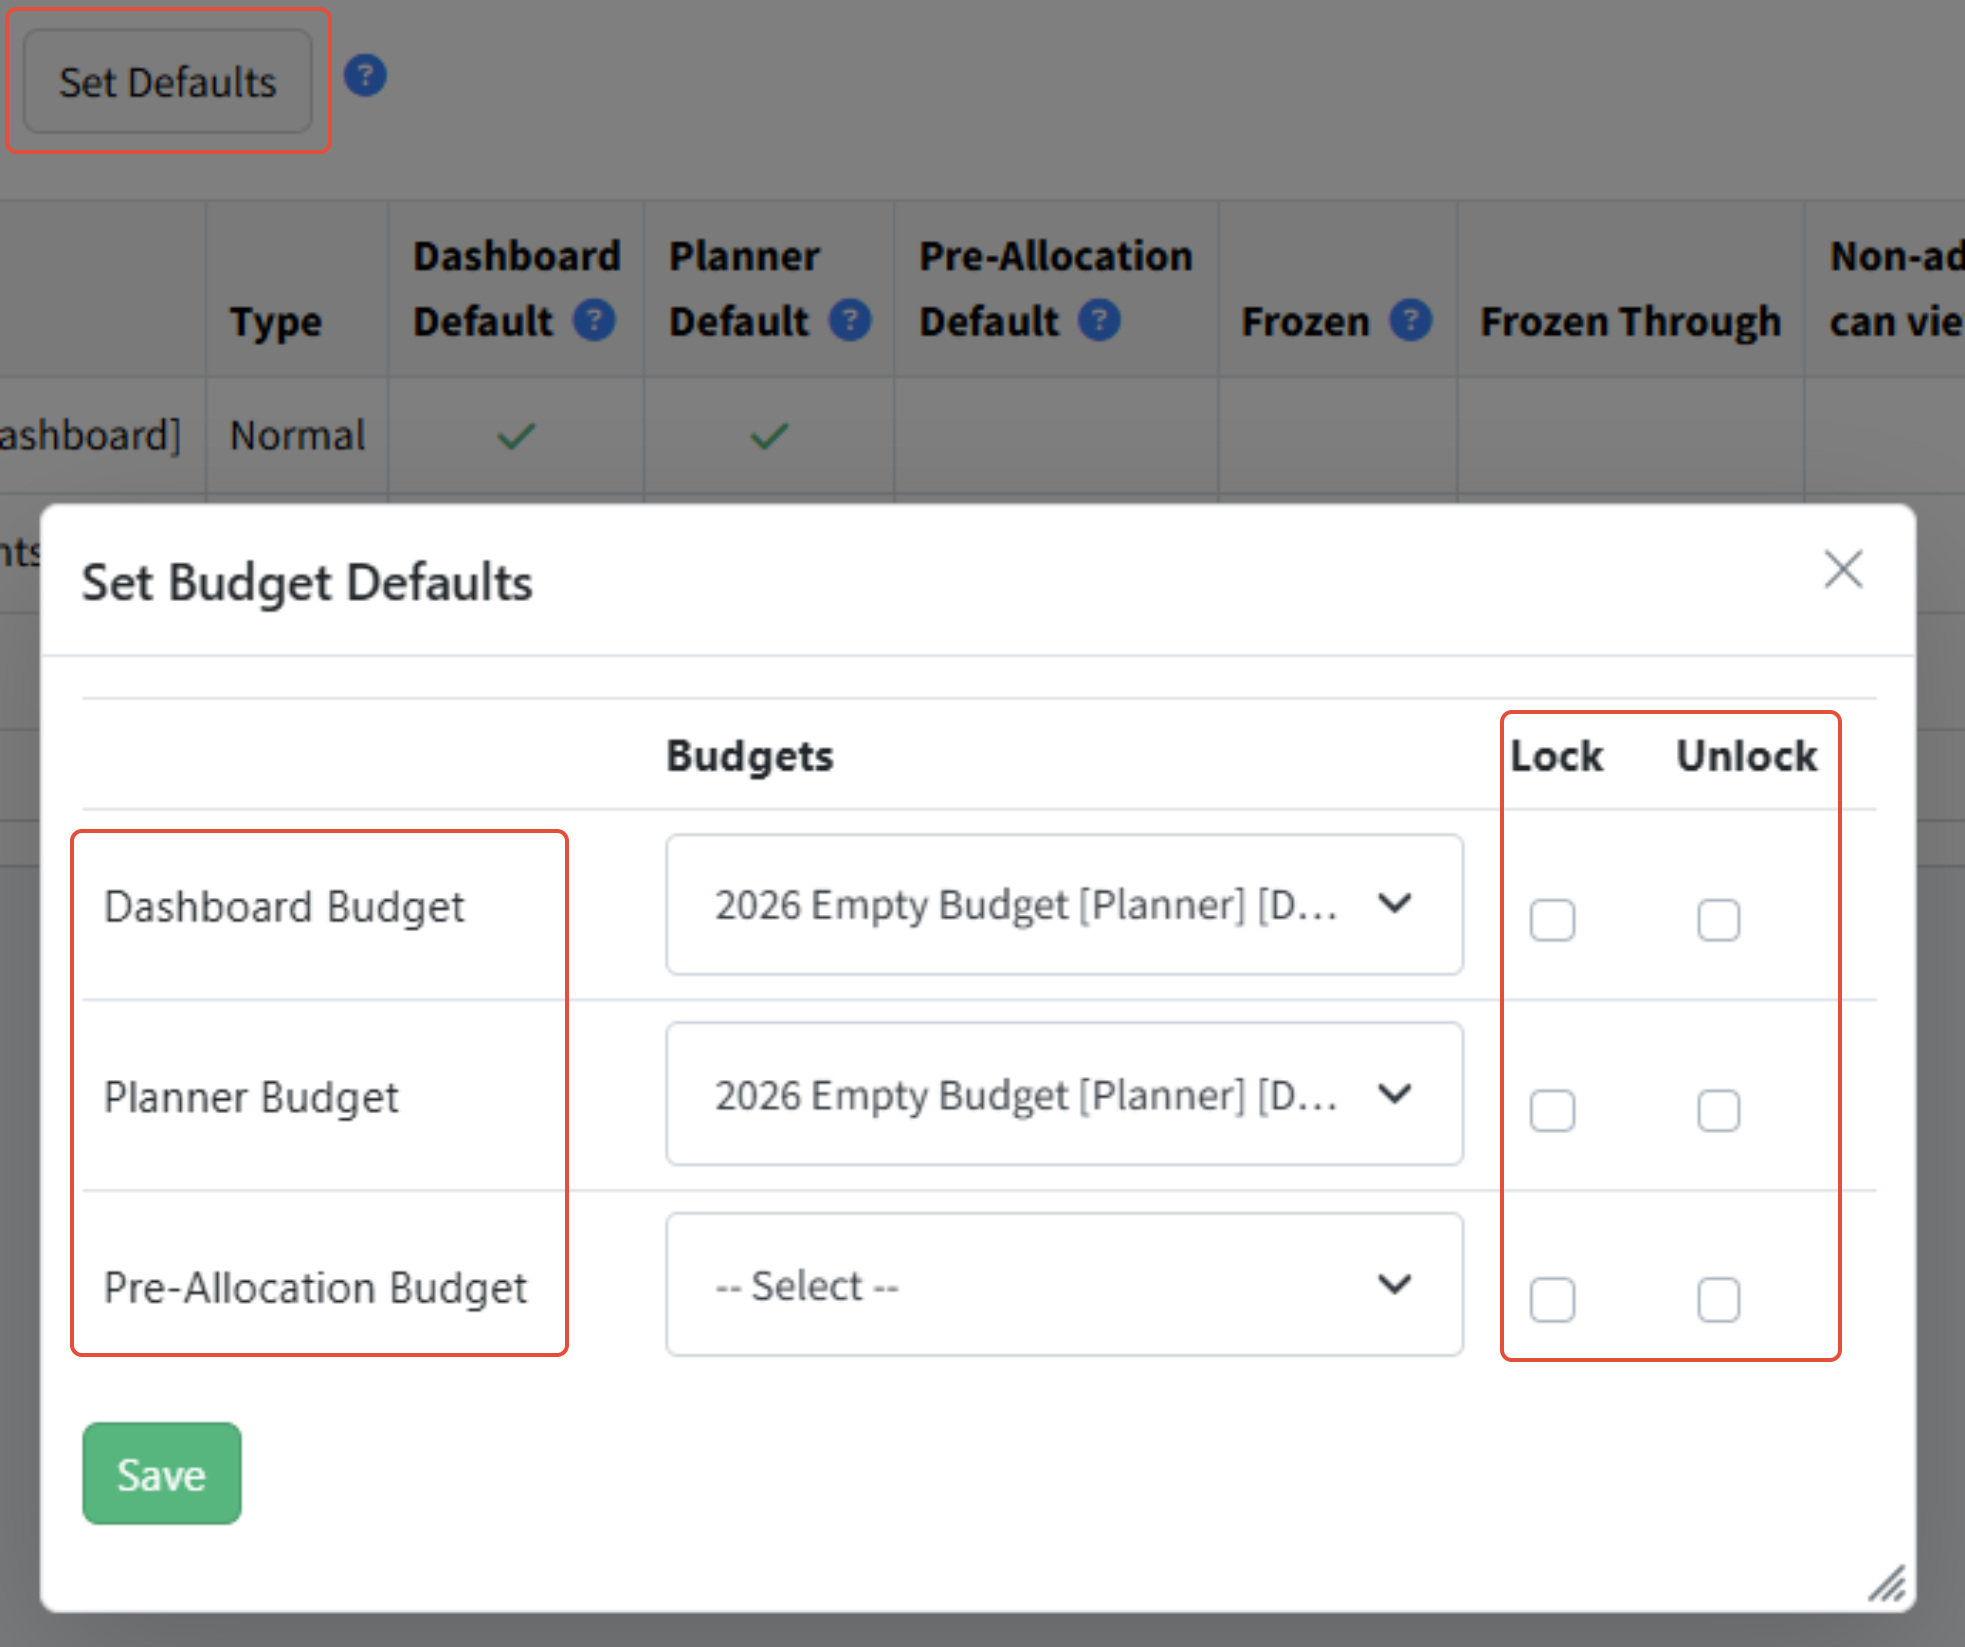
- Go to Planner > Planner Setup > Budget Management.
- Click Set Defaults to assign the Dashboard and Planner Default budgets (and the Pre-Allocation Default if applicable) and Lock or Unlock all worksheets.
- To manage the worksheets, review the Planner Setup article.
Was this article helpful?
That’s Great!
Thank you for your feedback
Sorry! We couldn't be helpful
Thank you for your feedback
Feedback sent
We appreciate your effort and will try to fix the article