Managing the Budget Cycle
This folder is for documents and videos related to creating forecasts and revised budgets within Martus.
New Budget Cycle - How To Create a New Budget
Martus offers a flexible path for creating a budget for a new budget cycle. A new budget can be created from scratch, from another budget, or from a combination of budget and actuals.
Before proceeding, identify which budget you want to copy into the new fiscal year. Go to Planner > Summary or Planner > Worksheets to review your current budgets.Set the Budget Year
- Go to Planner > Planner Setup > Set Budget Year.
- Select the year for the new budget and click Set as Budget Year.

Start the Budget
- Go to the Budget Management tab.
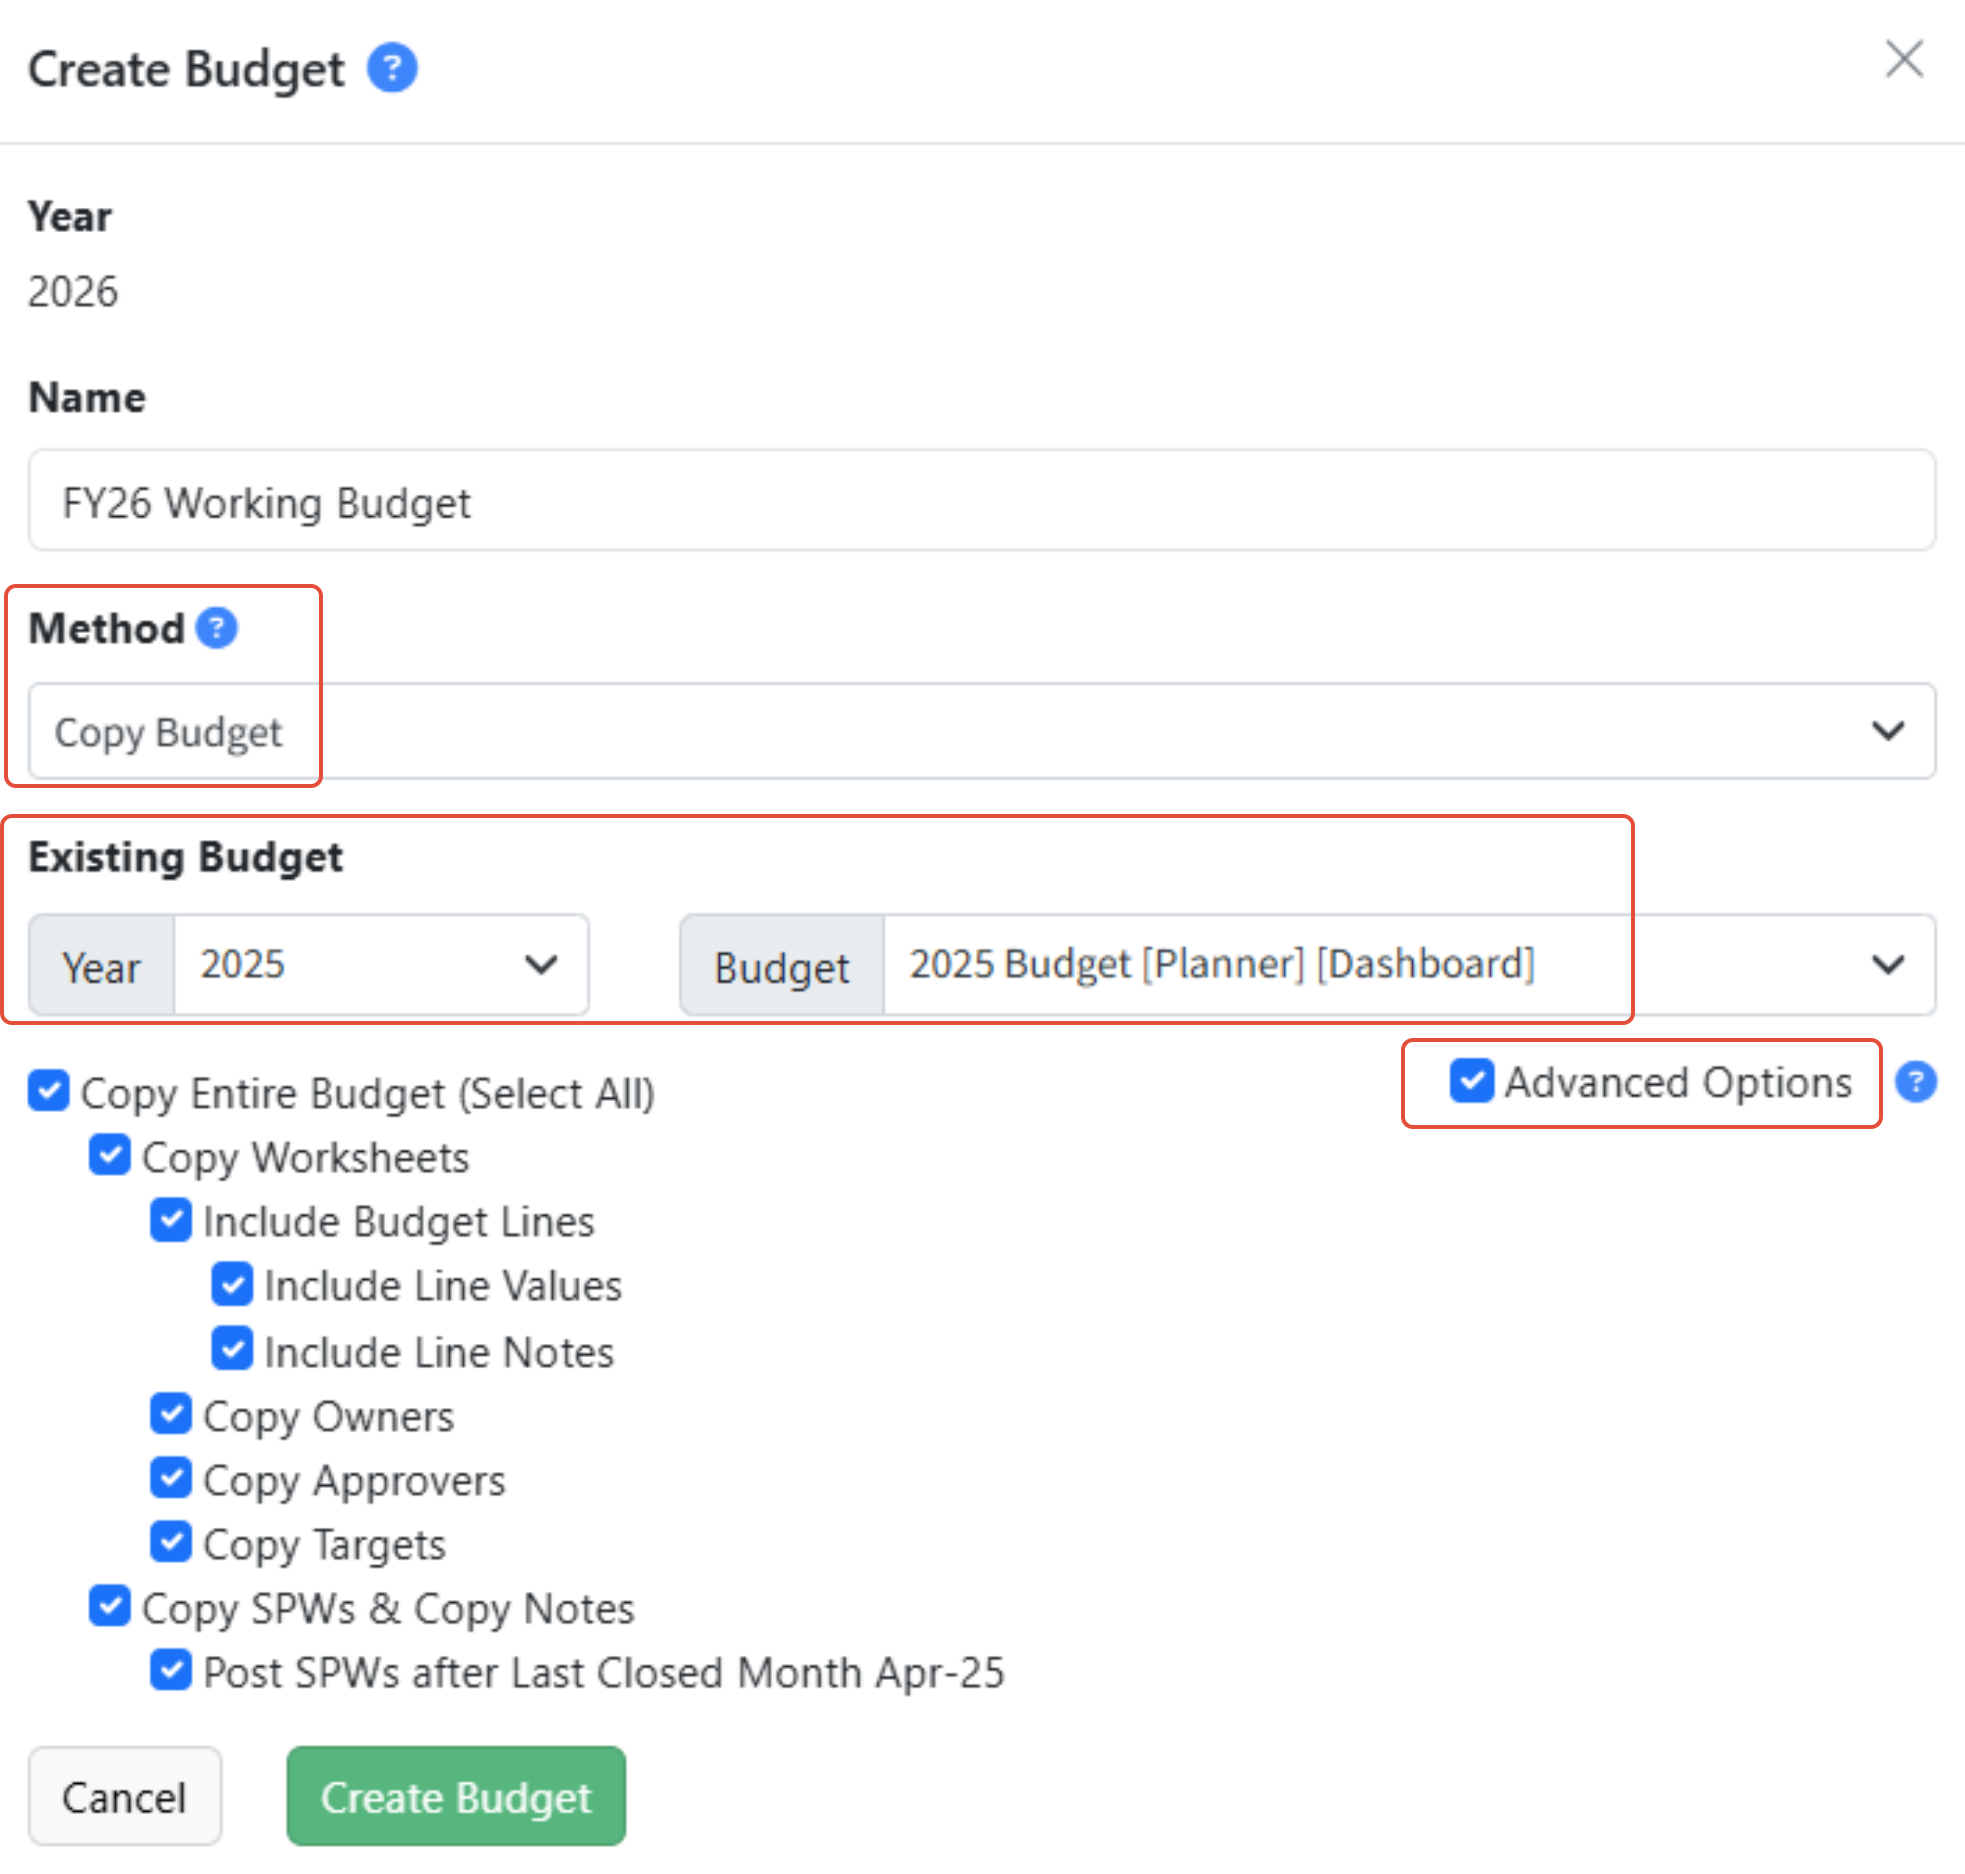
- Click Create Budget. The Year for the new budget is displayed.

Choose your Method
You have the following methods, with advanced options available.
- Copy Budget - Create a new budget based on a budget from any year.
- Copy Budget and Load Actuals - Create a new budget based on a budget from any year, and load actuals from the prior year or the current year, or load 12-month trailing actuals.
- Empty Budget - Create a new, completely empty budget, without any worksheets. This is most commonly used to create a pre-allocation budget.

Copy Budget - Step-by-Step
Create a new budget based on a budget from any year.
- Enter a Name for the new budget.
- Select Copy Budget from the Method dropdown.
- Select the Existing Budget Year and Budget from the dropdowns.
- Click Advanced Options to refine the elements to be copied. These are described in detail below.
- Click Create Budget.

Copy Budget and Load Actuals - Step-by-Step
Create a new budget based on a budget from any year, and load actuals from the prior year or the current year, or load 12-month trailing actuals.
- Enter a Name for the new budget.
- Select Copy Budget and Load Actuals from the Method dropdown.
- Select the Existing Budget Year and Budget from the dropdowns.
- Select the option desired from Load Actuals:
- Prior Year (20XX) - Load actuals from the prior year. Full year actuals will be loaded.
- Current Year (20XX) - Load actuals from the current year. Actuals through the Default Month set in Martus will be loaded.
- 12-Month Trailing Actuals - Load actuals from the previous 12 months. Actuals for the current year through the Default Month set in Martus will be loaded, with actuals from the prior year loaded following the Default Month.
- Click Advanced Options to refine the elements to be copied. These are described in detail below.
- Click Create Budget.


Empty Budget - Step-by-Step
Create a new, completely empty budget, without any worksheets. This is most commonly used to create a pre-allocation budget. Advanced options are not available when creating an empty budget.
- Enter a Name for the new budget.
- Select Empty from the Method dropdown.
- Select the Budget Type from the dropdown.
- Normal - Create a normal budget with no worksheets.
- Pre-Allocation - Create a budget with no worksheets to be used as a pre-allocation budget.
- Click Create Budget.

Advanced Options
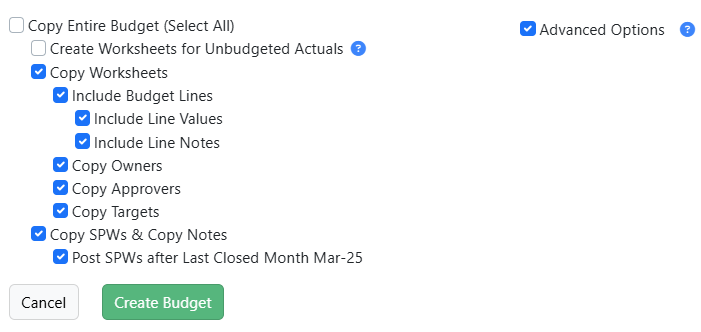
The following Advanced Options can be selected when creating a new budget. Child selections are only available if the parent is also selected.

- Copy Entire Budget (Select All)- Copies all components of the budget and also copies and posts the SPWs after the Default Month.
- Create Worksheets for Unbudgeted Actuals - Create worksheets where actuals do not match an existing worksheet, and are therefore unbudgeted
- Copy Worksheets- Copy the same set of worksheets.
- Include Budget Lines- Copy the same lines in the worksheets.
- Include Line Values - Copy the budget values on the lines.
- Include Line Notes - Copy the line notes on the budget values.
- Copy Owners - Copy the worksheet owners.
- Copy Approvers - Copy the worksheet approvers.
- Copy Targets - Copy the worksheet targets.
- Include Budget Lines- Copy the same lines in the worksheets.
- Copy SPWs & Copy Notes- Copy the SPWs with values and the SPW Notes.
- Post SPWs after Default Month MMM-YY - Post the SPWs after the Default Month set in Martus.
Complete the New Budget Setup
- Go to Dashboard > Updater and confirm the job has completed successfully.
- Go to Planner > Planner Setup > Budget Management.
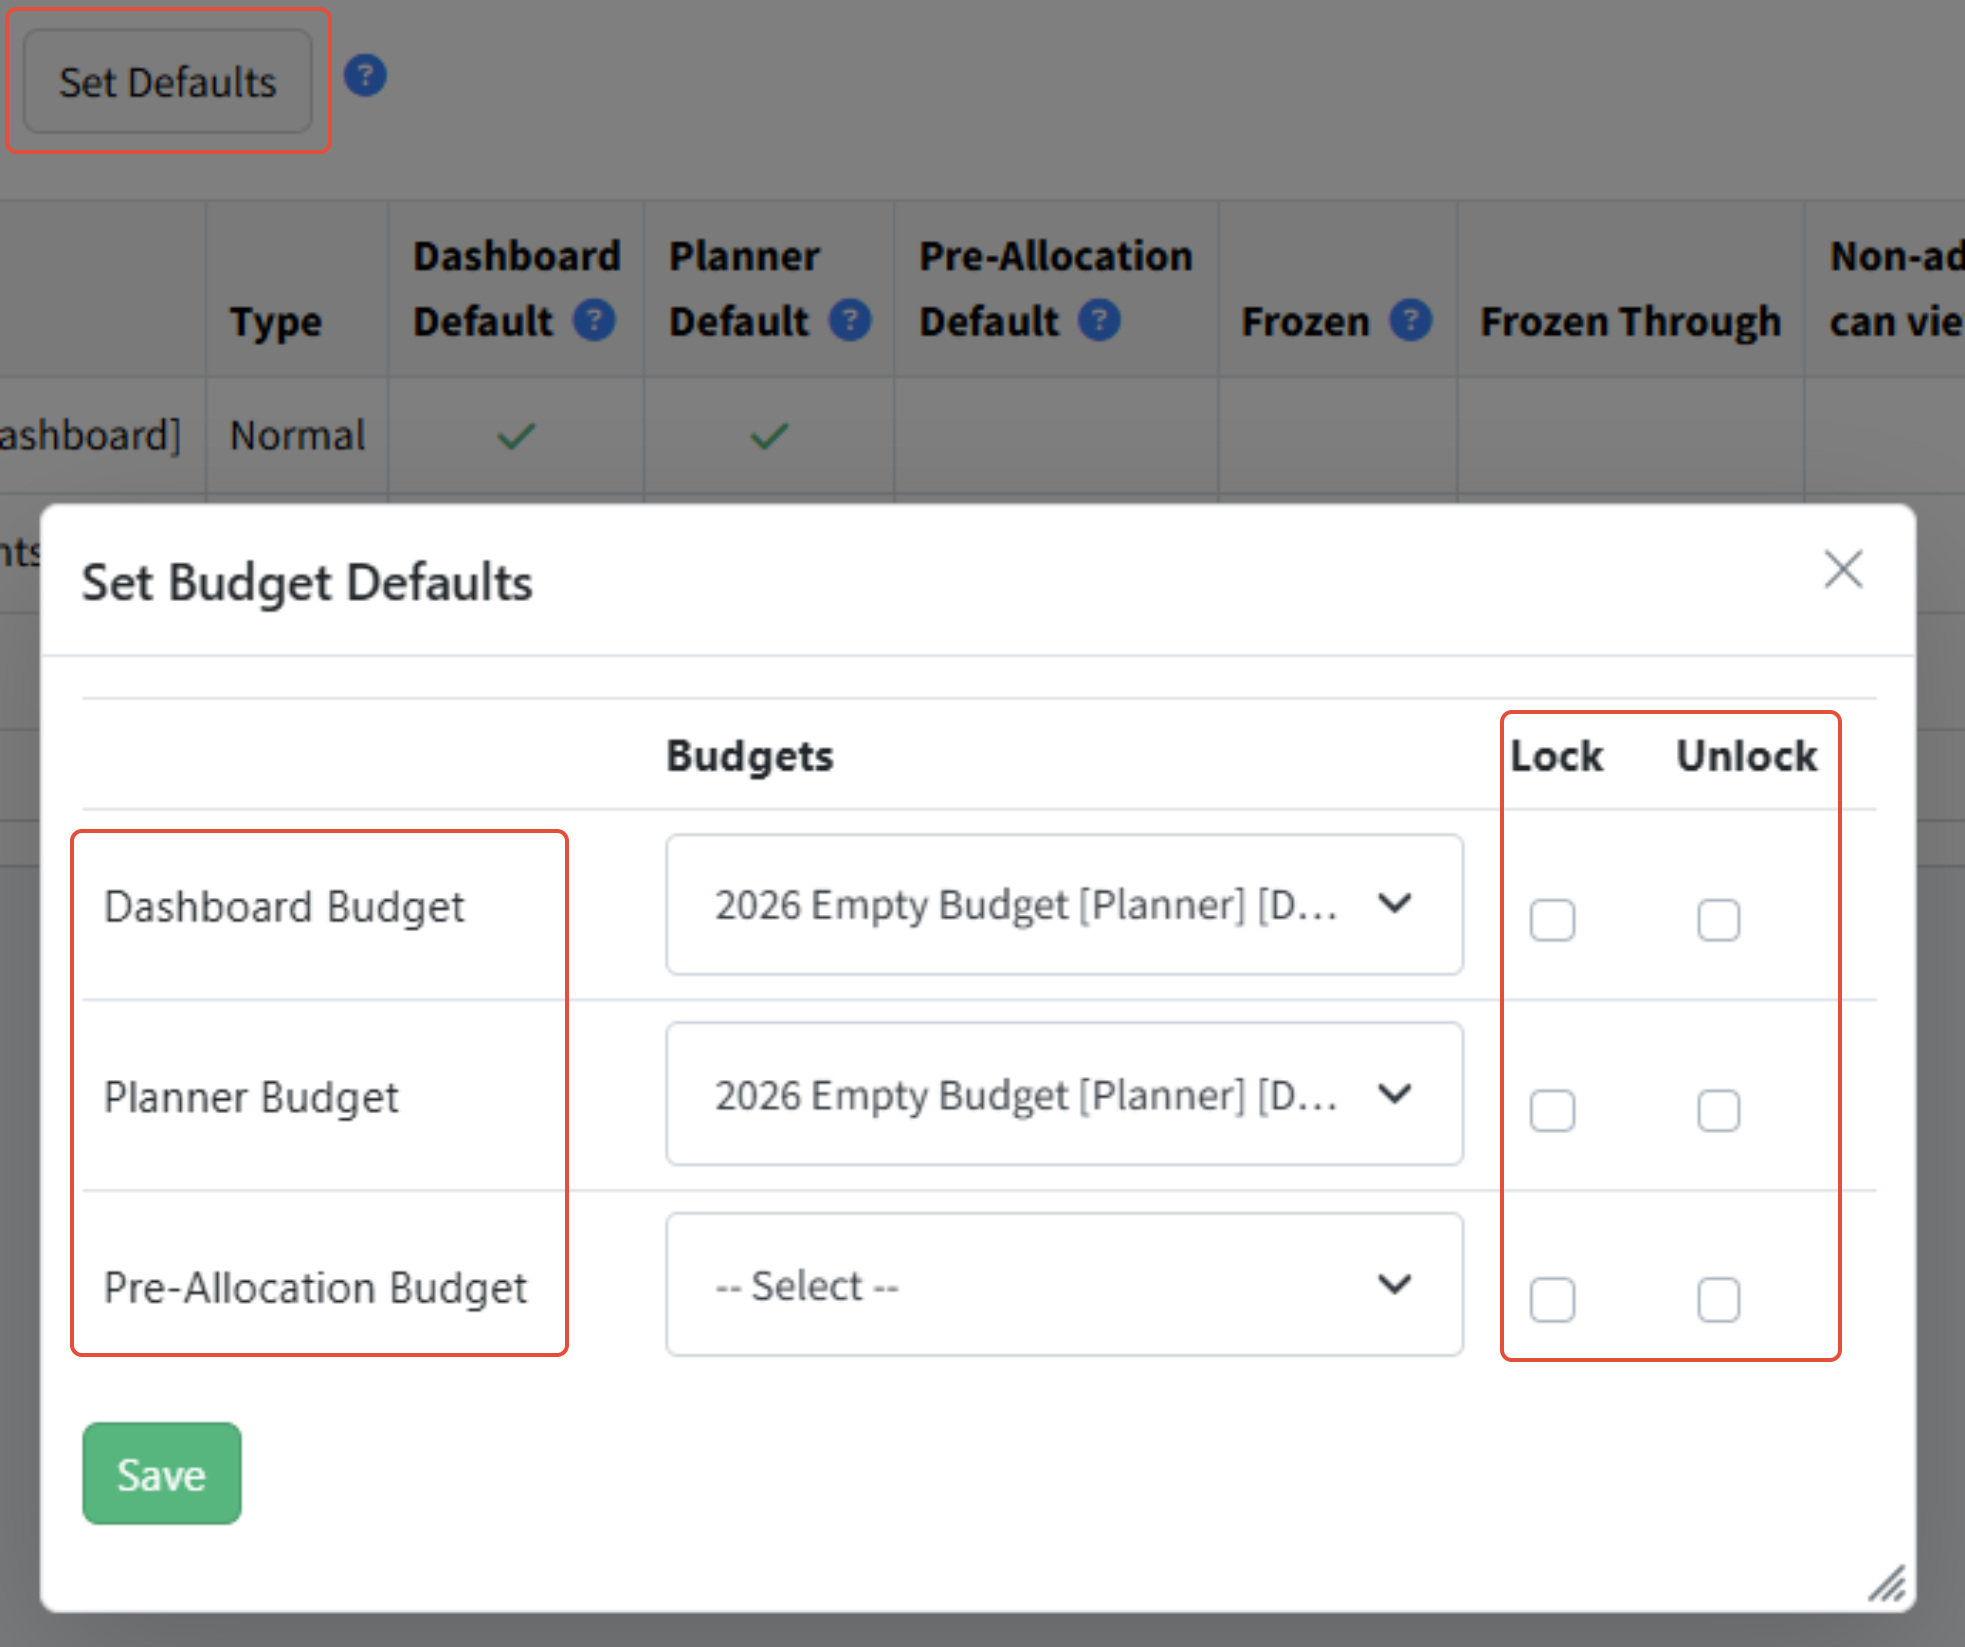
- Click Set Defaults to assign the Dashboard and Planner Default budgets (and the Pre-Allocation Default if applicable) and Lock or Unlock all worksheets.
- To manage the worksheets, review the Planner Setup article.

Budgeting - Final Steps for a New Fiscal Year
Your new fiscal year is starting soon. You’ve built your budget in Martus, and it has been approved! There are just a few more steps to take to be sure your budget is ready to go. You can perform these steps in any order, but Martus recommends that all be completed before your new fiscal year begins.
Confirm that all worksheets in this budget are locked.
- Start on Planner > Planner Setup.
- Select the budget.
- Click on Lock Worksheets.

Set the budget as the Dashboard default for the new fiscal year.
- Start on Planner > Planner Setup.
- Select the budget.
- Click on Set as Dashboard. You are given the option to lock all worksheets.
- Click Okay to lock all worksheets and prevent users from making edits.
- Click Cancel to keep the status of the worksheets unchanged.

Export the Martus budget for import to your accounting system.
- For Sage Intacct:
- Go to Planner > Intacct.
- Select the correct budget year.
- Pick the Martus budget and the target Sage Intacct budget.
- Click Upload. (Note: This syncs the budget to Sage Intacct using the API.)
- For Sage 100:
- Go to Planner > Sage 100.
- Select the correct budget and year.
- Enter the Budget Code.
- Click Export.
- For Sage 300:
- Go to Planner > Sage 300.
- Select the correct budget and year.
- Enter the Budget Code.
- Click Export.
- For ShelbyNext:
- Export a ShelbyNext budget import template from ShelbyNext. Save it in a convenient location.
- In Martus, go to Planner > ShelbyNext.
- Select and load the budget year, then pick the Martus budget to be exported.
- Browse for and select the ShelbyNext template that you exported from ShelbyNext.
- Click Export, and the ShelbyNext budget import template will be updated with the Martus budget information.
- Import the template into ShelbyNext.
- For Sylogist (Cloud version):
- Go to Planner > Dynamics.
- Select the correct budget and year.
- Enter the Budget Plan No and Document No.
- Click Export.
- For QuickBooks Online (Online Plus and Advanced versions only; the budget can only be detailed at a single dimension level - Class, Location or Customer):
- Go to Planner > Planner Setup.
- From the Budget Management tab select the budget.
- Click Export IIF File.
- For Financial Edge Next:
- Go to Planner > FinEdgeNxt.
- Select the correct budget and year.
- Click Export.
- For Other File-Based Implementations:
- Go to Planner > Planner Setup.
- From the Budget Management tab select the budget.
- Click Export.
Creating a Revised Mid-Year Budget
Here’s how to create a mid-year revised budget in Martus.
- Go to Planner > Planner Setup > Budget Management
- Click Create Budget
- Choose the option Based on Current Year's Actuals and Budget

- Choose whether to limit worksheets
- To review what worksheets will be created if unselected:
- Go to Dashboard > Financials
- Choose the Worksheet Budget Comparison report
- Any line with a red X will be created if the checkbox is unchecked
- Note: If you want to ensure that all activity from the current year is included, uncheck this box. This may create additional budget worksheets where they didn't previously exist.
- To review what worksheets will be created if unselected:
- Give the Budget a Name
- Click on Create Budget
- Go to Dashboard > Updater
- Confirm the job has been completed
- Go to Planner > Planner Setup
- Select the budget just created
- Click Set as Planner
- Setting this as the Planner default will make it the default budget to work with for this year when working in the Planner area.
- You are given the option to unlock all worksheets.
- Click Okay to unlock all worksheets and allow users to begin making edits.
- Click Cancel to keep the status of the worksheets unchanged.
- To manage the worksheets, review the Planner Setup article.
Note: When using this approach, Martus will freeze the budget through the Default Month or the source budgets frozen through date and set that date as the Frozen Through date. For more information on managing frozen budgets, click here.