Special Purpose Worksheets (SPWs)
Special Purpose Worksheets are a powerful feature of MartusPlanner. With SPWs, you can store the detail behind budget line items, record assumptions, and even pre-define certain budget amounts for non-admin users. There are three kinds of SPWs. Worksheet-specific SPWs apply onto to a specific worksheet. Global SPWs can be set up by Admin users and applied to multiple worksheets at the same time. SPW Templates (SPWTs) are also defined by Admin users; each template is a combination of assumptions and calculations that end-users can utilize within individual budget worksheets.
Special Purpose Worksheets Basics (SPW) (Video)
How To Itemize a Line In Your Budget using Special Purpose Worksheets
How To Itemize a Line In Your Budget using Special Purpose Worksheets
Special Purpose Worksheets provide the ability to build line item budget data from calculations and individual budget details and post the results to specific budget worksheet(s). See this KB article for Creating the Special Purpose Worksheet.
SPW Use Cases
Examples where a Special Purpose Worksheet might be useful:
- Budgeting for attendance at conferences, where registration revenue and expenses are per participant
- Budgeting for an event, where there is income expected from registrations and expenses associated with the event
- Budgeting for expenses related to the purchase of office furnishings, where there are multiple components to be specified (desks, chairs, and filing cabinets) but all costs are to be assigned to the same account
- For churches, budgeting for income, where tithes can be predicted based on historical giving rates and levels of attendance
- Budgeting for an expense based on a value calculated within the worksheet (such as a 10% tithe to Missions on the basis of predicted income, or a 5% license fee based on predicted revenue)
- Budgeting at the departmental level for amounts allocated by management. For example, applying rent or salary cost to departmental budgets, so that the amounts budgeted are predetermined and cannot be changed at the departmental level.
- Budgeting several locations that have similar types of underlying calculations and assumptions; for example, a school that charges tuition and program fees that vary from location to location
Types of SPWs
There are 3 types of SPWs.
- WSPW – Worksheet-specific Special Purpose Worksheets
- Accessed from within a budget worksheet
- Listed on the Planner/Special Purpose Worksheets page
- Worksheet-specific, only affecting the single worksheet that they are part of
- Available to any user with access to that worksheet
- May be modified by importing one or more SPWTs (SPW Templates)
- GSPW – Global Special Purpose Worksheets
- Accessed from the Planner/Special Purpose Worksheets page
- Available to non-admin users (with functional privileges and dimension access)
- Used to impact multiple budget worksheets
- Used to budget amounts that cannot be overridden at the individual worksheet level
- SPWT – Special Purpose Worksheet Templates
- Accessed only from the Planner/Special Purpose Worksheets page
- Available to Admin users only
- Imported to WSPWs by users
- Used to post updates to the WSPWs that use them
Planner > Special Purpose Worksheets
Both Admin and non-admin users can manage and maintain SPWs from Planner > Special Purpose Worksheets. The non-admin user permission Global SPWs determines which non-admin users can access GSPWs via this screen, and dimension restrictions do apply. (Click for more info: Understanding User Roles and Permissions)

Special Purpose Worksheet Page Actions
- Load Budget Year - The default is the current budget year.
- Select Budget - The default Planner budget for the specified budget year is displayed. All other budgets for which the user has access are available via the dropdown.
- Include SPW filters - Filter on SPW templates by type.
- Worksheet SPWs - Lists all SPWs for Admin users and permitted SPWs for non-admins per their dimension restrictions
- Global SPWs - Lists all SPWs for Admin users and permitted SPWs for non-admins with the Global SPWs permission, and per their dimension restrictions
- Template SPWs - Lists SPWs for Admin users only
- Add New Global SPW - Add a new Global SPW. (Admin and non-admins with the Global SPWs permission)
- Add New Template SPW - Add a new Template SPW. (Admins only.)
- Check SPW Access - Select the User and SPW from the dropdowns, and click Check Access to determine if the user has all, limited, or no access to the SPW selected. (Admins only.)

- Post All Templates and SPWs - Post all SPWs to any affected worksheets.
- Recalculate all Reporting Groups - Recalculate all worksheets where SPWs use reporting groups. (Admin only.)
- Resync WSPW Names - Resync WSPW names if a dimension name has been changed, as WSPW names reflect the worksheet dimensions and cannot be modified manually.
- Load Prior SPW - Select an SPW from a prior year's default Dashboard budget and bring it into the current default Planner budget.
User Permissions for SPWs
Admin users can:
- Add and update global SPWs
- Add and update template SPWs
- Post all templates and SPWs
- Recalculate all reporting groups for all SPWs (Reporting groups are part of Martus’ Plus and Premium subscription levels.)
Non-admin users can:
- View the list of applicable worksheet-specific SPWs and edit them
- View global SPWs if they have been granted permissions to global SPWs and those global SPWs match their dimension restrictions (For more info: Understanding User Roles and Permissions)
- Post all SPWs for which they have access
Locked Worksheets and SPWs
Any WSPW (Worksheet Special Purpose Worksheet) will inherit the status of the worksheet it is associated with. If changes are needed on the SPW, ensure that the worksheet associated is unlocked.
SPWs in the Worksheet
On the budget worksheet, any budget line that is controlled by an SPW has an SPW icon next to it, as seen in the image below.
These budget lines can only be updated from the SPW, accessed by clicking the SPW icon.
- If the worksheet is locked, the SPW can be viewed but not modified.
- If the budget line is based on a global SPW, only an Admin or a user with Global SPWs permissions and access to all worksheets in that Global SPW, can view the SPW.

Use Worksheets Actions to Post Global SPWs, and to see all Applicable SPWs for a worksheet.


Reusing SPWs from Prior Years
SPWs can be reused (rather than rebuilt) when starting a new budget year.
- If the new budget was copied from the prior year, then the SPWs are copied along with it. Access them from the individual worksheet or the Special Purpose Worksheets page.
- If the new budget was created using the “Framework” method, then budget preparers will need to specifically load any SPWs that they want to use.
To load a WSPW from a prior year:
- In Planner > Worksheets, select the worksheet to edit.
- Click Worksheet Action > Create Special Purpose Worksheet. This will display a blank SPW screen.
- Click Load Prior Year SPW. The WSPW will be filled out with all details from the prior year’s SPW, based on the current default Planner budget for that prior year.

To load a global SPW or SPWT from a prior year:
- Go to Planner > Special Purpose Worksheets.
- Verify that the current budget year is shown in the dropdown at the top of the screen
- Use the dropdown at the bottom of the screen to select the global SPW or SPWT to be loaded, and click Load Prior SPW.
- The SPW will be added to the list shown for the current budget year.

Deleting an SPW
NOTE: This action can not be undone.
- Navigate to the appropriate SPW.
- Click Delete.
Notes
- SPWs cannot be copied in Martus. However, SPW lines can be copied/pasted via a budget export/import if needed.
Creating the Special Purpose Worksheet (SPW)
Types of SPWs
There are four types of SPWs, each with specific uses.
- A Worksheet Special Purpose Worksheet (WSPW) is created from the Worksheet Actions menu on the worksheet, and is specific to a single worksheet in a budget. Detail for lines in that worksheet are captured in the WSPW.
- A Global Special Purpose Worksheet (GSPW) is created in Planner > Special Purpose Worksheets. GSPWs are used to affect multiple lines across multiple worksheets in a budget by using calculations and values to allocate non-editable amounts.
- A Template Special Purpose Worksheet (TSPW) is created in Planner > Special Purpose Worksheets. TSPWs are used to provide a template for import into an individual WSPW, with editable and non-editable lines.
- A Multi-Year Special Purpose Worksheet (MSPW) is created in Planner > Grant Budgeting. MSPWs are used for budgeting in multiple years, and can affect multiple lines across multiple budgets.
All SPWs can be accessed from Planner > Special Purpose Worksheets, except the MSPW, which is accessed from Planner > Grant Budgeting.
Click here to Watch How To Build an SPW.
Creating a Worksheet-Specific SPW (WSPW)
- Navigate to Planner > Worksheets.
- Click the Edit pencil to the left of the Worksheet for which you want to create the WSPW.
- Click Worksheet Actions.
- Click Create Special Purpose Worksheet from the dropdown.
Note: If a WSPW already exists for the budget worksheet, click Edit Special Purpose Worksheet from the Worksheet Actions menu.

Creating a Global SPW or Template SPW
- Go to Planner >Special Purpose Worksheets
- Click Add New Global SPW or Add New Template SPW as appropriate

To edit an existing GSPW or TSPW, click on Edit to the right of the name.

Creating a Multi-Year SPW
- Go to Planner > Grant Budgeting.
- Click Create MSPW or Edit MSPW. Click here for more information on MSPWs.

Anatomy of a SPW Page
An SPW is made up of multiple lines, typically organized into sections, like the example below. Those lines may contain values or calculations using formulas, and some may post to a defined worksheet line. When unfiltered, formula lines show the other lines used in the formula below the amounts. Posting rows show the account and dimensions, and any lines used in formulas, below the amounts.
The Summary section contains the rows that will post, with the location and amounts to be posted. Multiple posting rows may post to the same Summary line.
Before you create an SPW, you should consider how you want it to be organized. The best-practice recommendation is to structure each SPW with the sections that make it easy to follow a logical process from the models to the totals.

Building a SPW
Every SPW line contains related information: Info and Values.
- The Info tab is used to maintain the general information for that particular line: the Section it belongs to, the Description or name, and posting information if desired. Sections and Descriptions are listed in alphanumeric order; use a numbering system to control the sequence of lines.
- The Values tab is used to manage the values and maintain Notes for each month. On the Values tab, use the Budget Widget or a formula, based on calculations using other lines.
To begin to build your SPW, follow these steps:
- Click Add Line to create a new line.
- On the Info tab, choose an existing Section name from the dropdown, or define your own by typing in the Section field.
- Enter a Description for this line of the section. The Description must be unique and has a max length of 100 characters.
- If this line will be the line that is posted, check Post to Budget Worksheet and specify the Worksheet, Account and any other applicable dimensions. Uncheck Post to Budget Worksheet to stop posting to that worksheet and account.

- On the Values tab, enter the values for the line using the Budget Widget, or use a Formula to make calculations.

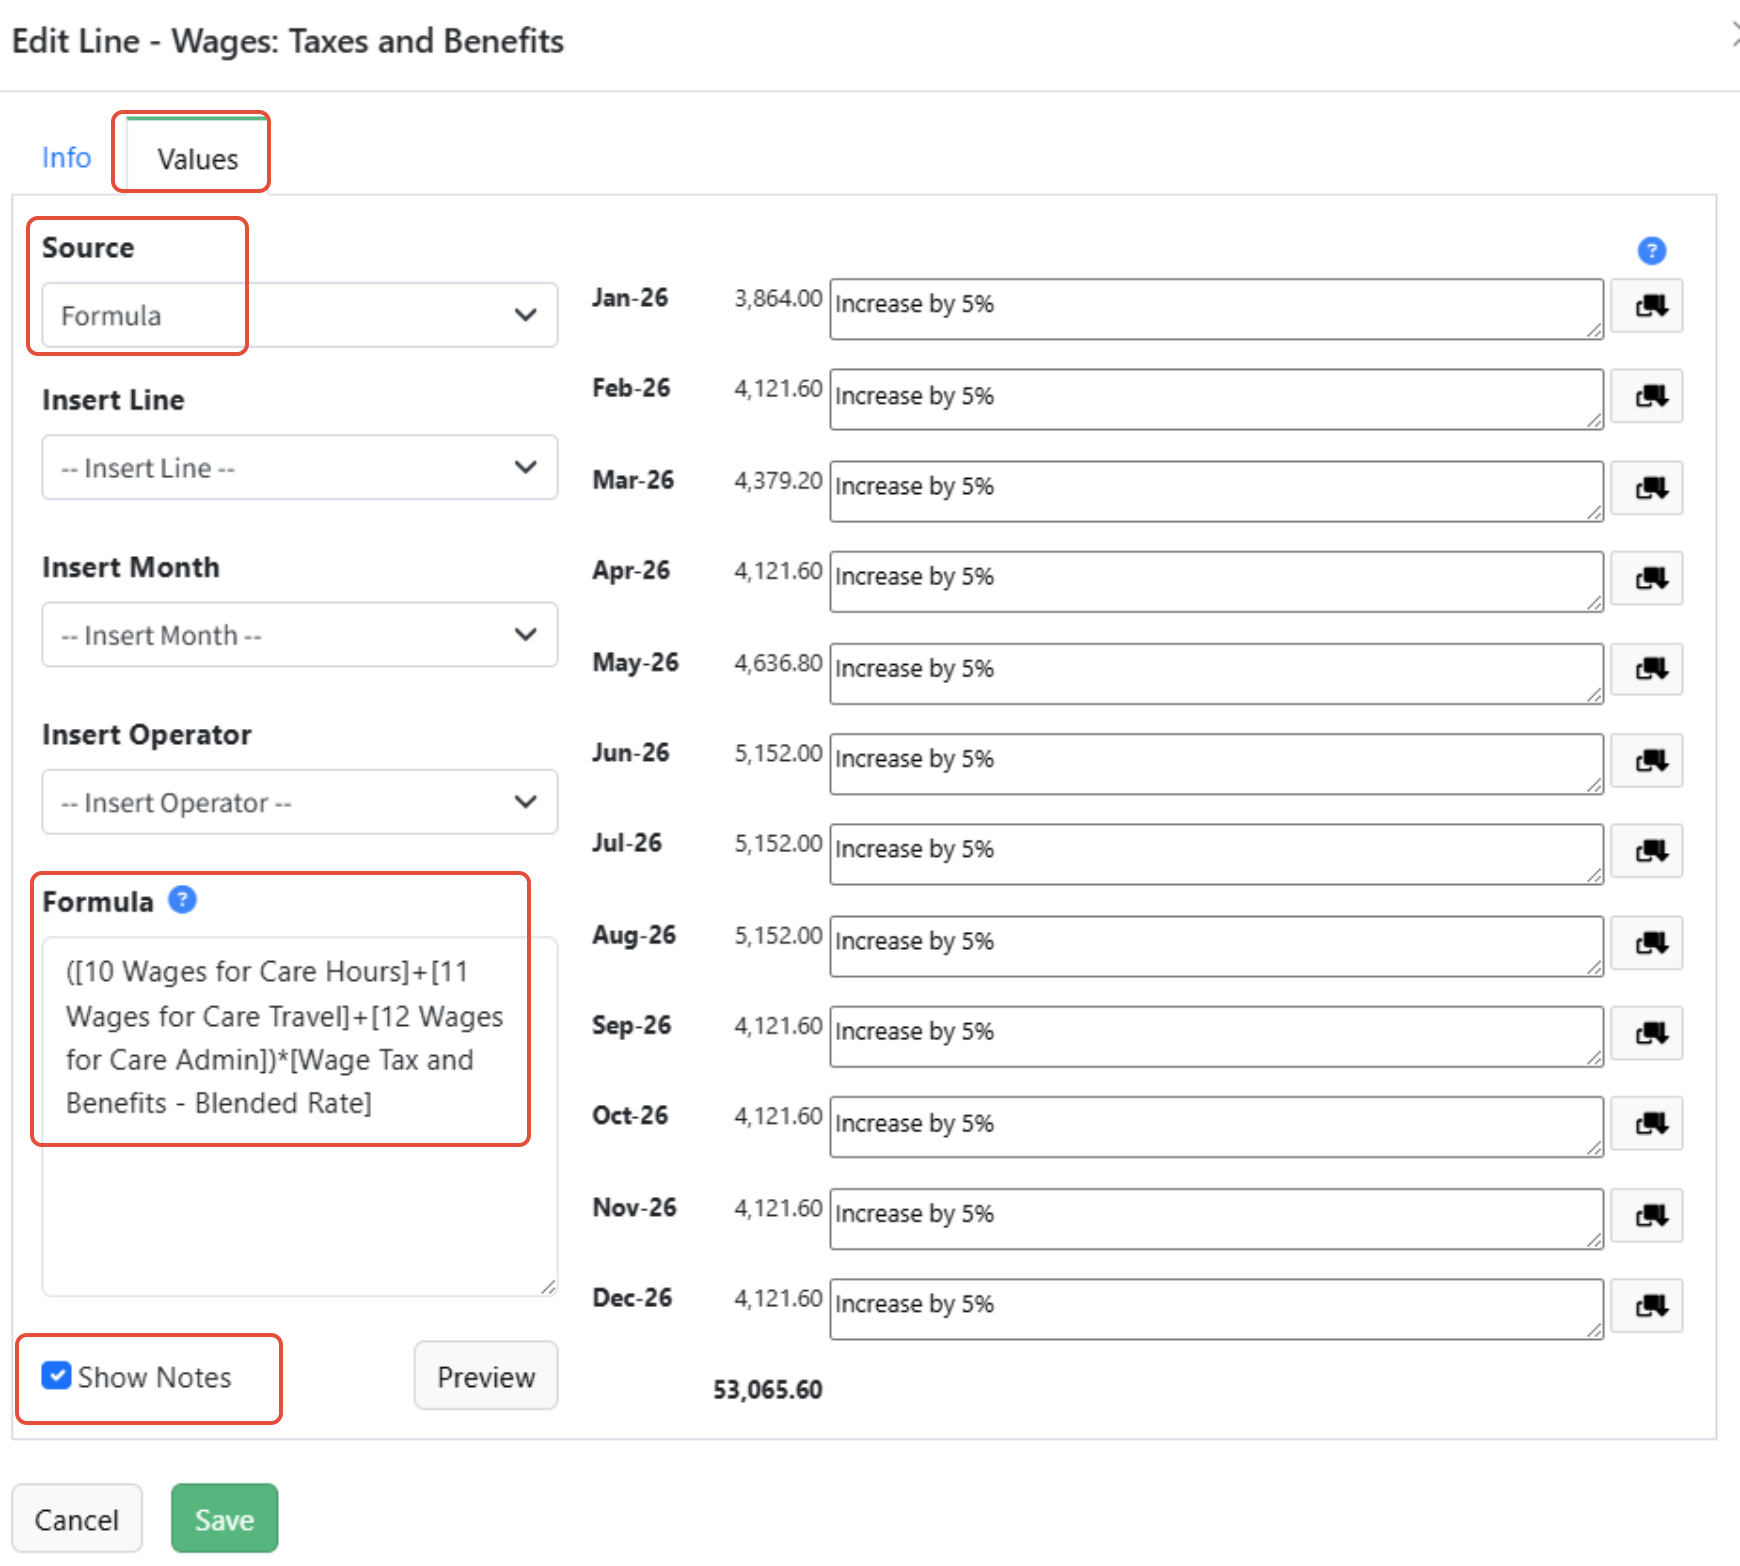
- Click Show Notes to enter any Notes desired.
- Click Preview to preview the amounts.
- Click Save to save your changes.
Click the red trash icon to the right of a line to delete the line from the SPW.
Continue to add as many sections and lines as needed, building the detail of the SPW.
- Click Add Line to start a new section or add lines.
- Click the + to the right of the section title to add lines to the section.
- Click Copy to the left of the Calculator Widget to add similar lines to that section. The description must be unique, and values must be entered for the new line.
For additional information about navigating an SPW, including other shortcuts, review Navigating the Special Purpose Worksheet.

When ready, click Post to Worksheet(s). The lines in the Summary will be posted to the worksheet(s).
Special Purpose Worksheet Actions
You have the following options:

- Cancel - Cancels any changes made since the last time the SPW was saved.
- Worksheet - Shown on WSPWs only, this button returns directly to the associated worksheet.
- Post to Worksheet - All budget numbers and notes in the Summary section are posted to the appropriate budget worksheets.
- Load Prior Year SPW - Load the SPW for this worksheet from the prior year's default Dashboard budget.
- Post to WSPWs and Worksheets - Post the updated SPWT to any WSPWs into which it has been imported, then post those WSPWs to their respective worksheets.
- Delete - Deletes the entire SPW. Any amounts and notes already posted to a budget worksheet are retained in that worksheet and can be edited directly through the worksheet. If an SPWT is deleted, imported lines remain, but they are no longer connected to the SPWT.
- Export Printable Version to Excel – Creates an Excel file with all the details of the SPW, including notes. This option is a printable version, to obtain a re-importable version, please export the budget from Planner > Planner Setup.
Notes about SPWs
Making mass edits to SPWs
- To make updates to SPWs via export and import, Go to Planner > Planner Setup and export the budget. Within the file, navigate to the SPW tab and make any changes. Then import the budget back into Martus into a new budget. Note: Certain changes such as making changes to formulas or formula rows are not best practice due to the high likelihood of error. For assistance with this process, please create a ticket through the Knowledge Base if you are a direct Martus customer, or contact your Martus reseller if you are supported through one of our Martus partners.
Interactions between SPWs and WSPWs
- If you have multiple SPWs and/or WSPWs that affect the same budget line, the contents of the budget line will be determined by the SPW that was most recently posted to the worksheet.
Posting to the same GLs and Dimensions within Different SPWs and WSPWs
- If you have different multiple Global SPWs that post down to the exact same GL line and dimensional combination Martus will not sum those lines. Only one line will be posted. The line that will be posted will be the last line going from top to bottom of your SPWs/WSPWs of that GL and dimensional combination.
Updates to Frozen Months
- When posted, GSPWs and WSPWs do not update frozen months.
Updates to Locked Worksheets
- SPWs cannot be posted to locked worksheets.
Copying Budgets
- When a budget is copied, all SPWs within it are also copied and posted if desired. SPWs are posted in this order: first any SPWTs are posted to WSPWs, then all WPSWs are posted, then any global SPWs are posted.
SPW Rounding
- SPW lines can hold up to 4 decimal places, but if the line posts to the budget worksheet, every monthly and yearly value will be rounded to 2 decimal places. Sometimes, the total on the SPW line up top will not match the total on the Summary line because of the rounding.
- The entire Summary line (rounded to two decimal places) will be what’s posted onto the worksheet. Rounding happens after calculations are done, so you get 4-decimal point precision through calculations (which can be significant when there are multiple lines of calculations and large numbers).
Unpost a GL from an SPW
- make sure the worksheet is unlocked
- Once you are in the SPW click the budget widget of the line you no longer want to post down to the budget
- check the box 'Post to Budget' and uncheck the box 'Post to Budget Worksheet'
- or delete the line entirely
- once changed make sure to scroll down to the bottom of the page and click 'post to worksheet' otherwise it will not unpost
Tempate SPWs
- Template SPWs are managed by Admins only.
- Any user who has access to a Worksheet Specific SPW (WSPW) can import any template into their WSPW.
- Any user who has access to a WSPW can remove template lines from the WSPW.
- Admins can adjust the Template and push adjustments into any WSPW that is currently utilizing that TSPW.
SPW Formulas (Video)
SPWs become more powerful when utilized with formulas. Formulas can be used in any special purpose worksheet (WSPW, GSPW, TSPW) in order to make updates easier.
Adding Formulas Step by Step
- Click Add Line to create a new line.
- On the Info tab, choose an existing Section name from the dropdown, or define your own by typing in the Section field.
- Enter a Description for this line of the section. The description must be unique and has a maximum length of 100 characters.
- If this line will be the line that is posted, check Post to Budget Worksheet and specify the Worksheet, Account and any other applicable dimensions. Uncheck Post to Budget Worksheet to stop posting to that worksheet and account.

- On the Values tab, choose the source Formula to make calculations.
- Enter the formula in the Formula text box:
- Choose the appropriate line from the Insert Line dropdown, if applicable. All lines from the SPW are shown.
- Choose the appropriate month from the Insert Month dropdown, if applicable. All months are shown. Always concatenate the Line with the Month!
- Choose the appropriate operator from the Insert Operator dropdown, or enter it directly using your keyboard.
- Add any additional lines or operators as needed.
- Click Show Notes to enter any notes desired.
- Click Preview to preview the amounts.
- Click Save to save your changes and close the modal.

Formula Operators
Martus provides a robust selection of operators that can be used within the formula function in an SPW:
- Parentheses () : controls the order of operations
- A * (B + C)
- Asterisk * used for multiplication
- A * B
- Forward Slash / : used for division
- A / B
- Plus Sign + : used for addition
- A + B + C
- Dash - : used for subtraction or to denote a negative number
- A - B
- Caret ^ : used for exponentials
- A^2
- Less-than < : used for logical comparisons of "less than" values (returns 1 if true; 0 if false)
- A < B
- Less-than or Equal-to <= : used for logical comparisons of "less than or equal to" values (returns 1 if true; 0 if false)
- A <= B
- Greater-than > : used for logical comparisons of "greater than" values (returns 1 if true; 0 if false)
- A > B
- Greater-than or Equal-to >= : used for logical comparisons of "greater than or equal to" values (returns 1 if true; 0 if false)
- A >= B
- Double Equal signs == : used as an equality operator to compare and determine if values are equal (returns 1 if true; 0 if false)
- A == B
- Not Equal to != : used as an equality operator to compare and determine if values are not equal (returns 1 if true; 0 if false)
- A != B
- Absolute Value abs() : used to return only positive values
- abs(A) returns the positive value of A
- If Statement if( , , ) : used to return values based on true or false conditions
- if (condition, is true C, is false D)
- Maximum Value max(,) : used to return the largest value from a given set of data
- max (A,B)
- Minimum Value min(,) : used to return the smallest value from a given set of data
- min (A, B)
- Average Value avg(,) : used to calculate the mean or average of a given set of data
- avg (A, B)
- Median Value median(,) : used to return the middle value in a dataset, separating the higher half of values and the lower half of values, not to be mistaken for the mean or average
- median (A, B, C) returns B
- Round round() : used to return values to a specified number of decimal places or digits
- round (A*100)/100 returns two decimals
- Balance(0,[LineName]): calculates a YTD balance of the line plus a starting balance. If no stating balance, enter 0.
- balance (A, B)
- Total([LineName]) : returns the total of the line.
- total (A)
- PriorMonth([LineName], Default) : use the value of the prior month. Use the default value in the first month of the year when there is no prior month.
- priormonth (A, B)
For use case examples of formulas in SPWs, check out SPW Formula Examples!
SPW Formula Examples
Here are some use cases for formulas in SPWs.
Using Month in a Formula
I have a conference with an early bird rate when registering before April.

I want to set the value as the month number.

Using a Cell Reference in a Formula
You can concatenate the Line and Month to reference a specific cell to use in a formula.

Using Balance to Capture a Running Total
The Balance function calculates a YTD running balance of the line plus a starting balance if desired. If there is no starting balance, enter 0.

Using PriorMonth in a Formula
Use the value of the prior month from another line. Use the default value in the first month of the year when there is no prior month.

Navigating the Special Purpose Worksheet
There are many options for navigating a special purpose worksheet - whether Global, Worksheet or Template.
Viewing SPW Data
To expose or limit data within the view, use Hide Details or Filter. Add Gridlines for delineating columns.
Hide Details - Click Hide Details to hide the details for lines that include formulas or post to the Summary section.

Gridlines - Click Gridlines to hide/show gridlines in the columns of the SPW.

Filter - Click Filter to limit the information displayed using various options. Remove filters by clearing the Filter dropdown, and/or associated dropdowns.

Filter options:
- Sections - Display a Section dropdown, used to limit the display to a specific section.

- Posts to Summary - Display lines that post to the Summary, and the Summary section.
- Summary Lines - Show only the Summary section.
- Reporting Group - Display a Reporting Group dropdown, used to limit the display to lines that are based on a specific reporting group.
- Account - Display an Account dropdown, used to limit the lines to a specific account.

- Formula - Show all lines that are based on a formula. Use the Formula dropdown to select a specific formula.
- Dimensions - If your organization uses line item dimensions, you can choose any of them to use as a filter. Choose a dimension to list all rows that make use of that dimension. This also displays a dropdown, and you can select any specific value for that dimension to show only lines that use that value.
- Worksheet - Available for GSPWs only. Show all lines that are based on a specific worksheet in a GSPW.
SPW Shortcuts
- Click on an amount in the Total column on the right to view only lines that are used in that calculation.
- Use "-" or "+" on the far right side of the header line for each section in order to collapse or expand that section.
- Click on the Description of a line to go straight to the Info tab for that item.
- Click on any monthly amount or the Calculator icon to go straight to the Values tab.
- Click on the total for any line in the Summary to see just the lines that make up the total shown there.
- Click on elements on any detail line, like Posts, Accounts, or Dimensions, to filter to all lines that include that same detail.
- Click on the Totals icon in the top line of any section that includes lines that are posted to the summary to see the impact of that section on the Summary, including the total income, total expense, and net gain/loss for that section.
- Click on the Section title to update the title.
- Click the + icon next to Totals on a section to add a new line to the section.
- Click the Copy icon to copy the existing line Info to a new line. Values are not copied.
- Click the red Trash Can icon to delete a line from the SPW

Reporting Groups - Management and Use on SPWs (Video)
This feature is part of the Standard Plus, Plus, and Premium subscription levels. NOTE: Only Martus Admins can create and edit reporting groups. Any non-admin can use reporting groups that match their dimension restrictions.Reporting groups are used to define combinations of accounts and dimensions. Reporting groups can then be used in the following reporting and budgeting areas of Martus.
Click here to review how to create Reporting Groups.
- SPWs - Use reporting groups within Global or Worksheet SPWs to calculate budget amounts based on the amounts currently budgeted for those combinations of accounts and dimensions.
- ReportBuilder - Use reporting groups in reports, sections, rows and columns to filter a custom report.
- Reports - Use reporting groups to filter most standard financial and budget reports in Martus.
Reporting groups are created by Admins in Setup > Reporting Groups. Non-admins have access to use reporting groups for which they have full dimension permissions.
Here are three examples of situations in which you would want to use reporting groups.
- A fee based on the total of specific income accounts is paid by some satellite locations to a central location. You want to be able to automatically compute an expense for the fee in the satellite location, along with income for the fee in the central location. Define a reporting group for each location and the specific income accounts on which the fee is to be based, then use that reporting group (which identifies the budgeted totals for those accounts) as the basis for calculations within a global SPW in order to budget the fee as an expense to the satellite locations and as income to the central location.
- Rent and utilities costs are budgeted to the Facilities department but are to be allocated to other departments within the organization, using an “allocations” account to reduce the total expenses for the Facilities department and increase the expenses for the other departments within the organization. Define a reporting group for the Facilities department and the rent and utilities accounts. Use that reporting group as the basis for calculations with a global SPW to budget an expense for this allocation to each other department and budget the credit for the total allocation to the Facilities department.
- The HR department expenses are budgeted to that department within one entity but are to be shared by a separate entity (a school), using an “allocations” account to reduce the total expenses for the HR department in the first entity and increase the expenses for the other entity. To set this up, define a reporting group for the HR department expenses to be allocated, then use that reporting group as the basis for calculations with a global SPW to budget an expense for this allocation to the second entity and credit the amount of that allocation to the original entity.
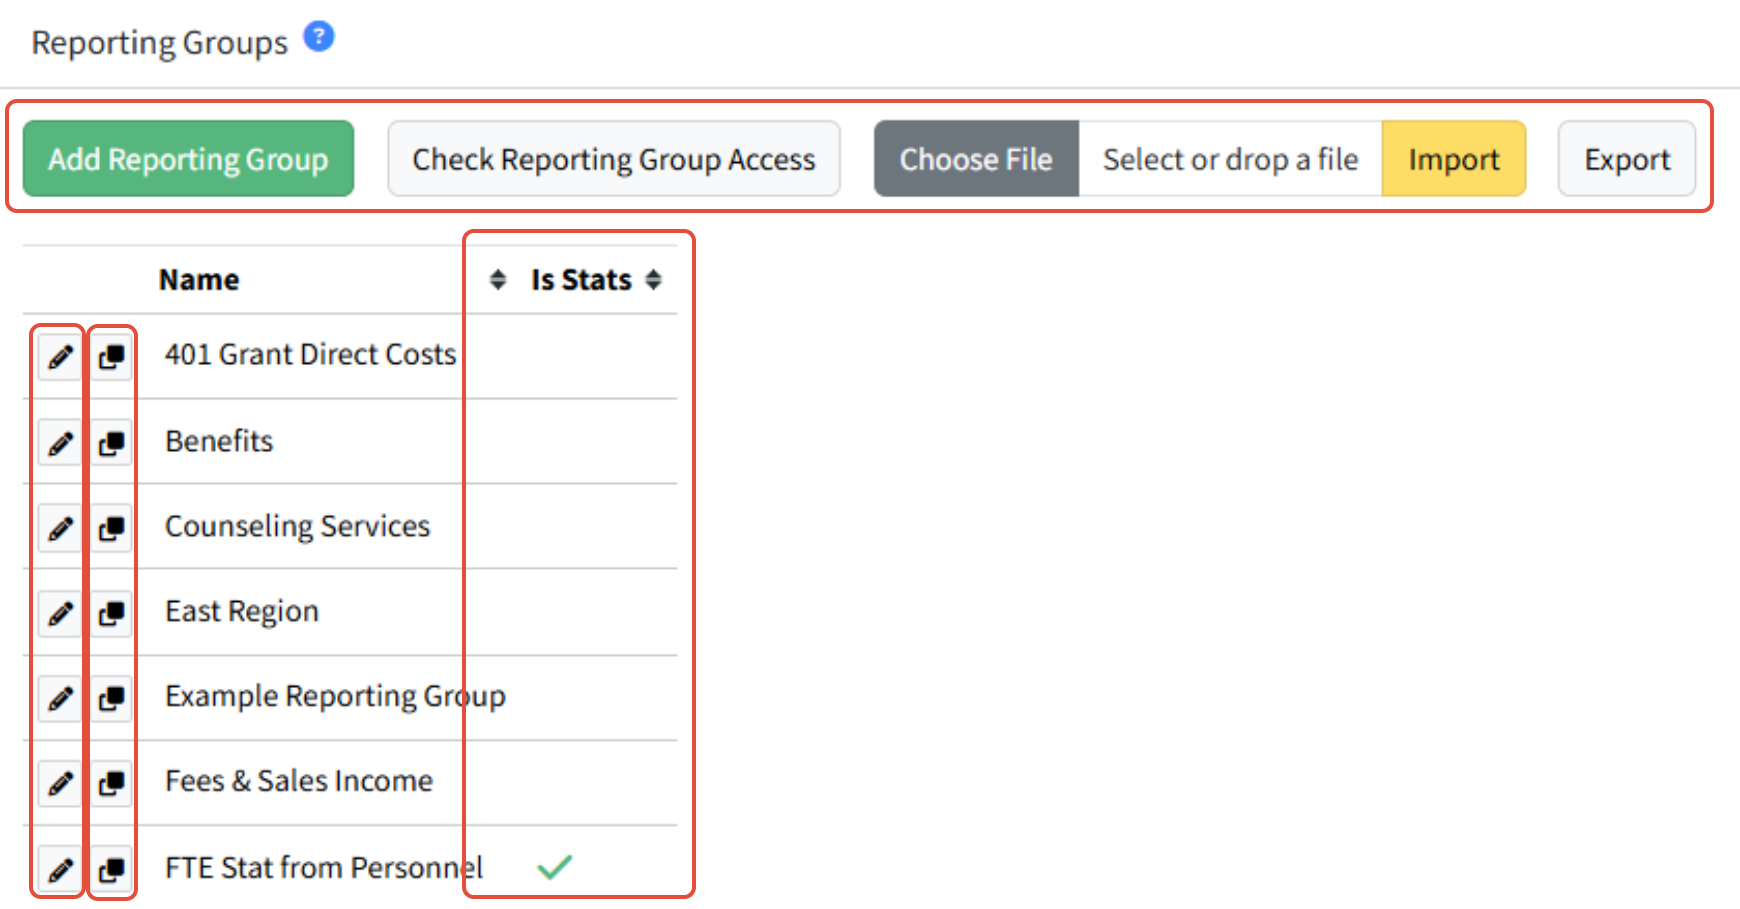
Reporting Groups Page Actions
Go to Setup > Reporting Groups to add and edit reporting groups. NOTE: Only Martus Admins can create and update Reporting Groups. Non-admins have access to use reporting groups for which they have full dimension permissions.
- Add Reporting Group - Click Add Reporting Group to create a new reporting group. The name must be unique.
- Check Reporting Group Access - Select the user and reporting group to verify their permissions. A message is given with any restrictions the user may have disallowing them to see/use the reporting group.
- Choose File / Import - Select an Excel file and click Import to add new or update existing reporting groups.
- Export - Export an Excel file of all reporting groups to make changes or review them.
- Edit (pencil)- Click Edit to modify an existing reporting group.
- Copy (copy icon) - Click Copy to create a copy of an existing reporting group. You will be prompted for a new name.
- Is Stats - If checked, this indicates the reporting group is used for stat accounts only.

Setting Up Reporting Groups
Edit Reporting Group - Section Actions:
- Id - The Martus-assigned ID for this reporting group.
- Name - Enter a unique name for the reporting group.
- Is Stats - Select if the reporting group only contains statistical worksheet lines.
- Cancel - Return to the list of reporting groups.
- Save - Save the reporting group with any changes made to the items.
- Delete - Delete the reporting group. Note: You cannot delete a reporting group that is in use in an SPW or ReportBuilder report.
- Select Worksheet Lines - Select worksheet lines for the reporting group. See Method 2 below for more details.
- Choose File / Import - Select an Excel file and click Import to add new or update existing lines in this reporting group. Missing lines will not be deleted.
- Export - Export this reporting group to Excel to make changes or review it.
Manage Reporting Group Items - Section Actions:
- Add (+) - Click Add to add the line to the reporting group.
- Copy (copy icon) - Click Copy to duplicate the line to the Add action. Make additional changes and click Add.
- Trash - Click the Trash icon to delete the line.
- Dimensions (sheet) - Select from dimensions like Location, Department, Class.
- Account Category - Choose from account categories to include in the reporting group. Note that the Account selector is ignored if an account category is selected on the same line.
- Account - Select the accounts to include in the reporting group.
- Dimensions (line) - Select from dimensions like Project or Employee.
Matching Budget Lines - Section Actions:
- Budget - Select the budget to match from the dropdown.
- Show Matches - Show matching lines based on the selections made above for this reporting group.
- Hide Matches - Hide the matches.

Assigning Reporting Group Items
There are two methods for assigning combinations of dimensions and accounts to a reporting group. You can use either method, or both, to set up each reporting group.
Method 1. This is the flexible method. Use the filters in the Manage Reporting Group Items section of the screen to add combinations individually and make use of the “All” wildcard selection. Use this method if you anticipate making changes to the referenced budget worksheets that you will want to automatically include in the reporting group.

Method 2. The second method is to select each worksheet line. This is the best method to use if you know exactly which budget lines are to be included in the reporting group, and you do not anticipate that this will change frequently.
Start by clicking Select Worksheet Lines to get a list of all dimension/account combinations on all your budget worksheets.
- Use the filters to limit this list by dimension, account number, and/or account category.
- Use the checkboxes on the left to pick the lines to add to the reporting group.
- Click Add Selected Worksheet Lines to Reporting Group at the bottom of the list.

Verify the Reporting Group
The Show Matches feature is useful to see what budget lines are in play for your reporting group. Select the budget, and click Show Matches. Click Hide Matches to hide them.

Setting Up Global or Worksheet SPWs to Use Reporting Groups
Reporting groups can be used in global and worksheet SPWs.
Add a Reporting Group Line to a SPW
- Open the appropriate SPW.
- Click Add Line.
- Fill out the Section and Description on the Info tab. Do not select the option to Post to Budget Worksheet.
- Go to the Values tab.
- Choose the Source option Reporting Group.
- Select the appropriate reporting group from the dropdown.
- Enter notes if desired.
- Click Preview.
- Click Save.

Managing Reporting Group Lines in an SPW
- Click Update Reporting Group Values to update the values for all the reporting groups on this SPW. This also performs all the calculations on the SPW and updates the totals in the Summary section. This button does not post anything to the worksheets identified on the SPW.
- Click Post to Worksheets to post the summary lines to the worksheets as needed. When an SPW is posted, any reporting group values on the SPW are updated and all calculations are recalculated before the SPW is posted.

Below is an example reporting group and how it is used in the SPW.


Reporting Group Filters on Reports
Reporting group filters can be found on most financial and budget reports in Martus. Select a reporting group from the dropdown. Only reporting groups for which the user has full access will show in the dropdown.

Notes
- The Account selector is ignored if an Account Category is selected on the same line.
- Reporting group totals are shown in the SPW as positive amounts, unless the reporting group contains both income and expense accounts, and the budgeted expenses exceed the budgeted income; in that case, the amount shown in the SPW will be negative.
- It is important to be sure that you are not allocating to the same account and dimension combination on more than one SPW. If you do, the “last one wins” and only the most-recently-posted SPW will be reflected on that account and dimension combination.
- A reporting group cannot be used to update an account that is referenced within the reporting group. If this is attempted, you’ll get a "Circularity" error when the SPW is posted. This error must be corrected before the SPW can be posted.
- Reporting group values are always updated and any related calculations are recomputed whenever an SPW is posted.
- When defining a reporting group, picking a parent dimension value does not include any of its child dimensions. If you want to include the child dimensions in the reporting group, you must add them specifically to that reporting group.
Modeling with SPWs (Video)
This video illustrates how to set up drivers within SPWs. This example illustrates this by calculating expected tuition and a fee discount. You can use these same methods for many kinds of drivers!
Multi-Year Special Purpose Worksheets (Grant Budgeting) (BETA)
Multi-Year Special Purpose Worksheets (MSPWs) allow budgeting across multiple years. This could potentially have many use cases, but most often will be used for budgeting grants.
Available Subscriptions
MSPWs are an optional paid feature in Martus. MSPWs are only available for the Plus and Premium subscriptions. Please create a ticket through the knowledge base if you are a direct Martus customer, or contact your Martus reseller if you are supported through one of our Martus partners.
Current BETA Limitations
Currently, Personnel Budgeting will NOT overwrite SPW lines in a budget, so this prohibits payroll allocations based by grant.
Client Configuration
The use of MSPWs in Martus is enabled by specific settings on the client record, and configuration consists of specifying the Grant Dimension and if applicable, the Funder Dimension.

Grant Configuration
Grants are configured on the Setup > Grants page in Martus.
- Grants can only be used once.
- Funder can be selected for multiple grants.
- Grants can only be created when the FY exists in Martus and a default planner budget has been set for each year.
- Grants can be edited and/or deleted only IF a MSPW is not yet associated with that grant on the Planner > Grant Budgeting page.
Navigating the Grants Page
- Add Grant - Add additional grants for budgeting in Martus.
- Search - Search on the list of existing grants.
- Status - View the list of grants by their status:
- Completed - Show grants that are no longer in scope because the End Date has passed.
- In-Progress - Show grants that are currently in scope based on the Start Date and End Date.
- Future - Show grants that have a Start Date in the future.
- Load - Click Load to apply the Search term and/or Status selected.
- Grid Sort - Sort on any column.

Navigating Add/Edit Grant
- Grant - Select the Grant from the dropdown. The list is determined by the Grant Dimension configured for the client.
- Start Date - Enter the Start Date for the grant.
- End Date - Enter the End Date for the grant.
- Cancel - Cancel any changes and close the modal.
- Save - Save the grant and any changes made.

Navigating the Grant Budgeting Page
- Search - Search on the list of existing grants.
- Status - View the list of grants by their status:
- Completed - Show grants that are no longer in scope because the End Date has passed.
- In-Progress - Show grants that are currently in scope based on the Start Date and End Date.
- Future - Show grants that have a Start Date in the future.
- Load - Click Load to apply the Search term and/or Status selected.
- Grid Sort - Sort on any column.
- Create MSPW or Edit MSPW - Click to create a new MSPW or edit the existing MSPW for that grant.
Creating/Editing the Grant Multi-Year SPW (MSPW)
Step-by-Step
- Navigate to Planner > Grant Budgeting. There must be at least one grant configured in Setup > Grants for this menu option to appear in Martus.
- Click Create to create a new MSPW for that grant. Click here for specific information on building SPWs in Martus.
- Click Edit to edit an existing MSPW for that grant. Click here for specific information on building SPWs in Martus.

Navigating the Edit Multi-Year SPW Page
- Add Line - Add a line to the SPW.
- Show Active Budgets - Show the budgets associated with this MSPW.
- Hide Details - Hide the detail lines.
- Gridlines - Hide/show the gridlines.
- Filter - Select a option to filter. Further filters will appear if in scope.
- Cancel - Cancel any changes and close the modal.
- Post to Worksheets - Post this MSPW to the appropriate worksheets.
- Delete - Delete the MSPW.
- Export Printable Version to Excel - Export the MSPW to Excel for viewing.

Specify the account and dimensions to which the individual lines will be posted.

Enter the budget values using the Source selected. All months for the length of the grant will be editable unless they are frozen, or if the worksheets are locked.

Click Show Active Budgets to view the budgets in scope for this MSPW.

Values are posted to all the budget worksheets in scope based on the length of the grant. Messages will provide details that the posting was successful or if there were errors.


Allocations - Using GSPWS and Reporting Groups
Reporting groups are used to define combinations of accounts and dimensions. Reporting groups can then be used in the following reporting and budgeting areas of Martus.
Click Here to review how to create Reporting Groups.
- SPWs - Use reporting groups within Global or Worksheet SPWs to calculate budget amounts based on the amounts currently budgeted for those combinations of accounts and dimensions.
- ReportBuilder - Use reporting groups in reports, sections, rows and columns to filter a custom report.
- Reports - Use reporting groups to filter most standard financial and budget reports in Martus.
Reporting groups are created by Admins in Setup > Reporting Groups. Non-admins have access to use reporting groups for which they have full dimension permissions.
Below is an example of how we can use Reporting Groups to create indirect allocations within Martus.
Reporting Group are only available to Plus and Premium customers.