Budget Management
Information for budget managers.
Planner Setup (Video)
Planner Setup allows high-level management of budgets for each fiscal year. Admin users can:
- Create, edit, and manage budgets
- Update the default budget year
- Add or remove worksheets in budgets
- Add, remove or edit worksheet targets
- Add, remove or edit worksheet owners and approvers
- Export/import budgets as needed
A non-admin user with access to Planner Setup will only have access to the Worksheet Management tab, allowing them to add and remove worksheets within the dimensions they have permissions to view.Each tab within Planner Setup allows for various actions.
Budget Management Tab
This is the default tab in Planner Setup. It provides options for managing your budgets.
Page Actions
- Year / Load - Select the year and click Load to see all of the available budgets for a specific year.
- Create Budget - Set the year and click Load, and then click Create Budget to create a blank budget or one based on the current or prior year's data. Review New Budget Cycle for more details about each option.

- Set Defaults - Click Set Defaults to set the planner and dashboard budgets, and lock and unlock worksheets for the selected budgets.

- Edit (pencil icon) - Click Edit to modify the budget name and budget comments. The budget ID is displayed for reference.
- Click anywhere on the budget name or on the pencil icon.
- Edit as appropriate.
- Click Save.

- Action menu - Select any budget using the box to the left of the budget name to load the action menu.

- Copy - Create a copy of the selected budget and choose to post or not post all special purpose worksheets (SPWs) to the copy. Also choose to include or exclude worksheet notes in the copy. Note that SPWs are always copied with SPW notes. Budget comments are updated on the copy to reflect the budget copied, along with the date/time.
- Delete - Move the budget from the Budget Management tab to the Manage Archived Budgets tab.
- Set/Unset as Dashboard - Set or unset the budget as the default in the Dashboard section. If set as the default, any user with access to Dashboard Financials or ReportBuilder will be able to see this budget.
- Set as Planner - Set/unset the budget as the default in the Planner section. If set as the default, any user with access to Planner Summary or Worksheets will see this budget.
- Load Actuals - Replace budget numbers with actuals and freeze the months through the date entered in a budget for that same year. This is most often used in the context of a reforecast. This action will load actuals whether or not the budget is currently frozen or the worksheet is locked.
- Create Worksheets for Unbudgeted Actuals - To see the impact of this, go to Dashboard > Financials and navigate to the Worksheet Budget Comparison report. Any rows with a red "X" will be created as a worksheet if this is unchecked.
- Load Actuals & Freeze Budget Through - Enter the date through which you want to load actuals and freeze those months. The date must be for the current budget year.
- Post SWPs after... - Click to post SWPs. Uncheck if posting is not necessary.
- Submit - Initiate the task or click Cancel to cancel.
- Set Viewable - Allows a non-admin with the explicit permission Can View Non-Default Budgets on the user record to access this budget.
- Freeze/Unfreeze - Freeze all months through the Freeze Through Date, or unfreeze the budget. Budgets are automatically frozen when actuals are loaded.
- Lock/Unlock Worksheets - Lock or unlock all worksheets within the budget. Martus recommends keeping all budget worksheets locked unless actively budgeting.
- Export - Export the budget to an Excel file. (Note that this is the ONLY format that can be manipulated in Excel and re-imported into Martus.)
- Archive - Create an archived copy of the budget in the Manage Archived Budgets tab. Martus recommends archiving the budget before making any major changes. This makes an archive of the budget without deleting it. You specify the name of this archive. Archived budgets can be restored from the Manage Archived Budgets tab within Planner Setup. While you can't archive one individual worksheet, archiving the budget will archive all worksheets in the budget that point in time.
- Set Default Reference Data - Set the default reference data on that budget's worksheets. The options are: current or prior year budget, actuals, actuals + budget, or 12-month trailing actuals.
- View Activity Log - View the activity log related to the budget checked.
Worksheet Management Tab
View the list of worksheets in the selected budget, and manage their settings here. This tab is the only tab in Planner Setup available to non-admins who have Planner Setup permissions on their user record.
Page Actions
- Year / Budget / Load - Select the year and/or budget, and click Load to see all of the available worksheets for a specific budget.
- Filter - Use the drop downs to filter the list of worksheets to manage.
- Checkboxes - Use the check boxes to select one or more worksheets.
- Edit - Use the pencil icon to edit owners and approvers.

- Add Worksheet - Click Add Worksheet in Worksheet Management to create a new worksheet with a dimension combination that does not currently exist in this budget. The Add Worksheet dialog allows you to assign owners and approvers and specify a target for the worksheet.

- Action menu- Select one or more worksheets from the target year/budget using the check box to the left of the name. An action menu loads.
- Delete - Delete the worksheet(s) from the target budget. If an existing worksheet needs to be deleted:
- Navigate to Planner > Planner Setup.
- Navigate to the Worksheet Management tab.
- Load the year and budget.
- Select the worksheet(s) to delete.
- Click Delete.
- Lock/Unlock - Lock or unlock worksheets in the selected budget.
- Set Target - The Gain/Loss Target is a guide for users when editing the worksheet. Set the target based on the total as viewed by an Admin, and Martus will automatically calculate for what is not viewable by non-admin users. For example, when a user does not have access to view restricted accounts, the target displayed on the budget worksheet and on the Worksheet Status is net of the total for the restricted accounts. You can set the target manually, or by percentage. Net Gain targets should be entered as positive numbers, while Net Loss targets should be entered as negatives. A good use-case for the "% Increase" method would be if you wanted to set the target to be what a prior year's budgeted net loss or net gain was for that worksheet. Remember 100% is your baseline and would reflect an identical net loss/gain as the budget you select, anything under 100% would result in a reduction and anything over 100% would be an addition.
- Update Owners & Approvers - Assign or remove users as owners and approvers on the worksheets.

Import Tab
Import budgets based on an exported budget template into Martus. Choose the fiscal year for the imported budget, and then the file to import.
- Import into Existing Budget - The imported budget overwrites existing lines and creates new lines in the selected budget.
- Create New Budget - A new budget is created from the imported file.

Manage Archived Budgets Tab
Archiving a budget prior to making major changes is best practice, as it makes it easy to restore if needed. Select a year and click Load, and then use the check boxes to select the budget desired.
Page Actions
- Action Menu
- Delete - Delete the budget permanently from Martus.
- Restore - Restore the budget to the Budget Management tab.

Set Budget Year Tab
Set as Budget Year - Set the default year for the Planner section. This is set by an Admin user for all users.

Notes
- During implementation, budgets can be pulled from API-connected systems into Martus. If you have an API connection between Martus and your accounting system, reach out to your support team if you need a budget pulled into Martus from your accounting system.
- Within Martus, a Planner Budget spans one fiscal year, or 12 months. You can create budgets further into the future to budget for multiple fiscal years into the future, however, each budget must be edited within the fiscal months of that year. For example, if there is a need to budget half way into the following fiscal year, a new budget should be created for that fiscal year, and both the next year and the following year's budget worksheets need to be updated as appropriate.
Worksheet Status - Locked versus Unlocked
Locking Worksheets
When actively budgeting, a worksheet is unlocked and users are updating it. Once it has been submitted, the worksheet will be automatically locked, and no further changes can be made to the worksheet or an associated special purpose worksheet. It is recommended that all worksheets in a budget stay locked once the budget has been approved to prevent accidental changes.
Locking Versus Freezing
When a budget is frozen, it impacts all worksheets within the budget, and all months up through the Frozen Through date cannot be modified. This is typically done when actuals are loaded into the budget and no changes should be made to those months.
When a worksheet is locked, no changes can be made to any row or column within the budget worksheets. Worksheets can be locked or unlocked independently of one another. Locking a worksheet indicates that the work of budgeting has been completed for that worksheet and no further changes should be made. It is important to ensure all worksheets are locked in approved/final budgets.
NOTE: The one exception where changes to a locked worksheet are permitted is via Budget Change Requests. For customers using Budget Change Requests (BCRs), a fully approved BCR will update both locked and unlocked worksheets in the Dashboard budget.
Locking and Unlocking from the Worksheet
A Martus Admin or any non-admin user who has "Can Unlock Worksheets" on their User Permissions can lock or unlock a worksheet.
- Start on Planner > Worksheets.
- Click Edit(pencil icon) next to any worksheet.
- Click the Lock icon to unlock/lock the worksheet.
OR - Go to Worksheet Actions > Submit and Lock or Unlock.

Locking and Unlocking from Planner Setup
A Martus Admin can lock or unlock all or specific worksheets from Planner > Planner Setup.
Unlocking/Locking all worksheets in a budget:
- Start in Planner > Planner Setup.
- Select the check box for the appropriate budget.
- Click on Lock Worksheets or Unlock Worksheets.

Unlocking/Locking one or more worksheets in a budget:
- Start on Planner > Planner Setup.
- Go to the Worksheet Management tab.
- Select one or more worksheets.
- Click on Unlock or Lock.

Worksheet Status - Frozen vs. Unfrozen
Frozen Budget Worksheets
When a budget is frozen, all months up through the Frozen Through date are frozen and cannot be modified, for all worksheets in the budget. Reforecast budgets are typically frozen while budget managers are working through them.
All budget worksheets for a single budget are frozen in three ways:
- Load actuals to existing budget - When actuals are loaded into an existing budget, a date indicated by the user determines the Frozen Through date. The budget is automatically frozen.
- Create a new budget - When creating a new budget based on current year actuals and budget, Martus will use the Default Month date to load actuals and set the Frozen Through date. The budget is automatically frozen.
- Manually freeze a budget - You can freeze a budget manually, and indicate the Frozen Through date by using the Budget Actions menu in Planner > Planner Setup > Budget Management. The Frozen Through date can be any month in the current fiscal year for that budget.

Freezing All Budget Worksheets
A Martus Admin can freeze all worksheets in a budget.
- Start in Planner > Planner Setup.
- Select the check box for the appropriate budget.
- Click Freeze.

- Enter the appropriate Freeze Through Date. The default is the current Default Month, however any month in the fiscal year can be selected.

- Click Freeze.
Unfreezing All Budget Worksheets
A Martus Admin can unfreeze all worksheets in a budget.
- Start in Planner > Planner Setup.
- Select the check box for the appropriate budget.
- Click Unfreeze.

Changing the Frozen Through Date on a Budget
If the Frozen Through date needs to be changed, use the following steps.
NOTE: This method does NOT change what actuals are loaded into the budget.
- Start in Planner > Planner Setup.
- Select the check box for the appropriate budget.
- Click Unfreeze.
- Select the check box for the appropriate budget again.
- Enter the appropriate Freeze Through date.
- Click Freeze.
Freezing or Unfreezing Individual Budget Worksheets
A Martus Admin can unfreeze or freeze any worksheet in a frozen budget.
- Start in Planner > Worksheets.
- Click Edit (pencil icon) next to any worksheet.
- Go to Worksheet Actions > Unfreeze/Freeze Worksheet.

Notes:
- Frozen months cannot be updated on the worksheet itself, by posting SPWs, or by posting a personnel scenario to the budget. (You will still be able to open up the SPW and edit the numbers but if the SPW is posted to the budget and numbers from the the frozen months have been updated, those frozen month numbers will not show in the budget.)
- If the budget is not frozen, individual worksheets cannot be unfrozen or refrozen. However, if a budget is frozen, an Admin can temporarily unfreeze a worksheet in that budget. The worksheet can be refrozen with a Worksheet Action, and it is automatically frozen when the Admin user leaves the worksheet.
- Uploading a Martus budget into Intacct is not affected by locked or frozen worksheets.
- A Locked, worksheet means that no changes can be made to any of the months in the worksheet with the exception of Budget Change Requests (BCRs). If using BCRs, a fully approved BCR will update a locked worksheet in the Dashboard budget.
- Individual worksheets can both be locked and frozen.
- Actuals can be updated at any point within a frozen budget by selecting the budget from Planner >Planner Setup Worksheet Management and clicking on Load Actuals. This will update all months with actuals through the date selected as the frozen through month.
- It is best practice for approved/final budgets to be locked; they do not also need to be frozen.
- The numbers within a budget line will never be updated without explicit action by a user. For example, if Actuals are loaded into the budget through May, and a new Actual is added to the accounting system, that number will be reflected in the reference data but NOT within the budget line itself. This is true regardless if the budget is locked, unlocked, frozen, or unfrozen.
Creating a Budget from Scratch (No reference data)
It is possible to start a budget from scratch, without a previous budget or actuals. This is an anomaly, as it is common practice to create a budget based on prior year actuals and/or budget. Often, this approach is used to create a Pre-Allocation Budget.
Create an Empty Budget - Step-by-Step
- Go to Planner > Planner Setup > Budget Management tab.
- Click Create Budget.
- Enter a Name for the new budget.
- Select Empty from the Method dropdown.
- Select the Budget Type from the dropdown.
- Normal - Create a normal budget with no worksheets.
- Pre-Allocation - Create a budget with no worksheets to be used as a pre-allocation budget.
- Click Create Budget.

Set the New Budget as the Default Planner
- Go to Planner > Planner Setup > Budget Management tab.
- Select the newly created budget and click Set as Planner. You are given the option to unlock all worksheets.
- Click Okay to unlock all worksheets and allow users to begin making edits.
- Click Cancel to keep the status of the worksheets unchanged.

Add Worksheets to the Budget
- Go to Planner > Planner Setup > Worksheet Management tab.
- Click Add Worksheet and fill out the fields as needed.

- Set the dimensions, owner and approvers on the worksheet.
- Add all needed worksheets.
Add Lines to the Worksheets
- Go to Planner > Worksheets.
- Click Edit (pencil icon) next to a worksheet.

- Click Line Actions > Add Line to add the needed accounts to the worksheet.
Note: Depending on your Martus configuration, you may also need to add additional dimension values such as program, activity, or project codes to each line. - Enter the budgeted amounts using the Budget Widget.
- When you are completely done, click Submit to lock the budget worksheet; this also submits it for approval if you are using that feature of Martus.
Budget Worksheet Owners and Approvers (Video)
Martus Admins are responsible for managing budget worksheet owners and approvers. Non-admin users with the "Planner Setup" permission can manage owners and approvers for the worksheets to which they have dimensional access.
One of the easiest and most efficient ways to update budget owners and approvers is via the Planner > Planner Setup > Worksheet Management tab.
Notes:
- A budget worksheet can only have one owner, but it can have multiple approvers.
- Specific user profiles can be assigned as owners/approvers for the worksheet approval workflow.
- Approvers can be assigned approval levels for customers with the Advanced Plus and higher subscription. Approval levels are used to manage the flow of approval emails.*
- Any user with the appropriate dimension access and software permissions can edit an unlocked budget worksheet. (You don't have to be an owner or approver to edit a worksheet.)
- Assigning a user as an owner or an approver does NOT grant dimension access! When you assign owners and approvers, you must make sure they have the appropriate dimension permissions. You'll be notified at the time of assignment if they don't have appropriate dimension permissions, and if you are an Admin user, you can add those permissions at that time.
- Budget worksheets are locked when they are submitted for approval
- Only a Martus Admin, or a non-admin with the privilege Unlock Budget Worksheets can unlock a budget worksheet
- When you copy a budget, the owners and approvers are copied too.
- When you create a new budget based on a budget from a prior year, the owners and approvers are carried forward to the new budget.
- If you are an owner or approver and take the action that would normally prompt an email, Martus will suppress that email as it assumes you know that the worksheet was submitted or approved (by you) and thus the email would be redundant.
- Notification emails cannot be turned off within Martus. Best practice is to handle them within your email software by sending the emails to a folder or archiving them.
- It is possible to bulk approve all worksheets via export and import of the Budget file.
Approval Levels for Advanced Plus and Higher Subscriptions
- Levels do not need to be used. Non-hierarchical approvers all have the same level - typically 0 - on the same worksheet.
- Levels and approvers are unique to each worksheet.
- Any user can be an approver on any worksheet they have dimension access to, and they can have different approval levels on different worksheets.
- Levels can be set from 0 to 99, but do not need to be used sequentially. The lowest approver is 0, and the 99 is highest.
- Multiple approvers can have the same level. They function as a 'group' of approvers.
- When a worksheet is submitted, the submission approval email goes to the owner and the lowest level approver(s).
- Once the lowest level user approves the worksheet, the next level user gets an approval email letting them know of the status.
- If the lowest level user denies approval of the worksheet, the owner will get an email with the status.
- The highest level approver can approve the worksheet, even if lower level users have denied it.
- Approvals can be done out of order, but emails are sent in order. All approvals must be done in order for the worksheet to show as fully approved.
- When any approver denies the worksheet, only the owner gets an email letting them know, and the next level is not alerted.

Approving and Denying Budget Worksheets (Video)
The Approval feature is part of the Martus Essentials, Plus, and Premium subscriptions.The video below illustrates how to approve and deny budget worksheets within Martus.
Approving a Worksheet
- Navigate to Planner > Worksheets
- Click Edit next to the appropriate worksheet
- Click on the Approvals tab
- Click Approve or Deny as appropriate
Budget Lines
Proceed with caution! The Budget Lines page allows Admins to make bulk edits to the budget. We highly recommend that you archive the budget prior to using any actions.
Budget Lines allows Admin users to apply bulk changes to the selected budget. Non-admins do not have access to Budget Lines.
Common uses for Budget Lines:
- Zero out specific lines, like payroll lines
- Zero out an entire budget
- Delete lines for inactive accounts across multiple worksheets
- Adjust a set of accounts across multiple worksheets
- Apply a custom spread to one or more lines
- Search globally across all worksheets for a specific term
- Export budget lines, from multiple Worksheets, to excel i
Navigating Budget Lines
Select the budget year and budget you would like to change. Then, further filter the data using dimension and account filters, and account category and reporting group filters. Choose to include excluded data and stat accounts. Export the viewable grid if desired. Click Load to apply the selected filters. Line Mode allows you to filter using the columns for more inclusivity. Note the number of Records Selected prior to choosing an Action to perform.

There are two ways to edit lines via the Budget Lines page. Any worksheet lines that are locked or are controlled by an SPW cannot be modified. You can unlock the desired worksheets in Planner > Worksheets to access locked lines, and then relock the worksheets. Changes to SPW lines must be made directly in the SPW.
- Budget Mode - Displays all lines that match the filters, and makes any changes to all lines.

- Line Mode - Displays all lines that match the filters, and allows changes to specific lines selected. Please note that 1,000 items or lines per page will appear and can be impacted at one time.

Adjust Amounts Step by Step
Adjust amounts by a percentage.
- Go to Planner > Budget Lines.
- Choose the appropriate Mode.
- Apply the appropriate filters. Grid filters will only apply to the records visible on the page. Use the page filters to limit the number of records further.
- Click Load.
- If using Line Mode, select the appropriate lines.
- Click Actions.
- Click Adjust Amounts.
- Select the appropriate months or Select All.
- Enter the adjustment percentage. See below regarding percentages and their impact.
- Click Apply or click Cancel to cancel.
The percentage that you enter will be multiplied times .01 and then times each budget amount in order to determine the new budget value. Thus, enter the percentage in this form:
- To double the value, enter 200
- To halve the value, enter 50
- To decrease values to 70% of the previous values, enter 70
- To increate values by 10%, enter 110
- To blank - or zero out - all values, enter 0
Round Amounts Step by Step
Round all editable lines in Budget Mode, and selected lines in Line Mode, to ones, tens, hundreds, or thousands.
- Go to Planner > Budget Lines.
- Choose the appropriate Mode.
- Apply the appropriate filters. Grid filters will only apply to the records visible on the page. Use the page filters to limit the number of records further.
- Click Load.
- If using Line Mode, select the appropriate lines.
- Click Actions.
- Click Round.
- Select the appropriate Rounding Type: Ones, Tens, Thousands or Hundreds.
- Click Round or click Cancel to cancel.
Burn Rate Step by Step
The Burn Rate is calculated by taking the average of the months being sourced. This average is then applied to the remaining open months that do not have a value or are not frozen. If the sum of the sourced months' values is zero or below, the sum of each month's absolute value is used to calculate the burn rate. If some months are not sourced, those months are not considered in the calculation.
- Go to Planner > Budget Lines.
- Choose the appropriate Mode.
- Apply the appropriate filters. Grid filters will only apply to the records visible on the page. Use the page filters to limit the number of records further.
- Click Load.
- If using Line Mode, select the appropriate lines.
- Click Actions.
- Click Burn Rate.
- Select the Source.
- Click Preview to see the results.
- Click Apply to apply the changes or click Cancel to cancel.
Delete Lines Step by Step (in Line Mode only)
Remove lines from the budget entirely.
- Go to Planner > Budget Lines.
- Choose Line Mode.
- Apply the appropriate filters. Grid filters will only apply to the records visible on the page. Use the page filters to limit the number of records further.
- Click Load.
- Select the appropriate lines.
- Click Actions.
- Click Delete.
- Click OK to confirm deletion of the selected lines.
Apply a Custom Spread Step by Step
Apply a custom spread to one or more lines in the budget.
- Go to Planner > Budget Lines, set the Year and Budget, and click Load.
- Choose Budget Mode or Line Mode.
- Apply the appropriate filters. Grid filters will only apply to the records visible on the page. Use the page filters to limit the number of records further.
- Click Load.
- Select the appropriate lines.
- Click Actions.
- Click Custom Spread.
- Select the Custom Spread desired.
- Select the type of spread.
- Total - Select a Source for the total Amount, or manually enter the total Amount to be distributed evenly across the months, based on the Spread selected.
- Rate - Enter the Amount for each month, based on the Spread selected.
- Select the Starting and Ending Months if desired and allowed for this spread.
- Click Preview to see the results.
- Click Apply to apply the spread to the selected lines.
Changing a Budget via Export/Import
Whenever a global change is needed on a worksheet or budget, it may be easier to export, update, and then import the worksheet or budget. Some examples include:
- Changing dimensions on worksheets
- Adjusting all account lines across all worksheets
- Adding a line dimension to multiple worksheets/lines
- Adding/removing worksheets
- Adding many lines throughout the worksheets
Best practice is to use a budget export from Martus as your template for an import. The export will provide the needed columns for your import. You can remove unnecessary lines.
Budget Import Behavior
Martus will add new and adjust existing lines, but won't remove unmatched lines when importing a file to an existing budget. To create a new budget from the import exactly as it is, import to a new budget.
When importing to an existing budget:
- Martus will add all new lines from the import file to the budget.
- Martus will update all values for the line(s) to the values found in the import file.
- Martus will do nothing to unmatched lines that were in the budget originally - they remain unchanged.
Updating a Specific Worksheet
- Navigate to Planner > Worksheets and open a worksheet.
- Click Worksheet Actions > Export Worksheet (xlsx).

- Open the file from your computer.
- Make changes as needed and save the file.
- If you are changing accounts and/or dimensions, there are two ways to make those adjustments.
- ID Method: Use the columns all the way to the right as shown below. The Id columns look at the ExternalId of your dimension items and accounts in Martus - not your Num in Martus.

- Num & Name Method: Delete all the ID columns to the right. In the left-most columns, ensure that all columns have one of the following formats: [Martus Num] OR [Martus Num] [Name]
- Num + Name Example

- Num Example

- Note: Do not mix formats like this example, as the import will error.

- Num + Name Example
- ID Method: Use the columns all the way to the right as shown below. The Id columns look at the ExternalId of your dimension items and accounts in Martus - not your Num in Martus.
- Save the file.
- Go to the worksheet and click Worksheet Actions > Import Worksheet (xlsx).

- Choose the file from your computer and click Import.
- Wait for Martus to finish importing.
- Review changes in Planner > Summary reports.
If sheet dimensions were changed, you may need to delete the old worksheet from the budget in Planner > Planner Setup > Worksheet Management.Updating Multiple Worksheets/Lines within a Budget
This method allows you to update or change all affected lines regardless of the worksheet and contains three steps - exporting the budget, adjusting the budget, and importing the budget back into Martus. Some use cases for the export/import option include:
- Bulk add lines to a worksheet(s)
- Bulk add Worksheets
- Copy a Worksheet to another dimension
- Copy lines from one worksheet to another
Exporting the Budget
- Navigate to Planner > Planner Setup > Budget Management.
- Select the budget to export by checking the box next to the name.
- Click Export from the action menu.
- Open the downloaded file in Excel.
- Navigate to the "Budget" sheet.
- Determine if you should use the ID method or the Num & Name method
- ID Method - Use this method if the values in the Id columns to the far right of the Budget tab are the IDs you are familiar with OR if you don't need to adjust the dimensions of the lines. This method is recommended if your system is integrated with Sage Intacct or is a file-based implementation. The Id columns look at the ExternalId of your dimension items and accounts in Martus - not your Num in Martus.
- Num & Name Method - Use this method if the values in the Id columns to the far right of the Budget tab are long and complex AND you need to adjust the dimensions of the lines. This method is strongly recommended if your system has an integration with Business Central, QuickBooks, or Xero, since the Ids for those integrations are long and complex. Note: Remove the ID columns to the right if using this method.
Making Adjustments with the ID Method
- Modify all of the desired worksheet lines.
- If you change dimensions for any rows, use the Id columns to the right - these are the columns Martus will use on import.
- If you add any rows, ensure to fill out the Id columns to the right.

- Delete or update any unneeded sheets within the Excel file. See below "Anatomy of a Worksheet" for more information.
- Save the updated Excel file.
- Continue with the steps in the section below "Importing the Budget back into Martus".
Making Adjustments with the Num & Name Method
- Delete all Id columns to the far right of the import, including the headers.
- In the left-most columns, ensure that all columns have one of the following formats: [Martus Num] OR [Martus Num] [Name]
- Num + Name Example
- Num Example
- Note: Do not mix formats like this example, as the import will error.
- Num + Name Example
- Modify all of the desired worksheet lines.
- Delete or update any unneeded sheets within the Excel file. See below "Anatomy of a Worksheet" for more information.
- Save the updated Excel file.
- Continue with the steps in the section below "Importing the Budget back into Martus".
Importing the Budget back into Martus
When you import the modified budget, you can import it to an existing budget or import it to a new budget.
Create a New Budget
- Navigate to Planner > Planner Setup > Import tab.
- Change the year if needed and click Load.
- Choose Create New Budget.
- Specify a Budget Name.
- Choose the file from your computer.
- Select Post SPWs to post all SPWs in the file to be imported. This includes all worksheet-specific SPWs, SPW templates, and global SPWs.
- Click Import.
- Go to your home screen to await the completion of the import.
- Navigate back to Planner > Planner Setup and review your changes. Set the new budget as the Planner and/or Dashboard defaults as desired.

Import into an Existing Budget
- Navigate to Planner > Planner Setup > Import tab.
- Change the year if needed and click Load.
- Choose Import into Existing Budget.
- Select the Destination Budget from the dropdown.
- Choose the file from your computer.
- Select Post SPWs to post all SPWs in the file to be imported. This includes all worksheet-specific SPWs, SPW templates, and global SPWs.
- Click Import.
- Go to your home screen to await the completion of the import.
- Navigate back to Planner > Planner Setup > Worksheet Management tab.
- Delete any unneeded worksheets using the action menu.
Notes on Importing
- All dates must be in the format mm/dd/yyyy, or Martus will error. (Except for AU customers, which use dd/mm/yyyy!)
- To remove lines and/or worksheets from a budget, you may want to utilize the export/import method and the option to import into a new budget. The new budget only contains the lines indicated in your file.
- Do not change the Worksheet tab names. The only recognized tab names are:
- Budget
- Setup
- Approvals
- Config
- SPW
- The file name can be set to any value but avoid special characters.
- There can be no duplicate combinations of dimensions and accounts. (We recommend testing this by concatenating these fields in a separate column and checking for duplicates.) If there are duplicates, the last one processed is the only one that will be imported into the budget ("last one wins").
- Excel formulas in fields that are to be imported will be replaced with the cell value. However, best practice is to copy and paste as values if needed. NOTE: ID fields and Date fields do not support formulas.
- The column titles included in the export file can not be adjusted.
- It is possible to remove month or note columns if not needed, for example, if only one month needs adjustments, delete all other month columns and only import the one month.
- The Id columns look at the ExternalId of your dimension items and accounts in Martus - not your Num in Martus.
- If your Martus dimension items do not have Nums (common in QuickBooks and some Intacct UDDs), you must use the [Num + Name] format for all imports.
- When using the [Num + Name] format, keep in mind it is case sensitive.
- If you want to import a dim item or account that is inactive in Martus, when you use the [Num + Name] format, it must have the [I] notation that is applied on the export. For example: ‘5001 Rent and Occupancy [I]’
- Martus imports always use xlsx (MS Excel) format, not CSV.
- All Martus file imports have a limit of 15MB.
Anatomy of the Import File
Budget Tab
The Budget tab is the primary tab and must be included when importing.
- Dimension & Account Names - Yellow:
- ID Option: These are only for reference if using the ID option. You can fill them in, leave them blank, or even delete those columns entirely.
- Name Option: Ensure that all columns are using one of these formats: [Num] or [Num + Name]
- Monthly Amounts - Green:
The total per month for that line. - Notes - Purple:
The Notes columns (1-12) apply to each corresponding month in your fiscal year. There's a 150-character maximum on each note. - Dimension & Account Columns - Blue:
Note: All dimension values should be filled in as appropriate per the method used. Ensure that only non-required dimensions columns have blank values.- ID Option:
- The columns for the Dimension IDs and account numbers are shown to the right of the Notes columns.
- The headings for these columns are critical and must be in the format of the dimension name plus Id (for example, DepartmentId).
- Use the code ID, not the name, and ensure there are no leading or trailing spaces. The Id columns look at the ExternalId of your dimension items and accounts in Martus - not your Num in Martus.
- Name Option: Remove these columns and column headers from the file.
- ID Option:
Setup Tab
One line per worksheet; defines owners, targets approval status and other worksheet data.
Approvals
One line per worksheet per Approver
Include additional lines for additional Approvers
Config
Includes overall budget information, should be deleted prior to import
SPW
One line per SPW line
Note: It is not recommended to adjust SPW lines in excel and re-import.
Top Level Budgeting
Top Level and All Level Budgeting allow budgeting at alternate dimension levels even though actuals are posted elsewhere.
Top Level and All Level Budgeting are optional features of Martus. They are available for clients at any subscription level. These features must be activated by Martus Support. If you would like to utilize these features, create a ticket through the Knowledge Base if you are a direct Martus customer, or contact your Martus reseller if you are supported through one of our Martus partners.Top Level Budgeting
The Top Level Budgeting feature helps when you want to budget at a parent dimension level even though actuals are posted to children of that dimension value.
- When budgeting, the actuals shown in the reference data section of the worksheet include the total for all child dimensions plus the parent.
- If you drill down from the reference data, you’ll see all the transactions that make up that total, whether those transactions are at the child or parent level.
- When you load actuals into a budget, the values for the parent and its child dimensions are included in the budgeted totals.
Examples where you might like to use Top Level Budgeting:
- A parent department named New Generation, with child departments for Preschoolers and School-Age.
- A parent program for External Affairs, with child programs for Federal and State. All Level Budgeting is a feature available within Top Level Budgeting that allows reference data to be summarized for all dimension values.
All Level Budgeting
The All Level Budgeting feature helps when you want to budget for all values within a dimension, rather than a singular or top level. This requires a worksheet with one dimension that is blank.
- When budgeting, the actuals shown in the reference data section of the worksheet include the total for dimensions on the blank dimension.
- If you drill down from the reference data, you’ll see all the transactions that make up that total across all dimension values for the blank dimension.
- When you load actuals into a budget, the values for blank dimensions are loaded into the budget.
Setting Top or All-Level Budgeting
Warning: If you do budget at the top level for a given dimension value, you should not also budget to the children of that dimension! Each worksheet will have an option at the top to select Top Level for each dimension. The best practice is to only use top level budgeting on one dimension at a time.
- Edit the worksheet.
- Click Top Level or All Levels next to the appropriate dimension.

- Martus refreshes and will update the reference data to include the child dimension amounts.
Loading Actuals into a Top-Level Budget
There are considerations to be aware of with top-level budgeting when loading actuals.
- When loading actuals, there is an option to Limit to Existing worksheets. When unselected, Martus will create new worksheets as needed for all lines with actuals.
- When using top level budgeting, select the appropriate dimension so that Martus will create the worksheet at the top level, rather than the lower levels, of that dimension.
Notes:
- Utilizing more than one dimension for top level is not recommended. While the actuals will be summarized when loading actuals, Martus only supports one dimension for loading actuals.
- All Level Budgeting and loading actuals: When you Load Actuals and do not limit the results to existing worksheets, no worksheets are created for All Levels. If you want to include any All Levels worksheets in the output, be sure to create them before running Load Actuals.
- If you use the Planner Allocations feature of Martus, top-level budgeting is used on all of the Pre-Allocation worksheets.
Planner Allocations
The Planner Allocations feature provides for a different type of budget, called a pre-allocation budget. Each worksheet in a pre-allocation budget can be allocated on a percentage basis to any worksheet(s) in the default Planner budget.
Planner Allocations is an optional feature of Martus, available with the Standard Plus, Plus, and Premium level subscriptions. This feature must be enabled by support. If you would like to utilize this feature, create a ticket through the Knowledge Base if you are a direct Martus customer, or contact your Martus reseller if you are supported through one of our Martus partners.
Important Facts about Pre-Allocation Budgets
- The pre-allocation budget should include worksheets only for those dimensions that need to be allocated.
- Pre-allocation budget will allow you to designate a singular percentage allocation that will be applied across that worksheet.
- The allocation percentage must total 100%.
- Each worksheet within a pre-allocation budget should only budget to those accounts that need to be allocated. Do not add accounts that are allocated elsewhere such as in Personnel Budgeting.
- Each pre-allocation budget can be managed within Martus with the same tools used for Planner budgets. This includes reporting, setting the default pre-allocation budget, and other standard functions such as copying, importing and exporting, using SPWs, and the approval process.
- The pre-allocation budget, when allocated to the default Planner budget, will replace all values associated with the lines in the pre-allocation budget.
- Allocated amounts can be edited in the worksheet, and there is no visual indication that the allocated amounts came from a pre-allocation budget. It is recommended to add notes to the pre-allocation worksheets, as these will post to the allocated amounts in the planner budget.
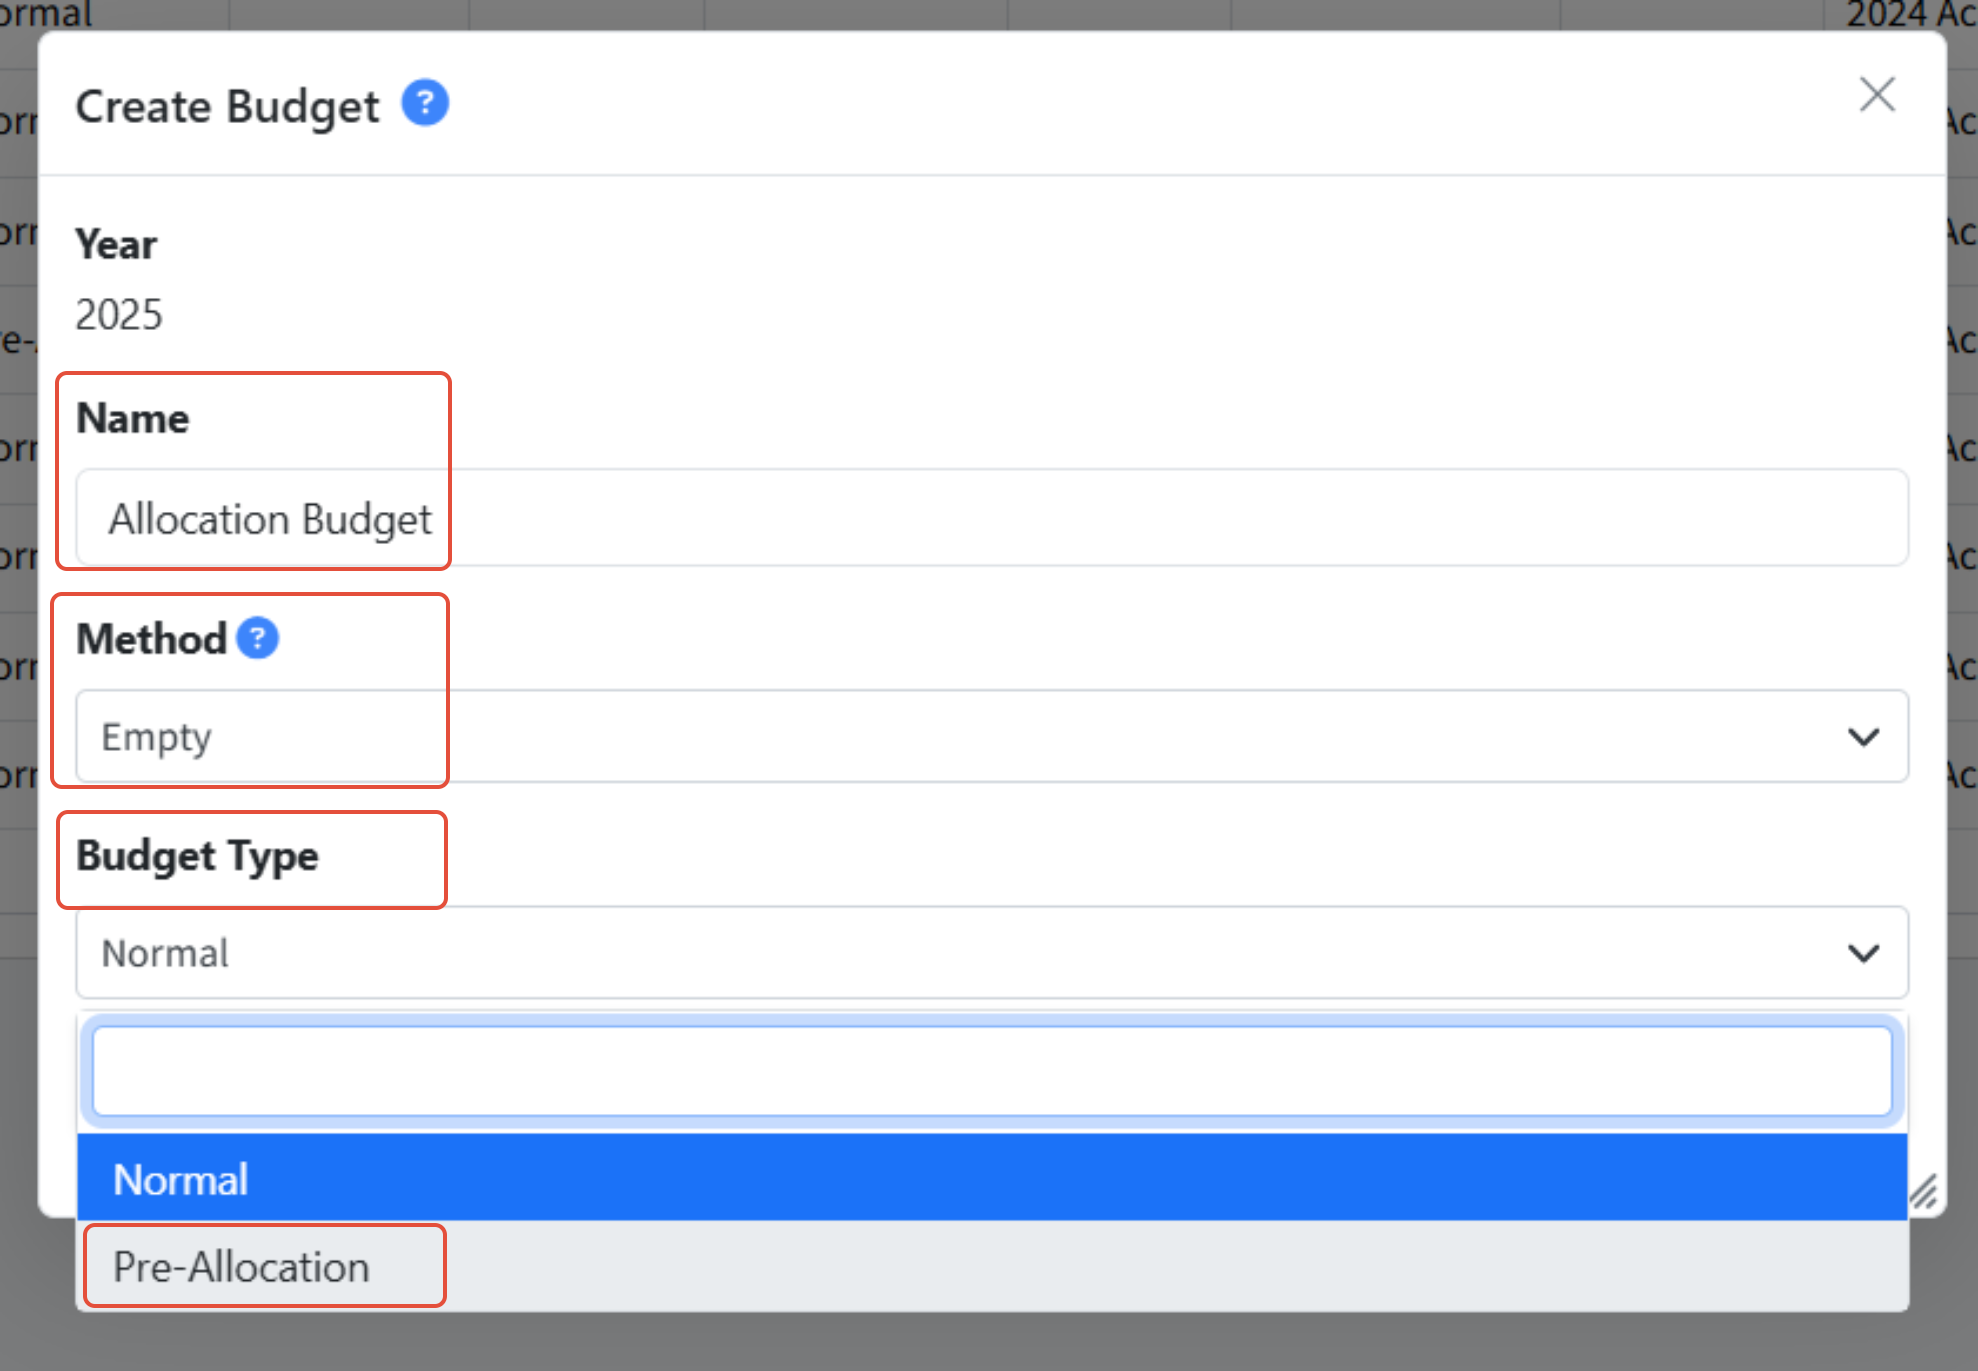
Creating a Pre-Allocation Budget
- Go to Planner > Planner Setup > Budget Management tab.
- Select the appropriate year if needed.
- Click Create Budget.
- Give the budget a Name.
- Choose Empty from the Method dropdown.
- Choose Pre-Allocation from the Budget Type dropdown.
- Click Create Budget.
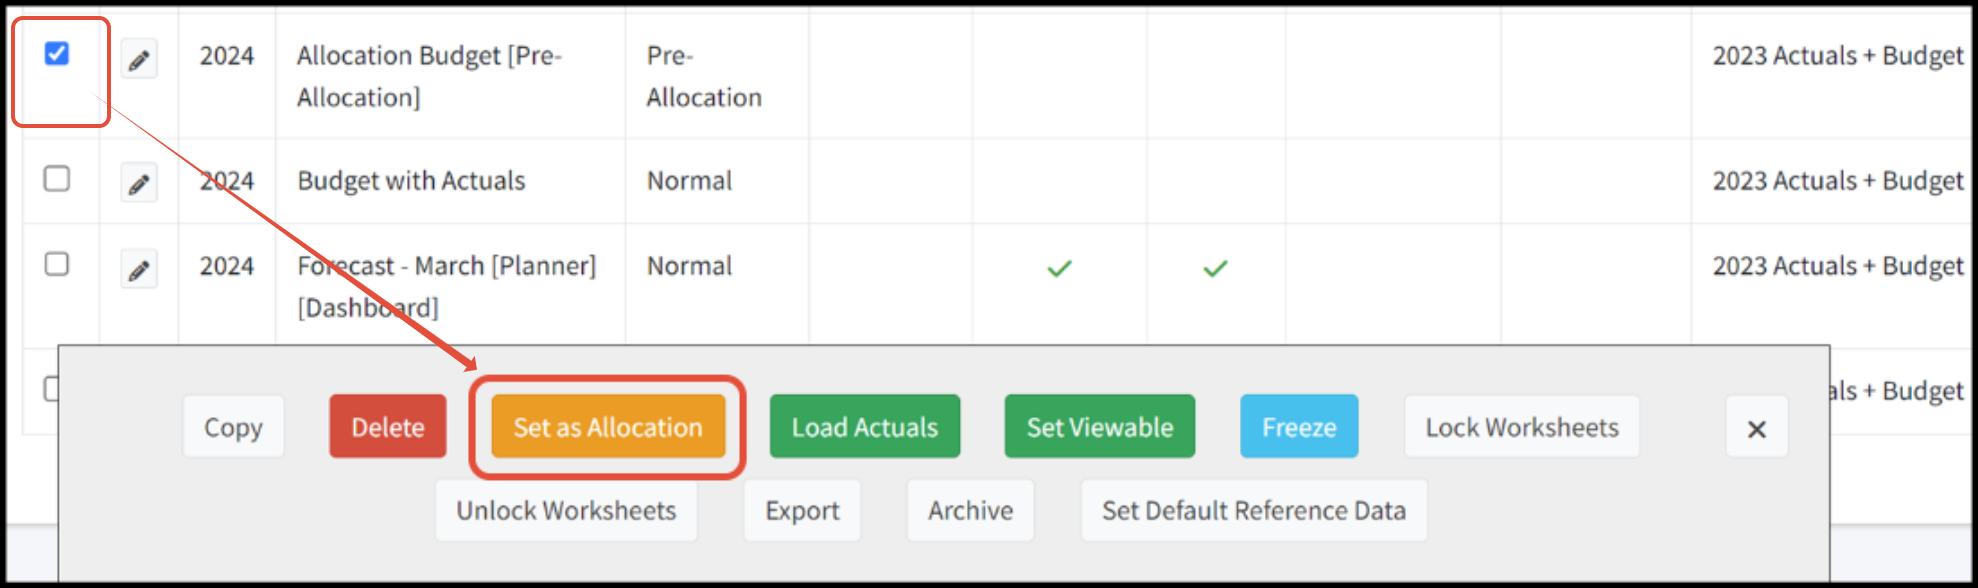
- Select the budget that was just created using the box to the left.
- Click Set as Allocation.
Adding Worksheets to a Pre-Allocation Budget
- Go to Planner > Planner Setup > Worksheet Management tab.
- Change the budget drop down to the pre-allocation budget.
- Click Load to view the pre-allocation budget.
- Click Add Worksheet.
- Fill out the fields as appropriate.
- Most Planner Allocation worksheets have one dimension that is left blank so that roll up amounts across that dimension can be utilized in the budget worksheet
 Note: Most Planner Allocation worksheets have one dimension that is blank so that roll-up amounts across that dimension can be utilized in the budget worksheet.
 - Click Add Worksheet.
Adding Lines and Values to a Worksheet One by One
- Go to Planner > Worksheets.
- Click Edit (pencil icon) for the appropriate worksheet.
- Click Line Actions > Add Line.
- Select the appropriate Account and any line dimensions desired.
- Click Add Line.
- Add additional lines as needed. Note: Remember only lines that need to be allocated should be added.
- If needed, click Show Reference Data or use > (carrot) on the row. As an example, all reference data for the Department below is showing regardless of what Corporation it is tied to as Martus will automatically select the "Top Level" option for the empty dimension.

- Update the line with the appropriate budget numbers.
Adding Lines and Values to a Worksheet Via Load
This will load all existing lines within the reference data to the worksheet.
- Go to Planner > Worksheets.
- Click Edit (pencil icon) for the appropriate worksheet.
- Ensure the appropriate reference data is set and click the Show Reference Data checkbox
- Review the lines that will be loaded
- Click Worksheet Actions > Load.
- Add or remove lines as needed.
Note: Remember that only lines that need to be allocated should be added.
Allocating the Worksheet
- From Planner > Worksheets, select a worksheet to edit.
- Click Worksheet Actions > Allocate worksheet.

- Click Add New Target and select the appropriate worksheet to allocate.

- Enter the percentage to allocate to the target worksheet and click + to save.
- Continue adding targets worksheets as needed.
- When finished, click Post to Planner Budget to post the allocated amounts to the matching lines in the default Planner budget.