Budgeting Basics - Learning Path
Budgets are maintained on budget worksheets.
Budgeting Basics - Learning Path
Introduction
Budgeting in Martus is all about the budget worksheet. Within a budget worksheet, it is possible to budget easily based on reference data from the previous year. Within this learning path, you will learn about the Worksheets page, the worksheet, and the Budget Widget, in order to budget successfully in Martus.
Learning Path Contents
- Planner Worksheets
- The Budget Worksheet
- The Budget Widget
- Budget Reporting - Planner Summary
Use the link below to navigate through the learning path.
Budgeting Basics - Learning Path >> Planner Worksheets
Planner Worksheets (Video)
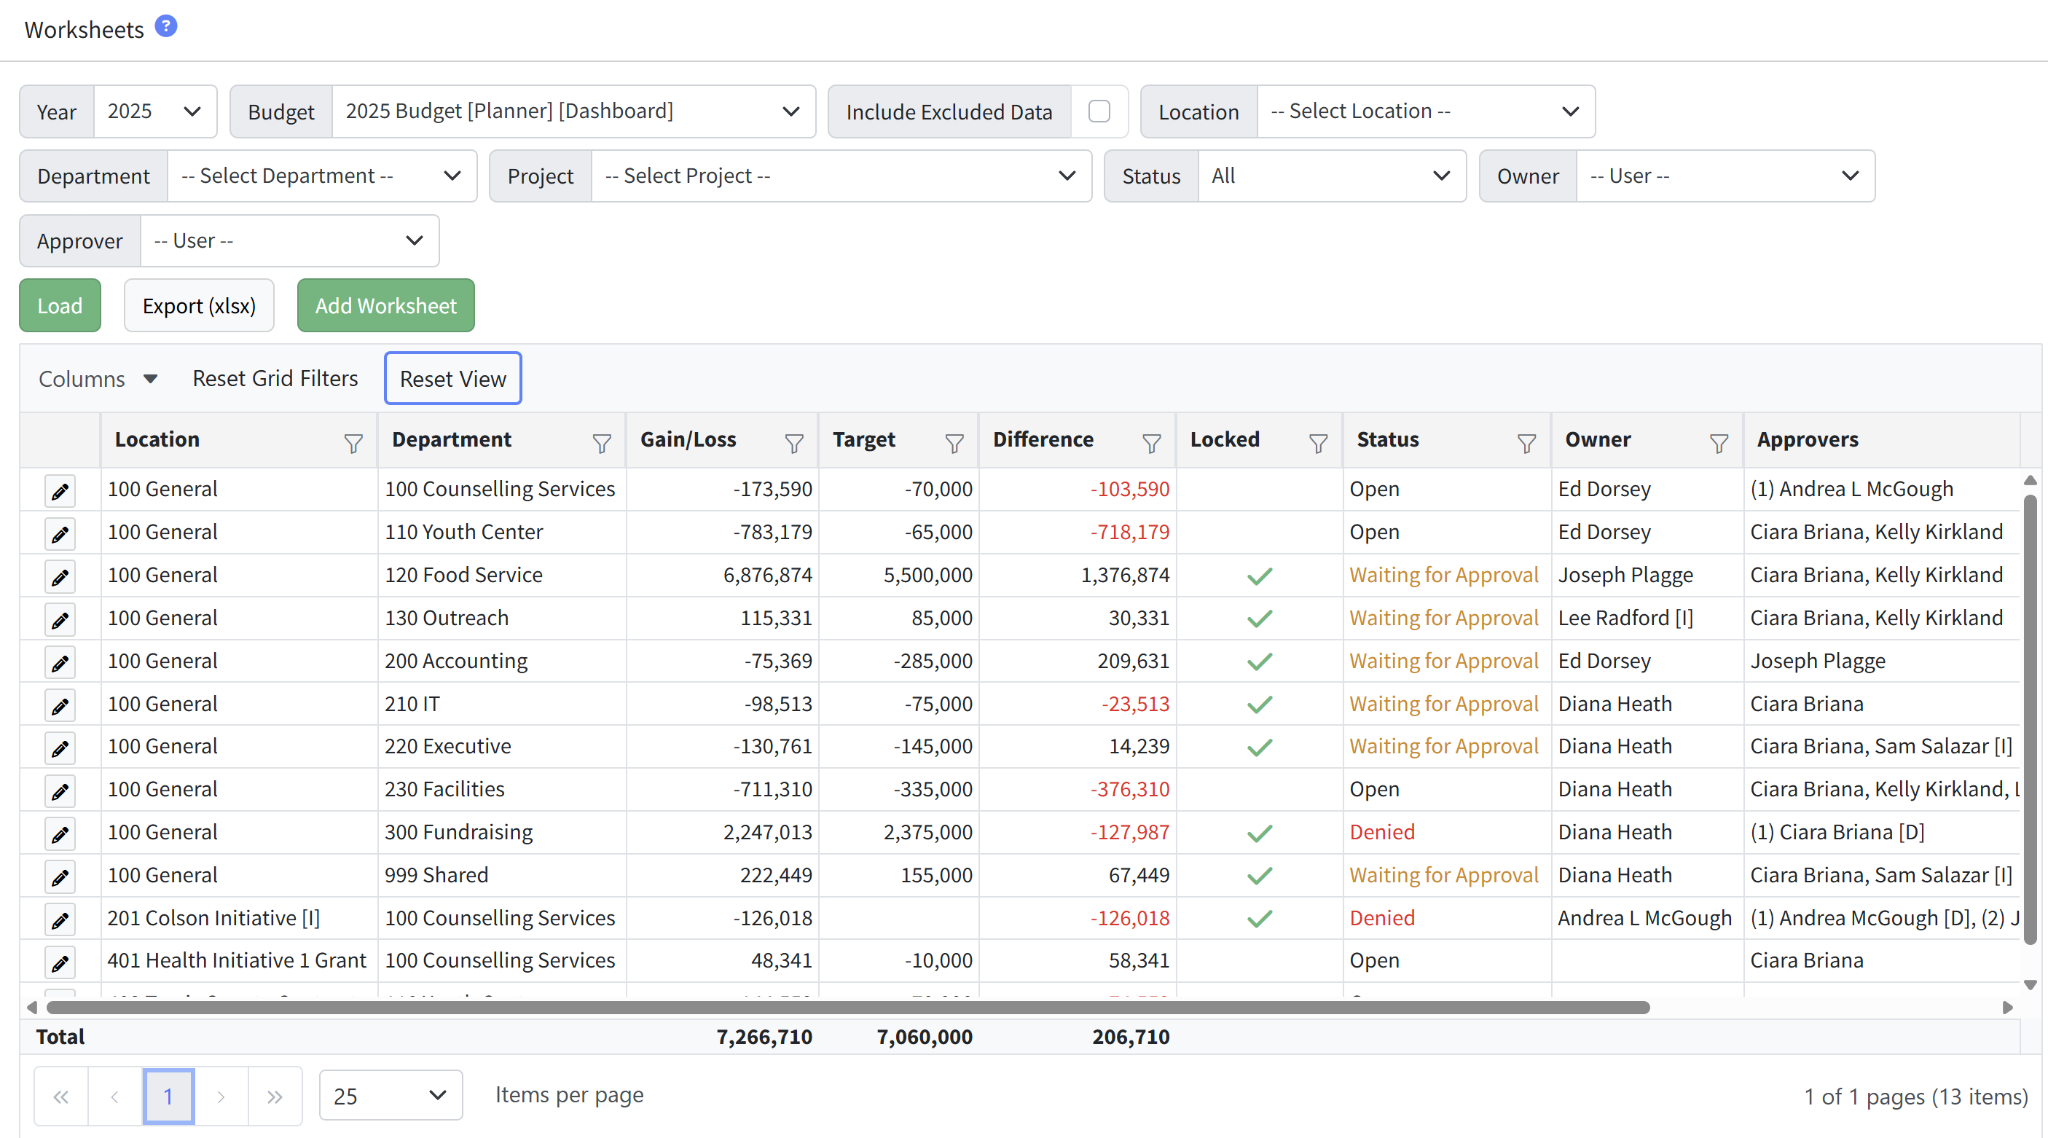
Planner > Worksheets provides a list of available worksheets. The worksheets displayed are determined by the dimension restrictions applied to the current user. Admin users see all worksheets, and non-admins see worksheets per their permissions and dimension restrictions.
Worksheets are listed by dimension, along with key information.
- Gain/Loss - The gain/loss total for the worksheet.
- Target - The target for the worksheet.
- Difference - The difference between the gain/loss and the target.
- Locked - A green check indicates the worksheet is locked.
- Status - Approval workflow statuses include Open, Submitted, Waiting for Approval, Partially Approved, or Approved.
- Includes Stats - Statistical accounts are included or not for the worksheet. (See this KB for more information about stat accounts in Martus.)
- Owner - The user primarily responsible for the worksheet. The owner will receive workflow email regarding the approval process.
- Approvers - The approvers for this worksheet. Approvers will receive workflow email regarding the approval process.
- Approval - Click Details to see the current state of approvals and manage the owner and approvers for the worksheet.
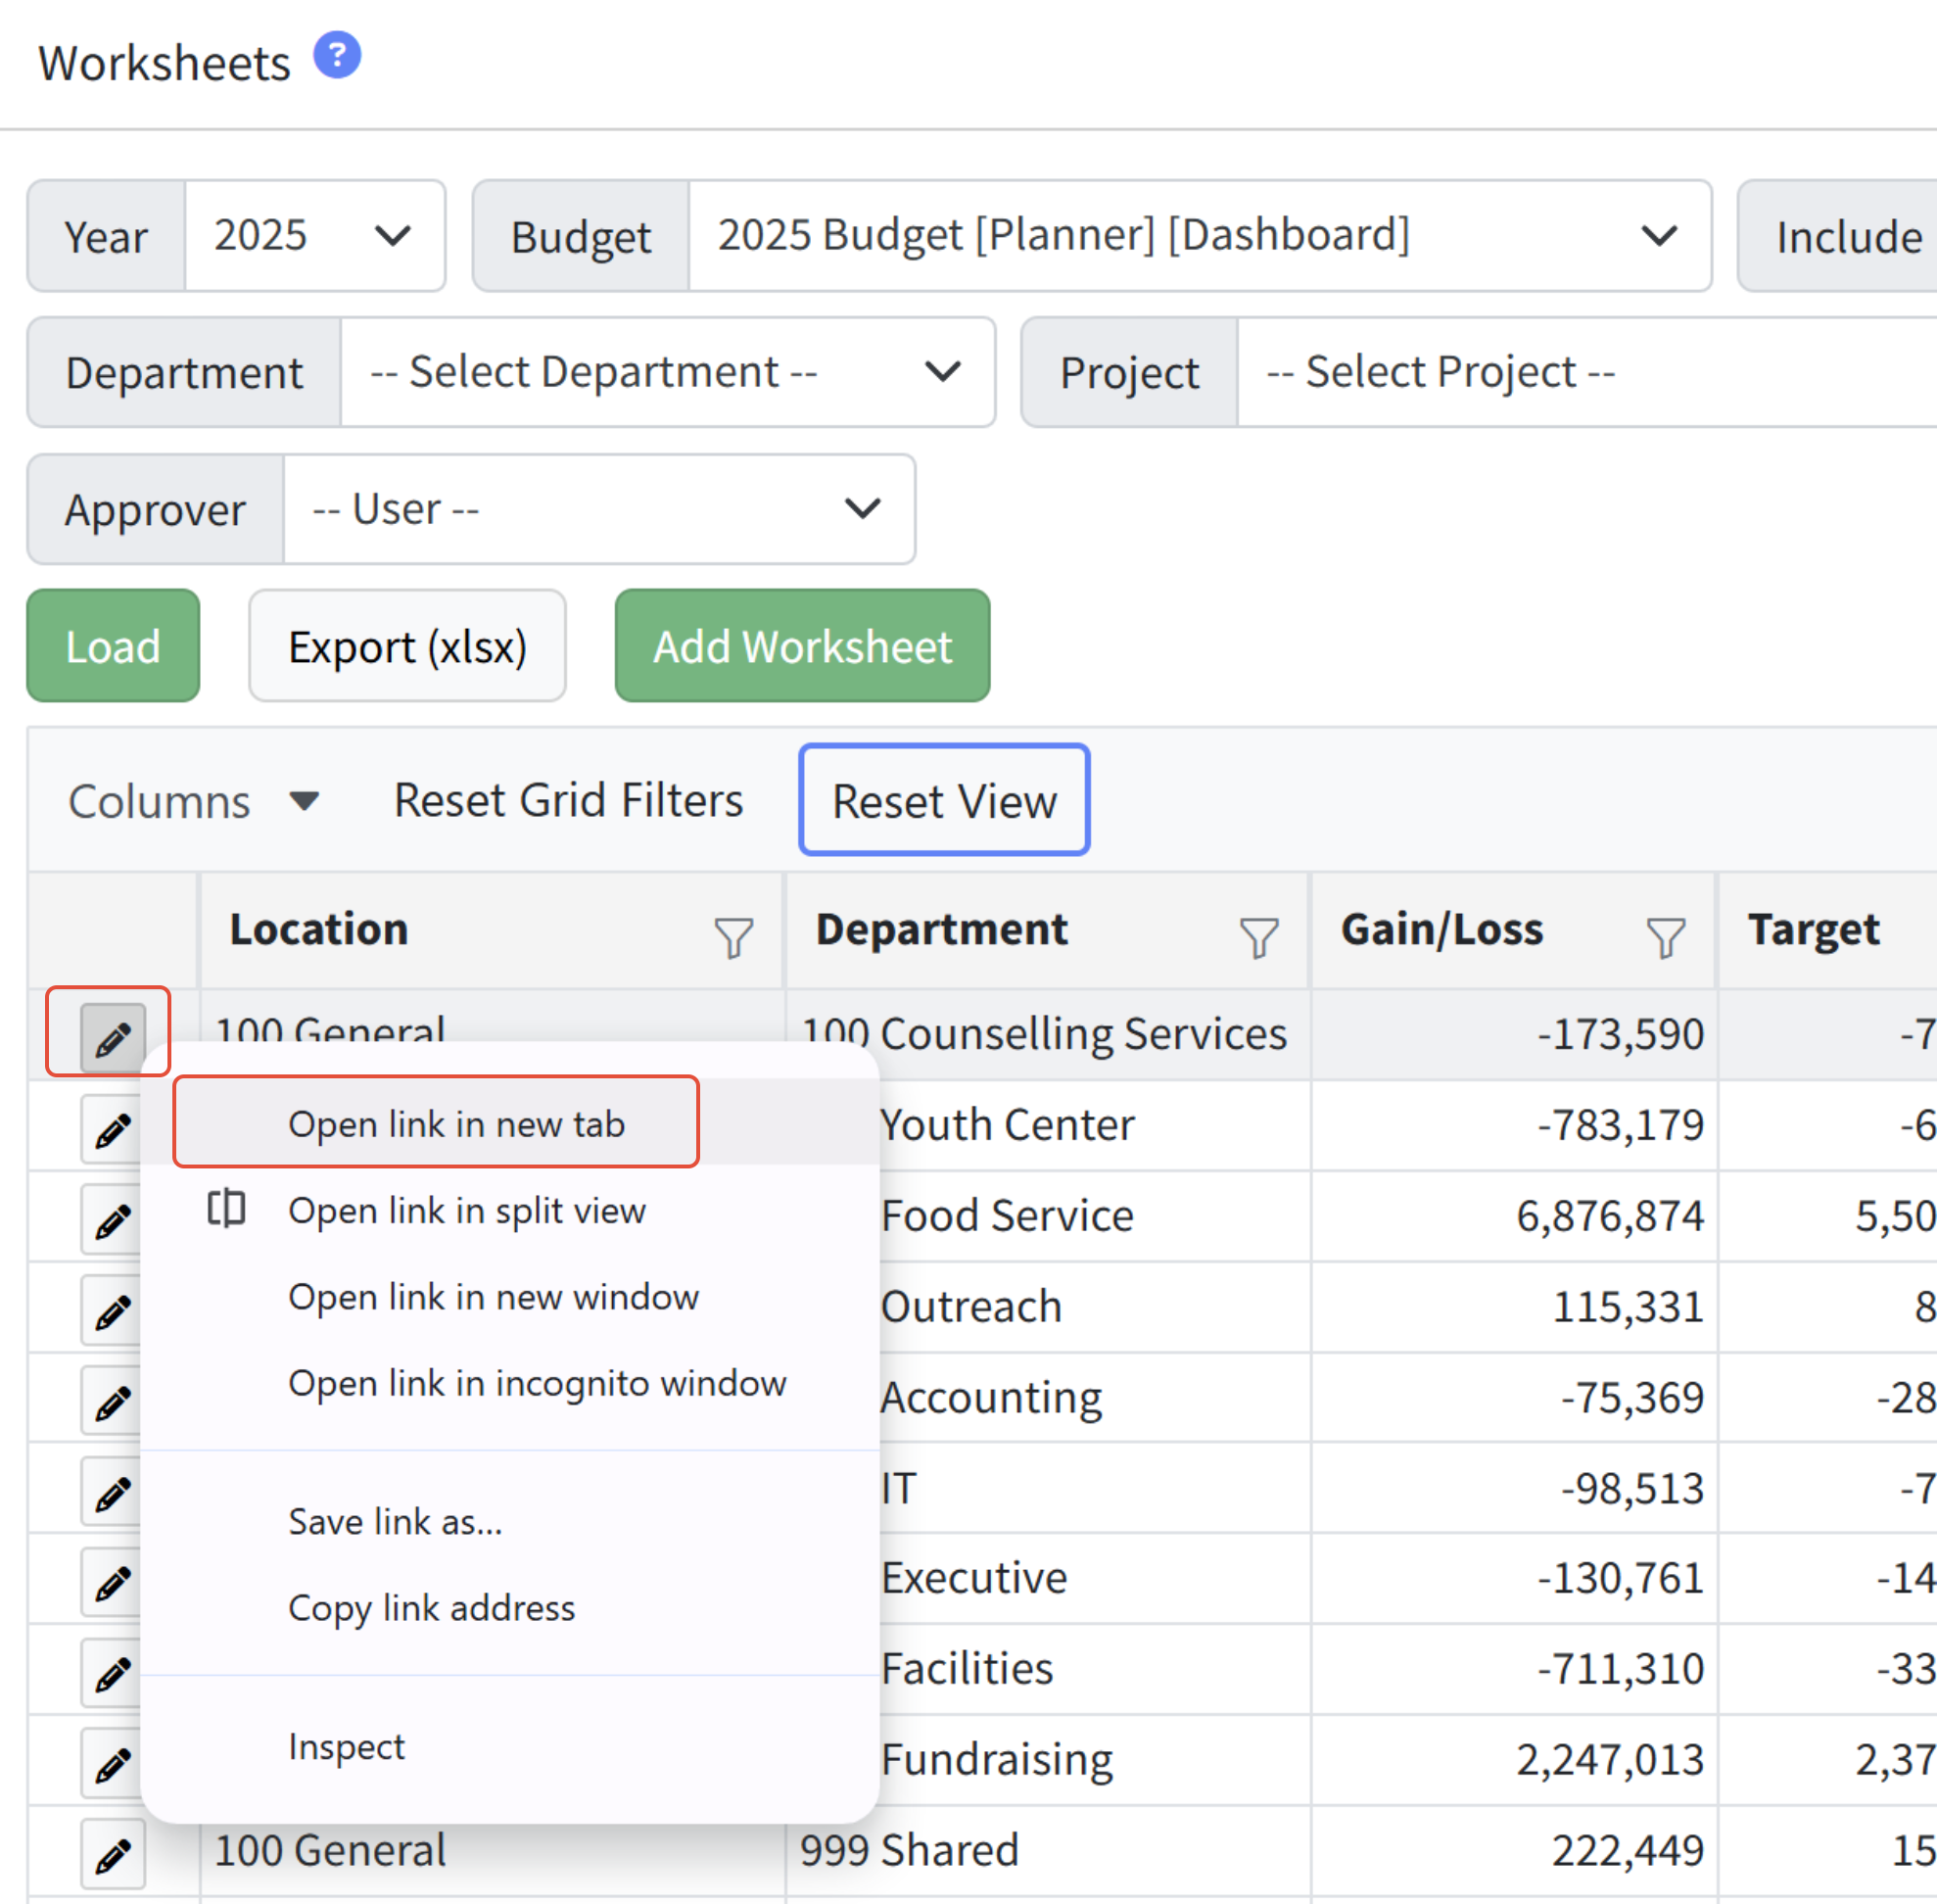
Selecting a Worksheet to Edit
- Go to Planner > Worksheets.
- Select the appropriate Year and Budget.

- Use the page and grid filters as needed to locate the worksheet.
- Click Edit (pencil icon) next to the appropriate worksheet. To keep Planner > Worksheets available in this tab of your browser, right-click and select Open link in new tab. A new tab will open with the selected worksheet.

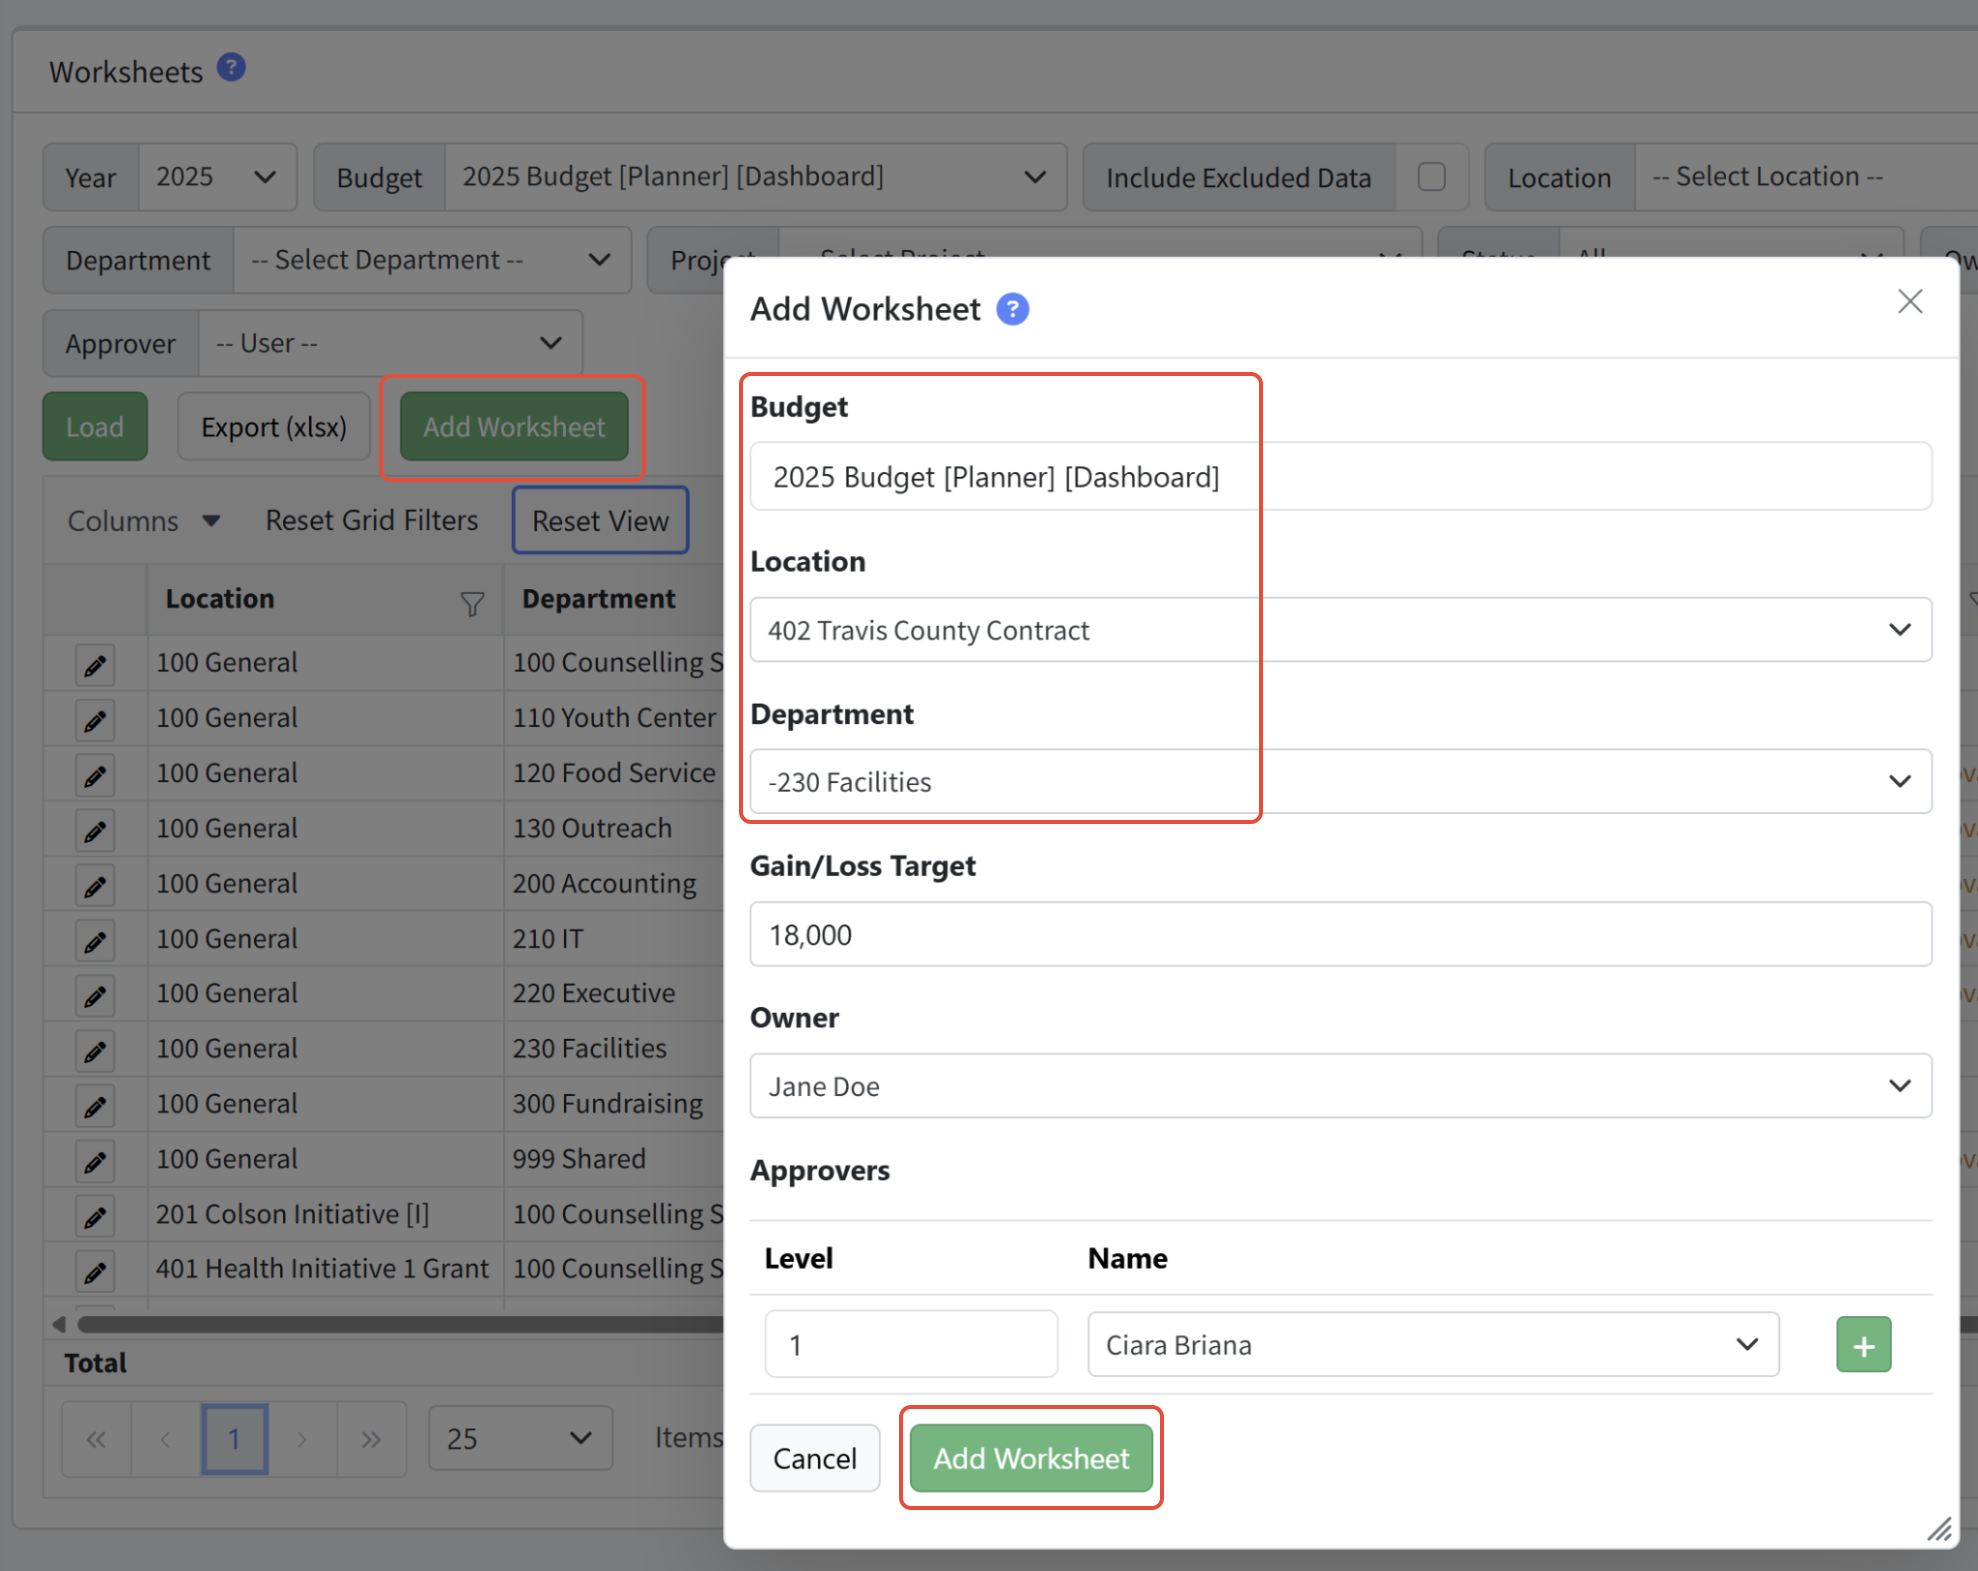
Adding a New Worksheet to the Budget
Martus Admins can add new worksheets to the budget. Non-admin users with the Planner Setup permission can also add new worksheets to the budget.
- Go to Planner > Worksheets.
- Select the appropriate Year and Budget.
- Click Add Worksheet.
- Input the dimensions and other fields for the new worksheet.
- Click Add Worksheet.
Deleting a Worksheet from the Budget
You can delete a worksheet you no longer need in Planner > Planner Setup > Worksheet Management. Select the worksheet(s) to be deleted and select Delete from the action menu. Be careful when deleting worksheets! This cannot be undone!
How To Edit Your Budget Numbers Using the Budget Widget
Martus is a collaborative budgeting tool. As such your budget will be broken out by worksheets. This is to ensure individual will only see the worksheets they are responsible for. When editing the budgets you will access individual worksheets which have GL accounts within them.
- Go to Planner > Worksheets.
- Click the pencil icon of the worksheet you want to edit
- If the worksheet is locked only an admin can unlock it - locked worksheets cannot be edited until unlocked.
- Click the budget widget (the icon that looks like a calculator)
- Change the 'Adjustment Type' dropdown
- Apply a number in the 'Amount' box
- Click 'Preview'
- Add your notes
- Click 'Save'
Use the links below to navigate through the learning path.
Introduction << Budgeting Basics - Learning Path >> The Budget Worksheet
The Budget Worksheet (Video)
The budget worksheet is designed to make budgeting easy. A budget worksheet is a unique combination of dimensions that allow a user to enter the values for that specific budget area. This article will explain the various actions that are available on the worksheet. We recommend utilizing the Budget Widget to update lines within the worksheet.
The following assumes that you are on the Worksheet screen and the worksheet is unlocked. If you aren't sure how to get there, review the Planner Worksheets article.
Budget Worksheet Anatomy
Worksheet Header - Displays the budget selected, which worksheet is being viewed, whether the worksheet is locked or not, and the Worksheet Actions menu.
Worksheet Tabs - These tabs are available at the top of the budget worksheet. They allow for switching between the Worksheet, Stats (if applicable), Attachments, Approvals, and Activity Log tabs.
- Worksheet - Changes to the worksheet are made here.
- Stats - View stat accounts for this worksheet.
- Attachments - Attach any supporting documentation for this worksheet.
- Approvals - Manager the owner, approvers, and levels for this worksheet.
- Activity Log - View the Martus activity pertaining to this worksheet. View the Admin Reports > Activity Log for the full log.

Worksheet Options - Options to hide or show reference data, change reference data, filter the worksheet by dimensions and/or accounts or by line source, refresh the worksheet, and the Line Actions menu. Select an Account Category to automatically display only the associated lines. Clear all filters using Clear Filters.

Reference Data - Select to display the reference data sections (with headers in light blue). This will show all actuals and/or budget amounts based on the reference data chosen. It will be organized into sections by Income, Cost of Goods, Expense, Other Income, and Other Expense as applicable.
- Note: Amounts in blue represent actuals and are drillable (if you have permission to drill into the account), whereas budget amounts will show in black.

Budgeting Area - All lines are organized into sections by Income, Cost of Goods, Expense, Other Income, and Other Expense as applicable.

Some budget lines will show special icons for specific reasons.
- A blue widget icon indicates the presence of a Note on at least one month's amount.
- A box with an arrow out indicates the line is coming from an SPW. Amounts on this line cannot be changed in the worksheet. Use Filter Line Type to show only SPW lines in the worksheet.
- Lines posted from a personnel budgeting scenario are noted, and can be changed in the worksheet.
- Lines posted from a personnel budgeting scenario allocation are not specifically noted, and can be changed in the worksheet.


Reference Data
By default, the reference data is hidden. However, it can be viewed in two places.
- Reference Section
- Click View Reference Data? to view all reference data related to this worksheet. This setting is sticky and will stay set until the user unselects it.

- You can choose which reference data to view via the drop-down menu. Budget data will source from the default Dashboard budget for that year.

- When referencing the budget in your data, the budget shown is the budget that is set as the Dashboard default for that year.
- Click the blue links to drill into transaction detail (with the appropriate permissions).
- Click View Reference Data? to view all reference data related to this worksheet. This setting is sticky and will stay set until the user unselects it.
- Line Reference
- Navigate to a line.
- Click > (carrot icon) to expand the reference data box.

- Click the blue link to drill into the transaction detail (with the appropriate permissions).
Worksheet Actions
Worksheet Actions - Step-by-Step
Within the worksheet, there are actions available that affect the entire worksheet. See below for the definition of each option in this menu.
- Click Worksheet Actions.
- Click the appropriate option. A greyed-out option indicates it is not available.
- Some actions may require more data to be provided.
Worksheet Actions - Definitions
- Load - This option will take into consideration all lines in the reference data and load any lines that are currently in the reference data but not in the budget. This is an easy way to add any missing lines to a worksheet.
- Initialize - Add the values from the budget or actuals and apply the amounts to each line.
- Zero Out Worksheet - Remove all values from the worksheet. Use with caution - there is no undo. Only available as a Worksheet Action.
- Round - Round all amounts to the nearest 1, 10, 100, or 1000 dollars. Use with caution - there is no undo.
- Submit and Lock - Lock the worksheet and initiate the approval process.
- Unlock - Unlock the worksheet to allow editing.
- Create Special Purpose Worksheet - Create a new Worksheet Special Purpose Worksheet (WSPW) that is tied to this specific budget worksheet. (Only available until a Special Purpose Worksheet is created.)
- Edit Special Purpose Worksheet - Open the Worksheet Special Purpose Worksheet (WSPW) associated with this worksheet (Only available after a Special Purpose Worksheet - SPW - is created).
- Post [#] Applicable SPW - Post any applicable SPW budget lines to the worksheet.
- Show Applicable SPWs - Show all Global and Worksheet Special Purpose Worksheets that are tied to this worksheet (Only available after a Special Purpose Worksheet is created).
- Note: Only those with access to Global Special Purpose Worksheets (GSPWs) will see the GSPWs based on permissions and dimension restrictions.
- Export Worksheet (xlsx) - Exports the worksheet in an Excel format that can be re-imported.
- Import Worksheet (xlsx) - Imports the worksheet assuming the format is the same as the export.
Line Actions
Line Actions - Step-by-Step
Within the worksheet, there are actions available that can affect one or more lines. See below for the definition of each option in this menu.
- Select one or more lines.
- Click Line Actions.
- Click the appropriate action. A greyed-out option indicates it is not available.
- Some actions may require more data to be provided.
Line Actions - Definitions
Line actions will affect any selected line or lines.
- Add Line - Allows a user to add a line to the worksheet if it does not yet exist.
- Initialize - Add the values from the budget or actuals and apply the amounts to each line selected.
- Adjust Amounts - Allows a user to change the current amounts by month with a percentage increase or decrease.
- Burn Rate - Select the Source to use. Click Preview to see the results before applying your changes. The Burn Rate is calculated by taking the average of the months being sourced. This average is then applied to the remaining open months that do not have a value or are not frozen.
- Move Line - Use this feature to summarize all selected lines into a target line. The target must be one of the selected lines. The action applies to all non-frozen months. Use with caution - there is no undo.
- Round - This will round all amounts to the nearest 1, 10, 100, or 1000 dollars. Use with caution - there is no undo.
- Flat to Budget - Updates the budgeted amounts in unfrozen months so that the total of all months on the budget line equals the corresponding line in the reference data. Budget amounts may be increased or decreased to accomplish this. If there is no corresponding reference line, or if the change would reduce any budget amount to less than zero, the budget amounts are reduced to zero to get as close as possible to the reference budget value. This option will be greyed out unless the budget has at least one frozen month as it is only available on frozen budgets.
- Change Dimensions - Utilized within systems that have line dimensions configured. This will allow the user to associate a different line dimension with the budget line.
- Delete Lines - Deletes the selected lines. Use with caution - there is no undo. Lines must be added back via the Load or Add Line options.
For more detailed descriptions, you can select the blue question marks in Martus from within the budget worksheet next to Worksheet Actions and Line Actions.
Use the links below to navigate through the learning path.
Planner Worksheets << Budgeting Basics - Learning Path >> The Budget Widget
The Budget Widget (Video)
The Budget Widget simplifies budgeting by doing the math for you! Whether you need to adjust your budget to a flat amount or by a percentage, the Budget Widget makes it easy. The Budget Widget is available on all unlocked worksheet lines unless they are controlled by a Special Purpose Worksheet. If you need to fill out your budget worksheet, using the Budget Widget is best practice for updating your budget lines.You can use the step by step instructions on how to use the Budget Widget to do the work of budgeting.
Select a calculation method from the Adjustment Type dropdown and enter the requested information. Then, click Preview to perform the calculation and display the results for each month. A total for the year is located at the bottom of the list of months. Enter Notes on any month and copy to additional months. Once you are ready to post the results of your selections, click Save.
Alternatively, you can choose to Paste from Excel. Values are copied from Excel into all months of a year.
Data can be pasted per these rules:
- Frozen months are ignored.
- The values in the clipboard must be Tab or Enter separated (i.e., a horizontal or vertical selection from Excel).
- Pasting always starts in the first month.
- If there are more than 12 values in the selection to be pasted, only the first 12 will be used.
- If there are fewer than 12 values, all values will be used, and remaining months are untouched.
You may also choose to use CTRL-V to paste the values from any month forward by clicking in the starting month desired.
Notes on Pasting:
- If you are using Chrome, the first time you paste, you will be prompted via a pop up in the top left of the browser to allow pasting into Chrome, ensure to enable this. If you do not see the pop-up and Martus isn't allowing ypasteo past look for a clipboard symbol to the right of your search bar, click that and then tell Chrom to enable pasting.
- If you are in Firefox, you may need to click the Paste button twice.
Each Adjustment Type is detailed below, following the step-by-step instructions.
Using the Budget Widget - Step by Step
- Select an unlocked worksheet to edit.
- Click the Budget Widget button on the worksheet line.

- From the Budget Widget window, adjust amounts as needed. Adjust the monthly amounts manually, use Paste from Excel, or use the Adjustment Type dropdown. (See below for a detailed explanation of each option).
- If you used an Adjustment Type to create values, click on Preview to see the results without committing to them just yet.
- Add any Notes as needed.
- Click Save to post your amounts and Notes back to the worksheet line.

Budget Widget Options: Weekly, Bi-weekly, Monthly, Quarterly, and Annual
Weekly, Bi-weekly, Monthly, and Quarterly spread a rate across a year with the indicated frequency.
- Monthly totals corresponding to that rate are automatically calculated for the entire fiscal year.
- Annual divides the specified rate by 12 to determine the monthly value.
- Optional: For Monthly, Quarterly, Annual, and Adjust choices, specify a starting month.
- Optional: For Weekly and Bi-weekly, specify a starting day of the week and/or month.
- If a starting month is specified, the calculations do not affect existing amounts for previous months.
- Regardless of whether a starting month is specified for an Annual amount, the monthly rate is one-twelfth of the annual amount.
Examples of Weekly, Bi-weekly, Monthly, Quarterly, and Annual
- Weekly - Enter the starting date and the amount. Martus will calculate the weekly amount taking into consideration the months with five weeks.

- Bi-Weekly - Enter the starting date and the amount. Martus will calculate the bi-weekly amount taking into consideration the months with 3 bi-weekly dates.

- Monthly - Enter the starting and ending months and the amount. Martus will update every month within the date range with that value. Note: It will not adjust other months' values.

- Quarterly - Enter the starting and ending months and the amount. Martus will update one month every 3 months with that value.

- Annual - Enter the starting and ending months and the amount. Martus will divide the amount evenly between the months selected, with remaining pennies in the last month.

Budget Widget Options: Adjust and Additional Amounts
Adjust and Additional Amounts are two different ways to modify the currently-budgeted monthly values for this line item.
- Adjust up or down by a percentage (100% keeps the amounts the same).
- Enter an Additional Amount (specified per month) to be added or subtracted. Use a negative number to reduce the budget amount.
- Optional for Adjust, specify a starting month to apply the adjustment beginning with that month.
Examples of Adjust and Additional Amounts
- Adjust - Enter the starting and ending months, and a value with which to adjust amounts. Martus will adjust the values that are currently on the line by the percentage input. For example, an input of 105 will increase the amounts by 5%. An input of 95 will decrease amounts by 5%.

- Additional Amounts - Enter an amount for each month as appropriate. Martus will add this amount to the current amounts.

Budget Widget Options: Allocation, Burn Rate and Copy Existing Values
Allocation, Burn Rate and Copy Existing Values reset the budgeted values based on the selected source budget and/or actuals. Your options include the current year, the prior year, and the trailing 12 months of actuals. The budget source is the default Dashboard budget for the specified year.
- Allocation spreads an annual total in proportion to the values in your source to the new monthly budget amounts. Any leftover pennies are included in the last month of the budget year.
- Burn Rate calculates the average of the months being sourced and places that into available months that do not have a value or are not frozen. Months with no source selected are ignored in the calculation.
- Copy Existing Values sets the new monthly budget amounts equal to the source.
Examples of Allocation, Burn Rate, and Copy Existing Values
- Allocation - Enter an amount and choose a source (actuals and/or budget) for each month. Each month's total will be compared to the original total of the reference data (4,365.00) to provide a percentage per month. That percentage is then calculated against the amount indicated (5,000.00) and the monthly amounts are displayed.

- Copy Existing Values - Enter an adjustment value and choose which reference data to use per month. Martus will utilize the appropriate data and adjust it by the adjustment value as appropriate.

- Burn Rate - This option will take the total of the months sourced (3,450.96) and divide it by the total months sourced (5) and apply that calculated average to all unfrozen months (690.19).

Budget Widget Option: Reforecast Line
Reforecast Line is used to adjust the remaining budget according to the actuals loaded. New values equal the New Budget Total less Actuals divided by the count of remaining unfrozen months.

Budget Widget Option: Custom Spread
Select the Spread, the type of spread, and either Total or Rate. Custom Spreads are created in Setup > Calendar > Custom Spreads by a Martus Admin.
- Total - Select a Source for the total Amount, or manually enter the total Amount to be distributed evenly across the months, based on the Spread selected. Note: Selecting a Source is not available in the SPW widget because there is no direct tie to actuals or budget data.
- Rate - Enter the Amount for each month, based on the Spread selected.

Use the links below to navigate through the learning path.
The Budget Worksheet << Budget Basics - Learning Path >> Budget Reporting - Planner SummaryBudget Reporting - Planner Summary
The Planner Summary is the reporting tool for the budgets you create in Martus. It provides very flexible filtering and view options. This article considers the basic steps for viewing, adjusting and exporting the various reports, as well as an overview of what each report shows.
Anatomy of the Planner > Summary Page
Report Selector - Select a report from the Select Report dropdown, and wait for the selected report to load before proceeding.
Report Criteria - Once you have changed the report criteria, click Load to apply the changes. Note that any changes to the report criteria will be sticky as you move from report to report. For example, if you have a filter applied in one report, when navigating to another report, that same filter will be applied until you change it.
The most utilized options include:
- Year - Specify the year for the report.
- Budget - This is set to the default Planner budget for the chosen Year. If you have permissions in Martus to view more than the default Planner budget, you will see other budgets in this drop-down if they exist for the year in scope.
- Rows - Group rows by other options such as viewing the rows by a dimension rather than by account.
- Columns - Group columns in different ways such as other date groupings or by dimension.
- Dimension filters - These are unique to your system configuration. In the example below, we have Corporation, Department, and Project-Grant.
- Account Category - Select the desired account grouping.
- Export (xlsx) & Export (pdf) - Export the report in either Excel or PDF format.

Planner Summary Reports Descriptions
- Planner Summary - An overview of the budget by month. Set the rows or columns as needed to display the data differently. If the rows are set to Account, you can click on the link to review all worksheets utilizing that Account.
- Budget Analysis - Will compare the current year Planner budget, the previous year Dashboard budget, and actuals. Set the rows to Accounts or Dimensions. Note: For this report to work, you must have two budgets in adjacent years.
- Prior Year Budget Comparison - Displays a column per month of the current year's budget, last year's total budget, and a comparison column. Rows can only be set to Accounts.
- Side-by-Side Budget and Actuals Comparison - Allows a user to pick multiple budgets and/or actuals and compare them. Can set the rows to Accounts or Dimensions and hide or display the Difference columns.
- Planner Summary by Worksheet in Excel - Will export the entire budget to Excel with a sheet per Planner Worksheet.
Frequently Asked Questions
- Is there a report that will include all budget line notes from all worksheets?
Yes - At the bottom of the Planner Summary report is the Detailed Budget Analysis Report. Choose an optional Dimension to sub-total by and click on "Detailed Budget Analysis Report" to create an export.
- Can I print reports?
Yes - You can print any report using the Export function to export the report to PDF or Excel. Then, print your report from within the desired program. - Departments are one of my dimensions. Can I see just a total row by department rather than income & expenses?
Yes - Utilize a report such as the Planner Summary and set the Rows to Department View or Department View Gain/Loss (you can replace "Department" with any dimension in your system). The Gain/Loss view will provide one line for the dimension selected, netting all Income, COGS, Expense, Other Income, and Other Expense into one line.
- Can I view more detail such as a hierarchy or second dimension?
Yes - Utilize a report such as Planner Summary. Set the rows to a Dimension and click Load. Then utilize the Expand or All Dimension buttons. Expand will show all parent/child relationships with sub-totals as well as the accounts under each section. All Dimensions will show all parent/child relationships. Example: Rows set to Department > Expand:
Use the link below to move through the Learning Path.
The Budget Widget << Budget Basics - Learning Path