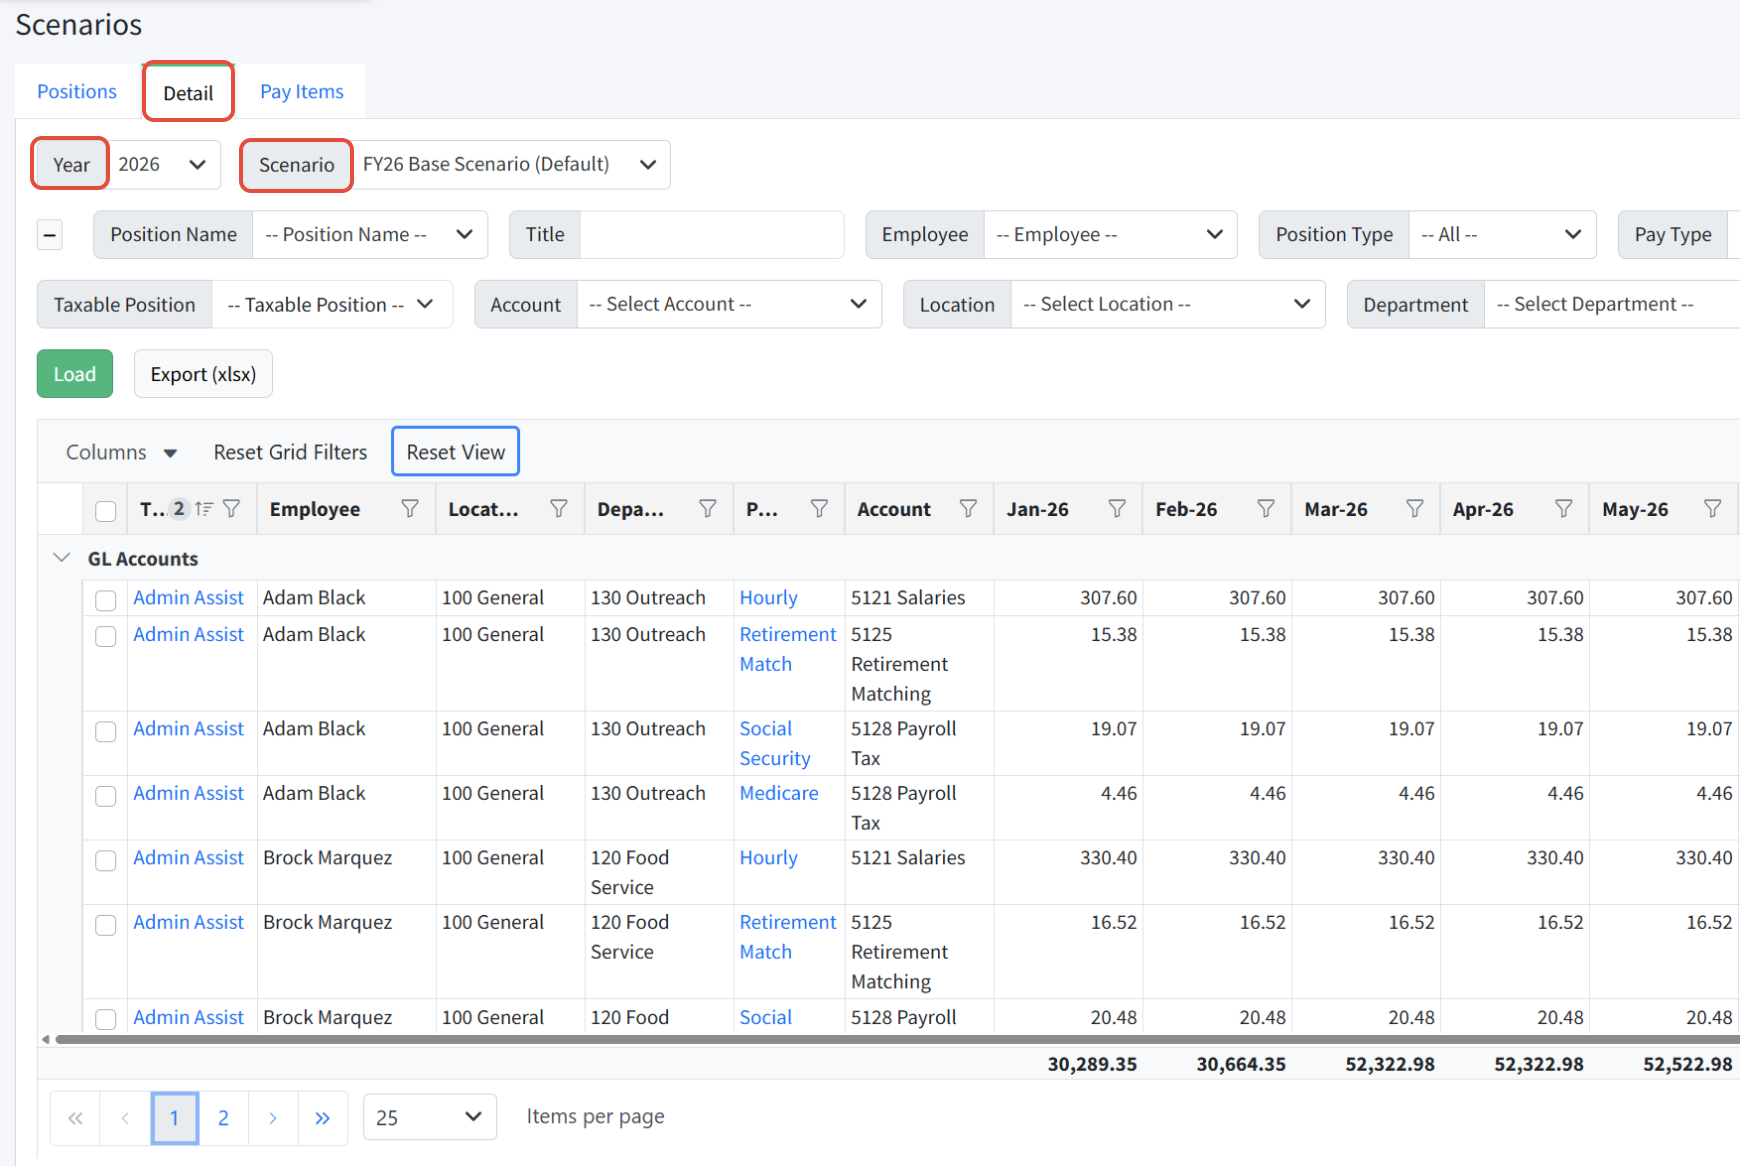
The Detail tab allows a user to review and adjust pay items. Each pay item, displayed as a row, is a specific pay type associated with a specific position. Each pay item row provides monthly and yearly totals.
Pay Items - All pay types associated with a position become pay items. Each pay item will be shown on the Detail tab.

Payroll Taxes - If utilizing the Config tab for calculating FICA, FICA amounts will not display on the Detail tab. Use the Positions and Pay tab to view FICA amounts instead.

Stat Accounts - If statistical accounts are in use, they are not included in totals with GL accounts. You can use the Pay Type criteria filter at the top to Show Pay Types with GL Accounts, with Stat Accounts, or choose to Show All Pay Types.

Overtime Pay Items - Mid-year adjustments made to Hourly pay items will not apply to Overtime pay items. Overtime pay items will always use the Hourly pay item base base rate.
Navigating the Detail Tab
The Detail tab is found in Personnel Budgeting > Scenarios. The scenario selected as the default in Personnel Budgeting > Scenario Setup is automatically loaded. You can change the Year and Scenario selected.
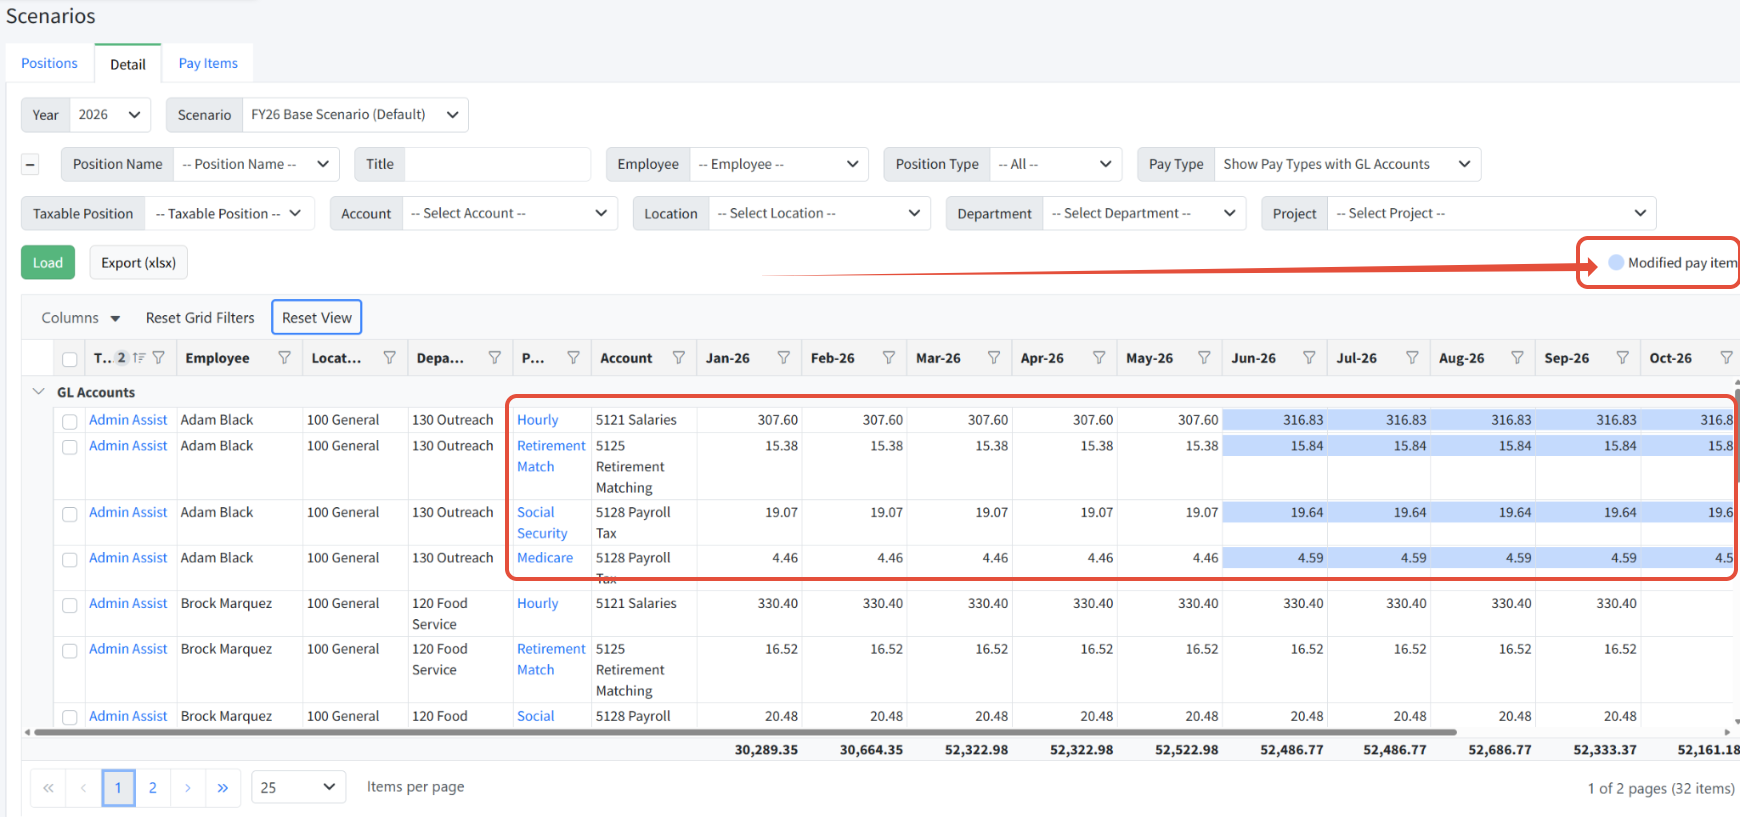
Modified Pay Items
When viewing the Detail screen, you may notice that some cells have been highlighted in blue. This indicates that a change has been made to that month, for that position and pay type, that does not match the base rate or amount for that pay item. This often occurs when a mid-year salary increase, health insurance rate adjustment, or bonus adjustment has been made. Any pay types dependent on the modified pay item will also show in blue. Making these types of adjustments to a scenario is covered in detail below.
Using Page Filters
Use page filters to filter available data. Always click Load after changing page filters.
- Position Name - Select a position name from the drop down. Position names are assigned by Martus based on the position Title.
- Title - Search position titles using key words or partial text.
- Employee - Select an employee to filter positions for that employee.
- Position Type - Filter by position type. Position types are customizable and set by the client. They are only used for reporting purposes.
- Pay Type - Select the pay types to display, either by specific pay type or by group:
- Show Pay Types with GL Accounts
- Show Pay Types with Stat Accounts
- Show All Pay Types
- Taxable Position - Filter to taxable (Yes) or non-taxable (No) positions.
- Account - Select an account to filter.
- Dimension Filters - Filter on dimensions in Martus.
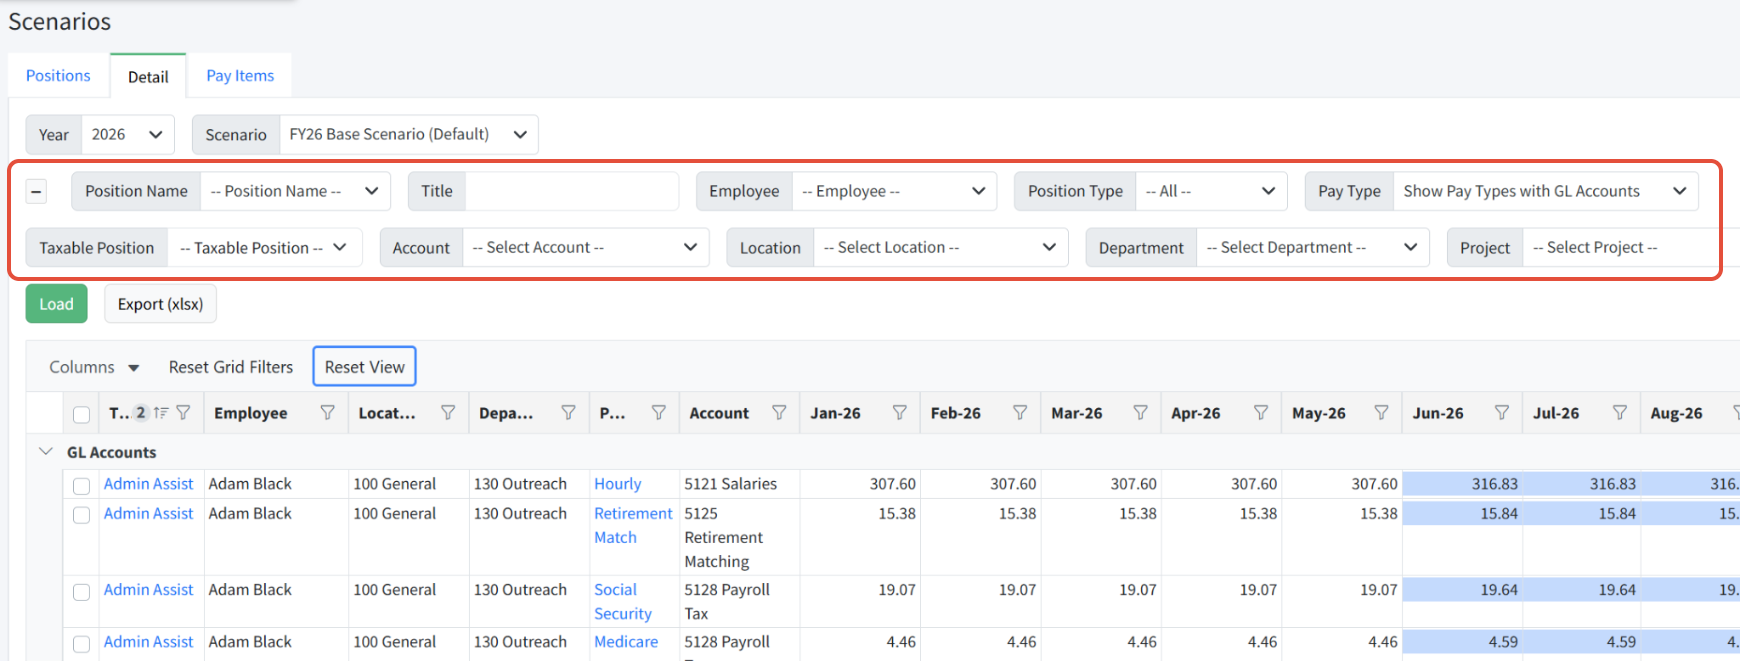
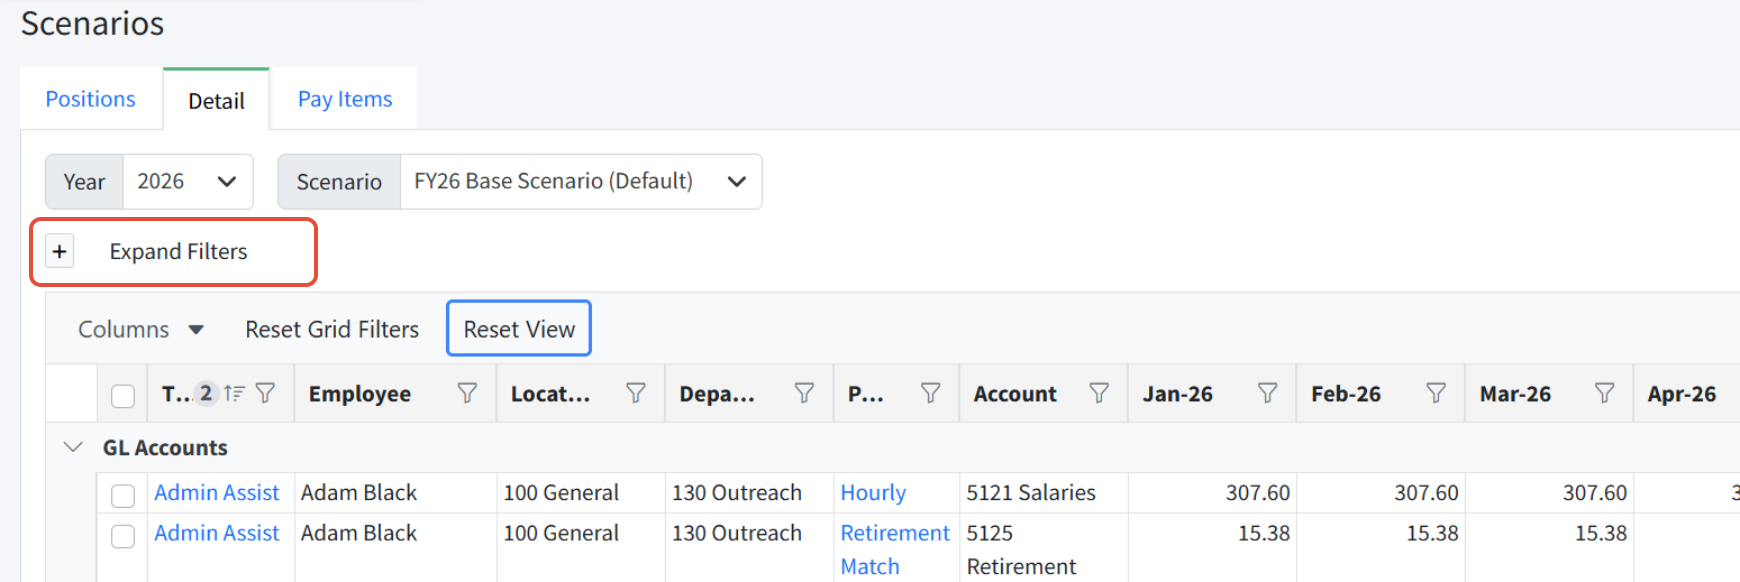
You can also hide the page filters by clicking on the - button in the upper left. Click + to expand the filters again.
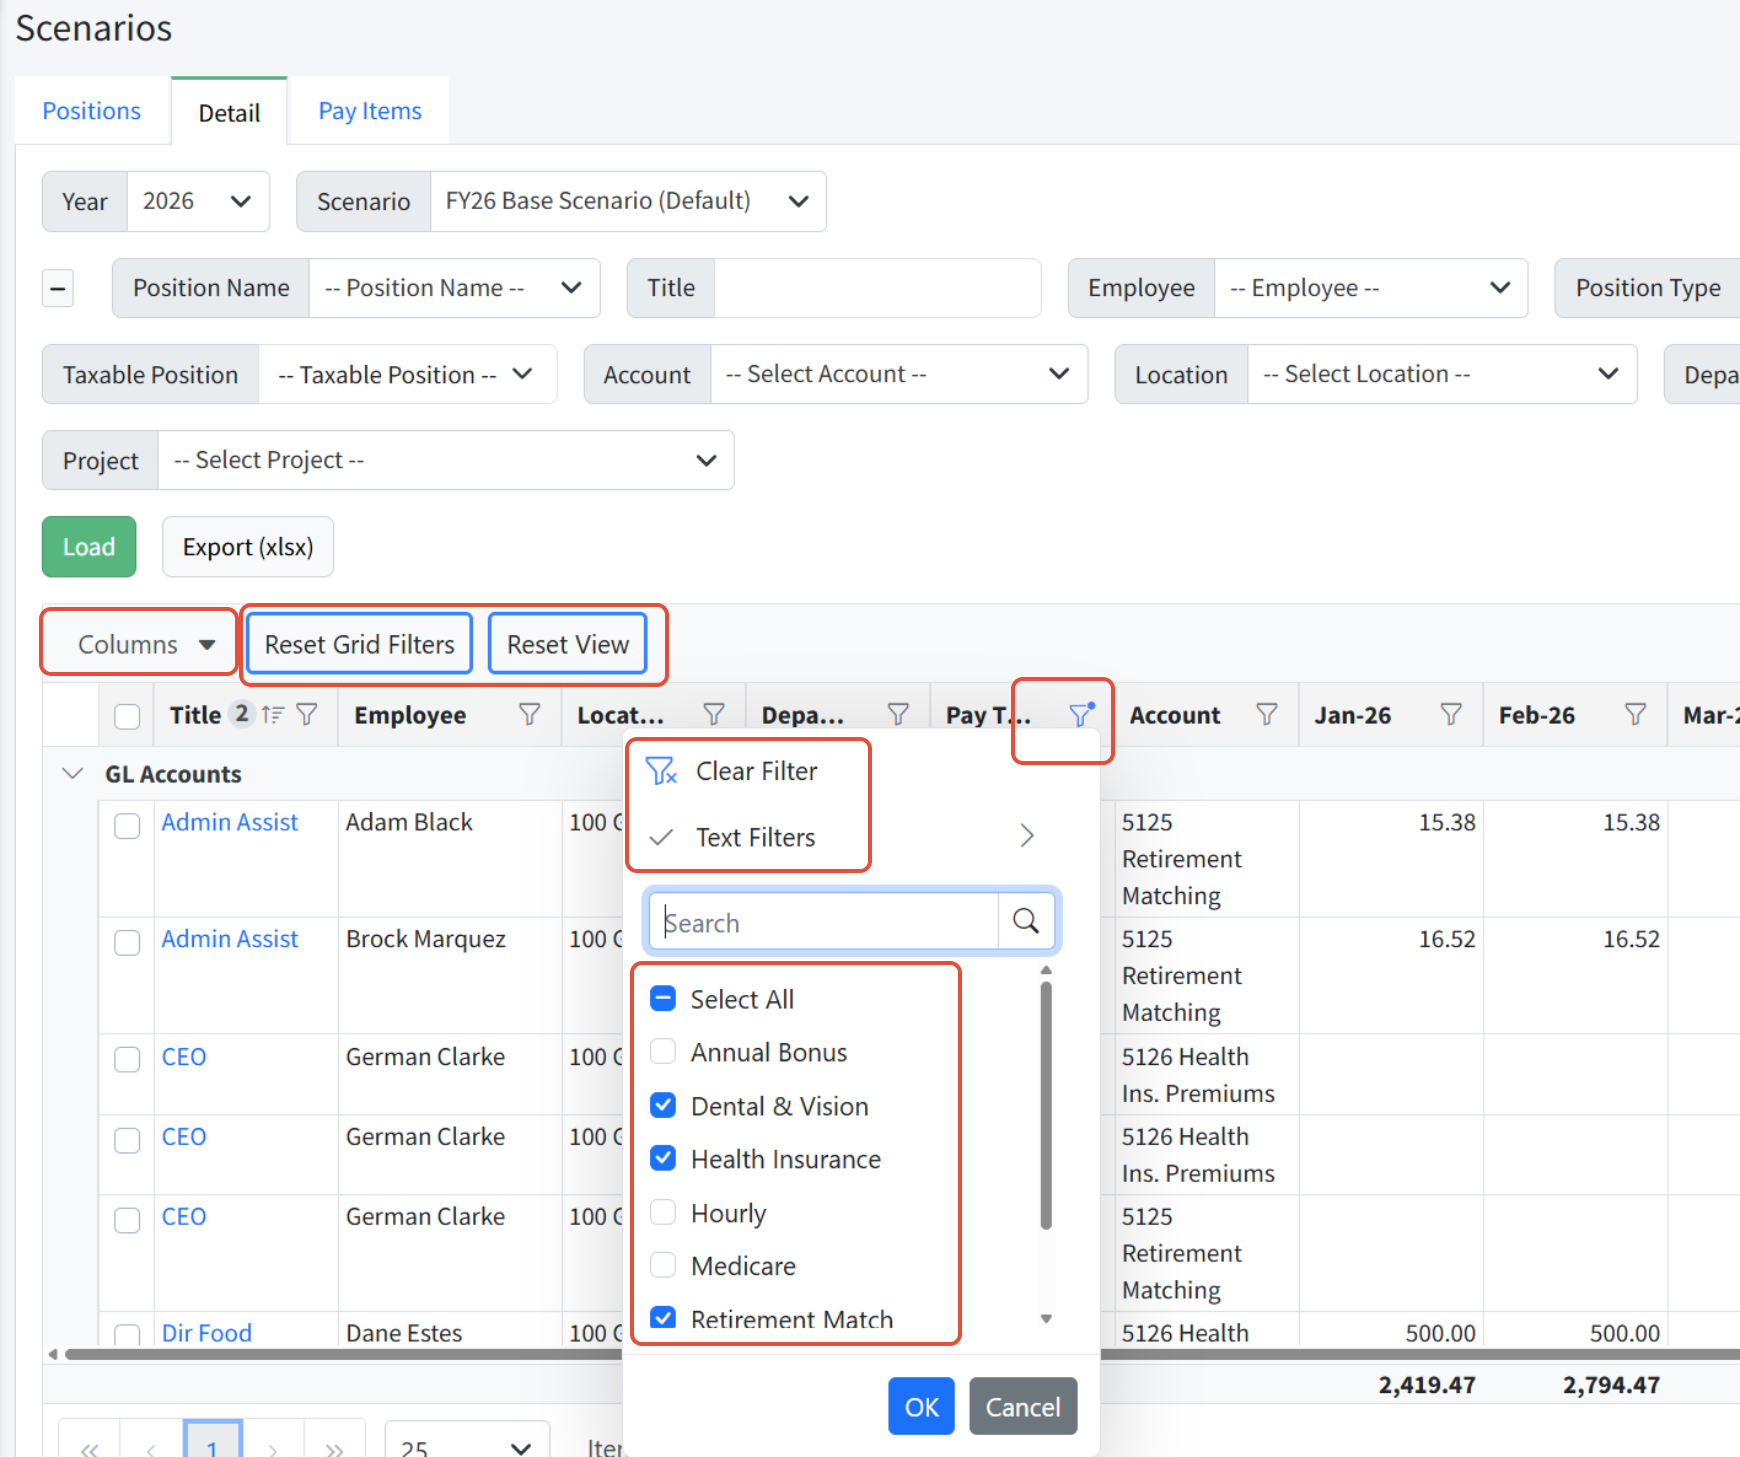
Using Grid Filters
Use grid filters on columns to filter to one or more values in one or more columns. You can drag and drop columns to rearrange the order, and click Columns to show or hide columns. Sort a single column by clicking in the column header. Sort by a second column by clicking CTRL-click in the second column.
- Columns - Show or hide columns.
- Reset Grid Filters - Remove filters currently set and see all data.
- Reset View - Restore columns and sorting and clear filters currently set.
- Filter - Click the filter icon to:
- select all, one, or more values
- click Clear Filter to clear the filters currently set
- click Text Filters to filter text using Equal, Not Equal, Starts With, Ends With, Contains, Does Not Contain, or Custom Filter options
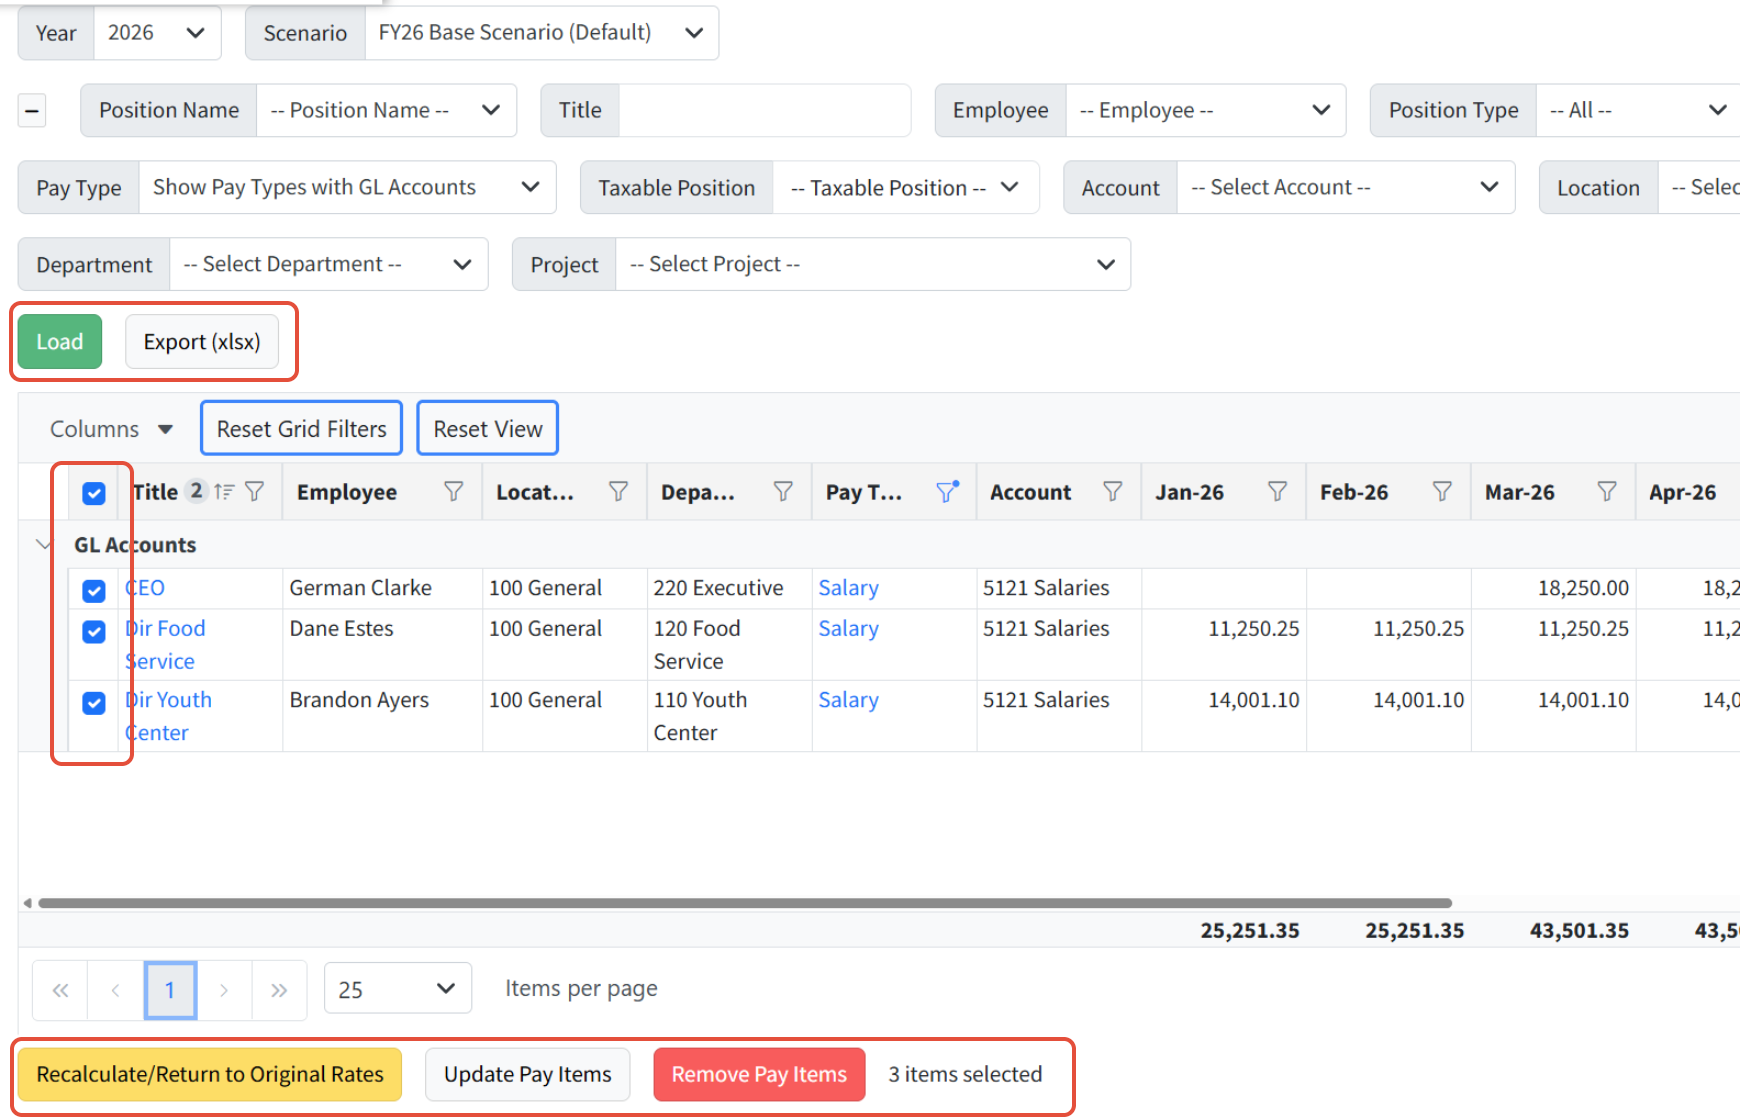
Page Actions
- Load - Load the filters and settings selected.
- Export (xlsx) - Export the view to Excel for review.
- Boxes - Select boxes to the left of a line to select that line, or click the top box to select all records in the view.
- Items per page - Use the option to scroll through pages or select the number of items per page to display.
- Recalculate/Return to Original Rates - Reset the selected lines to the pay type rate, or the pay item rate if the pay type does not have a default rate. Additional information below!
- Update Pay Items - Update the selected pay items. Additional information below!
- Remove Pay Items - Delete the selected pay items. Additional information below!
- Drilldown Links - Links in blue on the Details tab can be used to update additional data related to positions, employees, and pay items.
Managing Pay Items
There are many ways to update pay items on the Details tab.
- Recalculate/Return to Original Rates - If a change is made to the Annual Setup tab, Pay Types or Employees, Martus does not automatically apply that change to any scenario. Changes to employees or pay types must be pulled into the desired scenario using Recalculate/Return to Original Rates in the scenario for which you want the update(s) applied.
- Update Pay Items - Update pay items using one of two methods (described in detail below):
- Fiscal Month Range/Anniversary
- Custom Spread
Pay items are typically adjusted within a scenario using a new set of assumptions. For example, salary and hourly pay items could be recalculated with a 3% COLA. Any pay item can be modified for any portion of the year.
- Remove Pay Items - Select one or more rows and click Remove Pay Items to permanently remove them from the corresponding positions in this scenario. Other scenarios are not impacted.
- Pay Type drilldown link - Make full-year changes to a pay item's Hours Per Pay Period and/or Starting Rate/Amount. For example, if an employee's rate of pay changes at the start of the budget year, make the change directly to the pay item by clicking the pay type drilldown link and updating the Starting Rate as shown below.

Recalculate/Return to Original Rates
Use this method whenever a change has been made to the Annual Setup tab, or to Pay Types or Employees records, and the scenario should be updated with the new information. This can also used to reverse previous updates made using the Update Pay Items option and reset the pay item to the original settings.
- Filter to the appropriate pay types.
- Select all appropriate rows using the boxes on the left.
- Click Recalculate/Return to Original Rates.
Update Pay Items by Fiscal Month Range/Anniversary
Use this method whenever a pay item should be updated mid-year, for example, a pay increase, or if an organization is preparing alternate scenarios. This method is best for COLA scenarios or for pay types for insurance rates that increase mid-year.
- Filter to the appropriate pay types.
- Select all appropriate rows using the boxes on the left.
- Click Update Pay Items.

- Choose the type of Update:
- Fiscal Month Range - Apply the increase/decrease to all months or a specific month range.
- Anniversary - Apply the increase/decrease to the position based on the employee's anniversary date. This requires that the position be associated with an employee and that the employee has the Anniversary Date set in Personnel Budgeting > Personnel Budgeting Setup > Employees.
- Enter the Amount Type (Non Percentage Pay Type) to use as the increase/decrease to be applied to any pay type that is not based on a percentage.
- Flat - Enter the total amount to be added or removed per pay period based on the frequency of the pay type.
- Percent* - The total percentage increase/decrease to be applied per month.
- Enter the Amount Value, the flat dollar amount or percent that should be applied.
- Click Update and verify the changes are correct.
*NOTE: When a pay type has a default value, and you set the amount back to 0 -- by using a multiplier of -100% -- it will see the 0 and use the default value. The way around this, and to remove the remaining pennies, is to use -99.9999%. That will set the amounts to a very low value that won't be added to the columns.
Update Pay Items Using a Custom Spread
Apply a custom spread to an existing pay item, where the monthly compensation for the position has already been set. A custom spread is then applied to the calculated full year Starting Rate of the existing pay item to achieve the spread specified. You can find specific examples here: Custom Spread Examples in Personnel Budgeting.
NOTE: When a position or pay type has a start date after the 1st of the month, applying a custom spread will clear out the starting month value on the Detail tab. That month will not be included in custom spread calculations.
- Filter to the appropriate pay types.
- Select all appropriate rows using the boxes on the left.
- Click Update Pay Items.
- Change to the Custom Spread tab.
- Select the Spread from the dropdown that you would like to apply. (Custom Budget Spreads are created by an Admin in Setup > Calendar > Custom Spreads.)
- Click Preview to view up to the first 10 lines to be adjusted.
- Click Apply to apply the custom spread as is.
- Click Cancel to not make any changes to the pay items.

Example Use Case: In the example below, the salary pay type starting rate is $10,000. The frequency is monthly. The custom spread is 1 every other month. Therefore the total salary of $120,000 (10k X 12) is now spread out every other month as $20,000.

Note: If you need to apply mid-year adjustments, apply the custom spread FIRST, and then the adjustment. If you do the adjustment first, the custom spread takes the new total and allocates it by ratios over the whole year. So the order in which the adjustments are done is important!
Remove Pay Items
Use this method whenever a pay item should no longer be associated with a position. This does not remove the pay type from the Personnel Budgeting > Personnel Budgeting Setup > Pay Types page; rather, it only deletes the selected pay items within the selected scenario. Note that there is no option to reverse deleted pay items - the pay items need to be re-added by editing the position or via import.
- Filter to the appropriate pay types.
- Select all appropriate rows.
- Click Remove Pay Items.
- Click Ok to confirm.
Notes
- If the Detail tab has rows but no amounts in the columns, select all the rows and click Recalculate/Return to Original Rates. This normally occurs because the pay items have been imported or copied and there was an error causing them to be created but not populated with the appropriate values.
Was this article helpful?
That’s Great!
Thank you for your feedback
Sorry! We couldn't be helpful
Thank you for your feedback
Feedback sent
We appreciate your effort and will try to fix the article