Building a Scenario - Learning Path
Personnel Budgeting Introduction (Video)
Martus' Personnel Budgeting allows for budgeting by position across the organization. Personnel scenarios are built and then pushed to the planner budget when desired. The goal of a scenario is to hold the various assumptions or predictions about the personnel costs for an organization. With multiple scenarios, it is possible to post them to their own scenario budgets and compare them. For example, an organization may want to compare a base scenario to a 3% cola increase, or this year's personnel costs to last year's.
Personnel Scenarios
Each scenario is comprised of a set of positions, the configuration settings for that fiscal/calendar year, and an optional allocation.
- Positions - Personnel scenarios are position-based. Each position is a combination of the following:
- Title - The position title such as Communications Director or Controller.
- Employee - The person who holds this position (this is optional). The employee record consists of:
- Employee Name (First and Last) - The name of the employee.
- Payroll System ID - Used to cross reference Martus with a payroll system for easier import/export functions.
- Anniversary Date - The employee hire date (mm/yyyy), which may be used in calculations on pay types based on the number of months employed.
- Coverages - Used with pay types to determine rates for pay types with tiers such as medical insurance, dental and vision.
- Dimensions - The area of the organization to which this position will be budgeted.
- Pay Items - The various forms of compensation budgeted for this employee. Any pay type can be added to the position. Pay types are organization-specific. Common pay types are:
- Salary pay
- Hourly pay
- Bonus
- Medical insurance
- Dental/vision insurance
- 401k matching
- Cell phone reimbursement
- Annual Setup - Configuration settings on the Annual Setup tab control high-level personnel budgeting information such as the first payroll date of the year and payroll tax information.
- Allocations - Allocations are an optional component applied to the scenario to distribute pay items for various positions across multiple dimensions, such as when an individual salary is split across two departments.
Building a Scenario - Learning Path
To set up Personnel in Martus, follow this learning path. Personnel scenarios are built on positions. Since a position is a combination of title, employee, dimension and pay items, the Pay Types and Employees must exist before building the scenario. To walk through building a scenario, continue on the "Building a Scenario" learning path.
- Scenario Setup
- Personnel Budgeting Setup > Annual Setup
- Personnel Budgeting Setup > Pay Types
- Personnel Budgeting Setup > Employees
- Personnel Budgeting > Position Types
- Export/Import Employees & Positions
- Export/Import Pay Items
- Allocations
- Reports
- Summary (Post to Budget)

Use the link below to navigate through the learning path.
Building a Scenario - Learning Path >> Scenario SetupScenario Setup (Video)
In Personnel Budgeting > Scenario Setup, Admin users manage the various scenarios within their organization. All scenarios use the same employees, pay types, position types, and coverages. Scenarios may have unique positions, pay items, and allocations, however.
Creating a New Scenario
A new scenario will have no positions associated.
- Go to Personnel Budgeting> Scenario Setup > Scenario Management.
- Ensure the correct Year is selected.
- Click Create Scenario.
- Give the scenario a Name.
- Choose the Method. Select Empty to create a new, empty scenario.
- Add Comments for the scenario if desired.
- Click Save.
Copying an Existing Scenario
Scenarios can be copied from any year. A copied scenario will contain the same positions. For more details on starting a new year in Personnel, click here.
- Go to Personnel Budgeting> Scenario Setup > Scenario Management.
- Ensure the correct Year is selected.
- Click Create Scenario.
- Give the scenario a Name.
- Choose the Method. Select Copy Scenario to copy an existing scenario from any year. Select the Year and Source Scenario from the dropdowns. Check to Include Monthly Details if you want to carry forward mid-year adjustments to pay item rates.
- Add Comments for the scenario if desired.
- Click Save.
Setting a Scenario as the Default, and Locking or Deleting Scenarios
- Go to Personnel Budgeting > Scenario Setup > Scenario Management.
- Click the box on the scenario line to the left to show the action menu.
- Click Set as Default to make this the default scenario, viewable by non-admins with Personnel Budgeting permissions.
- Click Lock to lock the scenario and prevent changes by any user.
- Click Delete to permanently delete the scenario from Martus. Note you cannot delete a scenario set as the default.
- Click Okay.
Edit a Scenario Name or Comments
- Click the pencil to Edit the appropriate scenario.
- Edit the Name and or Comments.
- Click Save.
Managing Scenario Imports
There are two files that can be utilized within Personnel. The Pay Data File export/import allows for exporting, updating and re-importing large amounts of data, specifically employees and positions. The Pay Item Grid allows for updates to pay times based on existing positions.
Use the links below to navigate through the learning path.
Personnel Budgeting Introduction << Building a Scenario - Learning Path >> Annual Setup
Annual Setup (Video)
The Annual Setup tab controls several settings for all scenarios within a fiscal year.
Information within the Annual Setup tab does not copy from one budget year to the next, and should be filled out as appropriate each year.
Annual Setup Settings
- First payroll date in fiscal year (for weekly pay types) - Set for weekly pay types, if needed. The date selected will determine which months contain four pay periods and which will contain five pay periods. Set this to whatever date you recognize as the pay date in your accounting system so that Martus will match the actuals you enter.
- First payroll date in fiscal year (for bi-weekly pay types) - Set for bi-weekly pay types, if needed. The date selected will determine which months contain two pay periods and which will contain three pay periods. Set this to whatever date you recognize as the pay date in your accounting system so that Martus will match the actuals you enter.
- FICA Rate - Set the FICA tax rate. This is the percentage of all Is Taxable pay types assigned to a position. If you have different GL accounts for Medicare/Social Security or if you use the Social Security annual cap leave this blank.
- FICA Account - The account that will be utilized for budgeting FICA tax. If you have different GL accounts for Medicare/Social Security or if you use the Social Security annual cap leave this blank.
- Monthly Hours per FTE - This is the number of hours used in various reports to calculate the total hours per month a position works. The Allocation Analysis and FTE reports assign hours per this value. When set to 173.33, each full time position will be calculated at 173.33 or 40 hours per week. Use the following calculation to set this:
[Hours per week] * 52 / 12

Setting the Personnel Budgeting Year
To set the Personnel Budgeting Year, select the year from the dropdown and click Click here to set XXXX as Personnel Budgeting Year. This will become the default year in Personnel Budgeting.

Use the links below to navigate through the learning path.
Scenario Setup << Building a Scenario - Learning Path >> Pay Types
Pay Types (Video)
Pay Types represent each form of compensation that you want to budget on a per-position basis. Pay types are applied to positions as appropriate. For example, some positions may include salary, medical insurance, 401k matching and FICA pay types, while other positions may only include hourly pay and FICA pay types.
Pay Types & Pay Items
Pay types are defined at the organizational level and are applied individually at the position level. When applied to a position, a pay item is created to control the details of that Pay Type/Position relationship. For example, while many positions may use a salary pay type, each pay item will hold the salary amount for that specific position.
Common Pay Types
Some common forms of compensation include:
- Hourly pay
- Salary pay
- Overtime pay
- Year-end bonus
- Anniversary bonus
- Health insurance
- Cellphone reimbursement
- Employer’s retirement contribution
- FICA
- Worker's comp
- Life insurance
- STD & LTD
- Housing allowance
The Pay Types Tab
Navigate to Personnel Budgeting > Personnel Budgeting Setup > Pay Types. The Pay Types tab provides an overview of all pay types as well as key details.
Pay Types Page Actions
- Add New Pay Type - Click to add a new pay type.
- Export (xlsx) - Click to export the list of pay types to Excel for viewing.
- Drag and Drop - Use the grab (domino) icon to re-order pay types. This is helpful when viewing the Scenarios > Pay Items tab, which shows each pay type as a column.
- Edit (pencil icon) - Click the pencil icon to edit an existing pay type.

The Pay Type Record
Each pay type is defined by the following fields, some of which present based on other options selected.
- Name - The unique name for this pay type.
- Account - The account associated with this pay type. Statistical accounts can be assigned to pay types in order to calculate statistical costs. Examples include square footage occupied, number of FTEs represented, etc. Pay types using statistical accounts must be Non-Taxable.
- Tax - The taxable status of this pay type.
- Taxable - Pay types subject to regular employer payroll taxes. This applies only to taxes calculated on the basis of the Config setting (in other words, if the FICA rate is defined on the Config screen).
- Non-Taxable - Pay types that are never subject to employer payroll taxes, including certain health benefits, retirement contribution matching, housing allowances, and salaries for clergy. This applies only to taxes calculated on the basis of the Config setting (in other words, if the FICA rate is defined on the Config screen).
- Is Tax - Used to budget for payroll taxes. The pay types subject to this tax must be specified as "Source Pay Types" below. Amounts calculated by these pay types can be included and excluded from the scenario's Summary screen with the Show Taxes checkbox.
- Taxable - Pay types subject to regular employer payroll taxes. This applies only to taxes calculated on the basis of the Config setting (in other words, if the FICA rate is defined on the Config screen).

- Category - The way the pay type will be calculated.
- Regular - Martus will multiply the Regular Amount (a default in the pay type or the amount specified in the pay item) by the Frequency.
- Hourly - Martus will multiply the Hourly Amount (a default in the pay type or the amount specified in the pay item) by the Hours Per Pay Period (specified in the pay item) by the Frequency.
- Percentage - Martus will use the percentages specified and the Source Pay Types. Percentage requires additional information.
- Overtime - Martus will multiple the hourly rate on the position, by the percentage indicated, by the hours per pay period on the position. NOTE: This should only be used with Hourly pay types. NOTE: Mid-year adjustments made to Hourly pay types will not apply to Overtime pay types. Overtime pay types will always use the Hourly base rate.

- Frequency - How often the pay type will be calculated.
- Monthly - The amount entered is a full monthly amount, whether using the default Regular Amount on the pay type or the specific amount on the pay item.
- Semi-Monthly - The amount entered is a half the monthly amount, whether using the default Regular Amount on the pay type or the specific amount on the pay item.
- Bi-Weekly - The amount entered is a bi-weekly amount, whether using the default Regular Amount on the pay type or the specific amount on the pay item. Martus will use the bi-weekly start date on the scenario's Config tab to determine which months will have two periods and which will have three.
- Weekly - The amount entered is a weekly amount, whether using the default Regular Amount on the pay type or the specific amount on the pay item. Martus will use the weekly start date on the scenario's Config tab to determine which months will have four periods and which will have five.
- Once - Use the Start Date to apply the amount in one month per year.
- Anniversary - Use the employee's Anniversary Date to apply the amount on the employee's anniversary; often used for longevity bonuses.
Using the Bi-Weekly or Weekly frequency will result in the budget showing increases in the months with additional pay periods. If the desired budget is flat across all months, use the Monthly or Semi-Monthly frequency and adjust the amount and/or hours appropriately.

- Start Date - Controls the start date for this pay type. Most often used with the Once frequency to determine which month to budget. Use Start Date for pay types that are going to begin mid-year. For all ongoing pay types, leave this blank.
- Limit - The annual limit for this pay type. For example, if the organization will match a retirement contribution up to $6000 per year, enter 6000. Martus will stop budgeting for this pay item once the limit is reached.
- Calendar Limit - Used with the Limit field. If the fiscal year does not start in January, Martus will apply the budgeted amounts starting in January rather than the fiscal year start.

- Employer Percent - The percentage of the Source Percent that the employer is paying. Normally this is set to 100%, but could be less when the employer is not fully responsible for the entire tax or benefit amount.
- Source Percent - The percentage of the total of the applicable Source Pay Types that will be budgeted.
- Notes - Enter applicable notes regarding the pay type. Notes will appear below the Starting Rate/Amount when assigning pay items to a position, in Edit Position > Edit Pay Items.

- Regular Amount or Hourly Amount - Used as a default when applied to a Position as a Pay Item. The default can be overridden on the individual pay items as needed. Normally this is used for things such as a cell phone allowance which will be the same for the majority of employees. Leave blank for individualized pay types such as salary or hourly.

- Add New Tiers - Tiers allow for more complex calculations. When Add New Tiers is clicked, the following drop down will appear, and additional details are required, shown below.

- Months Employed - Allows for default values based on longevity. Uses the employee Anniversary Date to calculate the amount. For example, a longevity bonus may be calculated at the 5, 10, 15, and 20 year mark by using the minimum and maximum months employed and adding lines for 60, 120, 180 and 240 months.
- Name (optional) - The name of the tier.
- Minimum Months Employed - The smallest value used before this pay type should be calculated.
- Maximum Months Employed - The largest value used before this pay type should stop being calculated.
- Regular Amount - The amount to be budgeted.
- Add (+) icon- Used to add a new tier.
- Delete (trashcan) icon- Used to delete a tier.

- Fiscal Year- Used when an increase should apply to only one fiscal year that can be tracked from year to year. Use with the Monthly frequency.
- Name (optional) - The name of the tier.
- Starting Year - The smallest value used before this pay type should be calculated.
- Ending Year - The largest value used before this pay type should stop being calculated.
- Regular Amount - The amount to be budgeted.
- Add (+) icon- Used to add a new tier.
- Delete (trashcan) icon- Used to delete a tier.

- Fiscal Month- Used when wanting to budget only within certain months, such as quarterly. Use with the Monthly frequency.
- Name (optional) - The name of the tier.
- Month - The month the amount should be budgeted in
- Regular Amount - The amount to be budgeted.
- Add (+) icon- Used to add a new tier.
- Delete (trashcan) icon- Used to delete a tier.

- Coverages - Coverage 1 and Coverage 2 both use the corresponding coverage indicated on the Employee record. Coverage 1 is normally used for medical insurance. Coverage 2 is normally used for Dental AND Vision insurance. Click herefor more information on Coverages.
- Name (optional)- The name of the tier.
- Coverage - The level of coverage for which to budget.
- Regular Amount - The amount to be budgeted.
- Add (+) icon- Used to add a new tier.
- Delete (trashcan) icon- Used to delete a tier.

- Source Pay Types - A list of all pay types that will be summed per month from which a percent-based pay type is calculated. Use the Delete (trashcan) icon to remove a source.
- New Source Pay Type - Select an additional source to add and click Add Source.

Adding a New Pay Type
- Navigate to Personnel Budgeting > Personnel Budgeting Setup > Pay Types.
- Click Add New Pay Type.
- Fill out the fields appropriately.
- Click Save or click Cancel to cancel.
Editing an Existing Pay Type
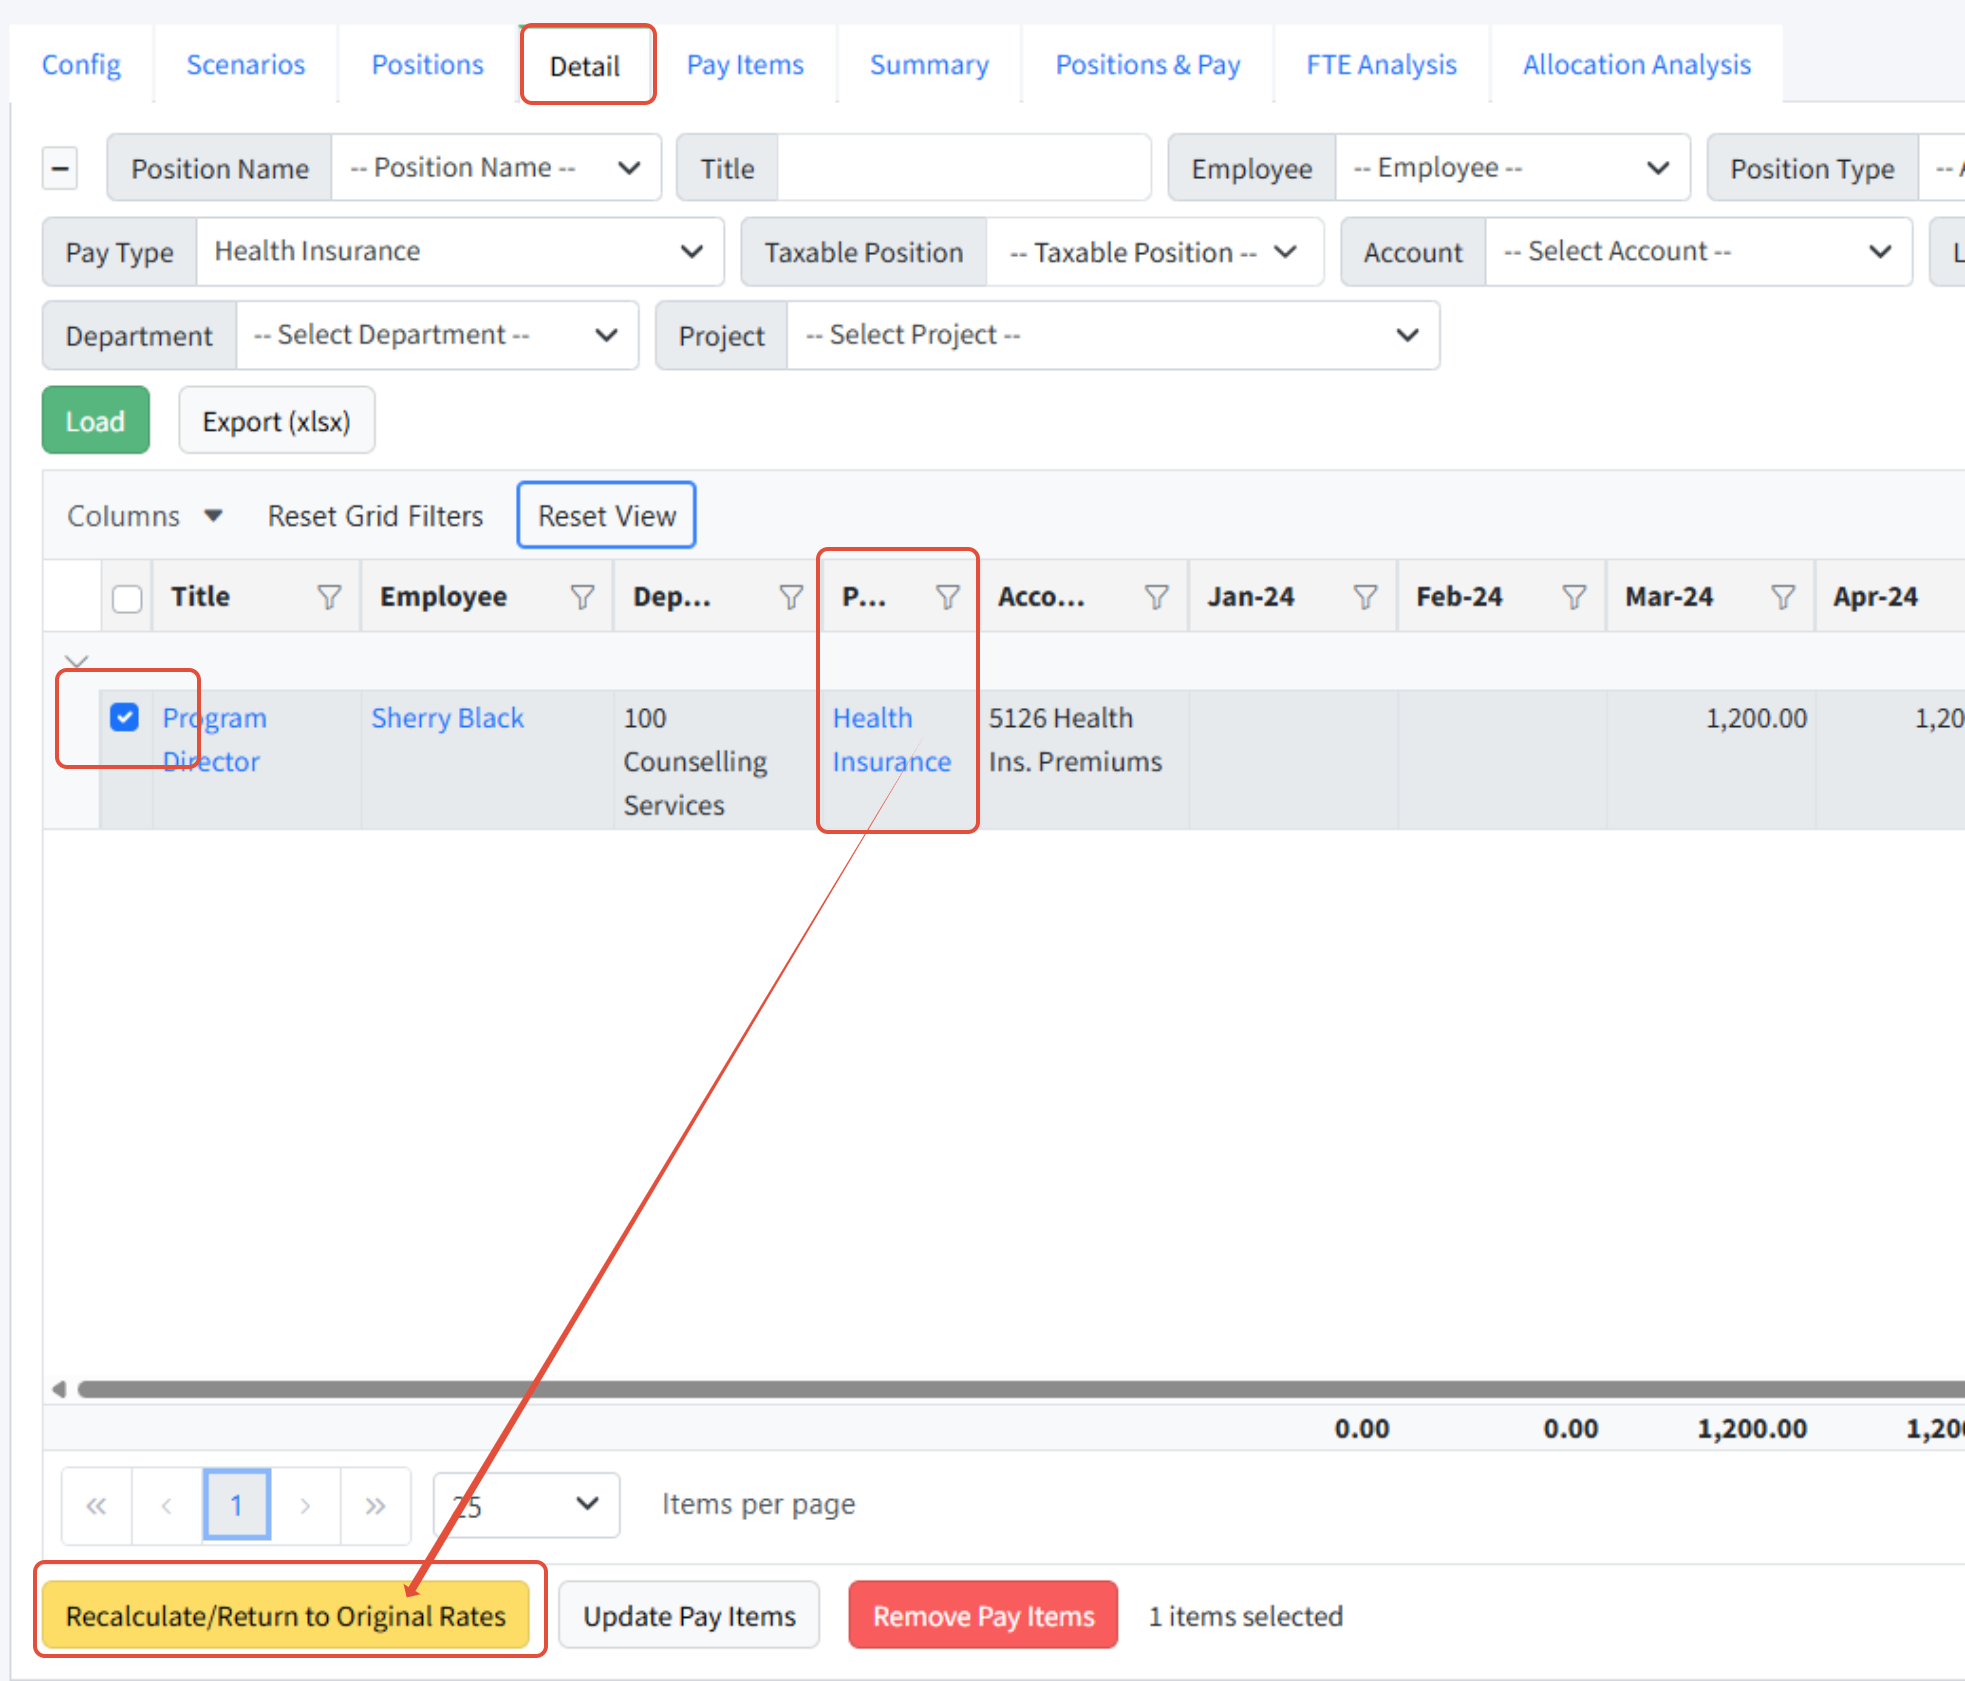
Edit an existing pay type by clicking the Edit (pencil) icon. After you edit an existing pay type, those changes are not immediately applied to any scenario. You must go to the Personnel Budgeting > Scenarios > Detail tab for that scenario, select the pay item rows for that pay type, and then click Recalculate/Return to Original Rates.

In the Details tab, you will need to apply the pay type you just updated to the lines for that pay type. Select the pay type using the dropdown or grid filters, select the lines, and then click Recalculate/Return to Original Rates. This will apply the pay type change to the selected lines.
Copying an Existing Pay Type
Copying a pay type can be very helpful when there are multiple, similar pay types, such as Medicare and Social Security taxes.
- Click the Edit (pencil) icon to open a pay type record similar to what you need.
- Scroll down to the bottom of the modal.
- Click Duplicate.

- The copy will open in edit mode and have the word "COPY" in the name.

- Adjust the name and any other details as appropriate.
- Click Save.
Deleting Pay Types
If a new pay type has been added by mistake, it can be deleted as long as it has not been assigned to any position. If a pay type has been used in a scenario, it cannot be deleted. Best practice is to rename the pay type to indicate it is no longer in use and drag it to the bottom of the sort order on the Pay Types page.
- Navigate to Personnel Budgeting > Personnel Budgeting Setup > Pay Types.
- Click Edit next to the appropriate pay type.
- Click Delete to remove it.
Notes about Pay Types
- Each pay type must be unique; two pay types cannot have the same name.
- Pay types are global; they apply to all years and all scenarios.
- A change to a pay type will not change any scenario until a user goes to the Detail tab, selects the corresponding pay items, and clicks Recalculate/Return to Original Rates.
- The best way to assign a pay type to every Position is to use the Pay Item Grid Export/Import process.
Pay Type Examples
Some common and not-so-common pay type examples can be found here.
Use the links below to navigate through the learning path.
Annual Setup << Building a Scenario - Learning Path >> Employees
Employees (Video)
Employees in Martus are linked to a Position within a Scenario to calculate certain Pay Types. While the Employee field is optional on a position, most organizations add their employees to Martus for better reporting. Users can manage Employees in Personnel Budgeting > Personnel Budgeting Setup > Employees.
Navigating the Employees Page
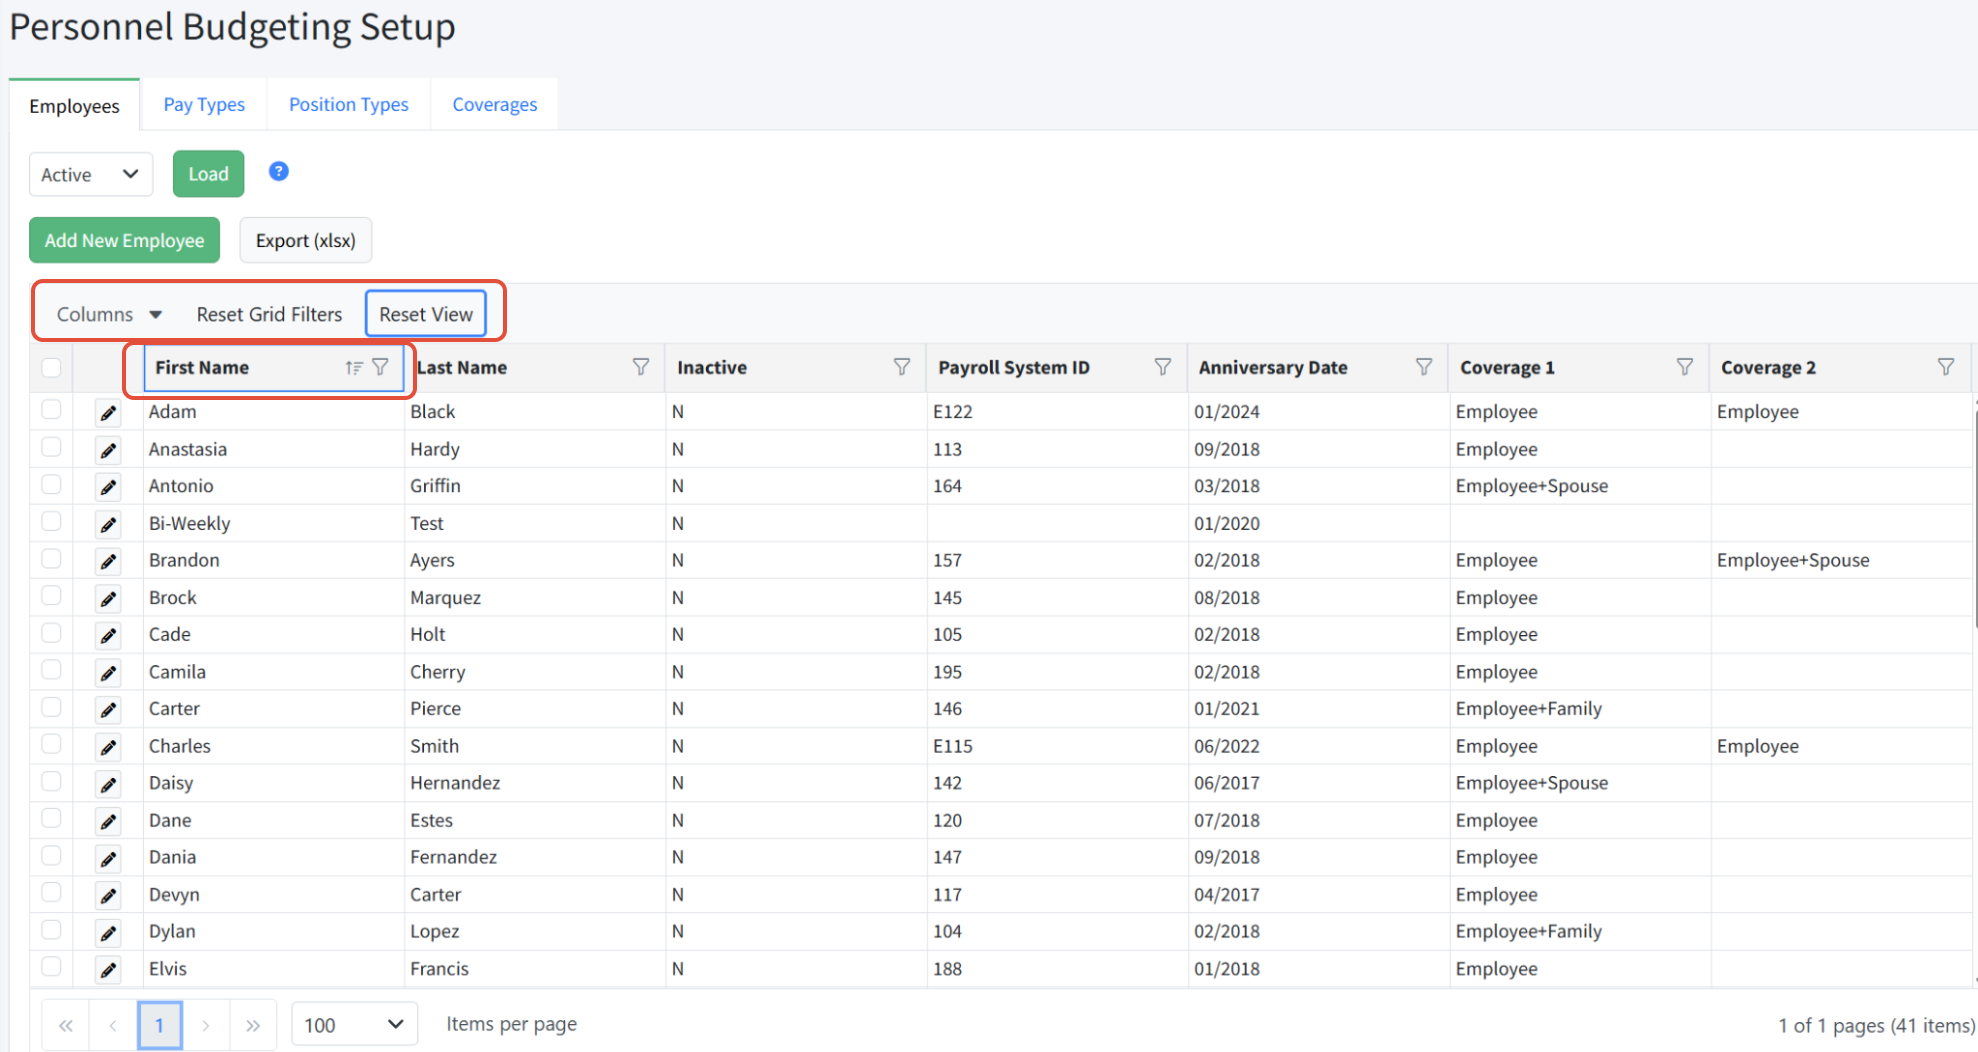
- The Employees page is found in Personnel Budgeting > Personnel Budgeting Setup > Employees.
- Click Columns to choose which columns to display. Sort columns by clicking on the header. Columns can also be dragged and dropped to different locations in the grid.
- Use Filters (the funnel) to search in any column. Click Reset Grid Filters to clear all filters.
- Click Reset View to clear all changes to sorting, filtering, column selections and ordering.
Employee Page Actions
- Click Add New Employee to add a new employee.
- To Edit an employee, click the pencil icon.
- To Activate, Inactivate, or Delete multiple employees, select the records first and then use the buttons at the bottom of the screen.
Employee Record Fields
- First Name - First name of the employee
- Last Name - Last name of the employee
- Inactive - Checked for inactive employees
- Payroll System ID - The Payroll System ID for this employee - useful when updating information via export/import
- Anniversary Date - The hire date (mm/yyyy) of the employee within the organization - used for calculating pay types such as tenure bonuses or retirement matching following a waiting period
- Coverage 1 - Normally used with medical insurance pay types to calculate the rate to budget
- Coverage 2 - Normally used with dental and vision insurance combined as a pay type to calculate the rate to budget

Employee Record Actions
- Click Save to save changes.
- Click Cancel to close without saving changes.
- Click Delete to delete the employee. NOTE: You cannot delete an employee associated with a position in any scenario.
Notes on Employees
- The employee record must be linked to a position in Personnel Budgeting > Scenarios > Positions to have any impact on the scenario.
- The employee is optional within a position, but it is needed if a pay item within the position relies on the Anniversary Date or Coverage 1 or Coverage 2.
- It is best practice to create at least one "Vacant Position" employee to be used for vacant, future, or seasonal positions. Create a placeholder for pooled positions if used.
- Each combination of First Name, Last Name, and Payroll System Id must be unique. If you aren't using the Payroll System Id, you can add a middle initial to the First Name.
- Employees can be imported via the Pay Data File.
Use the links below to navigate the learning path.
Pay Types << Introduction to Personnel - Learning Path >> Position Types
Position Types
Position Types are optional, and are used to group positions to filter or sort various tabs and reports within Personnel Budgeting. Organizations can choose what position types work for them according to their needs.
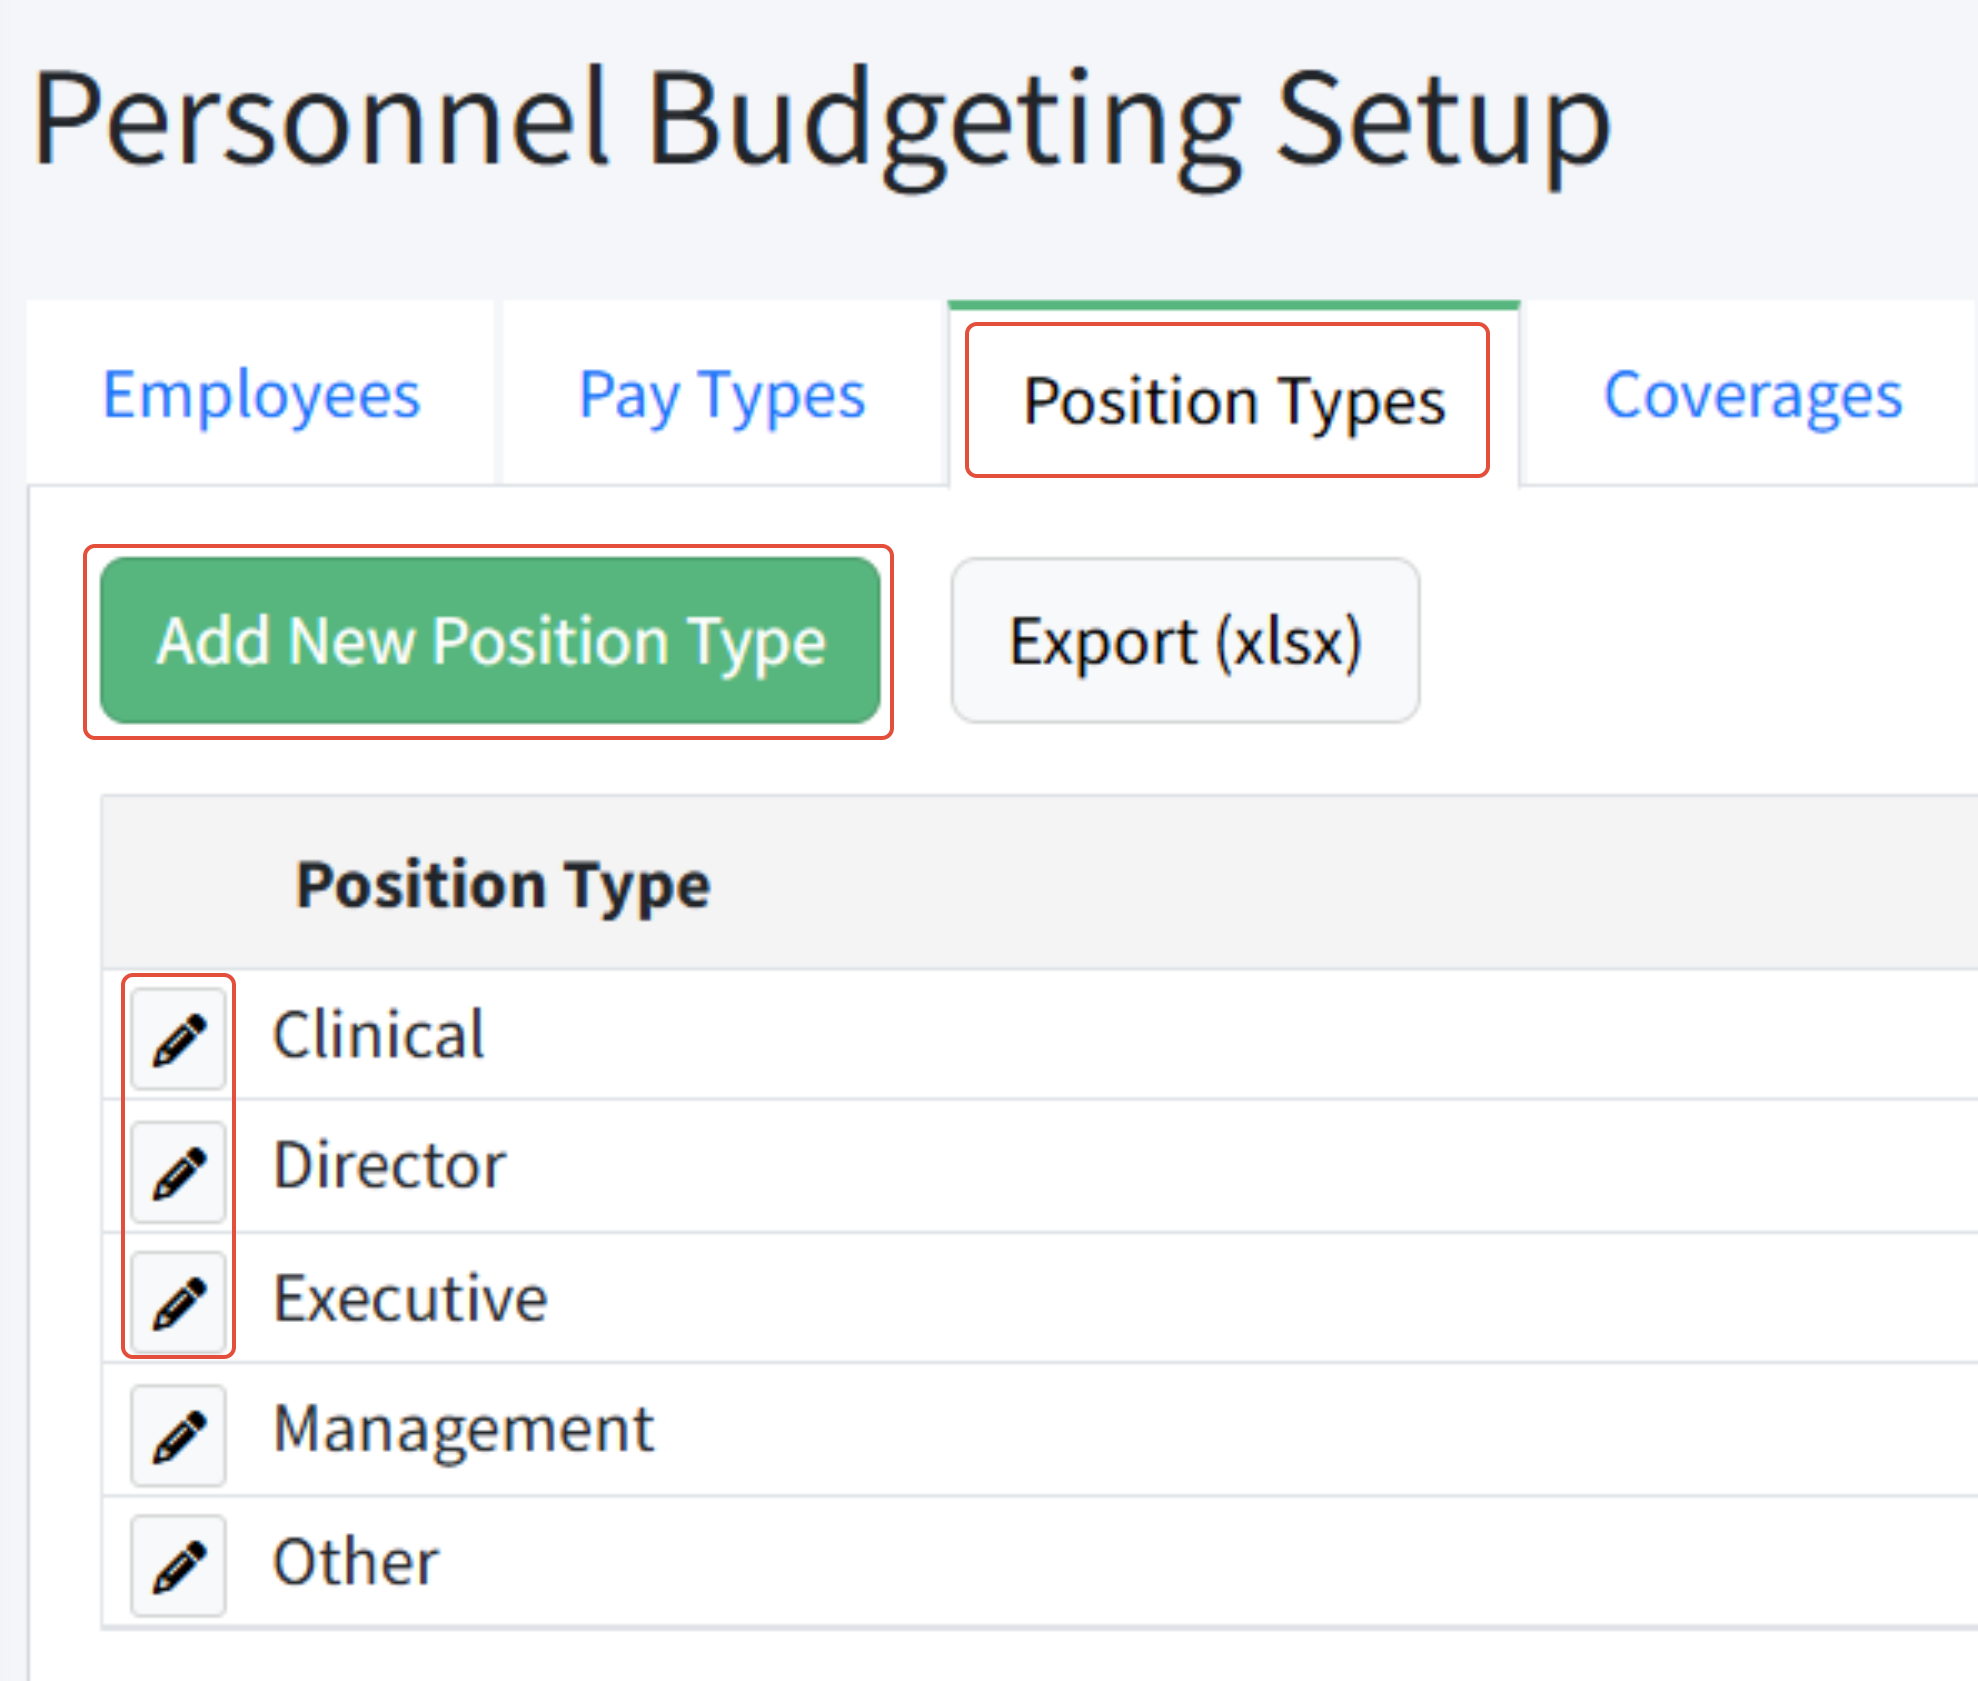
Position types are managed in Personnel Budgeting > Personnel Budgeting Setup > Position Types.
Adding a Position Type
- Navigate to Personnel Budgeting > Personnel Budgeting Setup > Position Types.
- Enter the Position Type name.
- Click Save to save the new type, or click Cancel to leave without saving.
How To Assign A Position Type
- Navigate to Personnel Budgeting > Scenarios > Positions.
- Click the Edit (pencil) icon for the position for which you want to assign the position type.
- Select the desired Position Type from the dropdown.
- Click Save.
Common examples of position types are below.
Example 1: Employee Status
- Full-Time Salary
- Full-Time Hourly
- Part-Time Hourly
- Seasonal
- Intern
Example 2: Organizational Level
- Executive
- Director
- Manager
- Associate
- Specialist
- Administrative
Notes about Position Types
- They are global and apply to all years and scenarios.
- They can be imported via the Pay Data File.
- The position type can be adjusted on each position via the Positions tab of the scenario or via the Pay Data File import.
Use the links below to navigate the learning path.
Employees << Introduction to Personnel - Learning Path >> Pay Data File
Pay Type Examples
Below are some typical pay type examples.

Salary
Tax - Taxable
Category - Regular
Frequency - Choose as appropriate
Start Date - Leave blank
Limit - Leave blank
Regular Amount - Leave blank

Hourly
Tax - Taxable
Category - Hourly
Frequency - Choose as appropriate
Start Date - Leave blank
Limit - Leave blank
Regular Amount - Leave blank

Bonus - Annual
Tax - Taxable
Category - Regular
Frequency - Once, for bonuses that are all paid in the same month
Start Date - Designate a month to hit the budget
Regular Amount - Leave blank to enter the bonus amount on the pay item for each position, or enter a default amount here for all positions

Bonus - Anniversary
Tax - Taxable
Category - Regular
Frequency - Anniversary for bonuses paid according to the employee's Anniversary Date
Start Date - Leave blank
Regular Amount - Leave blank to enter the bonus amount on the pay item for each position, or enter a default amount here for all positions

Health Insurance
Add one pay type per insurance plan you offer employees if the account or rates differ.
Tax - Non-Taxable
Category - Regular
Frequency - Usually Monthly
Start Date - Leave blank
Limit - Leave blank
Tiers - Change to Coverage One. Add a tier for each level of coverage, and the appropriate amount for each level.
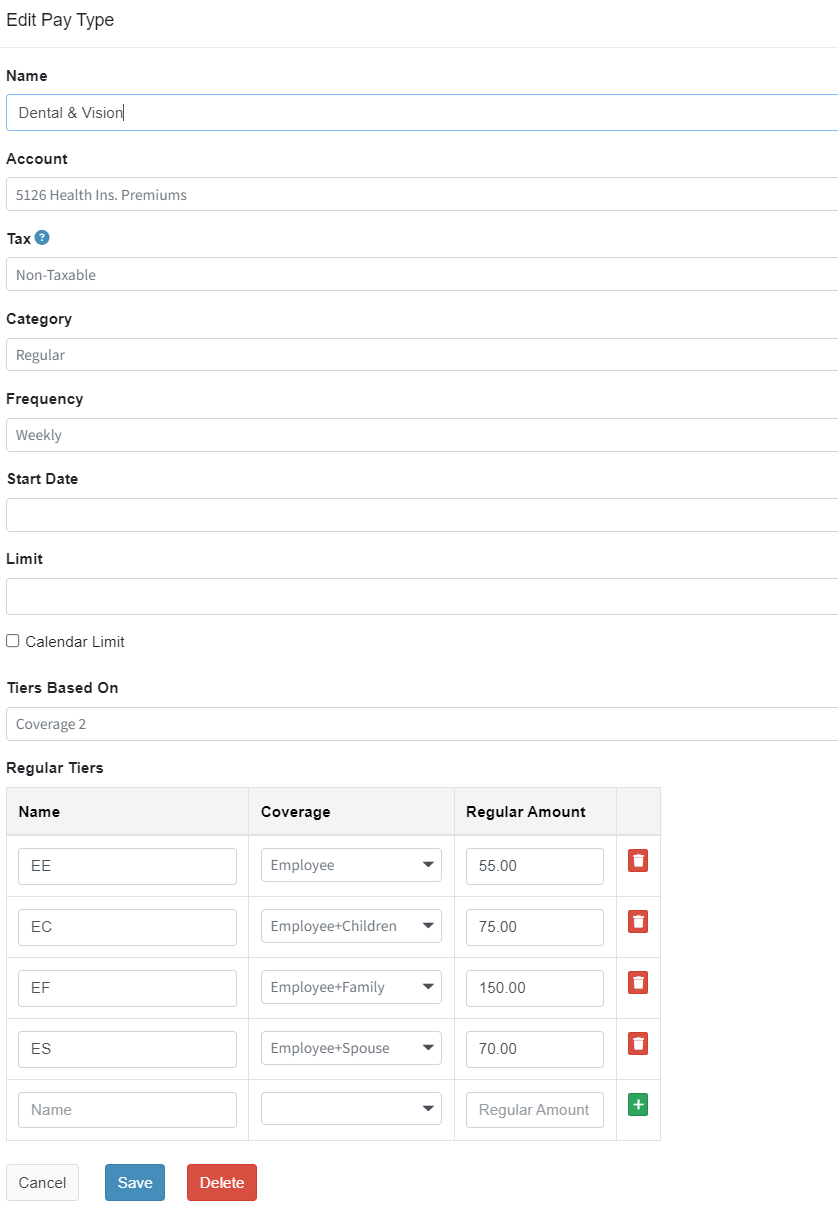
Dental & Vision Insurance
Add one pay type per insurance plan you offer employees.
Tax - Non-Taxable
Category - Regular
Frequency - Usually Monthly
Start Date - Leave blank
Limit - Leave blank
Tiers - Change to Coverage Two. Add a tier for each level of coverage, and the appropriate amount for each level.
 Retirement Match
Tax - Non-Taxable
Category - Percentage
Frequency - Usually Monthly
Start Date - Leave blank
Limit - Leave blank unless there is a limit on the total amount that the organization will match. (For example, if the organization contributes 5% of the first $100,000 of salary, the limit would be $5,000.)
Employer Percent - 100
Regular Amount - The base percentage if all employees are eligible when they start; otherwise, choose Tiers
Tiers - Select Months Employed, and enter the minimum number of months needed to work before this benefit is applicable
Source Percent - Percent organization wants to budget for - often the max available to the employee
Source Pay Types - Add all pay types to sum together as the basis for this pay type
FICA - Social Security & Medicare
FICA can be often be budgeted via the Config tab, but it is necessary to utilize pay types when:
- Separate GL accounts are utilized for the Medicare and Social Security portions of the FICA tax
- There are enough positions that meet the annual cap for Social Security to affect the budget
 Social Security
Tax - Is Tax
Category - Percentage
Frequency - Usually Monthly
Start Date - Leave blank
Limit - The Social Security limit for 2026 is 11439.00. (The maximum taxable earnings is $184,500. Therefore, the maximum employee tax is calculated: $184,500*6.2% = $11,439.)
Calendar Limit - Check if your organization does not begin their fiscal year in January
Employer Percent - 100
Source Percent - 6.2
Source Pay Types - Add all pay types to sum together as the basis for this pay type; normally this includes all taxable pay types

Medicare
Tax - Is Tax
Category - Percent
Frequency - Usually Monthly
Start Date - Leave blank
Limit - Leave blank
Employer Percent - 100
Source Percent - 1.45
Source Pay Types - Add all pay types to sum together for this pay type; normally this includes all taxable pay types
Overtime Pay
Tax - Taxable
Category - Overtime
Source Percent - The percent to multiply by the number of hours and rate from the hourly pay item for the position
Source Pay Types - Hourly category pay types
Coverages
Personnel Budgeting uses Coverages. Coverages - like levels - are utilized with both Employees and Pay Types to determine the rate of a specific pay type at a specific level. The most common use for coverages is for medical insurance.
Coverages will usually be created during implementation, but can be added and adjusted at any time.
The coverage selected for an employee stipulates what level the employee has opted in to for their self/family.
The coverage on the pay type stipulates the rate for that employee for that level of coverage.

 When a pay type using coverages & rates is added to a position, Martus will look up the employee's level of coverage and match the appropriate rate to budget for that position.
Creating a Coverage Option
- Go to Personnel Budgeting > Personnel Budgeting Setup > Coverages.
- Click Add New Coverage.
- Enter the name of the new coverage.
- Click Add.

Personnel Budgeting Training - Prep Guide
The guide linked below will help you prepare for your Personnel Budgeting training. Be sure to review this guide carefully, and prepare the requested information.
Please complete the guide and return it to your implementation consultant prior to your first Personnel Budgeting training.
This document includes:
- A list of questions about your organization's compensation practices
- A list of items to prepare before the training
- Links to prerequisite videos
The Positions Tab (Video)
The Positions tab in Personnel Budgeting > Scenarios lists the positions defined by your organization. Each position displays on a single row, with the title, employee, and other data. Add new positions, edit existing positions, or delete positions from the Positions tab.
Filtering Positions
Filter positions using the page filters at the top, and the grid filters below. Page filters allow you to select a single value from the dropdown. The grid filters allow you to select multiple values at the same time.
The Position Record - Field Definitions
The Position record contains lots of information, described in detail below.
- Position Name - This is auto-assigned by Martus and cannot be edited. Martus will set this when the position is saved.
- Title - The position title such as Communications Director or Senior Accountant. You can have more than one position with the same title.
- Employee - The person who holds this position (optional). Employees are managed in Personnel Budgeting > Personnel Budgeting Setup > Employees. Create employees with coverages to simulate an actual employee not yet hired, such as Vacant Employee, to assign to positions.
- Position Type - Use Position Types to filter reports in Personnel Budgeting. Position Types are managed in Personnel Budgeting Personnel Budgeting Setup > Position Types. Examples include Director, Associate, Executive, CNA, RN, etc.
- Is Taxable - Check this box to calculate taxes for this position based on the setup (FICA Rate and FICA Account) in the Config tab. If unchecked, it will not calculate taxes. Positions exempt from taxes might include clergy, students, etc.
- Is Pool - When selected, the total compensation for the position is based on the assigned pay items multiplied by the FTE value on the position. Click here for more information on Pooled Positions.
- Full-Time Equivalent - The total FTE for this position. For a full-time employee enter 1, half-time enter .5, etc.
- Start and End Date - Leave these fields blank if the position should be budgeted for all twelve months. Otherwise, if a start and/or end date is entered, it will only calculate for those months, and it will calculate based on the date in conjunction with the frequency of a pay type.
- Dimensions - The area of the organization that is responsible for this position's budget. A worksheet in the current default planner budget must already exist for this combination of dimensions so that Martus has a place to post this position. If a worksheet does not exist, you will receive an error when trying to save the position.
- Notes - Add notes pertaining to the position or its associated pay items, up to 500 characters.
- Pay Types - The various forms of compensation budgeted for this position. Any pay type can be added to the position. Pay types are organization-specific. Common ones include:
- Salary Pay
- Hourly Pay
- Bonus
- Medical Insurance
- Dental Insurance
- 401k matching
- Cell phone reimbursement
- Stipend
- FICA (if not using the Config tab option)
Adding a New Position
Use the steps below to add a new position to Martus.
- Navigate to Personnel Budgeting > Personnel Budgeting Setup > Positions.
- Click Add New Position.
- Fill out the form, using the field definitions above as needed.

- Click Save.
- Click Add Pay Item to add the pay types relevant to this position.
- Fill out the form for the appropriate pay types.
- Click Save to close the modal, or click Save and New to add another pay type.
- Continue until all appropriate pay types are added.
- When you are done, click View Detail to see the detail for this position in the Detail tab.

Updating a Position
Click Edit (the pencil icon) on the row for a position to make changes. Be sure to Save the changes when you are done.
Duplicating a Position
Duplicate an existing position and then edit the copy when two positions are similar.
- Click Edit (the pencil icon) to open a position to duplicate.
- Click Duplicate.
- Everything is duplicated except the notes on the position, and the new position is displayed
- Edit the position information and pay items as needed.
- Save the position when you are done.

Deleting Positions
Delete a single position from the open position record by clicking Delete. The position and any associated pay types will be removed from the selected scenario. Other scenarios are not impacted.
To delete multiple positions, select the positions using the check boxes to the left of each line. Then select Delete from the bottom of the page.

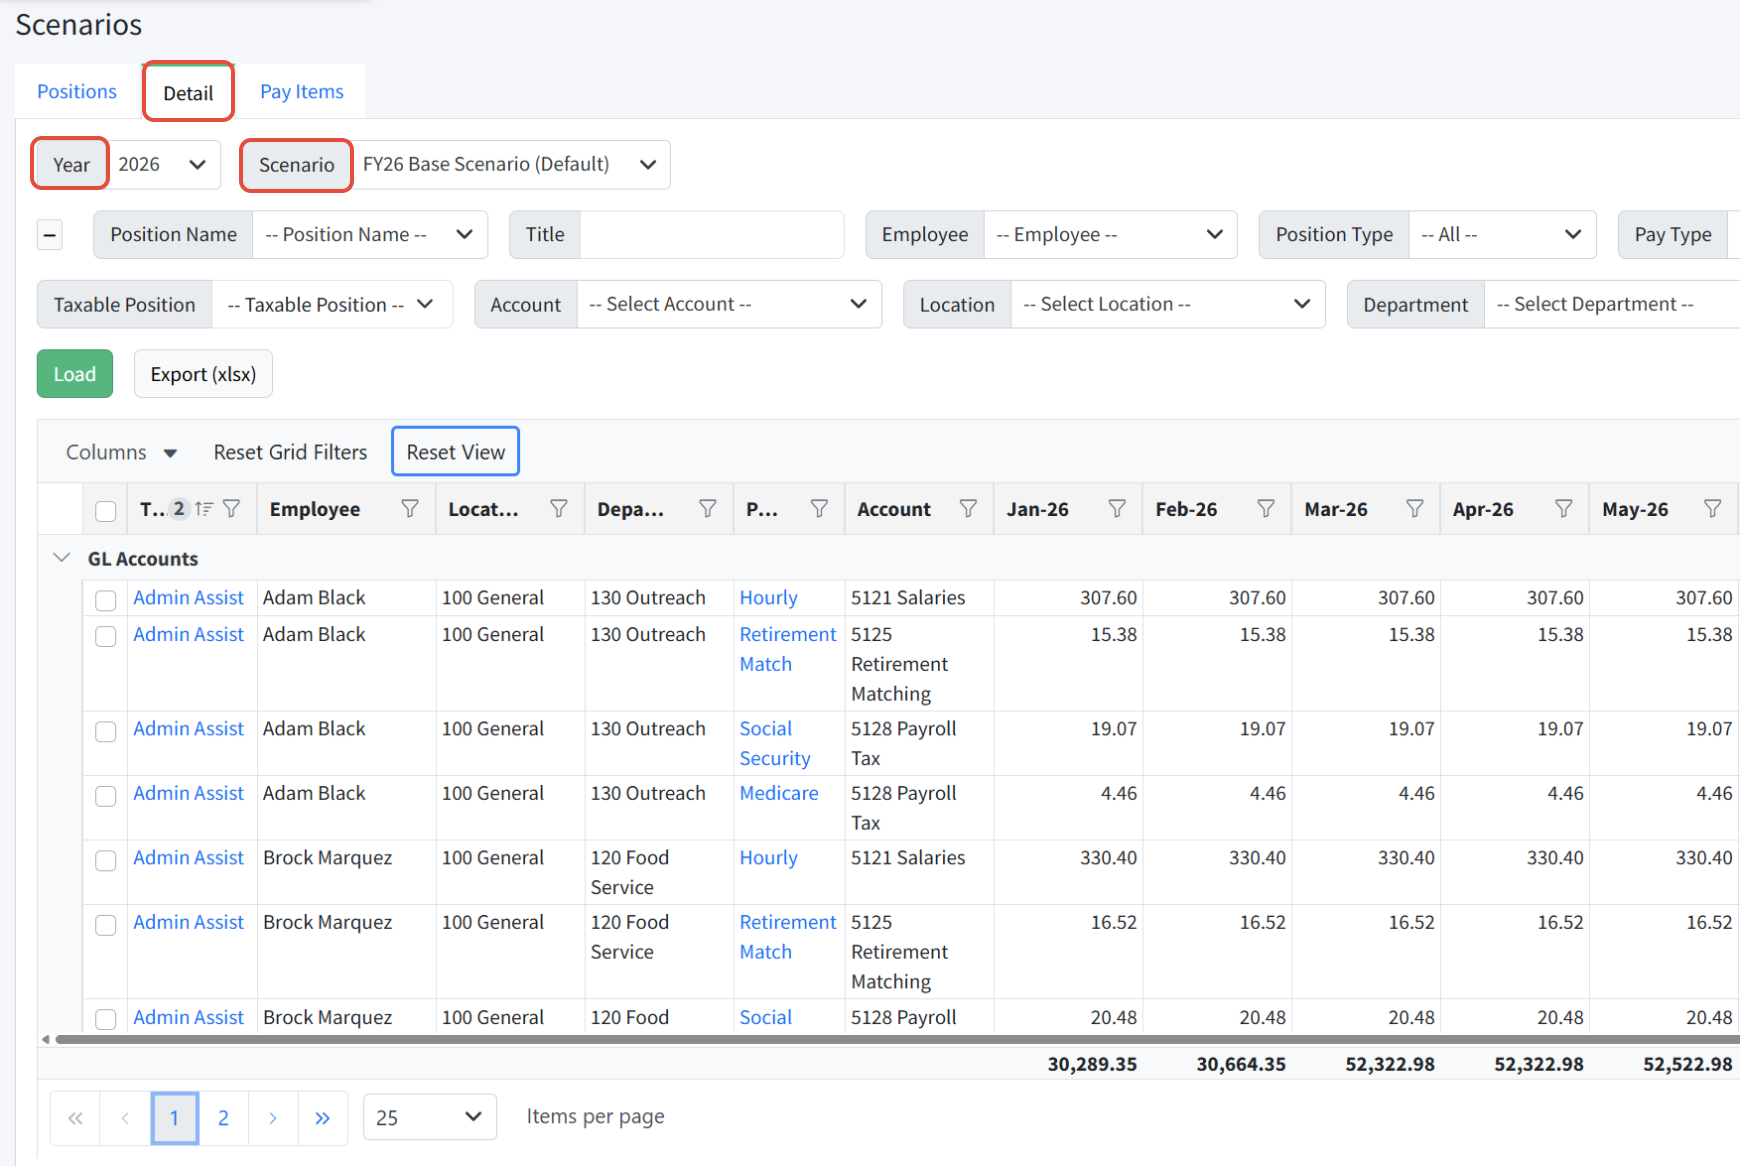
The Detail Tab
The Detail tab allows a user to review and adjust pay items. Each pay item, displayed as a row, is a specific pay type associated with a specific position. Each pay item row provides monthly and yearly totals.
Pay Items - All pay types associated with a position become pay items. Each pay item will be shown on the Detail tab.

Payroll Taxes - If utilizing the Config tab for calculating FICA, FICA amounts will not display on the Detail tab. Use the Positions and Pay tab to view FICA amounts instead.

Stat Accounts - If statistical accounts are in use, they are not included in totals with GL accounts. You can use the Pay Type criteria filter at the top to Show Pay Types with GL Accounts, with Stat Accounts, or choose to Show All Pay Types.

Overtime Pay Items - Mid-year adjustments made to Hourly pay items will not apply to Overtime pay items. Overtime pay items will always use the Hourly pay item base base rate.
Navigating the Detail Tab
The Detail tab is found in Personnel Budgeting > Scenarios. The scenario selected as the default in Personnel Budgeting > Scenario Setup is automatically loaded. You can change the Year and Scenario selected.
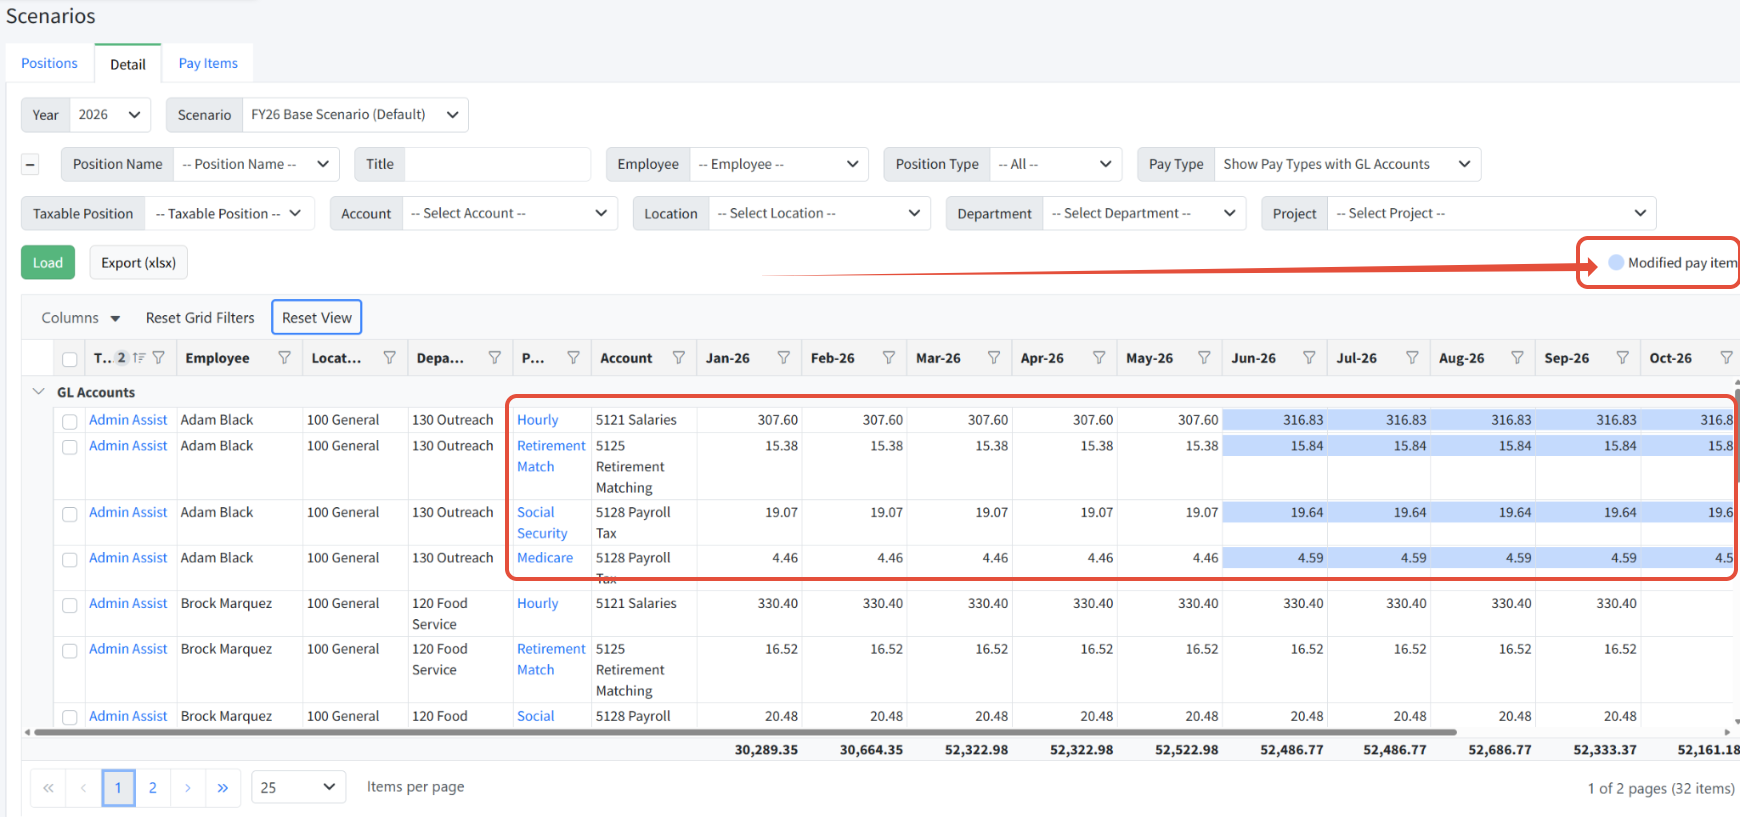
Modified Pay Items
When viewing the Detail screen, you may notice that some cells have been highlighted in blue. This indicates that a change has been made to that month, for that position and pay type, that does not match the base rate or amount for that pay item. This often occurs when a mid-year salary increase, health insurance rate adjustment, or bonus adjustment has been made. Any pay types dependent on the modified pay item will also show in blue. Making these types of adjustments to a scenario is covered in detail below.
Using Page Filters
Use page filters to filter available data. Always click Load after changing page filters.
- Position Name - Select a position name from the drop down. Position names are assigned by Martus based on the position Title.
- Title - Search position titles using key words or partial text.
- Employee - Select an employee to filter positions for that employee.
- Position Type - Filter by position type. Position types are customizable and set by the client. They are only used for reporting purposes.
- Pay Type - Select the pay types to display, either by specific pay type or by group:
- Show Pay Types with GL Accounts
- Show Pay Types with Stat Accounts
- Show All Pay Types
- Taxable Position - Filter to taxable (Yes) or non-taxable (No) positions.
- Account - Select an account to filter.
- Dimension Filters - Filter on dimensions in Martus.
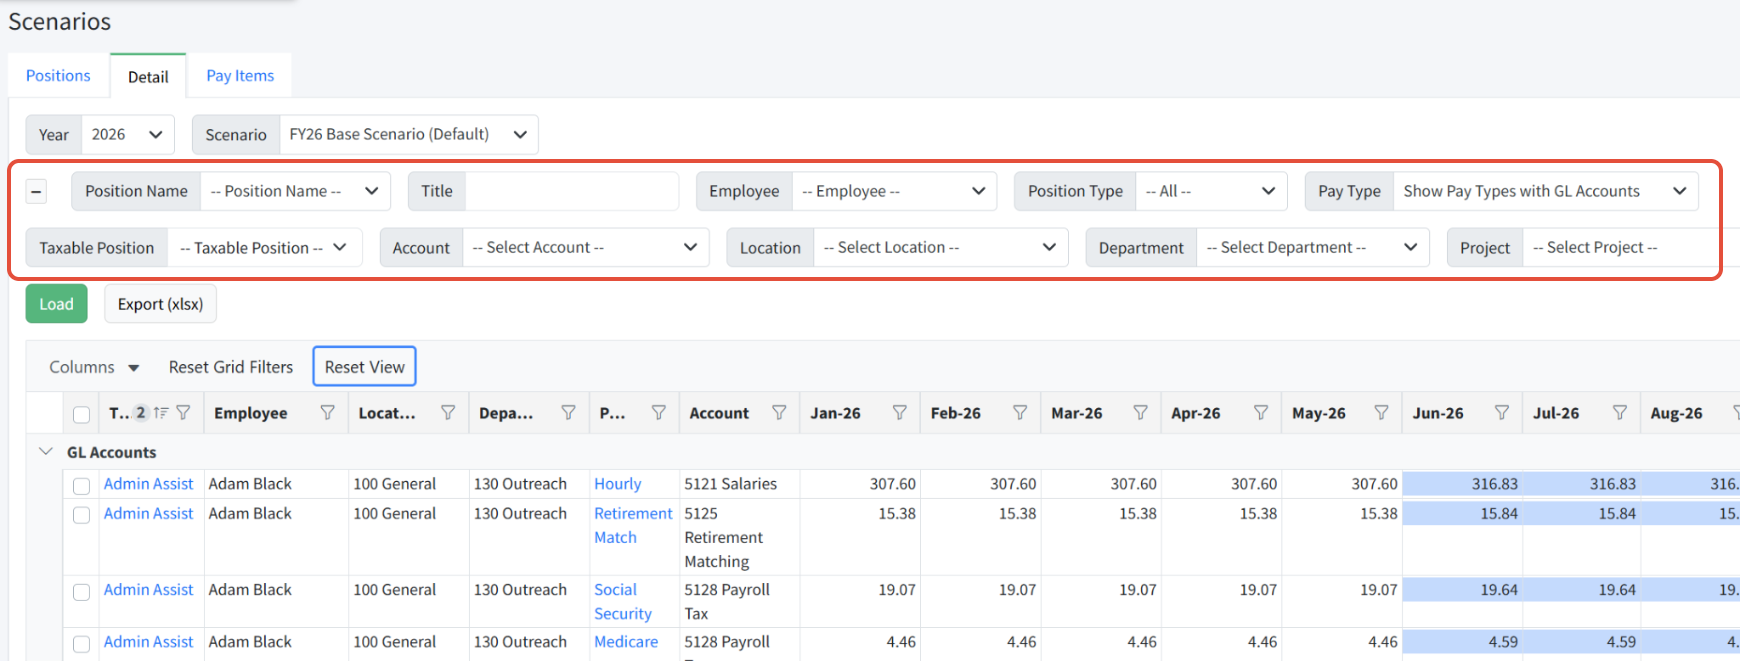
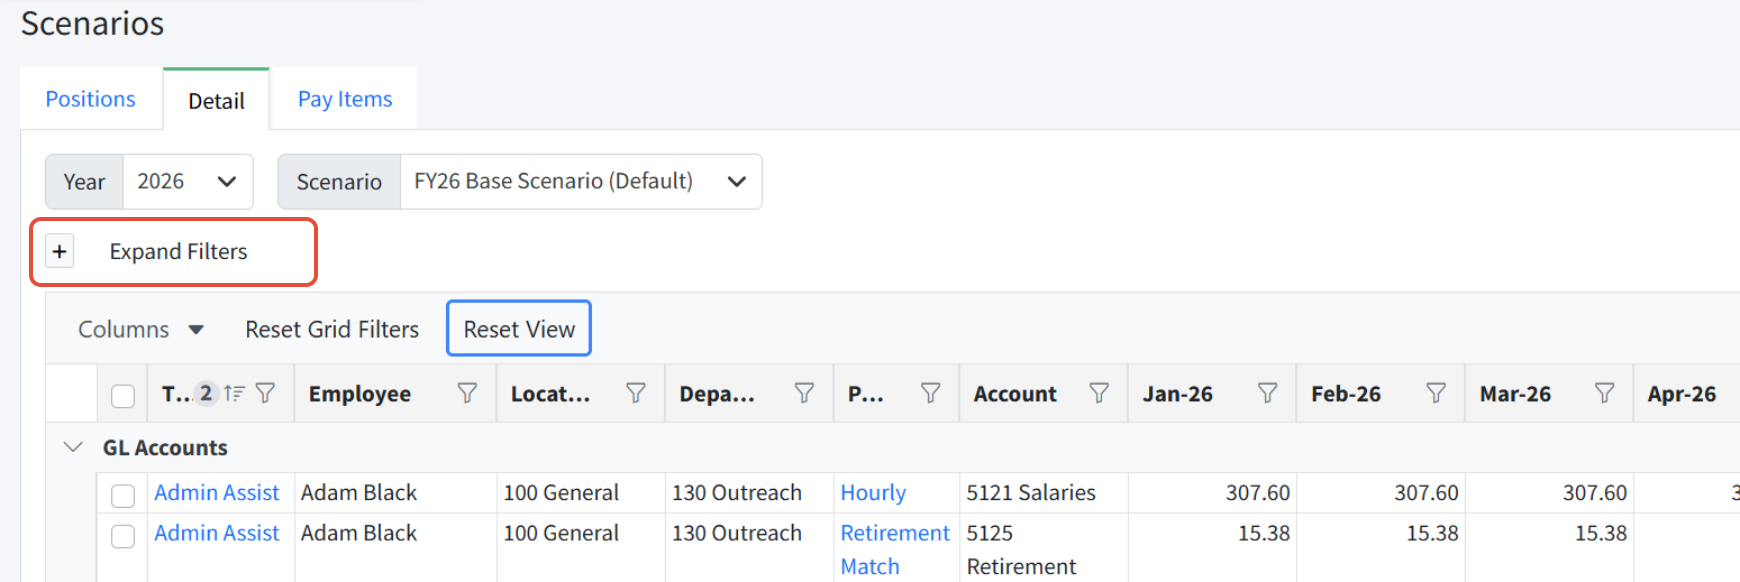
You can also hide the page filters by clicking on the - button in the upper left. Click + to expand the filters again.
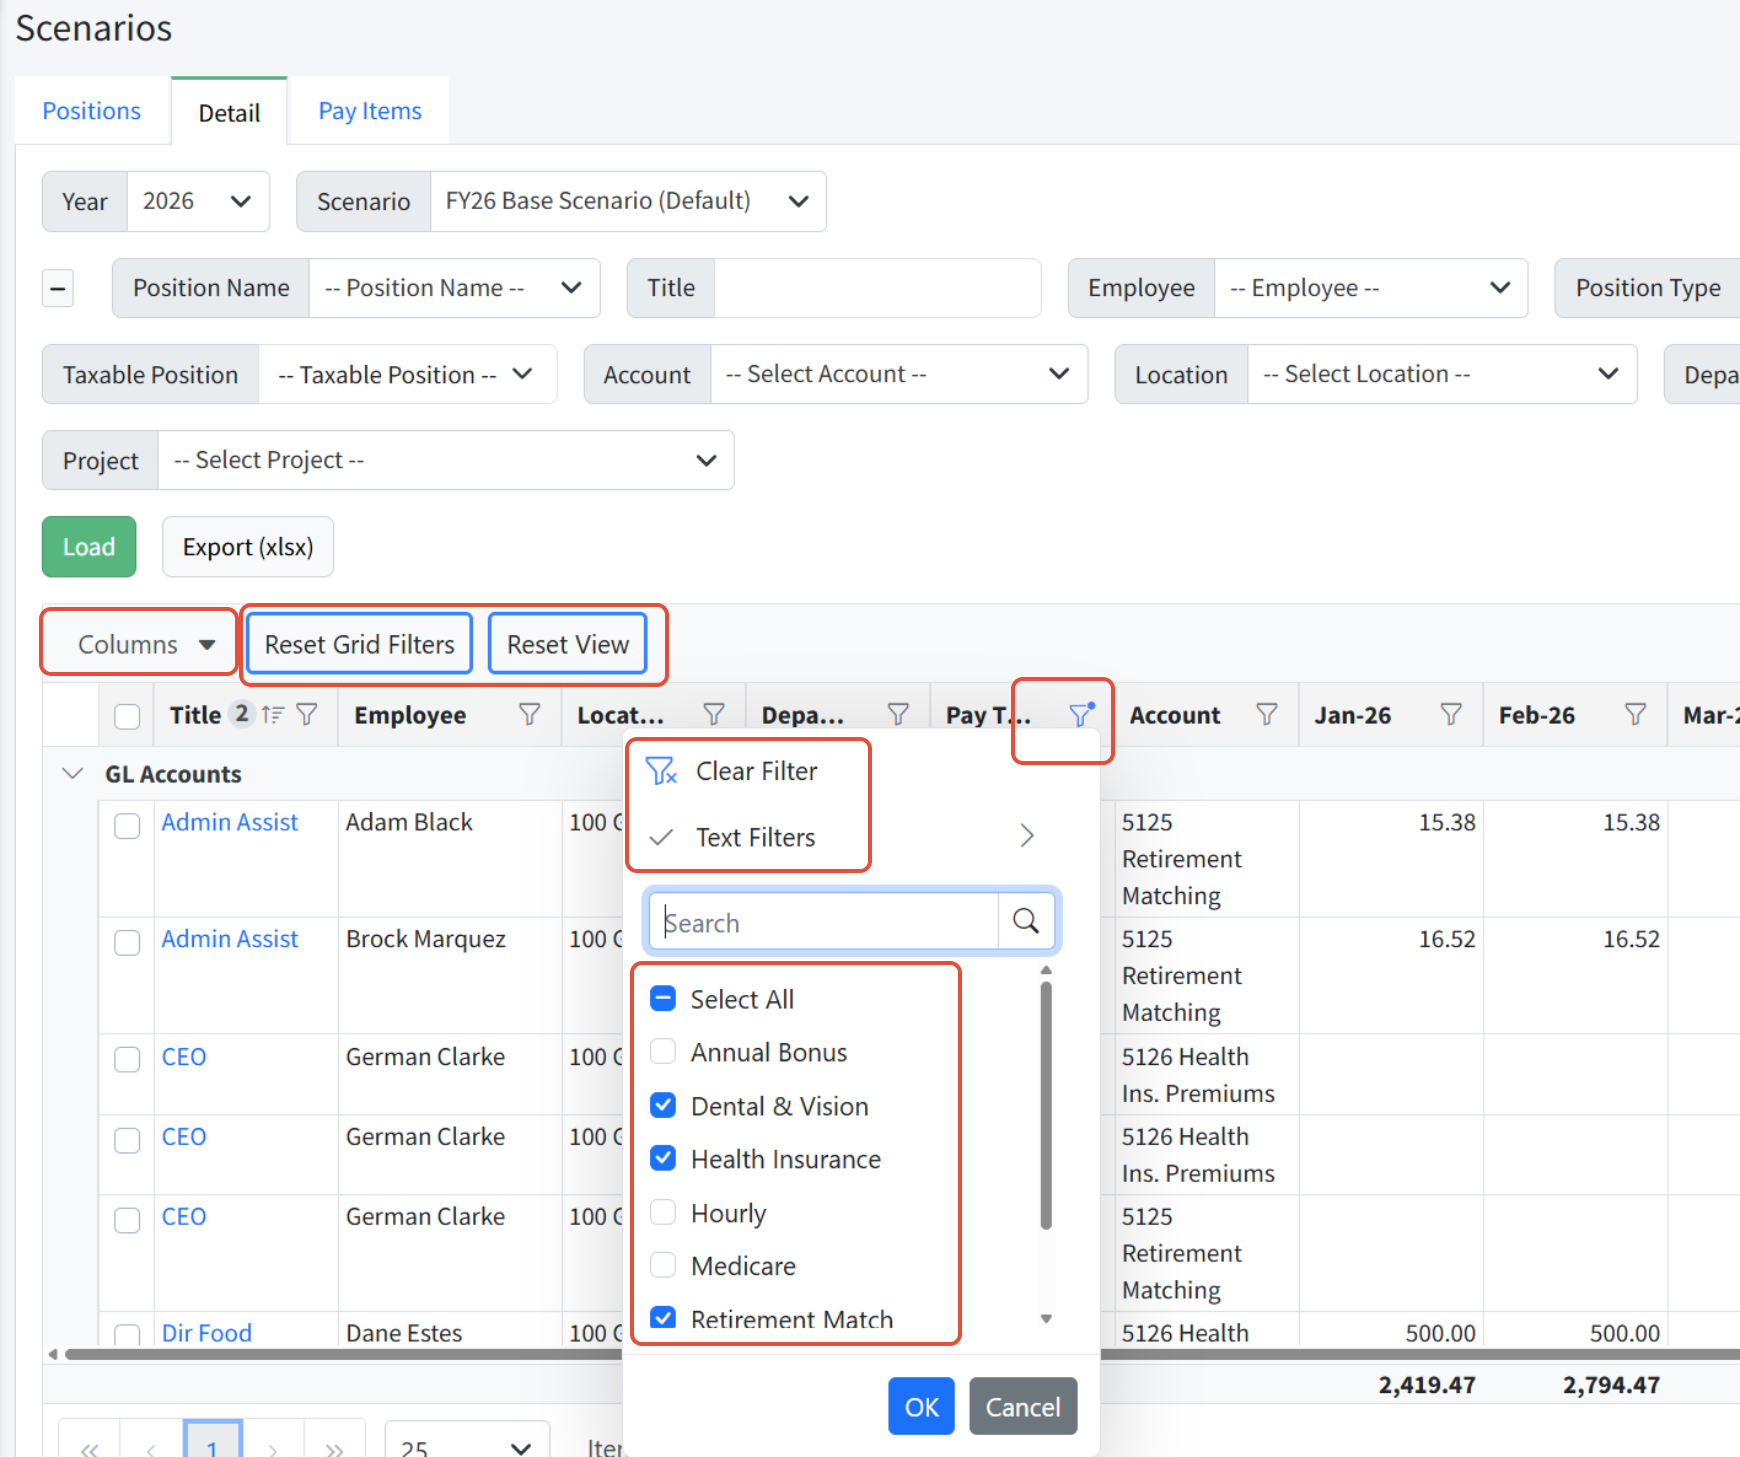
Using Grid Filters
Use grid filters on columns to filter to one or more values in one or more columns. You can drag and drop columns to rearrange the order, and click Columns to show or hide columns. Sort a single column by clicking in the column header. Sort by a second column by clicking CTRL-click in the second column.
- Columns - Show or hide columns.
- Reset Grid Filters - Remove filters currently set and see all data.
- Reset View - Restore columns and sorting and clear filters currently set.
- Filter - Click the filter icon to:
- select all, one, or more values
- click Clear Filter to clear the filters currently set
- click Text Filters to filter text using Equal, Not Equal, Starts With, Ends With, Contains, Does Not Contain, or Custom Filter options
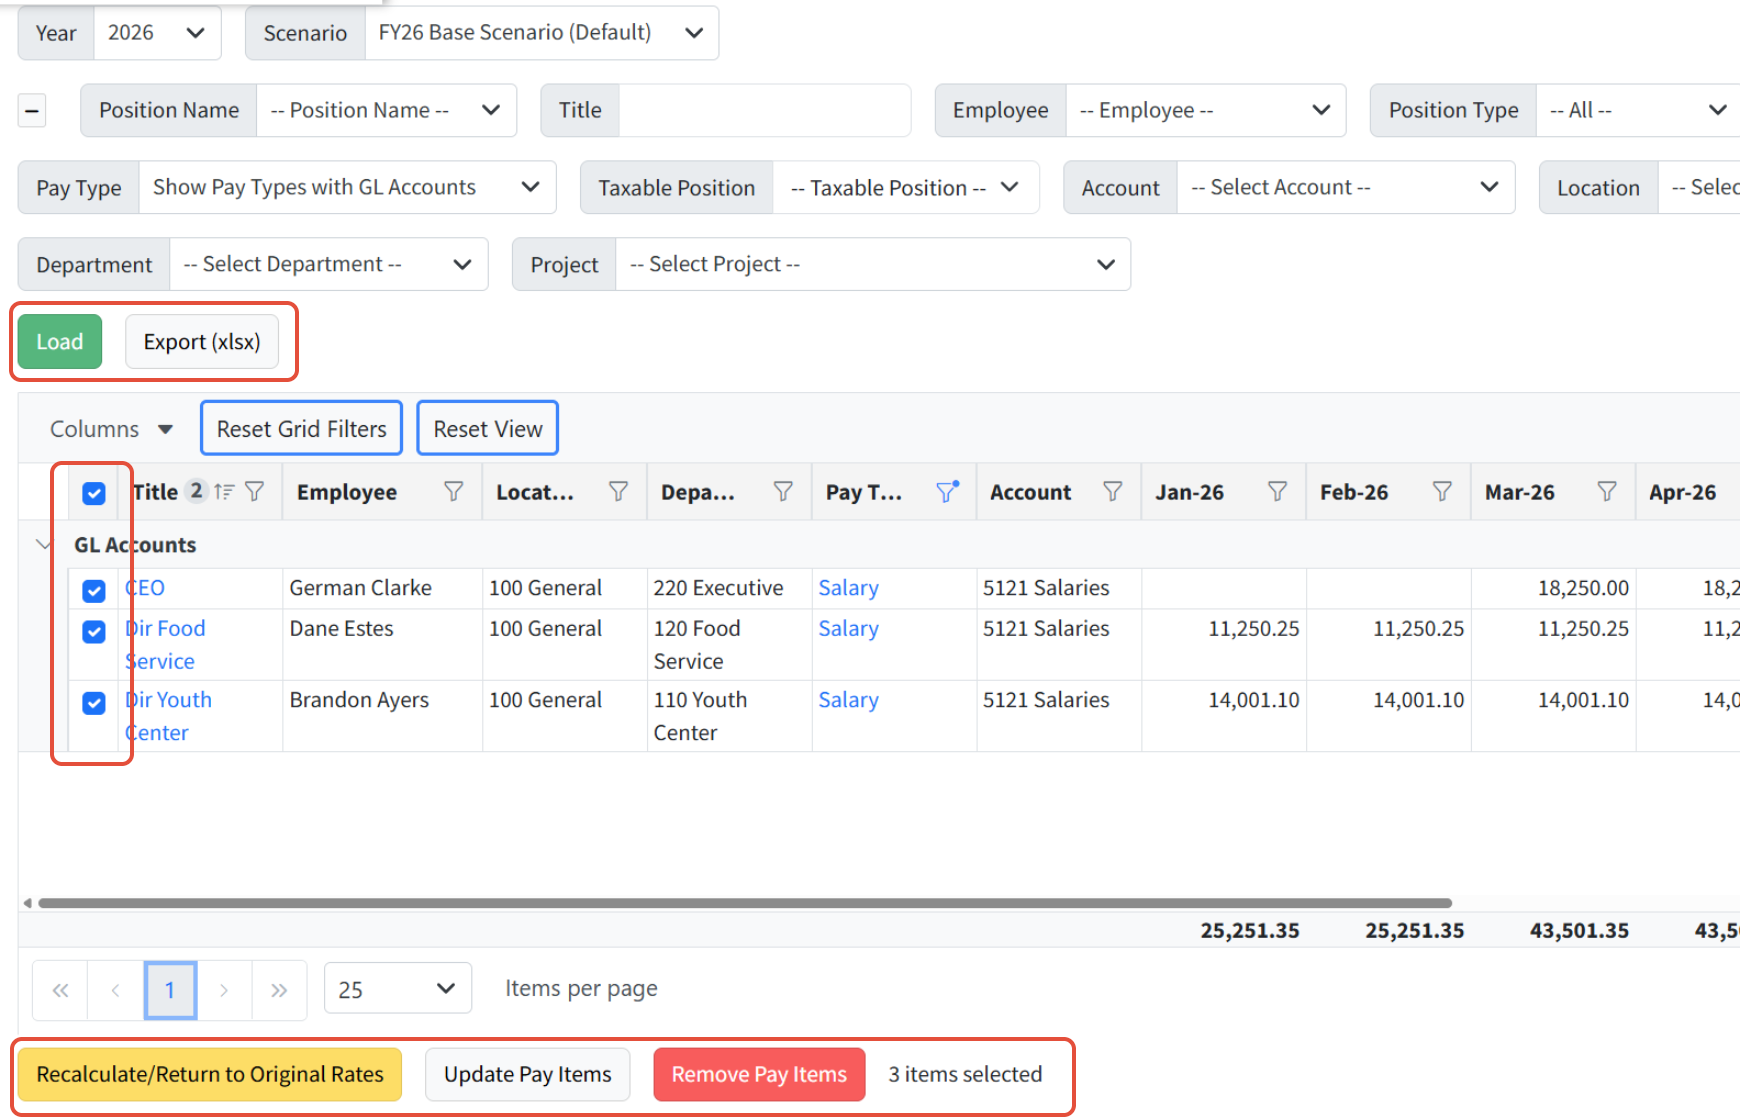
Page Actions
- Load - Load the filters and settings selected.
- Export (xlsx) - Export the view to Excel for review.
- Boxes - Select boxes to the left of a line to select that line, or click the top box to select all records in the view.
- Items per page - Use the option to scroll through pages or select the number of items per page to display.
- Recalculate/Return to Original Rates - Reset the selected lines to the pay type rate, or the pay item rate if the pay type does not have a default rate. Additional information below!
- Update Pay Items - Update the selected pay items. Additional information below!
- Remove Pay Items - Delete the selected pay items. Additional information below!
- Drilldown Links - Links in blue on the Details tab can be used to update additional data related to positions, employees, and pay items.
Managing Pay Items
There are many ways to update pay items on the Details tab.
- Recalculate/Return to Original Rates - If a change is made to the Annual Setup tab, Pay Types or Employees, Martus does not automatically apply that change to any scenario. Changes to employees or pay types must be pulled into the desired scenario using Recalculate/Return to Original Rates in the scenario for which you want the update(s) applied.
- Update Pay Items - Update pay items using one of two methods (described in detail below):
- Fiscal Month Range/Anniversary
- Custom Spread
Pay items are typically adjusted within a scenario using a new set of assumptions. For example, salary and hourly pay items could be recalculated with a 3% COLA. Any pay item can be modified for any portion of the year.
- Remove Pay Items - Select one or more rows and click Remove Pay Items to permanently remove them from the corresponding positions in this scenario. Other scenarios are not impacted.
- Pay Type drilldown link - Make full-year changes to a pay item's Hours Per Pay Period and/or Starting Rate/Amount. For example, if an employee's rate of pay changes at the start of the budget year, make the change directly to the pay item by clicking the pay type drilldown link and updating the Starting Rate as shown below.

Recalculate/Return to Original Rates
Use this method whenever a change has been made to the Annual Setup tab, or to Pay Types or Employees records, and the scenario should be updated with the new information. This can also used to reverse previous updates made using the Update Pay Items option and reset the pay item to the original settings.
- Filter to the appropriate pay types.
- Select all appropriate rows using the boxes on the left.
- Click Recalculate/Return to Original Rates.
Update Pay Items by Fiscal Month Range/Anniversary
Use this method whenever a pay item should be updated mid-year, for example, a pay increase, or if an organization is preparing alternate scenarios. This method is best for COLA scenarios or for pay types for insurance rates that increase mid-year.
- Filter to the appropriate pay types.
- Select all appropriate rows using the boxes on the left.
- Click Update Pay Items.

- Choose the type of Update:
- Fiscal Month Range - Apply the increase/decrease to all months or a specific month range.
- Anniversary - Apply the increase/decrease to the position based on the employee's anniversary date. This requires that the position be associated with an employee and that the employee has the Anniversary Date set in Personnel Budgeting > Personnel Budgeting Setup > Employees.
- Enter the Amount Type (Non Percentage Pay Type) to use as the increase/decrease to be applied to any pay type that is not based on a percentage.
- Flat - Enter the total amount to be added or removed per pay period based on the frequency of the pay type.
- Percent* - The total percentage increase/decrease to be applied per month.
- Enter the Amount Value, the flat dollar amount or percent that should be applied.
- Click Update and verify the changes are correct.
*NOTE: When a pay type has a default value, and you set the amount back to 0 -- by using a multiplier of -100% -- it will see the 0 and use the default value. The way around this, and to remove the remaining pennies, is to use -99.9999%. That will set the amounts to a very low value that won't be added to the columns.
Update Pay Items Using a Custom Spread
Apply a custom spread to an existing pay item, where the monthly compensation for the position has already been set. A custom spread is then applied to the calculated full year Starting Rate of the existing pay item to achieve the spread specified. You can find specific examples here: Custom Spread Examples in Personnel Budgeting.
NOTE: When a position or pay type has a start date after the 1st of the month, applying a custom spread will clear out the starting month value on the Detail tab. That month will not be included in custom spread calculations.
- Filter to the appropriate pay types.
- Select all appropriate rows using the boxes on the left.
- Click Update Pay Items.
- Change to the Custom Spread tab.
- Select the Spread from the dropdown that you would like to apply. (Custom Budget Spreads are created by an Admin in Setup > Calendar > Custom Spreads.)
- Click Preview to view up to the first 10 lines to be adjusted.
- Click Apply to apply the custom spread as is.
- Click Cancel to not make any changes to the pay items.

Example Use Case: In the example below, the salary pay type starting rate is $10,000. The frequency is monthly. The custom spread is 1 every other month. Therefore the total salary of $120,000 (10k X 12) is now spread out every other month as $20,000.

Note: If you need to apply mid-year adjustments, apply the custom spread FIRST, and then the adjustment. If you do the adjustment first, the custom spread takes the new total and allocates it by ratios over the whole year. So the order in which the adjustments are done is important!
Remove Pay Items
Use this method whenever a pay item should no longer be associated with a position. This does not remove the pay type from the Personnel Budgeting > Personnel Budgeting Setup > Pay Types page; rather, it only deletes the selected pay items within the selected scenario. Note that there is no option to reverse deleted pay items - the pay items need to be re-added by editing the position or via import.
- Filter to the appropriate pay types.
- Select all appropriate rows.
- Click Remove Pay Items.
- Click Ok to confirm.
Notes
- If the Detail tab has rows but no amounts in the columns, select all the rows and click Recalculate/Return to Original Rates. This normally occurs because the pay items have been imported or copied and there was an error causing them to be created but not populated with the appropriate values.
The Pay Items Tab
The Pay Items tab displays one row per position, with columns for each pay type. This page allows for simple updates to the base rates for pay items without having to use the export and import process. When making simple changes to pay items, the Pay Items tab is the best option.

Pay Items Filters and Actions
Navigation
- Columns - You can click in any column header to sort by that column. Pay type columns are arranged in the order presented in Personnel Budgeting > Personnel Budgeting Setup > Pay Types.
- Arrow & Tab keys - Use your arrow keys or tab key to move from cell to cell.
Filters
- Title - Search position titles using key words or partial text.
- Employee - Select an employee to filter positions for that employee.
- Employee Status - Filter to Active, Inactive, or None.
- Position Type - Filter by position type.
- Pool - Filter to Pooled or Not Pooled positions.
- Dimension Filters - Filter on customer-specific dimensions in Martus.
- Load - Load the filters and settings selected.

Updating Pay Items
All pay types associated with a position become pay item for that position. Pay items are specific to each scenario, while pay types are utilized with all scenarios to create pay items. Each pay item will be shown on the Pay Item tab as one of the following:
- An amount - Indicates this is an amount specific to this pay item for this position. For example, Life Insurance rates are often age-based and therefore different for each position. Salaries are also specific to the position. Amounts can be used to override the default on the pay type, whether dollar-based or percent-based.
- Default - The default rate set for that pay type in Personnel Budgeting > Pay Types is used. For example, a Cell Phone Allowance may be $50 per pay period for all positions. A 0 is initially used to indicate the default will be accepted. Amounts can be used to override the default on the pay type, whether dollar-based or percent-based.
- Blank - The pay type is not associated with that position. For example, not all positions will opt in to Dental Insurance.
- Position Notes - Add or update text regarding the position in the last column on the right if desired.
Steps to Update Pay Items
- To edit any pay item, click in the cell.
- Enter an amount, or 0 to indicate using the default rate. Leave a cell blank if that pay type is not associated with that position.
- Tab or click to the next cell. Updated cells will have a blue outline indicating a change has been made.
- After one or more updates, be sure to click Save Changes.
Save Changes - Saves updates made to the pay items and position notes, if applicable. Pay Items will be recalculated.
- Cancel Changes - Cancel any updates made to pay items and position notes.
- X Pay Item(s) to be updated - Indicates the number of changes made that will be either saved or cancelled.

Updating Pay Items via Export/Import
You can export the pay item grid, update it in Excel, and then import it back into Martus.
Export Pay Item Grid (xlsx) - Export the pay items and notes.
Include Starting Rate/Amounts - Use the existing rates in the pay items.
Export Empty Grid - Exclude the existing rates in the pay items.
- Choose File - Choose the file to import.
- Import Pay Item Grid (xlsx) - After selecting the file to import, click Import Pay Item Grid (xlsx).

Notes
- Changes to the Pay Item tab will override any adjustments made via the Detail tab including any mid-year adjustments.
- If planning on making many changes, be sure to download the Pay Data file prior to starting as a backup in case changes are made by mistake.
- You cannot make changes to a locked scenario.
Summary (Post to Budget)
The Summary (Post to Budget) page displays all budget lines that exist in the scenario and allows for posting those lines to a budget. This consolidated view of personnel data can be filtered as needed. Any scenario must be manually posted by a Martus Admin via the Summary (Post to Budget) page to a planner budget. A default allocation is automatically selected and loaded if available.
Posting a scenario to a budget requires the following steps, given in greater detail below.
- View the Scenario
- Filter the scenario lines as needed to review what will be posted to the budget.
- Be sure the appropriate allocation is applied in Personnel Budgeting > Scenarios > Summary. A default allocation will be automatically applied.
- Prepare to Post the Scenario
- Zero out any existing Planner budget amounts using Planner > Budget Lines, selecting accounts to impact via an account category. Make a copy of the Planner budget in Planner > Planner Setup first before using Budget Lines!
- Click Post to Scenario Budget in Personnel Budgeting > Scenarios > Summary. Compare the scenario budget and the Planner budget in Planner > Summary.
- Post the Scenario to the Budget
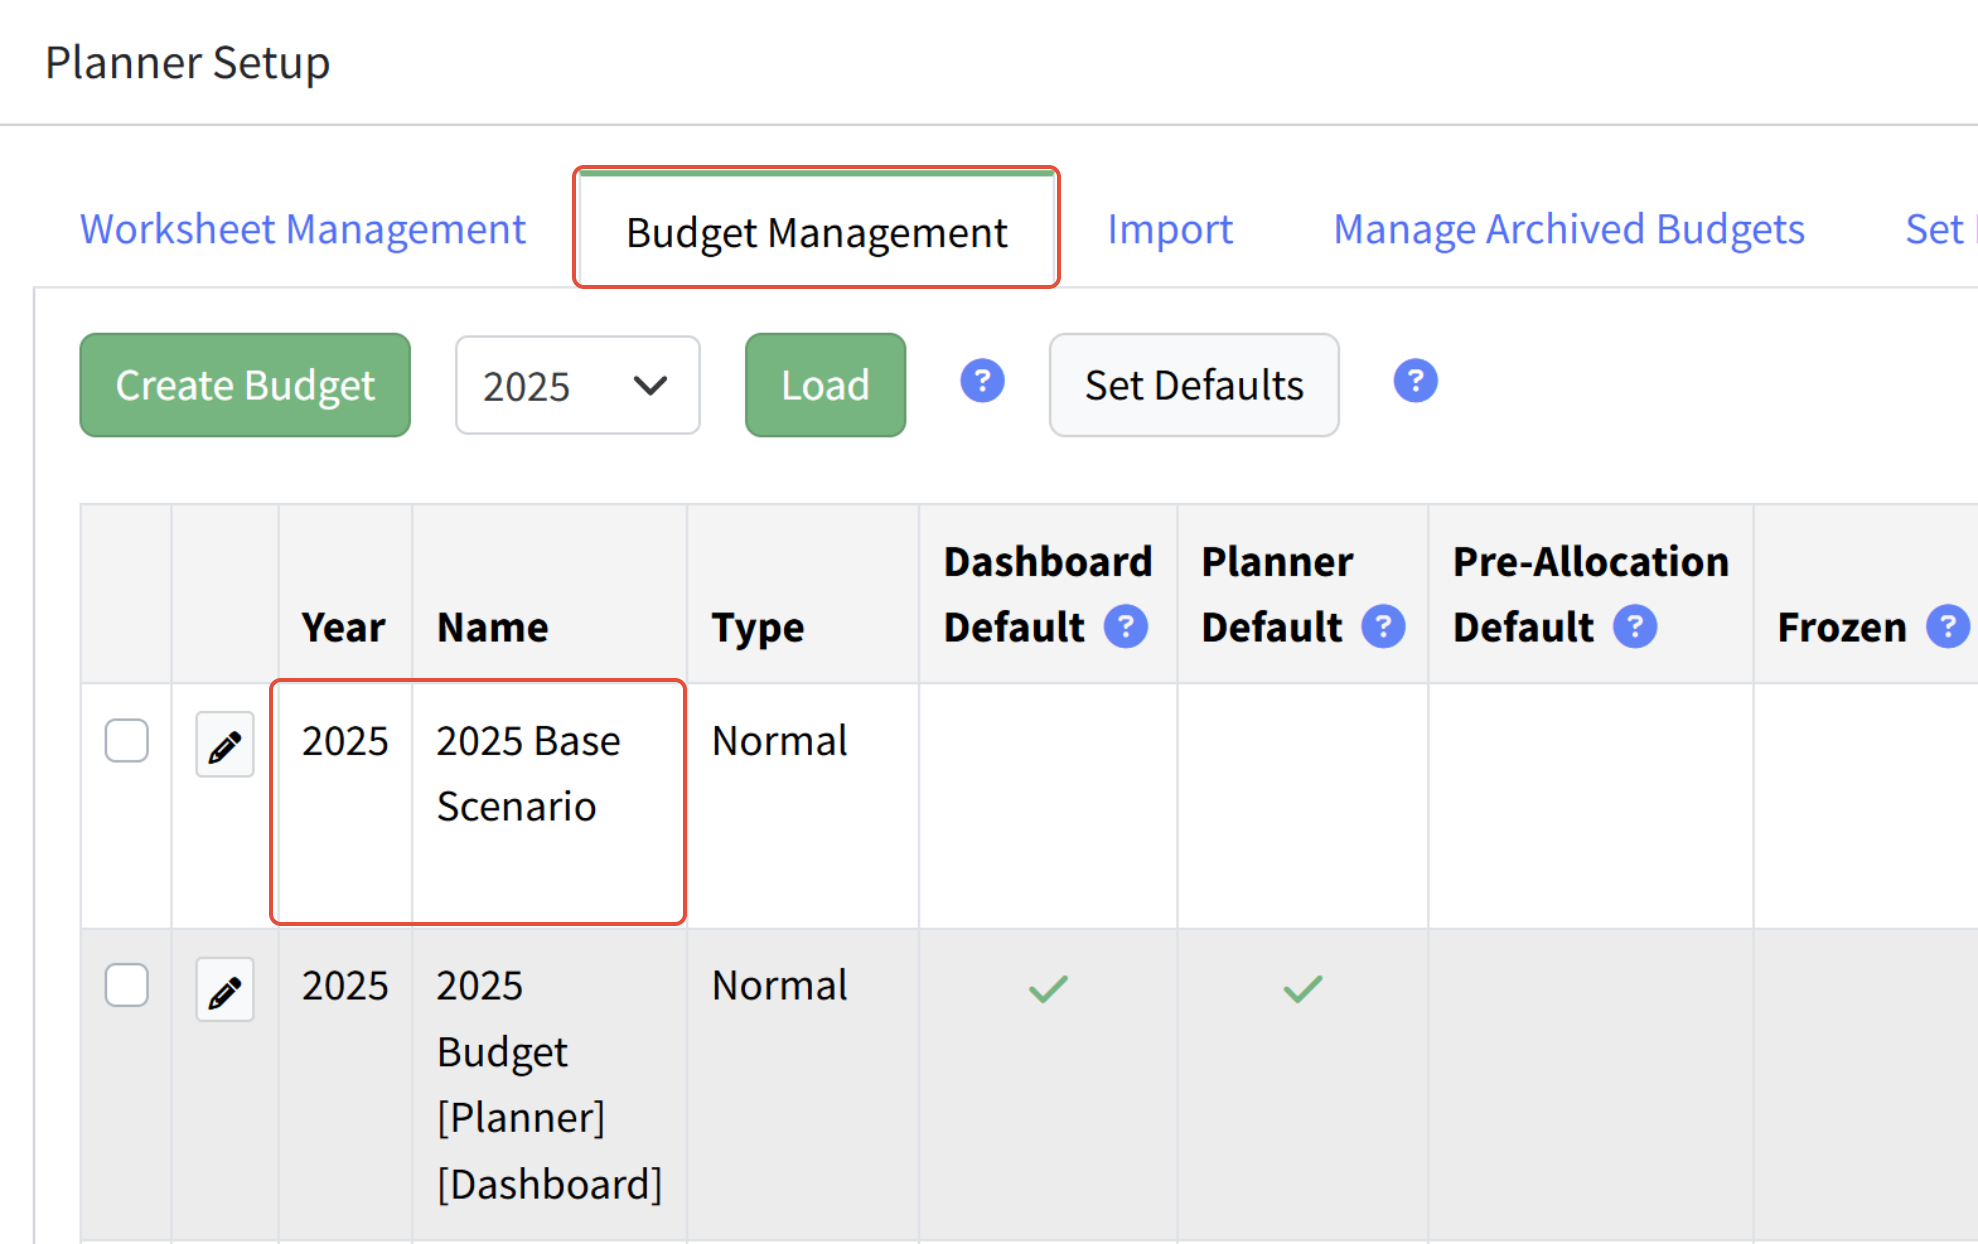
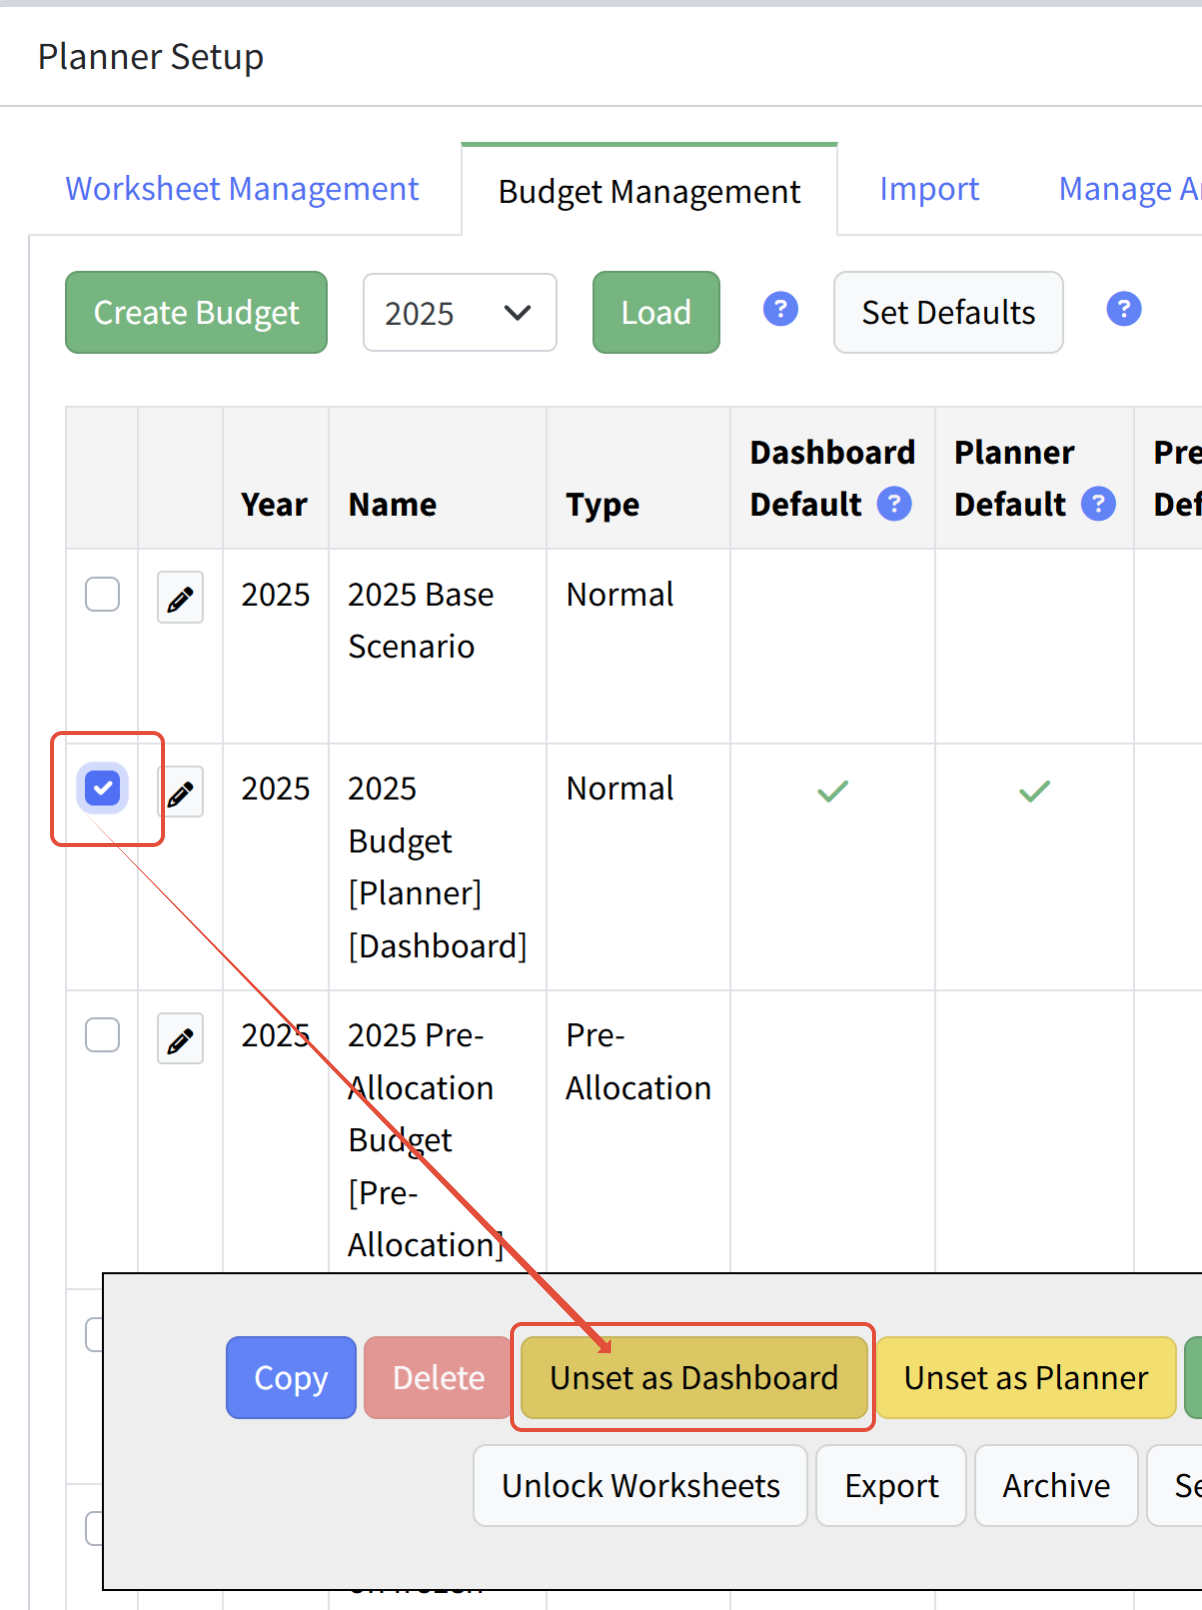
- Unset the Planner budget as the Dashboard default in Planner > Planner Setup.
- Click Post to Existing Budget after selecting the desired budget in Personnel Budgeting > Scenarios > Summary to post the scenario lines to the budget.
- Set the Planner budget as the Dashboard default in Planner > Planner Setup.
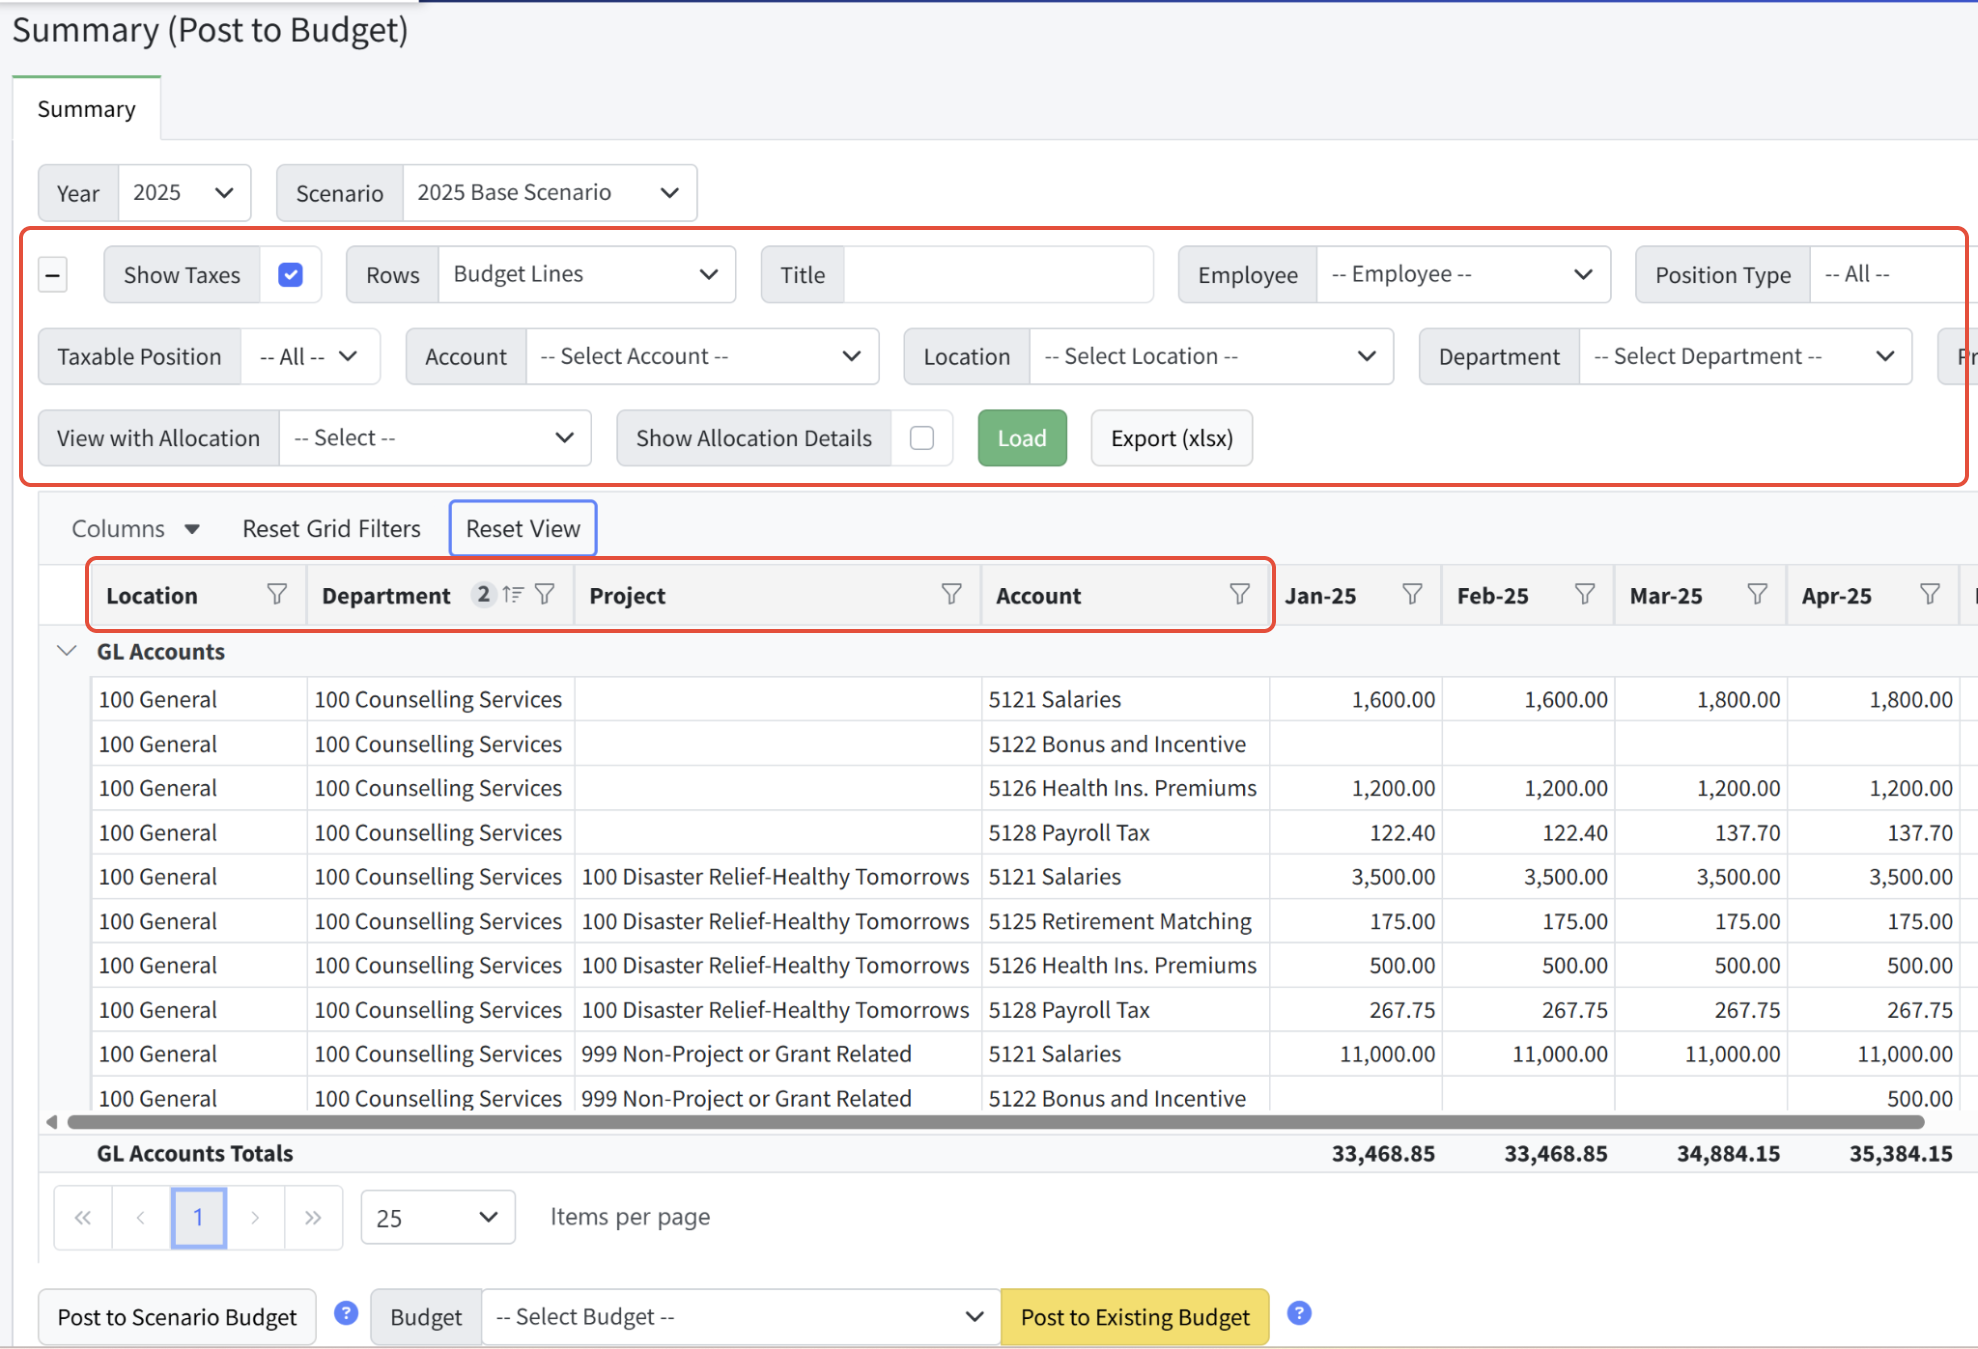
View the Scenario
Filtering and Viewing
The Summary (Post to Budget) page allows for filtering in both the criteria above and the column filters on individual columns. Note that statistical accounts are not included in totals with GL accounts. You can filter the Pay Type criteria to adjust which pay types are shown.
When posting the scenario to a budget, all lines are posted, regardless of what lines are showing per applied filters.
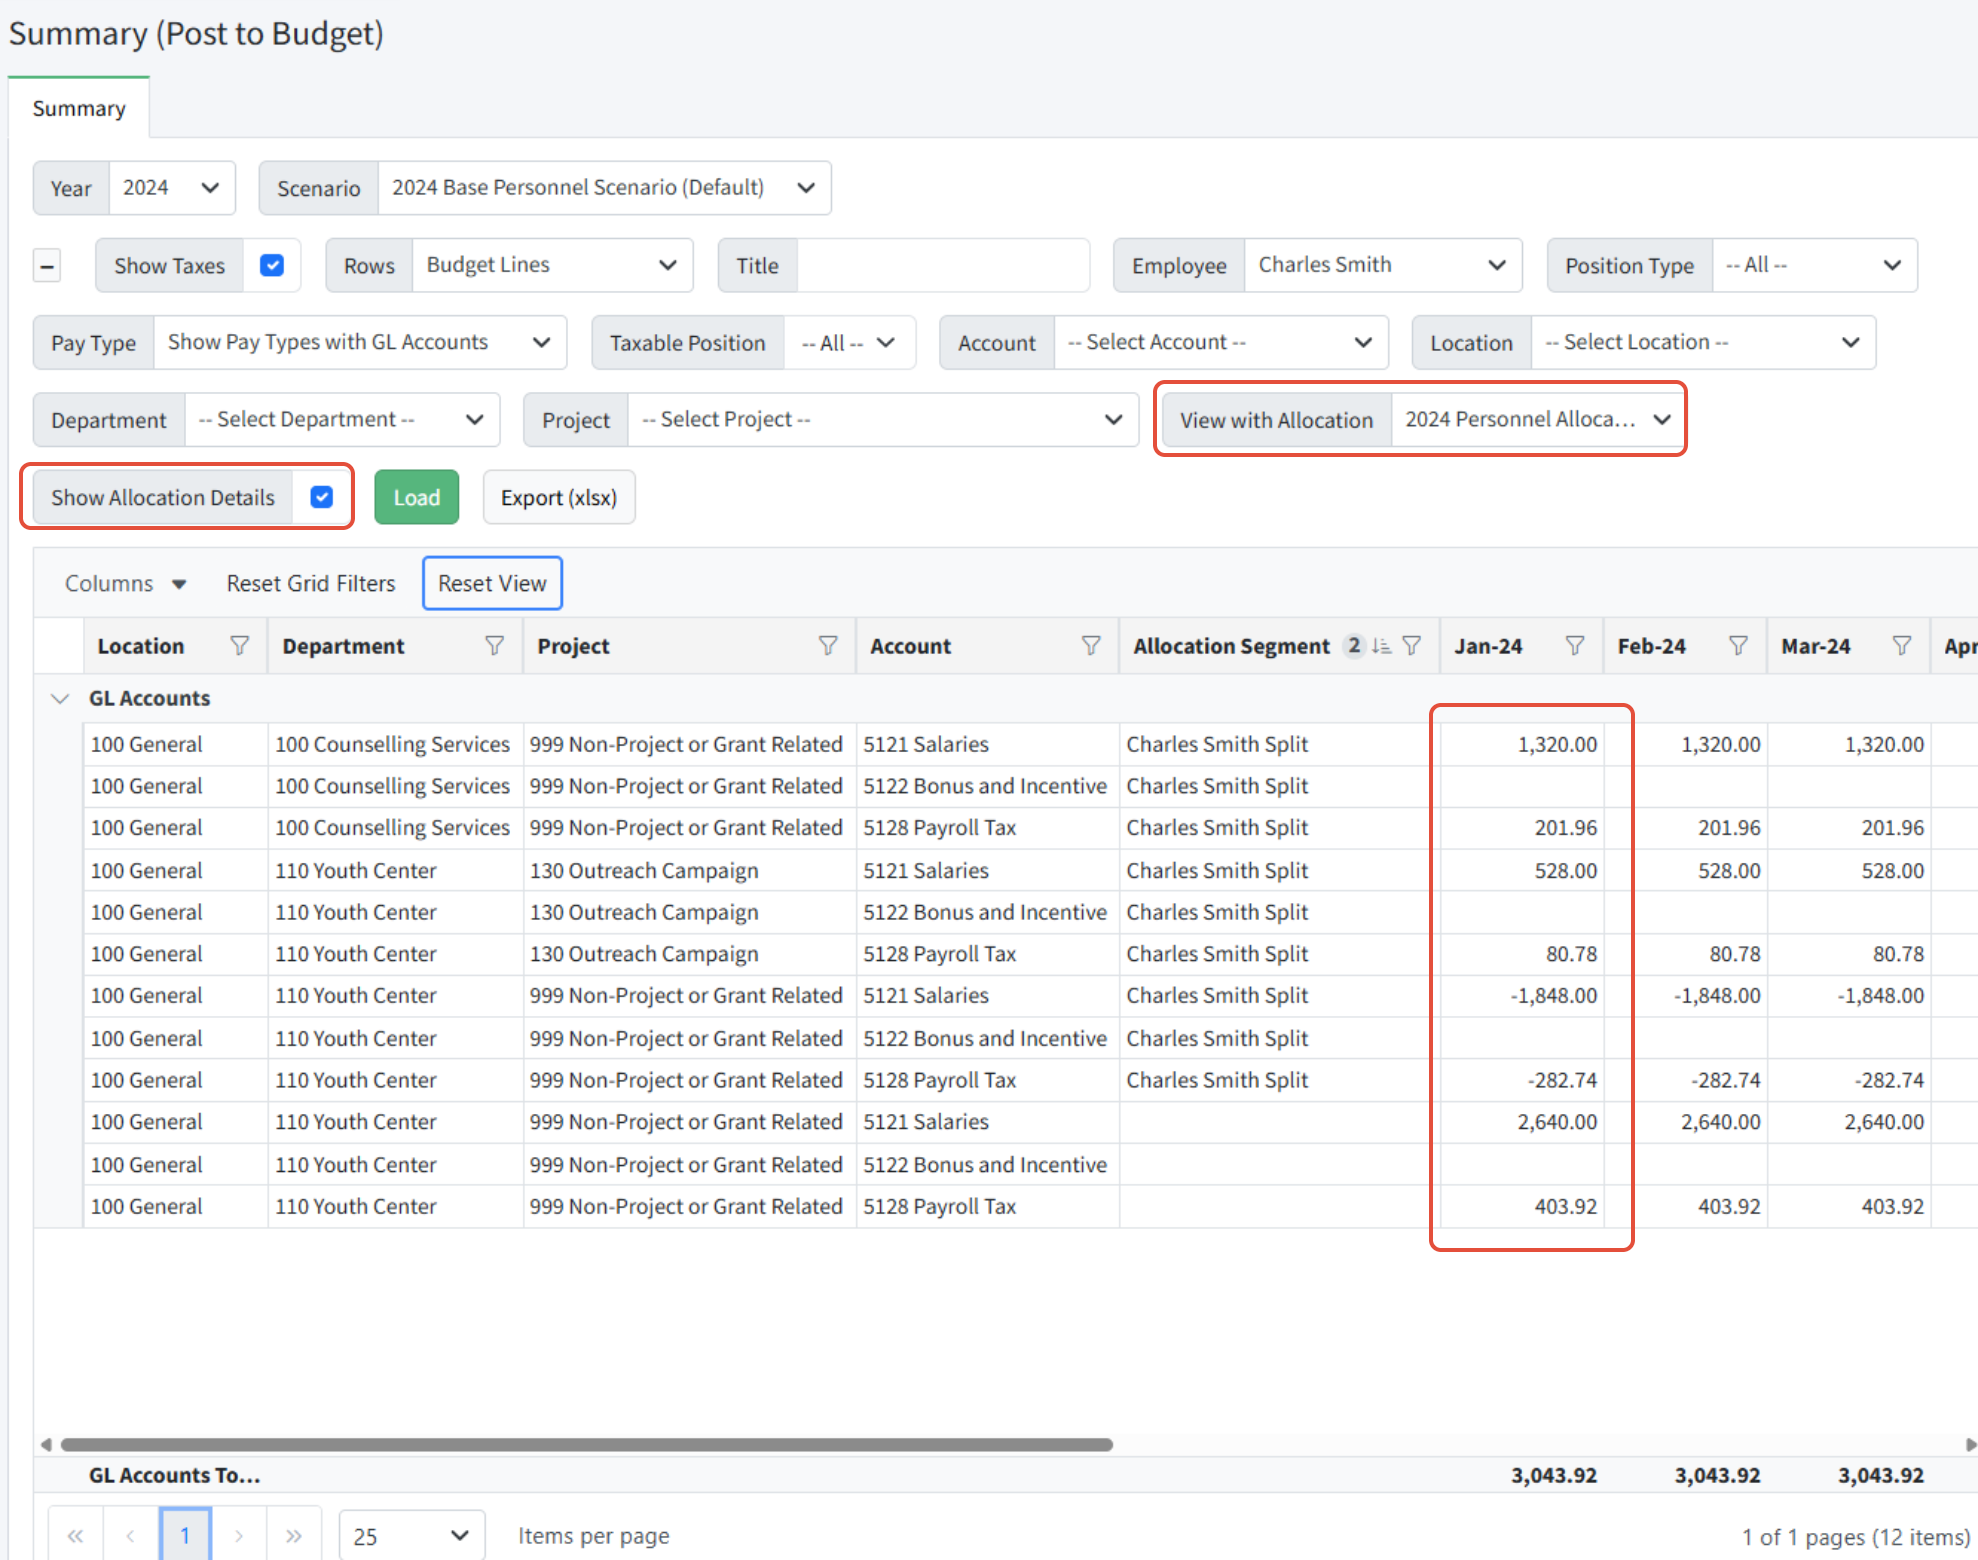
Viewing an Allocation
If you have personnel allocations, the default allocation is automatically selected and loaded. Select another allocation from the dropdown and click Load if desired. When using an allocation, the Show Allocation Details option will provide lines for each allocation displaying the debits and credits that result from that allocation's application.
Prepare to Post the Scenario
Zeroing Out Personnel Lines in the Budget
Best practice before posting the scenario to a budget is to clear any existing budget amounts from your payroll accounts using Planner > Budget Lines. We highly recommend making an archive copy of the budget before you use Budget Lines. To make an archive copy, navigate to Planner > Planner Setup, select the budget using the box to the left, and click Archive from the actions menu.

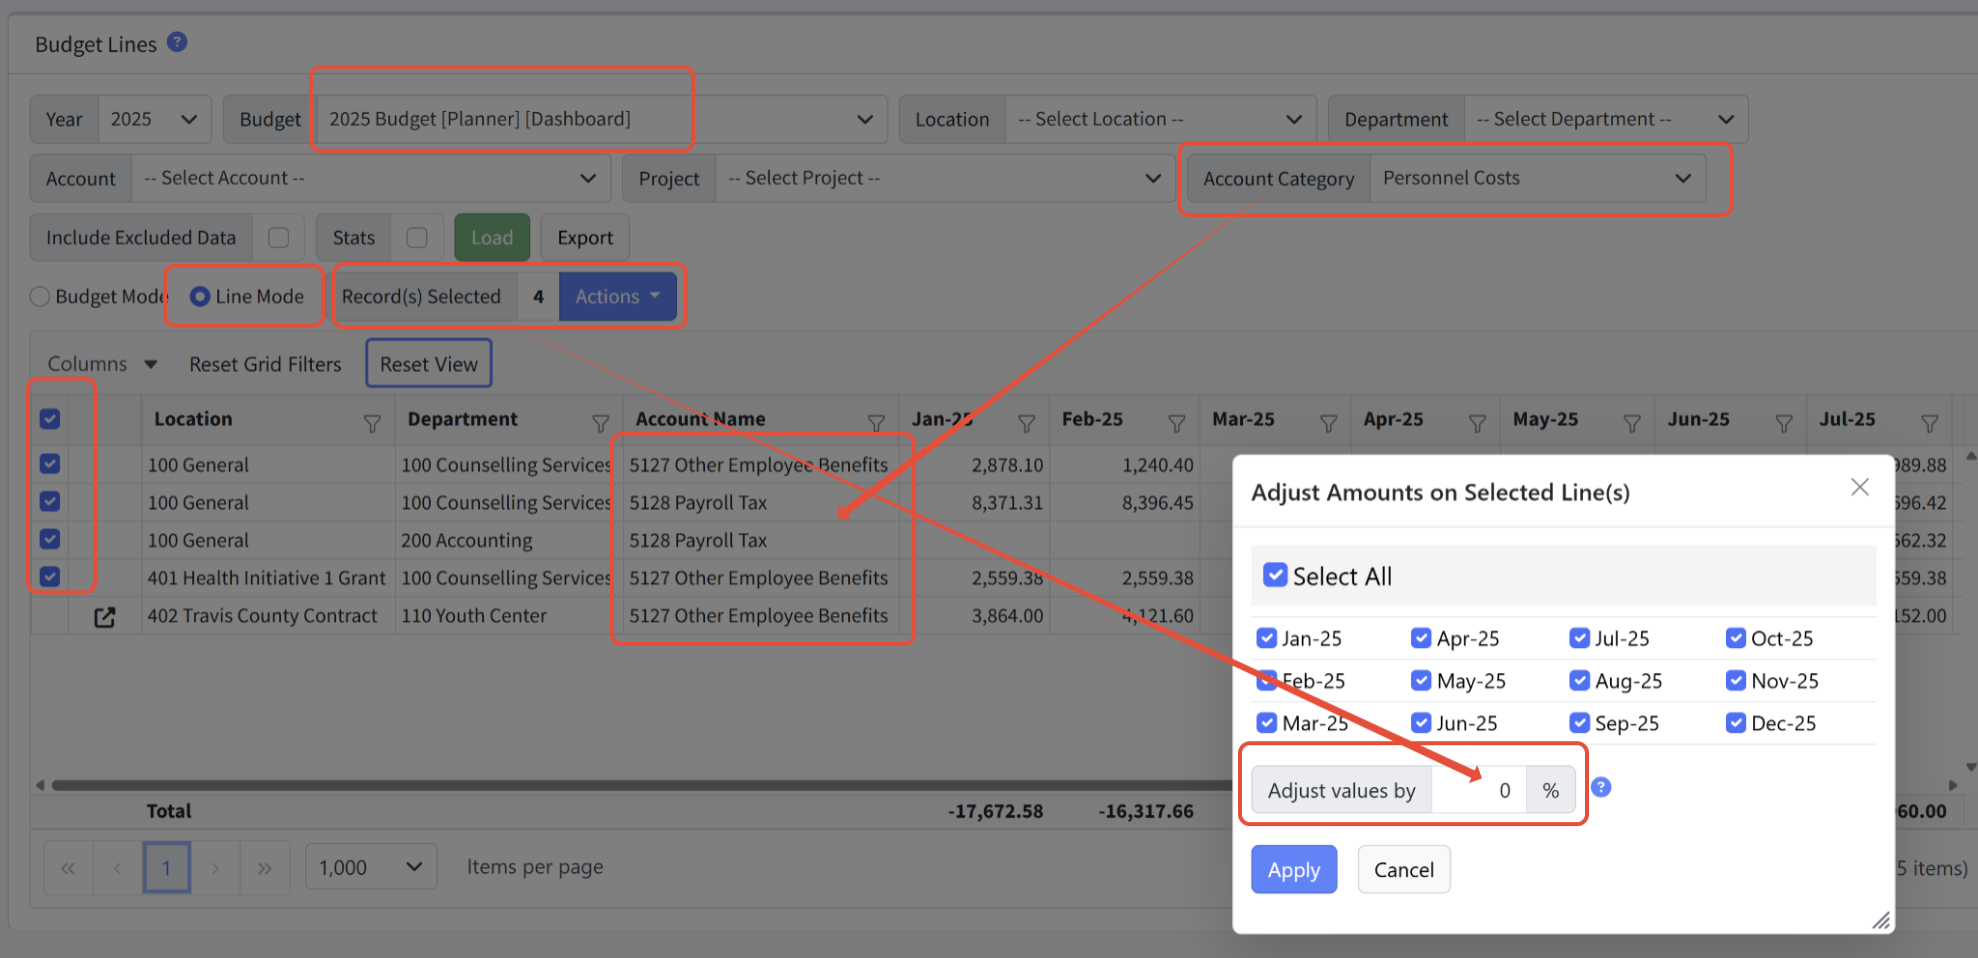
Next, navigate to Planner > Budget Lines (available to all Martus Admins) to zero out current budget numbers. Specify the budget and mode, and select the appropriate accounts to zero-out. Worksheets must be unlocked. Any budget amounts coming from an SPW will not be impacted.
From the Actions menu, select Adjust Amounts. Click Select All, and set Adjust values by to 0.
TIP - Use an account category to quickly isolate your payroll accounts!
Click here for more information on using Budget Lines. Click here for more information on setting up Account Categories.
Viewing the Scenario as a Mini-Budget
It is important to review the personnel summary lines before posting to one of the existing Planner budgets. You can do this by posting to a "scenario budget." This will create a mini-budget in Planner with the same name as the scenario.
- Navigate to Personnel Budgeting > Summary (Post to Budget).
- A default allocation is automatically selected and loaded if available.
- Scroll to the bottom of the screen.

- Click Post to Scenario Budget (Review the blue question mark for more detailed on-screen help).
- Martus creates a budget for this personnel scenario in Planner to review and compare in reports there.
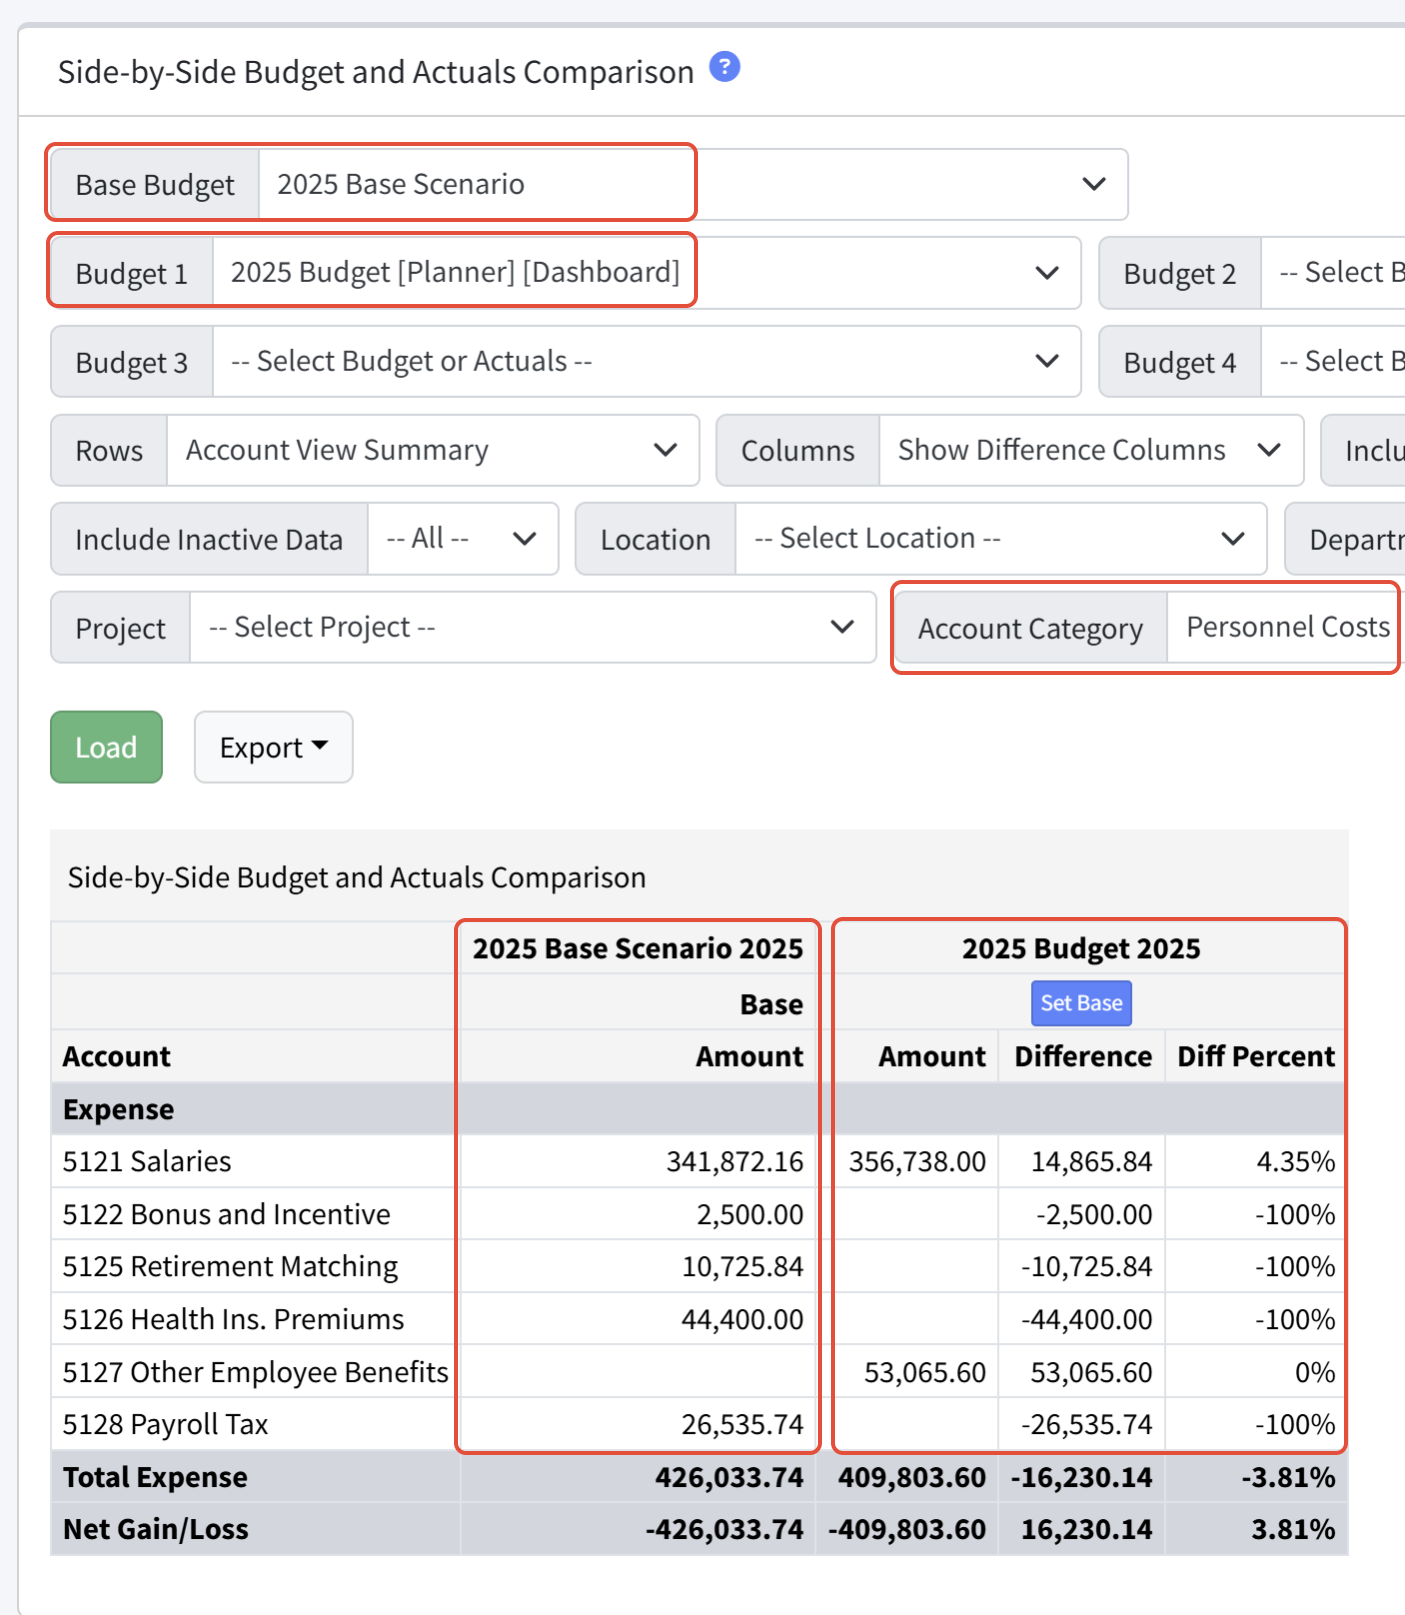
Best practice is to review and compare the scenario budget and the Planner budget using the reports in Planner > Summary (especially the Side-by-Side Budget and Actuals Comparison report). Once the scenario budget is confirmed, you are ready to post the scenario to an existing Planner budget.
Post the Scenario to the Budget
When posting to an existing budget, all budget lines in the personnel scenario will be posted to the budget. If the scenario was previously posted, it will replace existing lines in the budget, and any new lines will be added.
Unset the Dashboard Budget
The budget selected cannot be the Dashboard default budget. Temporarily unset the budget as the Dashboard default, and then reset it after posting the scenario.
Note: An archived copy of the budget you select is automatically created prior to posting the scenario, and can be found in Planner > Planner Setup > Manage Archived Budgets with the name of the budget appended to "Prior to Personnel Posting", with the date.
- Navigate to Personnel Budgeting > Summary (Post to Budget).
- A default allocation is automatically selected and loaded if available.
- Scroll to the bottom of the screen.

- Select the budget to post the scenario budget to.
- Click Post to Existing Budget.
Important Notes
- When you post a scenario, it will update all worksheets in the budget, whether they are locked or not.
- Worksheet lines posted from a scenario budget will assume the status of the worksheet. If the worksheet is unlocked, then the scenario lines can be edited by the user.
- Personnel only adds or updates lines within a budget; it will not remove data from lines that do not appear in the scenario summary.
- A note is added to each amount on the line posted to by a scenario for that worksheet so that the user can easily tell which lines were posted to and which scenario was used when posting to the Planner Budget. In order to identify which scenario has been posted to a Budget, open a worksheet that contains personnel lines and view the line note.

- Only Admins can post a personnel summary to a Planner Budget.
- ALL lines of the scenario will be posted regardless of what filters are applied on the Summary screen.
- Scenarios will not post to frozen months in the Planner Budget.
- It is possible to compare multiple Scenarios via the Post to Scenario budget option. Simply post multiple Scenarios from either the same fiscal year, or multiple fiscal years to their own Scenario budgets. Then go to Planner > Summary and navigate to the Side by Side Budget & Actual Comparison report to select the various Scenario budgets that should be compared. This method allows for a year-over-year analysis of Personnel Costs.
- If the Summary Tab is not showing any amounts, it is recommended to navigate to the Detail tab and ensure it is populated; if not, use the option to Recalculate/Return to Original Rates.
Use the links below to navigate through the learning path.
Allocations << Introduction to Personnel - Learning Path