Other Setup Topics
Account Categories (Video)
Account Categories is a feature within Martus that allows you to group accounts for reporting purposes. With account categories, you can consolidate information on your Income Statement and other financial reports into a concise format that groups related GL accounts together.
Setting Up Account Categories
- Go to Setup > Account Categories, and click Add Category to create categories.
- Enter the Name for the category.
- To create a child category, select a Parent Category. You can nest as many parent/children as needed.
- Select the Type, either Balance Sheet, Income & Expense, or Statistical.
- Click Save.

Once all your account categories are created, go to Setup > Accounts and change the Category of your accounts.

Click Balance Sheet Quickstart to select and load Balance Sheet Categories. Uncheck any categories not needed.

Changing the Order of Account Categories
- Create at least two account categories.
- Click on the gripper (it looks like an 8 domino) to the left of an account category and drag it to the appropriate place.
- Changes are automatically saved.
NOTE: In order to move an account category under a new parent (a category without any children), first edit one of the prospective children and update the parent to the new parent. Then you can drag and drop under the new parent category.
NOTE: You MUST always drag a new child to the 1st position under an existing parent (so it knows what parent to use), and then you can move it within the family.

Using Account Categories
Account categories are used to group accounts for reporting purposes. You can select them as Rows, and also specify a specific category to view on most reports under Account Category. Additionally, use Account Categories in Load Second Dimension when Rows are set to a dimension. Account categories can also be used in Report Builder.

Account categories can also be used in ReportBuilder.

Exporting and Importing Account Categories
You can export the account categories, make updates or add entries, and then import the file back into Martus. Be sure that parent categories are listed before child categories. The default Type when importing is Income & Expense.

The video below walks you through setting up account categories.
NOTE: This video does not yet demonstrate the more recent release of the ability to drag and drop categories.
Setup > Calendar - Managing the Default Month & Default Dashboard Budget
The Default Month helps Martus organize the information that is presented to users. It can be set to update automatically each month, or it can be updated manually by an Admin. It is used to determine the data displayed or used in the following areas:
- Reports - Provides the default Ending Date on the Dashboard > Financial reports and in ReportBuilder. Any user can override the Ending Date to see data from more recent months.
- Worksheets - Provides the ending month through which actuals are shown in the reference data on budget worksheets.
- Load Actuals - Provides the ending month through which actuals are loaded into a new or existing budget.
- Nightly Sync - The Default Month will limit the actuals that are synced from your accounting system during the nightly sync if you have unchecked the Allow Sync after Default Month option on the Setup > Calendar page. Otherwise, Martus will sync all actuals year-to-date regardless of the Default Month.

Setting the Default Month
The Default Month can be set to update automatically each month, or it can be updated manually by an Admin.
Auto Set Option
Set the Default Month to automatically update based on the desired selection.
- Prior Calendar Month - The Default Month will update to the current prior month on the day selected.
- Current Calendar Month - The Default Month will update to the current month on the day selected.
Click Send Emails to automatically send a Default Month email to your Martus users to remind them to go to Martus and review their reports. Click Update Default Month Email Text to customize your email.
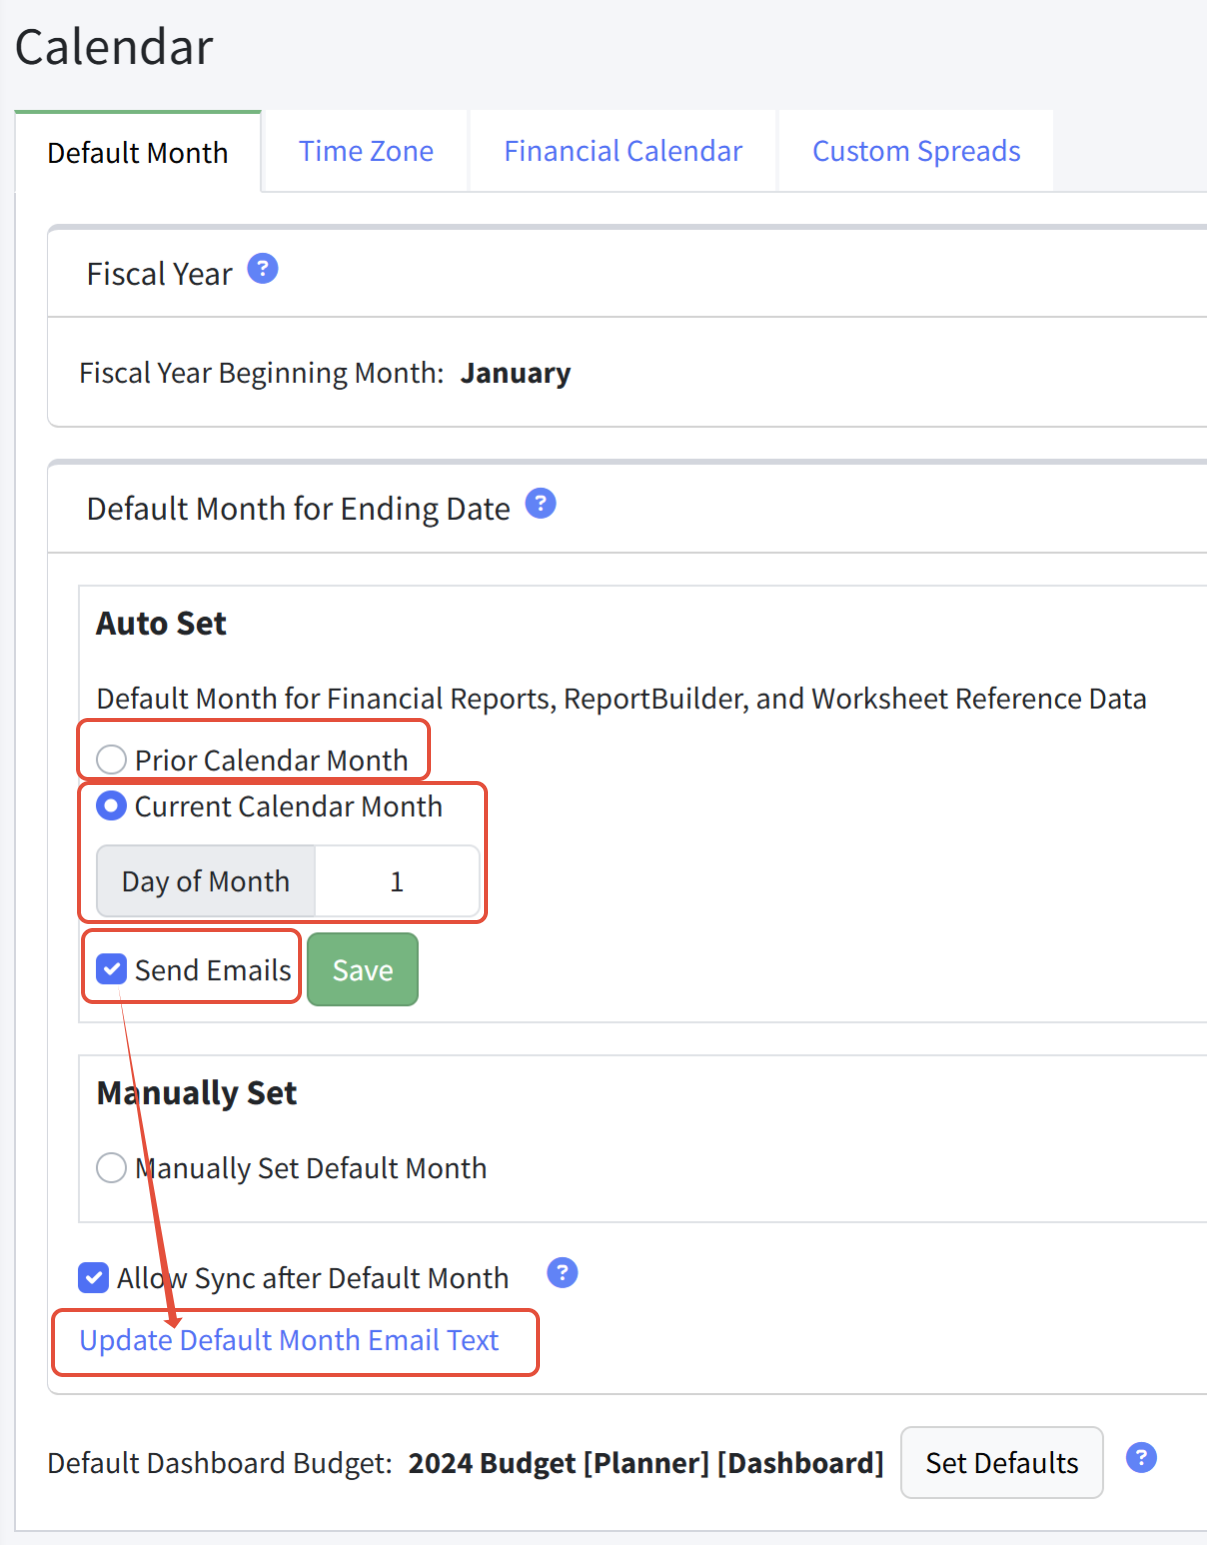
Step-by-Step
- Select Prior Calendar Month or Current Calendar Month and choose the Day of Month to switch the Default Month.
- Click Send Emails to alert users that the Default Month has been updated in Martus.
- Click Save.

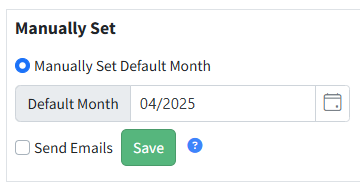
Manually Set Option
You can choose to set the Default Month manually. Best practice is to keep this set to the current month, or one month prior to the current month, so that your end-users automatically see current actuals.
You may also choose to change this date when you've closed the month in your accounting system, to be sure that the data your users see has been reviewed for accuracy.
Click Send Emails to send a Default Month email to your Martus users when you update the Default Month to remind them to go to Martus and review their reports. Click Update Default Month Email Text to customize your email.
Step-by-Step
- Click Manually Set Default Month.
- Select the month.
- Select Send Emails to alert users that the Default Month has been updated in Martus.
- Click Save.
Setting the Default Dashboard Budget
The Setup > Calendar page also displays and allows an Admin to assign the default dashboard budget for the current fiscal year. The default dashboard budget is available to non-admin users on Dashboard > Financial reports and is the default budget for Admins.
Step-by-Step
- Go to Setup > Calendar.
- Click Set Defaults.

- Choose the appropriate budget.

- Select Lock to ensure all worksheets in the budget cannot be unintentionally changed.

- Click Save.

Martus Status Summary
Use the Martus Status Summary to review your Martus Status Score.
A perfect "100" indicates that you are using Martus well, are ensuring that your users have easy access to current actuals, and that key budgets are accessible. Total scores cannot be negative.
Access your Martus Status Summary
Navigate to Admin Reports > Martus Status Summary to view the Martus Status Summary. Only Martus Admins can access the Martus Status Summary.
The Martus Status Score
This score reflects your Martus configuration and usage. Points are deducted as follows.
Planner Budget for Next Year
Points Deducted | Time Intervals |
| No points deducted | A default planner budget has been set for the next fiscal year. |
| -5 points | 3 months prior to fiscal start |
| -10 points | 2 months prior to fiscal start |
| -15 points | 1 month prior to fiscal start |
Dashboard Budget for Current Year
| Points Deducted | Time Intervals |
| No points deducted | A default dashboard budget has been set for the current fiscal year. |
| -5 points | 1 month from fiscal start |
| -10 points | 2 months from fiscal start |
| -15 points | 3 months from fiscal start |
Default Month (for Ending Date)
| Points Deducted | |
| 0 points deducted | The Default Month is set to the current month, or prior 2 months |
| -20 points | 3 months prior to current month |
| -30 points | 4 months prior to current month |
| An additional -10 points for every month |
Recent Logins for Admin and Non-Admin Users
| Admin Login Behavior (at least 1) | Non-admin Login Behavior (40%) | Time Interval |
| 0 points deducted (at least 1 admin has logged in) | 0 points deducted (at least 40% of non-admins have logged in) | During the last 15 days |
| -5 points | -5 points | 16-30 days |
| -10 points | -10 points | 31-45 days |
| -15 points | -15 points | 46-60 days |
| -25 points | -25 points | more than 61 days |
Example A - Martus Status Summary
In the example below from May 2025, the score is 30.
- 20 points were deducted because the Default Month is set too far in the past (earlier than March).
- 25 points were deducted because an Admin user has not logged in for more than 91 days.
- 25 points were deducted because more than 60% of non-admin users have not logged in for more than 61 days.
- 0 points were deducted because a planner budget has not been started and the FY start month is January.
- 0 points were deducted because a dashboard budget has been set for the current year.

Example B - Martus Status Summary
In the example below from May 2025, the score is 100.
- 0 points were deducted because the Default Month is set to less than 3 months in the past.
- 0 points were deducted because an Admin user has logged in during the last 15 days.
- 0 points were deducted because at least 40% of non-admin users have logged in during the last 15 days.
- 0 points were deducted because a planner budget has not been started and the FY start month is May.
- 0 points were deducted because a dashboard budget has been set for the current year.

User Login Summary
This widget displays important information about your Martus users, including:
- Total number of licenses and number of active users
- Number of users (Admin and non-admin) who have logged in by date range
- Summary of points deducted
- A User List link to Setup > Users to review users
Budget Info
Budget Info displays the following:
- Current Fiscal Year, and Default Planner and Dashboard Budgets
- If different than the Current Fiscal Year, the Default Budget Year, and Default Planner and Dashboard Budgets
- The Default Month, and an Update link to change it
- A link to Planner Setup to update budget settings and lock worksheets
- Warnings concerning locked worksheets and recommended updates
Activity Log
The Activity Log is a feature of the Plus and Premium subscriptions. The log captures the date and time of the activity, the user who performed the action, the action, the entity (the object of the action), and provides additional details as well.
The Activity Log is not an audit log. It does not track detail to the level of amounts that are updated on budget worksheets. Best practice is to use the Notes function of the Budget Widget in worksheets to track amount changes, and/or create versions of budgets to preserve historical data.
The Activity Log is accessed from Admin Reports in the menu, so it is available only to Admin users. There are no additional permissions that apply to viewing the Activity Log.
NOTE: Partial Activity Logs are available as per below:

The Activity Log directly pertaining to a worksheet is accessed in Planner > Worksheets. It contains activity specific to the open worksheet and can be viewed by non-admins as well as Admins.

The Activity Log directly pertaining to a budget is accessed in Planner > Planner Setup > Budget Management and can only be viewed by Admins.

The Activity Log captures these and many more actions:
Email Log
The Email Log is a feature available to Martus Admins. The Email Log is accessed from Admin Reports in the menu. The log captures the date and time of any email sent through Martus, and the current status.
NOTE: You must hit Load to view sent emails. They do not automatically show on the page!Status is defined as:
- Sent - Email was sent
- Opened - Email was opened by the receiver
- Bounced - Email was not delivered and the email address in user's profile needs reviewed
- WaitingToRetry - Martus is waiting to retry sending the email to the receiver
In the log, you are able to filter and sort each column as needed, and choose which columns to show/hide.
The Error column lists any problems encountered, which allows the Admin to address the root cause.
If you have an issue with an email sent from Martus, please create a ticket through the Knowledge Base if you are a direct Martus customer, or contact your Martus reseller if you are supported through one of our Martus partners.

Setup > Branding
The Branding page allows you to control the look and feel of certain aspects of Martus. This page includes four tabs:
- Logo - Add a logo file - either JPG or PNG - for use in ReportBuilder and/or the Martus masthead and emails
- Default Month Email - Allows customization of the Default Month email
- Invitation Email - Allows customization of the New User Email
- Report Names - Override the standard report names for the Income Statement and the Balance Sheet
Adding a Logo for ReportBuilder Reports, Emails, and the Masthead
- Go to Setup > Branding.
- Navigate to the Logo tab.
- Click Choose File to find the appropriate file. Select a logo file with a white background, ratio 4:1, in either PNG or JPG format. All Martus file imports have a limit of 15MB.
- Click Upload Client Logo.
- Set the defaults for the use of the logo. If you are a direct client of Martus, you can choose use the Martus logo or your company logo for emails or in the masthead. (The Masthead refers to the upper left corner of the software above the vertical menu.) ReportBuilder will always use the company logo if it is available.
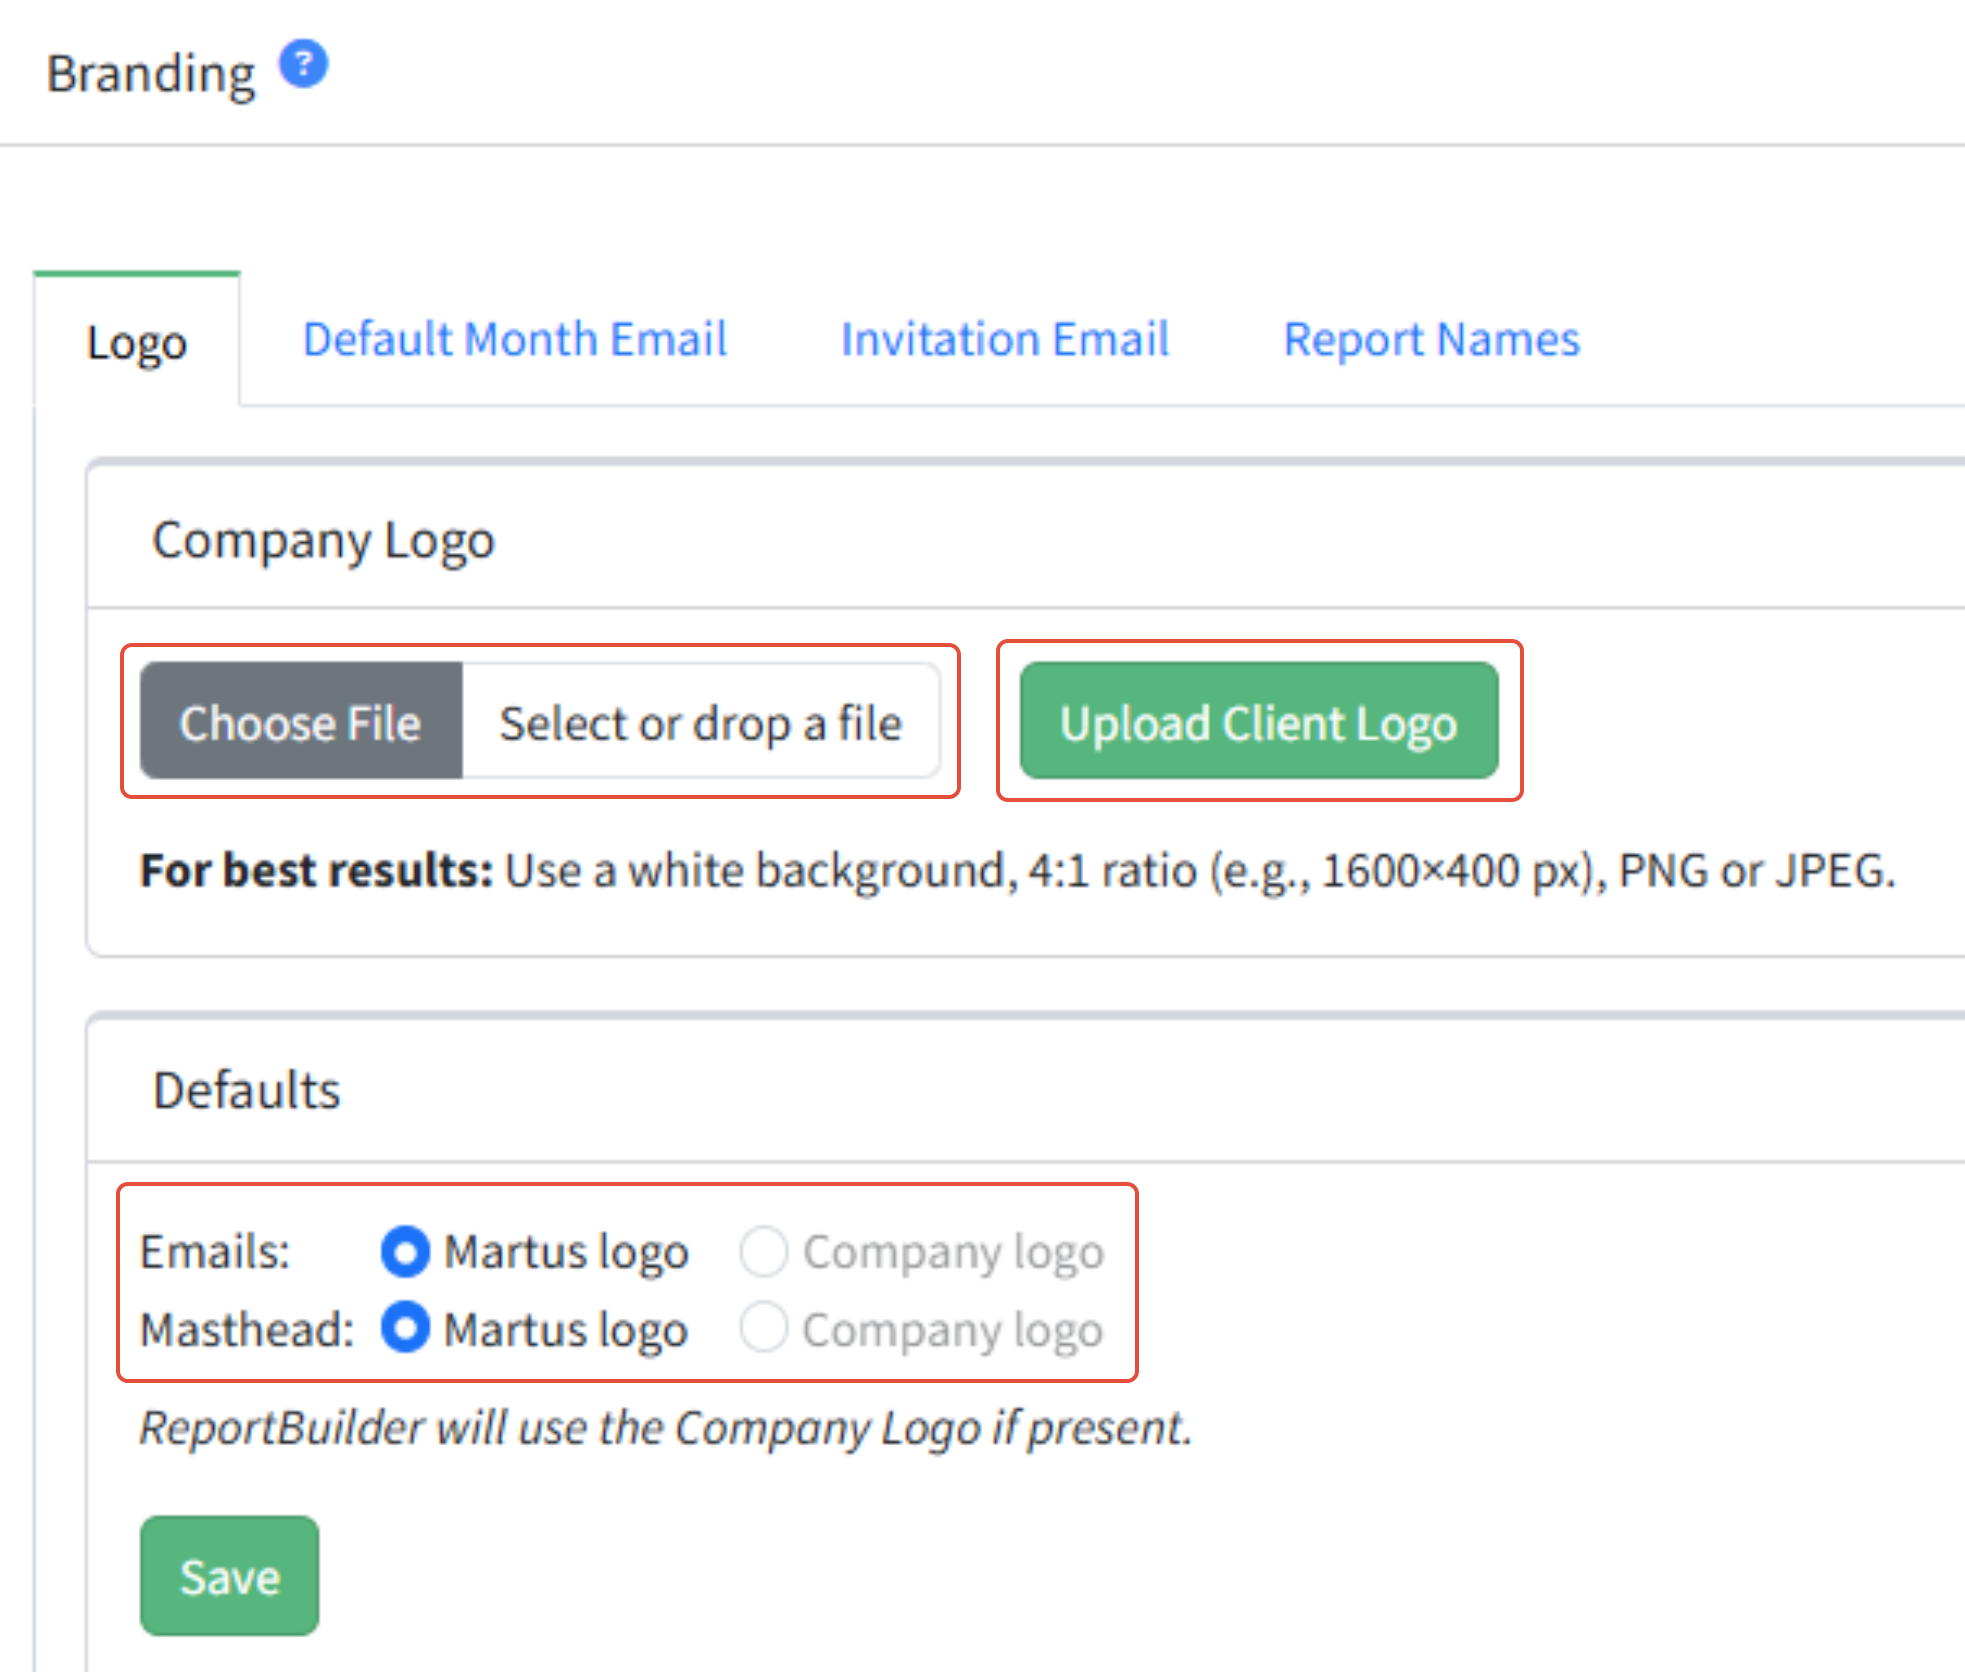
If you are a partner client, you can select additional options for the use of logos in Martus. Select the Martus logo, company logo if available, or Partner logo if available, for use in emails and the masthead. ReportBuilder will always use the company logo if it is available.

For more information on ReportBuilder formatting, click here.
Customizing the Default Month Email
- Go to Setup > Branding.
- Navigate to the Default Month Email tab.
- Fill out the form as desired and click Save.

- The email above will appear as follows when delivered:

For more information on the Default Month, click here.
Customizing the Invitation Email
- Go to Setup > Branding.
- Navigate to the Invitation Email tab.
- Fill out the form as desired and click Save.

- The email above will appear as follows when delivered:

For more information on adding Users, click here.
Customizing Report Names
Enter the names you would like to use to override the Income Statement and Balance Sheet reports. The names will show in the Dashboard > Financials > Select Report dropdown.


Dimension FAQ
General Notes
What are dimensions?
Dimensions can be thought of as tags on GL activity that allow your GL activity to be filtered and summarized in many different ways.
Defining dimensions in Martus is a crucial configuration step that affects the structure of budget worksheets, user restrictions, and reporting filters.
The dimension name field is restricted to 100 characters or less, so longer names will need to be shortened.
How can I see my dimensions?
You can see the dimensions that are configured in your Martus instance by going to Setup > Dimensions.
What is a line dimension vs a sheet dimension?
Line dimensions are tags inside a budget worksheet on the budget line.
- Sheet dimensions determine how budget worksheets are defined. A separate budget worksheet may be created for each unique combination of sheet dimensions.
- Examples of line vs sheet dimensions can be found here.
Some of my dimension items are not showing nums in Martus. How do I get them to show nums?
Martus will show a blank Num if the value in your accounting system is greater than 25 characters long. If you would like to see the num in Martus, you will need to update your accounting system so that the value is less than or equal to 25 characters long.
I need additional dimensions added to Martus. How can I get those added?
Please create a ticket through the Knowledge Base if you are a direct Martus customer, or contact your Martus reseller if you are supported through one of our Martus partners.
My dimension setup in Martus needs to be updated. How can I do that?
Please create a ticket through the Knowledge Base if you are a direct Martus customer, or contact your Martus reseller if you are supported through one of our Martus partners.
What happens if I change a dimension name or number in Martus?
Do not modify Dimension values in Martus if you are using an API integration without contacting Martus support or your Martus partner. For file-based customers, changes may be made, but they will affect all previous years, and future transaction files must include the new information.
How do I inactivate a dimension value?
Navigate to Setup > Dimensions.
Click View [#] next to the appropriate dimension.
Click Edit on the dimension value you want to inactivate.
Select Inactive.
If you are an API-based client, also select the option to Lock the dimension.
Click Save.
API-Based Clients
If I rename my dimensions in my accounting software, will the rename sync to Martus?
Yes, the name change will sync to Martus in our nightly sync.
What if I need to add more values to a pre-existing dimension?
You should add new values to pre-existing dimensions within your Accounting system, and then initiate an on-demand sync in Dashboard > Updater to add the new values to Martus. You can also wait until the the nightly sync to capture any new values in your pre-existing dimensions.
File-Based Clients
I renamed my dimension in my accounting software. What do I need to do now?
Please create a ticket through the Knowledge Base if you are a direct Martus customer, or contact your Martus reseller if you are supported through one of our Martus partners for assistance.
What will happen if I do not advise Martus of the name change?
When you attempt to upload your monthly transactions, your upload will error due to the mismatch.
What if I need to add more values to a pre-existing dimension?
You can add new values to a pre-existing dimension by navigating to Setup > Dimensions. Select View in the Count column of the dimension for which you wish to add values. Click Add New and complete the needed information.
Changing Your Accounting System
Martus integrates with more than 20 accounting and ERP systems. Each integration is slightly different and requires that Martus be configured in specific ways.
If you are planning on changing your accounting system, we'll need to create and configure a new instance of Martus. There is a reimplementation fee associated with switching accounting systems.
We can help make your transition as smooth as possible! Please create a ticket through the Knowledge Base if you are a direct Martus customer, or contact your Martus reseller if you are supported through one of our Martus partners.
Review the questions below and provide the requested information in your support ticket or to your partner. That will help us or your partner to work with you to develop a transition plan.
Information to Provide in the Ticket to Support or your Partner
What is your current accounting system? And your new system?
- Current system:
- New system:
When do you plan to go live on the new system?
Are you keeping the same fiscal year?
- Yes
- If no, what is your new fiscal year?
Would you like to upgrade to a different subscription during the transition?
- Yes / No
Dashboard Updater
Martus' budgeting and reporting features rely on the ability to view what has been spent versus what is budgeted. The budget to actual reporting and the ability to see actuals while budgeting are key aspects of Martus. For our customers using one of our integrated accounting systems, the flow of actuals into Martus happens automatically every weeknight via the auto-update process, also called the nightly sync.
The Dashboard Updater screen is important as it allows a user to do the following:
- Manually pull into Martus any changes to Actuals on demand.
- Manually pull into Martus any changes to Accounts on demand.
- Manually pull into Martus any changes to Dimensions on demand.
- Display all nightly syncs and other Martus tasks and their status.
- Manually pull into Martus more historical information.
Martus automatically syncs via our API with the following integrated accounting systems. Martus will pull specific data via sync from the accounting system. However, no accounting systems will pull data from Martus - the sync is only one way. (For other accounting systems, Martus provides a file-based approach where actuals can be loaded manually or through the Martus EZ connector.)
- Sage Intacct
- QuickBooks (QBO and Desktop)
- Financial Edge NXT
- Microsoft Dynamics
The Martus Sync
Martus' auto-update runs every weeknight. It automatically syncs:
- The current and previous two months of actuals
- Scenario one: Current date of 1/1/2024 - Martus will sync Jan 2024, December 2023, November 2023
- Scenario two: Current date of 6/30/2024 - Martus will sync June 2024, May 2024, April 2024
- The Chart of Accounts
- All dimensions
Manually Syncing Actuals
The nightly process runs the updater to sync the current month and two prior months. If you have made changes in months outside that range, those changes would not be picked up. You will have to manually sync the actuals to ensure Martus picks up those changes. Or if there are transactions in the accounting system added today that need to be visible in Martus to run a report, the following steps will refresh all actuals in Martus for the months chosen. It is also possible to pull in any historical Actuals data that is in the accounting system via this method.
- Go to Dashboard > Updater.
- Choose the appropriate months.
- Click Sync Monthly Actuals.

Manually Syncing Dimensions
There are times when it is necessary to add data such as accounts or dimension values to your accounting system and have that data immediately available in Martus rather than waiting for the nightly sync.
- Go to Dashboard > Updater.
- Click the appropriate Chart of Accounts or Dimension Sync - your Martus instance may have different dimension options.

The Updater Task Queue
The Updater Task Queue is a list of all jobs, both automated such as the nightly sync (or auto-update), and manual such as a budget copy. The task queue is monitored by Martus Support staff who may reach out to you if there are issues. The task queue will show all successful and errored jobs. If you receive an error, please create a ticket through the Knowledge Base if you are a direct Martus customer, or contact your Martus reseller if you are supported through one of our Martus partners.

Martus Sync Limitations:
- The Dashboard > Updater screen only PULLS information from the accounting system. It does NOT push data from Martus out to the accounting system.
- It is possible for Martus support staff to PULL budgets from the accounting system if needed.
- Intacct Customers ONLY - can PUSH their budget directly to Sage Intacct via the Planner > Intacct screen.
Managing Defaults - Dashboard, Planner, and Budget Year
Dashboard Default Budget
The Dashboard Default Budget will be the default budget that will be used to generate the reports under Setup > Dashboard but is controlled by the Planner > Setup page.
Setting this is important as it will ensure that your reports will load with the correct budget information you want.
How To Set the Default Budget
- Go to Setup > Planner Setup
- Check the box for the budget that you want to set as the default
- Click 'Set as Dashboard'

Planner Default Budget
The Planner Default Budget will be the default budget that will be used to generate the reports under Planner > Summary.
Setting this is important as it will ensure that your reports will load with the correct budget information you want.
How To Set Your Planner Default Budget
- Only admins can set default budgets
- Go to Setup > Planner Setup
- Check the box for the budget that you want to set as the default
- Click 'Set as Planner'

Budget Year
The Budget Year will be the default year in the Planner Section. It does not impact the Dashboard > Financial Reports.
Setting this is important as it will ensure that if a new budget year has come that you and your users will be in the correct year for budgeting.
How To Set Your Default Budget Year
- Only admins can update the Budget Year
- Go to Planner > Planner Setup > Set Budget Year Tab
- Change the dropdown to the year you need
- Click 'Set Budget Year'
FAQ:
If I do not have a Dashboard or Planner default set what will happen?
When you go into Dashboard or Planner if the report you are looking at contains budget information it will not load any budget data if do not have a Dashboard or Planner Default set
Who can change the Dashboard and Planner Defaults, Budget Year?
Only admins
I have set my budget year to the new calendar year but my Financial Reports are not changing?
The budget year will not impact the financial reports under Dashboard > Financial Reports. If you need your Financial reports to reflect your new budget year please update your Default Month to be a month within your new fiscal year.
Custom Budget Spreads
Standard spreads in Martus include Monthly, Weekly, Bi-Weekly, Quarterly, Annual, etc. Custom spreads allow our clients to specify alternate budget patterns according to their needs.
Custom Spreads allow for customized budget patterns, and can be used by any user. Custom spreads might include:
- Days per month
- Business days per month
- Weekdays per month
- School days per month
- Summer months
- Q1 months
Custom spreads can be used in the following areas.
- Planner > Worksheets:
- Budget Widget: Use custom spreads in the budget widget to impact the current worksheet line.
- Line Actions: Use custom spreads to impact multiple lines in the worksheet.
- Planner > Special Purpose Worksheets - Impact single lines in the SPW when using the budget widget.
- Planner > Budget Lines - Impact one or more lines using Actions. See this KB article for more information.
- Personnel Budgeting > Scenarios > Detail > Update Pay Items - Select one or more pay items and the custom spread to be used. See this KB article for more information.
Just like the standard spreads, the custom spreads are a mechanism to calculate budget amounts for each month. NOTE: The spread that was used to determine the values is not saved as part of the budget line or the SPW. Also, the calculated values can be overridden at any time.
Custom Spreads - Setup
Custom budget spreads are defined via Setup > Calendar > Custom Spreads. They can be created and edited by Martus Admins only. Custom spreads are shown with monthly impacts, according to your fiscal year start.
- Click Add Spread to add a new custom spread.
- Click Edit (pencil icon) to modify the spread.
- Click Delete (trash can) to remove the spread.

Add a New Spread
- Navigate to Setup > Calendar > Custom Spreads.
- Click Add Spread to add a new spread.
- Add a Name for the spread.
- Enter the numbers per month for this spread.
- Numbers can be whole, representing days.
- Numbers can toggle 0/1, representing the month is in scope or isn't.
- Numbers can have decimals, to represent a multiplier.
- Click Save to save the spread, or Cancel to leave without saving.

Using Custom Budget Spreads
Custom Spreads are available in the Budget Widget and in Line Actions in worksheets and in SPWs for all users. They can also be used in Budget Lines and in Personnel Budgeting on the Detail tab.
- In the Budget Widget, select Custom Spread under Adjustment Type.
- Select the Spread desired.
- Select the type of spread.
- Total - Select a Source for the total Amount, or manually enter the total Amount to be distributed evenly across the months, based on the Spread selected. Note: Selecting a Source is not available in the SPW widget because there is no direct tie to actuals or budget data.
- Rate - Enter the Amount for each month, based on the Spread selected.
- Select the Starting and Ending Months if desired and allowed for this spread.
- Click Preview to see the results.
- Add Notes if desired.
- Click Save to save your changes or Cancel to leave without saving.
Example using the Total calculation based on a Source using the 2024 Business Days spread
The goal is to divide the total amount per year and spread it across each working day.
The Amount, the total of the Source selected, is divided by the total sum of the values for all months in the spread, then multiplied by the amount in the month. In the example, there are 253 total days in the spread. 559,017.92 is divided by 253, and then multiplied by 22 for January, resulting in 48,610.25 in January; multiplied by 22 for February (also resulting in 48,610.25), multiplied by 20 for March (resulting in 44,191.14). etc.


Example using the Total calculation based on an Amount using the 2024 Business Days spread
The Amount is divided by the total sum of the values for all months in the spread, then multiplied by the amount in the month. In the example, there are 253 total days in the spread. 50,000.00 is divided by 253, and then multiplied by 22 for January, resulting in 4,347.83 in January.


Example using the Rate calculation based on the Summer (May-Aug) spread
The Amount is multiplied by the amount for each month in the spread.


Example using the Rate calculation based on a decimal spread
The Amount is multiplied by the percent for each month in the spread.


Sheet Dimension vs Line Dimension
Sheet Dimensions and Line Dimensions
Defining dimensions in Martus is a crucial configuration step that affects the structure of budget worksheets, user restrictions, and reporting filters. When defining dimensions we need to understand two terms: Sheet dimensions and Line dimensions.
Martus supports up to eight dimensions, five sheet dimensions and three line dimensions.
Sheet Dimensions
Sheet dimensions determine how budget worksheets are defined. A separate budget worksheet can be created for each unique combination of sheet dimensions. Users will then use these worksheets to budget for those specific area of the budget.
For example, if Location and Department are both sheet dimensions, worksheets can be created for each combination.
|  |
Notes about Sheet Dimensions:
- Sheet dimensions are used in unique combinations to define budget worksheets.
- They do not need to be set as required since Martus Admins have discretion and control over the dimensions used to define worksheets.
- Within Martus you can have up to 5 sheet dimensions.
Line Dimensions
Line dimensions are tags inside a budget worksheet on the budget line.
For example, if Project is a line dimension, there could be multiple budget lines for the same GL account inside of that worksheet, tagged with a Project.
|  |
Notes about Line Dimensions:
- Line dimensions are used within a budget worksheet and in SPWs (Special Purpose Worksheets) to provide more granular budgeting.
- Line dimensions can be set as "required", meaning a value is necessary on every budget line on worksheets and SPWs.
- Within Martus, you can have up to 3 line dimensions.
- Line dimensions can be set to "non-budgetable". This means you won't be able to budget to that dimension, but that dimension will be accessible as a filter to see activity on financial reports and budget reports.
Changes to Your Dimension Settings and Dimension Structure
If you want to discuss making a change to your dimension configuration or dimension settings, create a ticket through the Knowledge Base if you are a direct Martus customer, or contact your Martus reseller if you are supported through one of our Martus partners. Note that some kinds of changes will require a reimplementation of Martus.
Please see our Dimension FAQ document for more information!
Non-Standard Reporting Periods
Martus will allow the use of non-standard reporting periods for all integrations. We can support 4-4-5 type configurations, but not 13 reporting periods per year.
- The client instance requires a client-level flag to be turned on on the client record.
- Setup > Calendar requires the Fiscal Year Beginning Month and Week Ending Day be defined.


Financial Calendar Tab
Users will manually enter calendar dates based on the structure they would like to follow. Additional calendars can be imported by Martus Support if they are provided.
These are the guidelines for new calendars:
- Start/End dates must honor the day of the week indicated on Setup > Calendar > Financial Calendar.
- The start day will auto-populate based on the ending day of the year prior.
- The ending day will auto-populate based on the start day of the year following.
- Deleting a calendar will cause the button to Add a year to appear.
- Users are warned if the Start/End dates do not honor the beginning/ending day. Note: This means Martus cannot support starting every year on July 1st no matter the day or ending on Dec 31 no matter the day.
- Missing dates between months will cause an error.
Multi-Currency Support (API and File-Based Integrations)
Martus includes support for multiple currencies for both actuals and budgets. Martus also allows you to view actuals and budget in local currency or consolidated into a single currency.
API Integration support is per the table below. All File-Based Integrations support multi-currency.
API Integration | Multi-Currency Support | Notes |
| Yes | ||
| No (See Notes) | If your accounting system is set to use multi-currency, you can integrate with Martus. Transactions will be in the base currency used in your general ledger. Budgeting and reporting is also done in the base currency. | |
| No (See Notes) | If your accounting system is set to use multi-currency, you can integrate with Martus. Transactions will be in the base currency used in your general ledger. Budgeting and reporting is also done in the base currency. | |
| Yes | ||
| No | ||
| No | ||
| No (See Notes) | If your accounting system is set to use multi-currency, you can integrate with Martus. Transactions will be in the base currency used in your general ledger. Budgeting and reporting is also done in the base currency. | |
| No | ||
| No |
Actual and budget amounts within Martus are nominal (not formatted for any specific currency). Each location or entity can view their actuals and do their budgeting in their local currency. Currency format is identified at the client level (along with the date format).
Additional multi-currency features are provided as part of the optional Multi-Currency module, available at an additional cost to customers with a minimum of the Plus subscription.
These include:
- Specify the dimension to which “currency” is related. For Sage Intacct integrations, this must be Location. For file-based integrations, this can be any sheet dimension. This is configured at the client level by Martus Support.
- Define the currency to be used for each dimension value (i.e., location). For Sage Intacct integrations, this information is pulled from Sage Intacct via the API. For file-based integrations, this is defined manually on the Setup > Currency screen.

- Exchange rates are synced into Martus each night. You can, however, set a custom exchange rate for any or all currencies on the Setup > Currency screen.

- Convert a budget that contains multiple local currencies to a designated consolidated currency. To do this, navigate to the Budget Management tab in Planner > Planner Setup, select a specific budget, then use the Create Consolidated option on the Activity Menu.
When you click to Create Consolidated, a background job is queued. You will receive an email message when the budget has been created. If the process encounters any errors, they will be noted in the email. Contact Martus Support for assistance if you do not know how to correct the error or have any questions.

For customers with Sage Intacct integrations who have a consolidated book, you can upload the consolidated budget to Sage Intacct for reporting against the consolidated book.
You may also wish to have a separate, second instance of Martus for your consolidated actuals; if so, you would export the consolidated budget from the primary Martus instance and import it into your consolidated (second) instance for reporting purposes.
How to Create Reporting Groups
This feature is part of the Standard Plus, Plus, and Premium subscription levels. NOTE: Only Martus Admins can create and edit reporting groups. Any non-admin can use reporting groups that match their dimension restrictions.You can find a more in-depth review here: Managing and Using Reporting Groups.
Reporting groups are used to define combinations of accounts and dimensions. Reporting groups can then be used in the following reporting and budgeting areas of Martus.
- SPWs - Use reporting groups within Global or Worksheet SPWs to calculate budget amounts based on the amounts currently budgeted for those combinations of accounts and dimensions.
- ReportBuilder - Use reporting groups in reports, sections, rows and columns to filter a custom report.
- Reports - Use reporting groups to filter most standard financial and budget reports in Martus.