Scenario Setup
Create the scenario for your fiscal year.
Scenario Setup (Video)
In Personnel Budgeting > Scenario Setup, Admin users manage the various scenarios within their organization. All scenarios use the same employees, pay types, position types, and coverages. Scenarios may have unique positions, pay items, and allocations, however.
Creating a New Scenario
A new scenario will have no positions associated.
- Go to Personnel Budgeting > Scenario Setup > Scenario Management.
- Ensure the correct Year is selected.
- Click Create Scenario.
- Give the scenario a Name.
- Choose the Method. Select Empty to create a new, empty scenario.
- Add Comments for the scenario if desired.
- Click Save.
Copying an Existing Scenario
Scenarios can be copied from any year. A copied scenario will contain the same positions. For more details on starting a new year in Personnel, click here.
- Go to Personnel Budgeting> Scenario Setup > Scenario Management.
- Ensure the correct Year is selected.
- Click Create Scenario.
- Give the scenario a Name.
- Choose the Method. Select Copy Scenario to copy an existing scenario from any year. Select the Year and Source Scenario from the dropdowns. Check to Include Monthly Details if you want to carry forward mid-year adjustments to pay item rates.
- Add Comments for the scenario if desired.
- Click Save.
Setting a Scenario as the Default, and Locking or Deleting Scenarios
- Go to Personnel Budgeting > Scenario Setup > Scenario Management.
- Click the box on the scenario line to the left to show the action menu.
- Click Set as Default to make this the default scenario, viewable by non-admins with Personnel Budgeting permissions.
- Click Lock to lock the scenario and prevent changes by any user.
- Click Delete to permanently delete the scenario from Martus. Note you cannot delete a scenario set as the default. Set another scenario as the default if needed.
- Click Okay.
Edit a Scenario Name or Comments
- Click the pencil to Edit the appropriate scenario.
- Edit the Name and or Comments.
- Click Save.
Managing Scenario Imports
There are two files that can be utilized within Personnel. The Pay Data File export/import allows for exporting, updating and re-importing large amounts of data, specifically employees and positions. The Pay Item Grid allows for updates to pay items based on existing positions.
Annual Setup (Video)
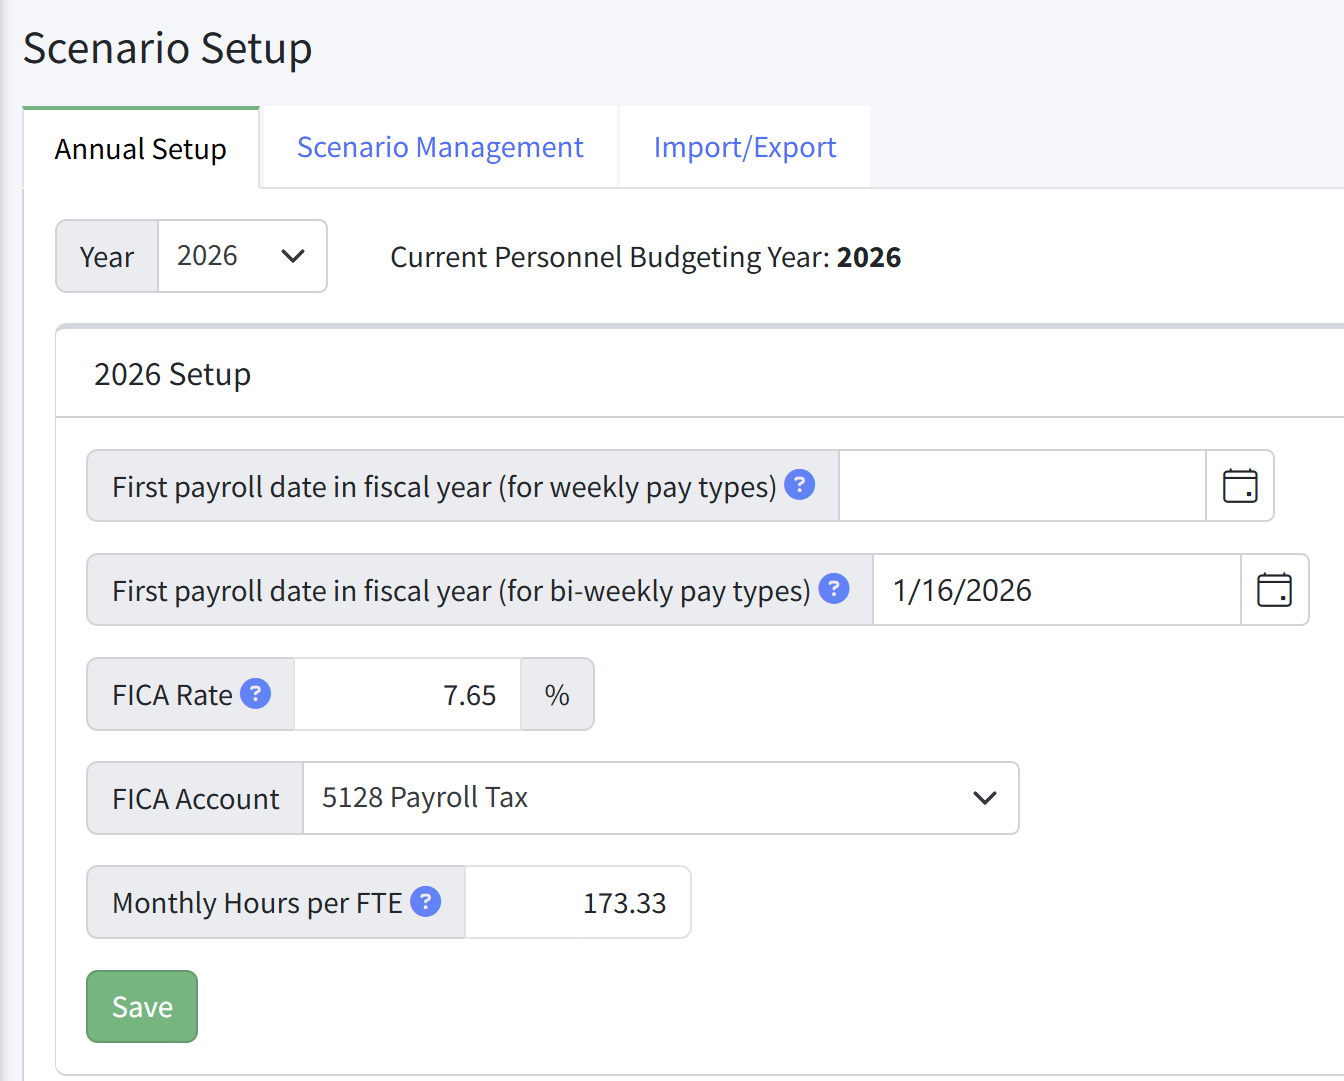
The Annual Setup tab controls several settings for all scenarios within a fiscal year.
Information within the Annual Setup tab does not copy from one budget year to the next, and should be filled out as appropriate each year.
Note - this video references the previous name of the Setup tab > The Config tab.
Annual Setup Settings
- First payroll date in fiscal year (for weekly pay types) - Set for weekly pay types, if needed. The date selected will determine which months contain four pay periods and which will contain five pay periods. Set this to whatever date you recognize as the pay date in your accounting system so that Martus will match the actuals you enter.
- First payroll date in fiscal year (for bi-weekly pay types) - Set for bi-weekly pay types, if needed. The date selected will determine which months contain two pay periods and which will contain three pay periods. Set this to whatever date you recognize as the pay date in your accounting system so that Martus will match the actuals you enter.
- FICA Rate - Set the FICA tax rate. This is the percentage of all Is Taxable pay types assigned to a position. If you have different GL accounts for Medicare/Social Security or if you use the Social Security annual cap leave this blank.
- FICA Account - The account that will be utilized for budgeting FICA tax. If you have different GL accounts for Medicare/Social Security or if you use the Social Security annual cap leave this blank.
- Monthly Hours per FTE - This is the number of hours used in various reports to calculate the total hours per month a position works. The Allocation Analysis and FTE reports assign hours per this value. When set to 173.33, each full time position will be calculated at 173.33 or 40 hours per week. Use the following calculation to set this:
[Hours per week] * 52 / 12
Setting the Personnel Budgeting Year
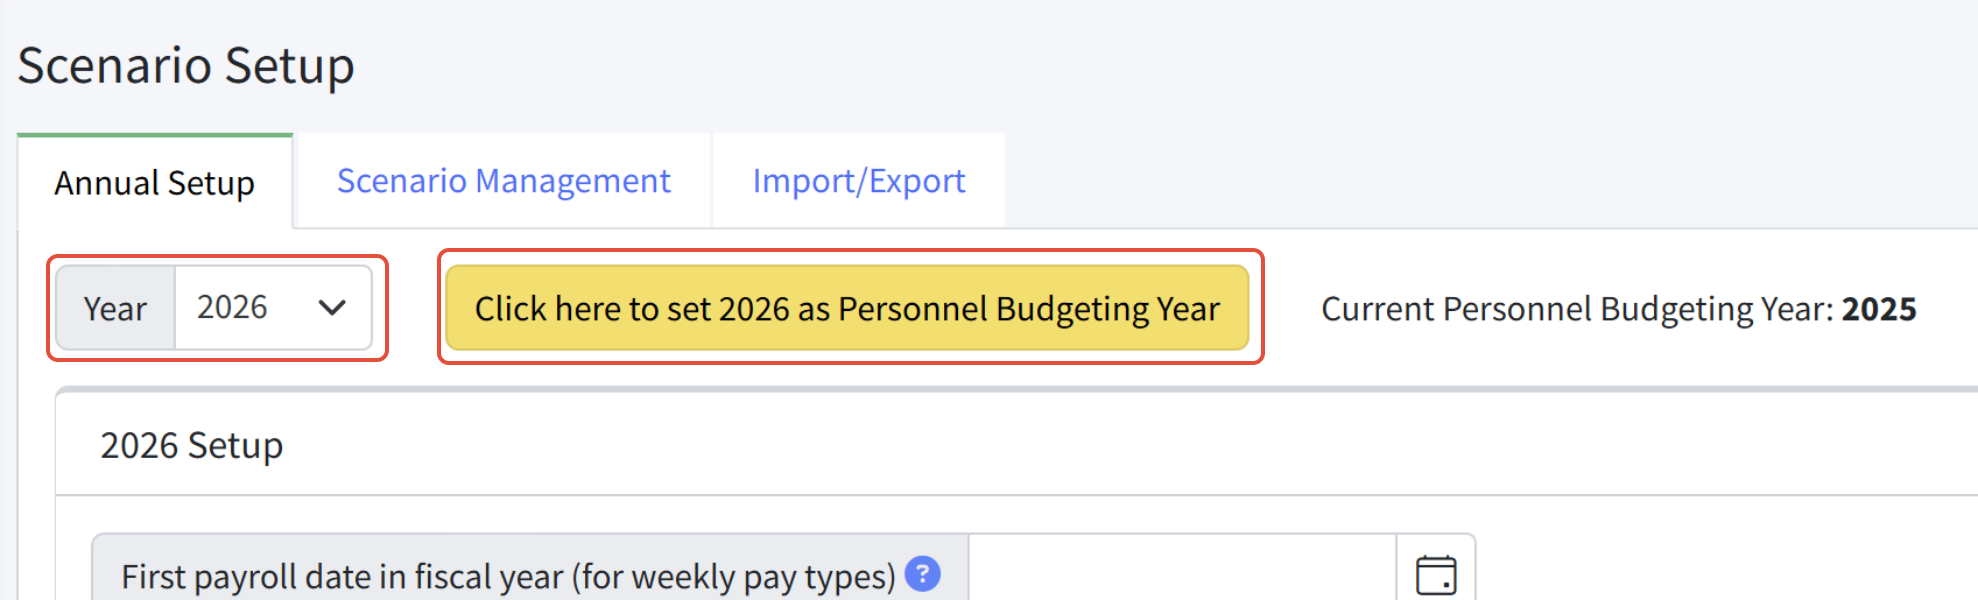
To set the Personnel Budgeting Year, select the year from the dropdown and click Click here to set XXXX as Personnel Budgeting Year. This will become the default year in Personnel Budgeting.
Personnel Export & Import Files
When first entering information into Personnel Budgeting, it is often easier to use the export and import process to load large amounts of data at once.
There are three types of imports within Personnel Budgeting:
- Pay Data File - This is the most comprehensive file and allows for importing of all information within Personnel except for Allocations. The best use of this file is for adding employees and positions.
- Pay Item Grid - This is the best file to import the compensation for positions.
- Allocation File - This is the only way to import allocations and is usually used when an organization has a lot of allocations.
Note: It is imperative that an organization utilize the export from within their system in order for the import process to work as expected. Do not try to create a file for import from the documentation in this section.
Import notes
- The Excel tab names should not be changed.
- The Excel header row names should not be changed.
- For multi-tabbed files, you can remove unneeded tabs and import only the desired tabs.
- Imports only update or add information; they will never remove positions, employees, allocations, pay items or any other data within Personnel Budgeting.
- All imports will be queued in the background; utilize the Dashboard > Updater page to ensure they have been completed successfully.
- Do not re-order the tabs. The Import process will work from left to right through the tabs in the worksheet. Some tabs are dependent on others; for example, please make sure that the Employees tab is to the left of Positions as the Positions tab requires the Employees to be imported.
- Excel formulas in fields that are to be imported will be replaced with the cell value. However, best practice is to copy and paste as values if needed. NOTE: ID fields and Date fields do not support formulas.
- All Martus file imports have a limit of 15MB.
If you experience errors when uploading files, please create a ticket through the Knowledge Base if you are a direct Martus customer, or contact your Martus reseller if you are supported through one of our Martus partners.
How to Use the Pay Data File (Excel)
There are two options for importing new data and adjusting existing data in the Personnel module. The primary use for the Pay Data File export/import is to import and update employees, positions, and dimension assignments for the positions. Attached is an example Pay Data File with instructions on each tab.
Exporting the Pay Data File
The general process for updating the pay data file is as follows:
- Navigate to Personnel Budgeting > Scenario Setup > Import/Export.
- Choose the Year and the Scenario.
- Click Export Pay Data File (xlsx).
- Make changes to the Employees and Positions tabs. All other tabs should be ignored and/or deleted. (Coverages and Position Types can be used for reference if needed.)
- Import the pay data file back into Martus. First click Choose File, and then click Import Pay Data File (xlsx).
Additional options, very rarely used, include:
- Export > Include Monthly Details - Only choose to include monthly values if you've made mid-year updates to compensation or benefit rates and you want to view those details.
- Import > Recalculate All Pay Items - Select this to recalculate all pay items. This will override any mid-year rate changes such as a mid-year raise that you made using the Update Pay Item button on the Detail screen.
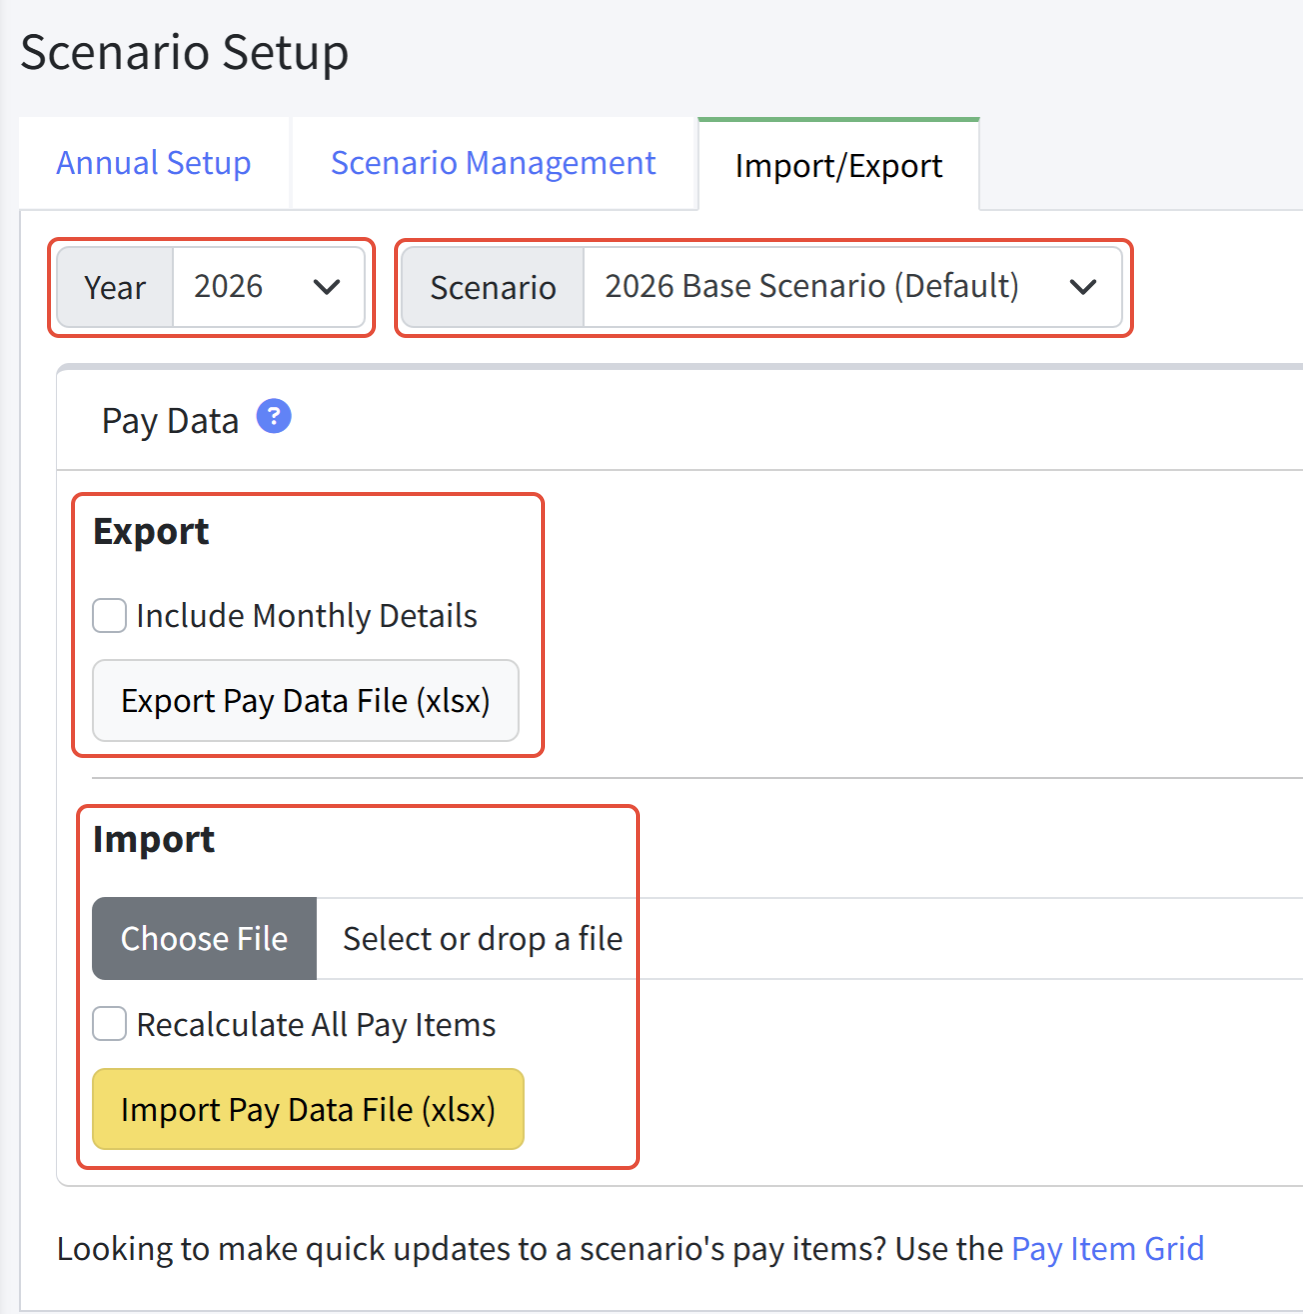
There is a sample file with detailed instructions at the bottom of this page that you can download.
Understanding the Pay Data File
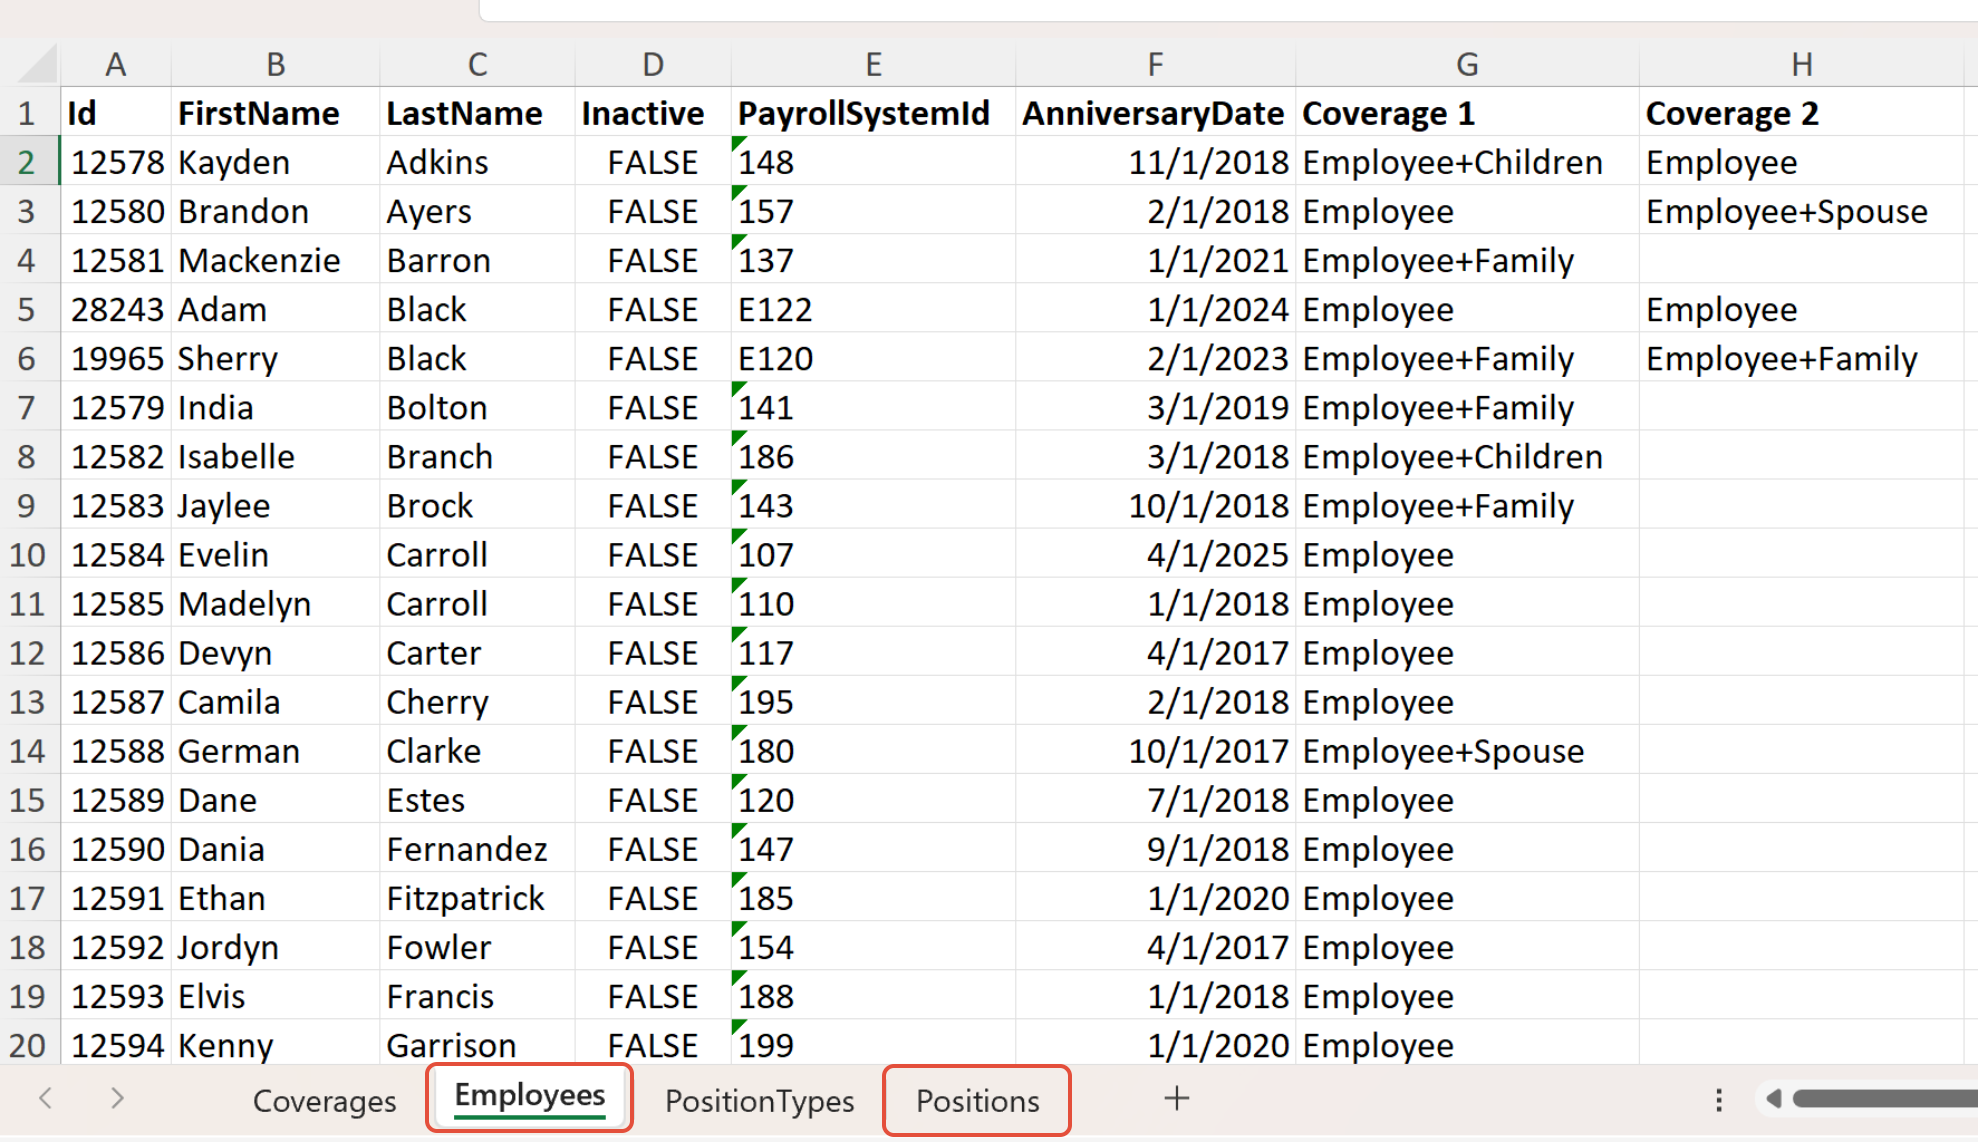
The Pay Data File contains numerous tabs. Martus recommends ONLY adjusting the following two tabs via the export and import process. Best practice is to ignore and/or delete the remaining tabs. (Coverages and Position Types can be used for reference if needed.)
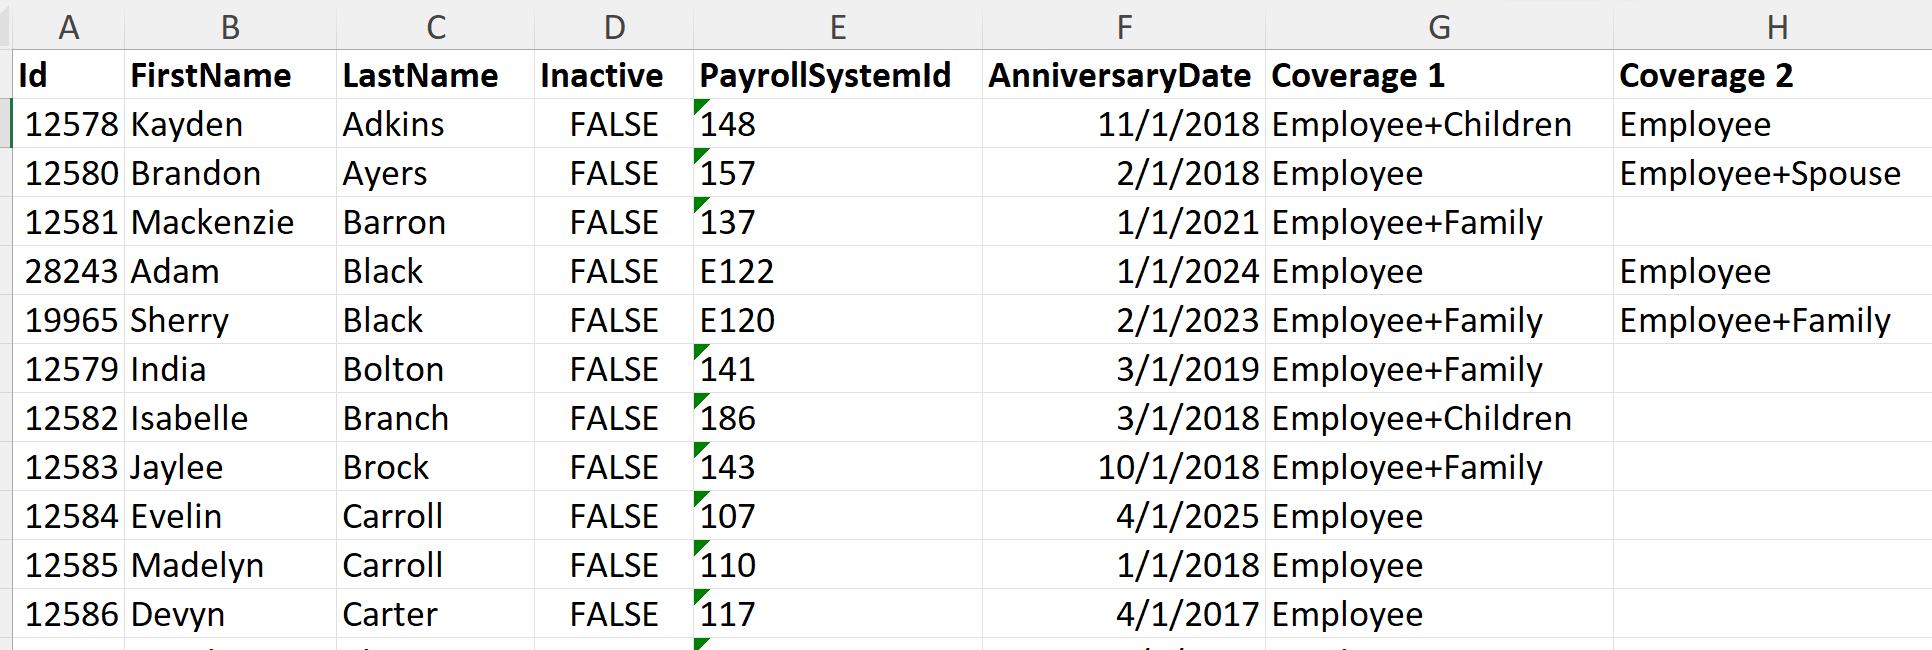
Editing Employees
- Id: Martus assigns this ID when employees are added. Leave this column blank for new employees, or leave it as is for updating existing employees.
- FirstName: The first name of the employee.
- LastName: The last name of the employee.
- Inactive: The status of the employee. Update to TRUE for any employee no longer active with the organization. Otherwise, active employees should be labeled here as FALSE.
- PayrollSystemId: The ID that corresponds with the employee in the organization's payroll system. This allows for easier cross-referencing.
- AnniversaryDate: The date the employee began working with the organization. This date can be used to calculate bonuses or salary increases based on the employee's hire date.
- Coverage 1: The level of election within a tiered pay type; most commonly used for medical insurance.
- Coverage 2: The level of election within a tiered pay type; most commonly used for dental and vision insurance.
Notes for Import:
- The Coverage 1 and Coverage 2 values must match exactly (capitalization and spacing) to a value in the Coverages tab of the file.
- All columns must be included in the import; columns may be left blank, but do not rearrange columns or remove the column header.
- Spacing, punctuation, etc., must be exact in order for Martus to import the employees with matching positions. For example, "Mary" is not the same as "mary".
Editing Positions
- Id: Martus assigns this ID when positions are added. Leave this column blank for new positions, or leave it as is for updating existing positions.
- PositionName: Martus will assign this field using the title of the position. Leave this column blank for new positions, or leave it as is for updating existing positions. Note: Martus creates a unique value by appending a numeric value to the title, e.g., Assistant 1, Assistant 2, etc.
- Title: The job title of the position. Job titles do not need to be unique.
- PayrollSystemID: The payroll system ID for the employee
- EmployeeFirstName: The employee's first name.
- EmployeeLastName: The employee's last name.
Note: The PayrollSystemID, EmployeeFirstName and EmployeeLastName uniquely identify an employee in Martus.
- Type: The position type associated with this position. Copy values exactly as they appear on the PositionTypes tab in this file.
- IsTaxable: Default is TRUE. Set to FALSE for those who have opted out of paying taxes, normally associated with clergy.
- IsPool: Determines if this position is pooled or not. All pooled positions will multiply the FTE amount per each Pay Item assigned to this position. More information on Budgeting for Pooled Positions.
- StartDate: The date in which to begin budgeting for this position. Best practice is to enter the start date for seasonal positions or mid-year hires. Leave this blank for positions budgeted for all 12 months.
- EndDate: The date in which to stop budgeting for this position. Best practice is to enter the end date for seasonal positions or mid-year terminations. Leave this blank for positions budgeted for all 12 months.
- FullTimeEquivalent: Enter the FTE for this position - 1 for full time, .5 for half time, etc. This number will apply to the Allocation Analysis tab and the FTE Analysis tab. It is also used in conjunction with the IsPool field to calculate pooled positions.
- SheetDim1, SheetDim2, LineDim2,etc: The dimensions associated with this position. These will be unique for each Martus client. To confirm which dimension is SheetDim1, SheetDim2, etc., navigate in Martus to Setup > Dimensions and note the order of dimensions on the screen. SheetDim1 is first, SheetDim2 is second, etc.
- Note: Only add each position once. If a position will be allocated to multiple dimensions, those will be handled using the Allocation feature in Personnel.
- Note: Only add each position once. If a position will be allocated to multiple dimensions, those will be handled using the Allocation feature in Personnel.

Notes for Import:
- Excel formulas in fields that are to be imported will be replaced with the cell value. However, best practice is to copy and paste as values if needed. NOTE: ID fields and date fields do not support formulas.
- Ensure that the Employee names and the Payroll System ID are exact matches for those fields on the Employees tab.
- Ensure that the combination of sheet dimensions used in the Positions tab exist in the Planner Budget as budget worksheets. To determine this, go to Planner > Planner Setup > Worksheet Management tab and search for the appropriate worksheets. If the worksheet is missing, you will receive an error saying "Worksheet does not exist in the Planner Budget upon importing".
- Spacing, punctuation, etc., must be exact in order for Martus to import the employees with matching positions. For example, "Mary" is not the same as "mary".