Scenarios
Add positions and assign pay items, and make mid-year adjustments.
Personnel Scenarios
Each scenario holds a set of assumptions about the positions for that fiscal year. It is common to utilize multiple scenarios per year to identify how various changes to personnel will affect the overall budget. For example, there may be a scenario that holds all of the base pay, and a scenario that has a 3% COLA applied.
Scenario Tabs
Click the link below for more information on each tab. For additional information on creating scenarios go to Scenario Setup.
- Positions - Lists all positions within the scenario.
- Detail - Lists each Pay Item within the scenario and allows for updates.
- Pay Items - Lists the positions on rows and a column for each pay type. This can be edited directly in Martus, or via export/import.
The Positions Tab (Video)
The Positions tab in Personnel Budgeting > Scenarios lists the positions defined by your organization. Each position displays on a single row, with the title, employee, and other data. Add new positions, edit existing positions, or delete positions from the Positions tab.
Filtering Positions
Filter positions using the page filters at the top, and the grid filters below. Page filters allow you to select a single value from the dropdown. The grid filters allow you to select multiple values at the same time.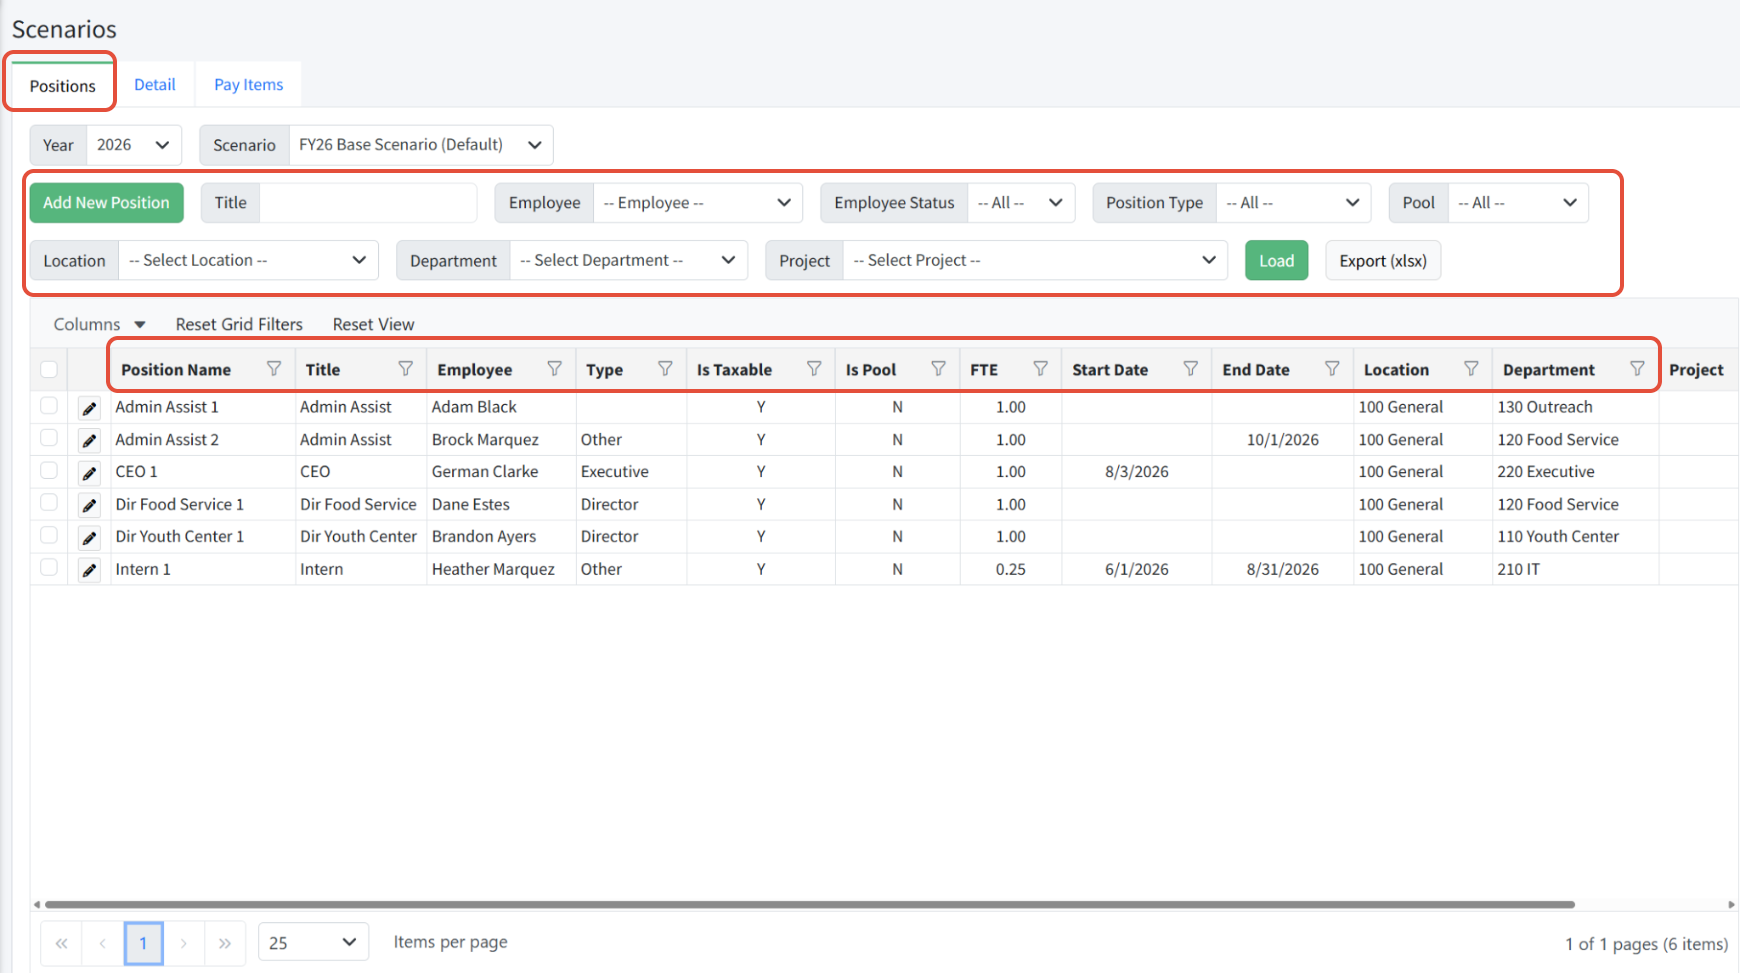
The Position Record - Field Definitions
The Position record contains lots of information, described in detail below.
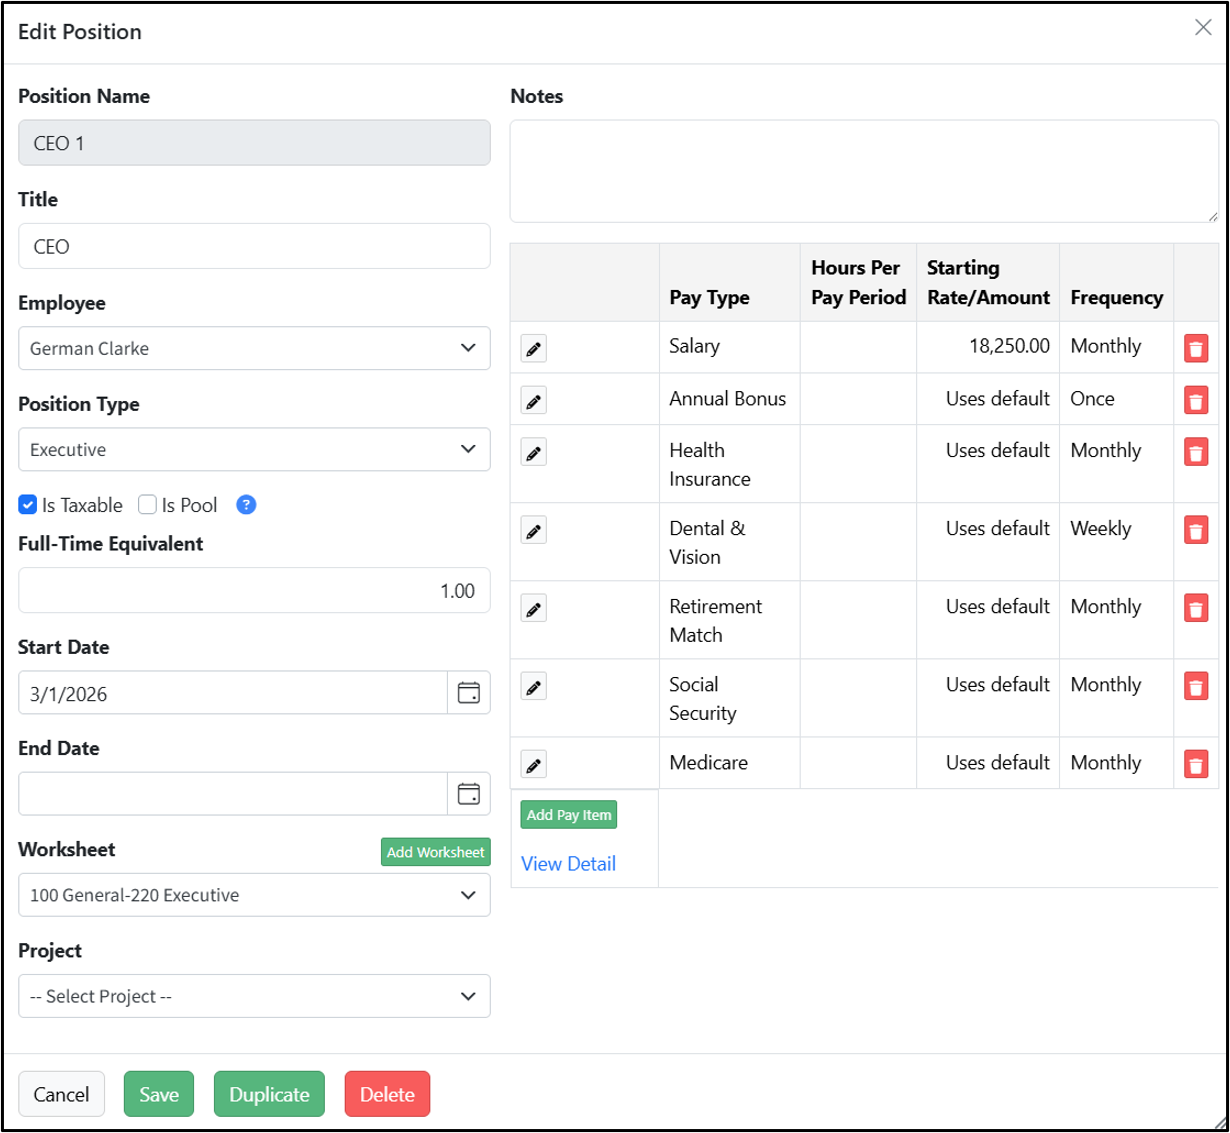
- Position Name - This is auto-assigned by Martus and cannot be edited. Martus will set this when the position is saved.
- Title - The position title such as Communications Director or Senior Accountant. You can have more than one position with the same title.
- Employee - The person who holds this position (optional). Employees are managed in Personnel Budgeting > Personnel Budgeting Setup > Employees. Create employees with coverages to simulate an actual employee not yet hired, such as Vacant Employee, to assign to positions.
- Position Type - Use Position Types to filter reports in Personnel Budgeting. Position Types are managed in Personnel Budgeting Personnel Budgeting Setup > Position Types. Examples include Director, Associate, Executive, CNA, RN, etc.
- Is Taxable - Check this box to calculate taxes for this position based on the setup (FICA Rate and FICA Account) in the Config tab. If unchecked, it will not calculate taxes. Positions exempt from taxes might include clergy, students, etc.
- Is Pool - When selected, the total compensation for the position is based on the assigned pay items multiplied by the FTE value on the position. Click here for more information on Pooled Positions.
- Full-Time Equivalent - The total FTE for this position. For a full-time employee enter 1, half-time enter .5, etc.
- Start and End Date - Leave these fields blank if the position should be budgeted for all twelve months. Otherwise, if a start and/or end date is entered, it will only calculate for those months, and it will calculate based on the date in conjunction with the frequency of a pay type.
- Worksheet - Select the worksheet where this position will post in the current default planner budget for this combination of dimensions. If a worksheet does not exist, click Add Worksheet.
- Dimensions - Additional line dimensions used to define the budget for this position.
- Notes - Add notes pertaining to the position or its associated pay items, up to 500 characters.
- Pay Types - The various forms of compensation budgeted for this position. Any pay type can be added to the position. Pay types are organization-specific. Common ones include:
- Salary Pay
- Hourly Pay
- Bonus
- Medical Insurance
- Dental Insurance
- 401k matching
- Cell phone reimbursement
- Stipend
- FICA (if not using the Annual Setup tab)
Adding a New Position
Use the steps below to add a new position to Martus.
- Navigate to Personnel Budgeting > Scenarios > Positions.
- Click Add New Position.
- Fill out the form, using the field definitions above as needed.
- Click Save.
- Click Add Pay Item to add the pay types relevant to this position.
- Fill out the form for the appropriate pay types.
- Click Save to close the modal, or click Save and New to add another pay type.
- Continue until all appropriate pay types are added.
- When you are done, click View Detail to see the detail for this position in the Detail tab.
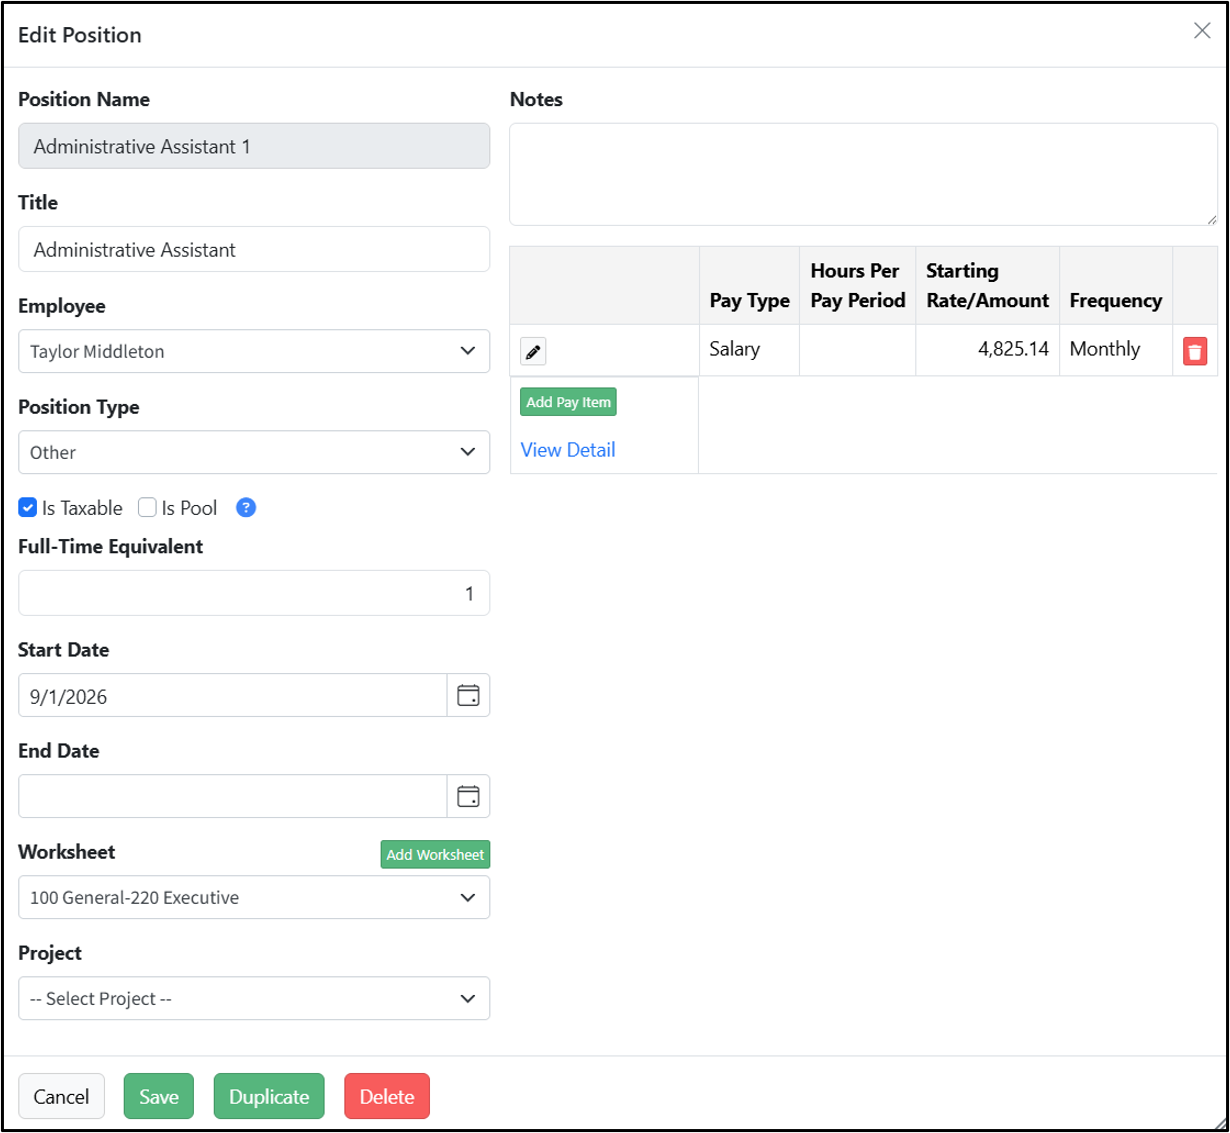
Click Edit (the pencil icon) on the row for a position to make changes. Be sure to Save the changes when you are done.
Duplicating a Position
Duplicate an existing position and then edit the copy when two positions are similar.
- Click Edit (the pencil icon) to open a position to duplicate.
- Click Duplicate.
- Everything is duplicated except the notes on the position, and the new position is displayed.
- Edit the position information and pay items as needed.
- Save the position when you are done.
Deleting Positions
Delete a single position from the open position record by clicking Delete. The position and any associated pay types will be removed from the selected scenario. Other scenarios are not impacted.
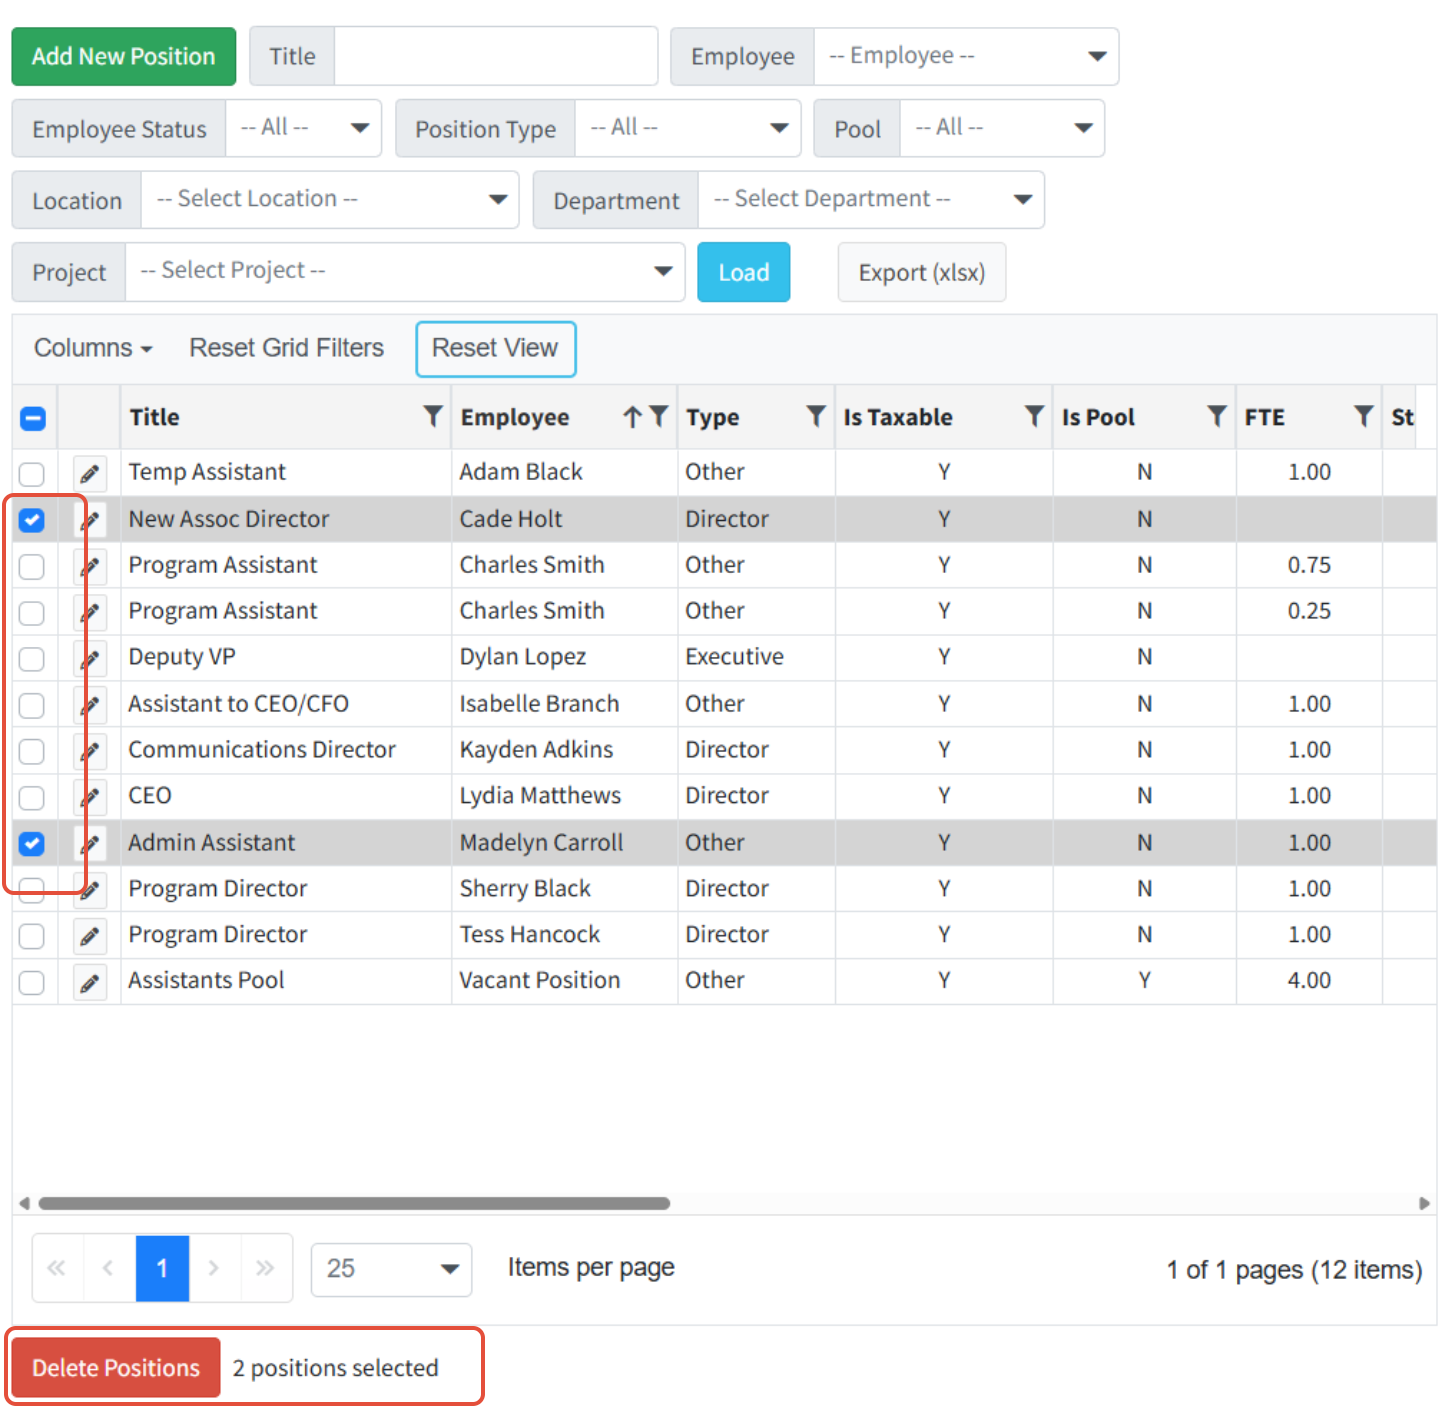
To delete multiple positions, select the positions using the check boxes to the left of each line. Then select Delete from the bottom of the page.
The Detail Tab
The Detail tab allows a user to review and adjust pay items. Each pay item, displayed as a row, is a specific pay type associated with a specific position. Each pay item row provides monthly and yearly totals.
Pay Items - All pay types associated with a position become pay items. Each pay item will be shown on the Detail tab.

Payroll Taxes - If utilizing the Config tab for calculating FICA, FICA amounts will not display on the Detail tab. Use the Positions and Pay tab to view FICA amounts instead.

Stat Accounts - If statistical accounts are in use, they are not included in totals with GL accounts. You can use the Pay Type criteria filter at the top to Show Pay Types with GL Accounts, with Stat Accounts, or choose to Show All Pay Types.

Overtime Pay Items - Mid-year adjustments made to Hourly pay items will not apply to Overtime pay items. Overtime pay items will always use the Hourly pay item base base rate.
Navigating the Detail Tab
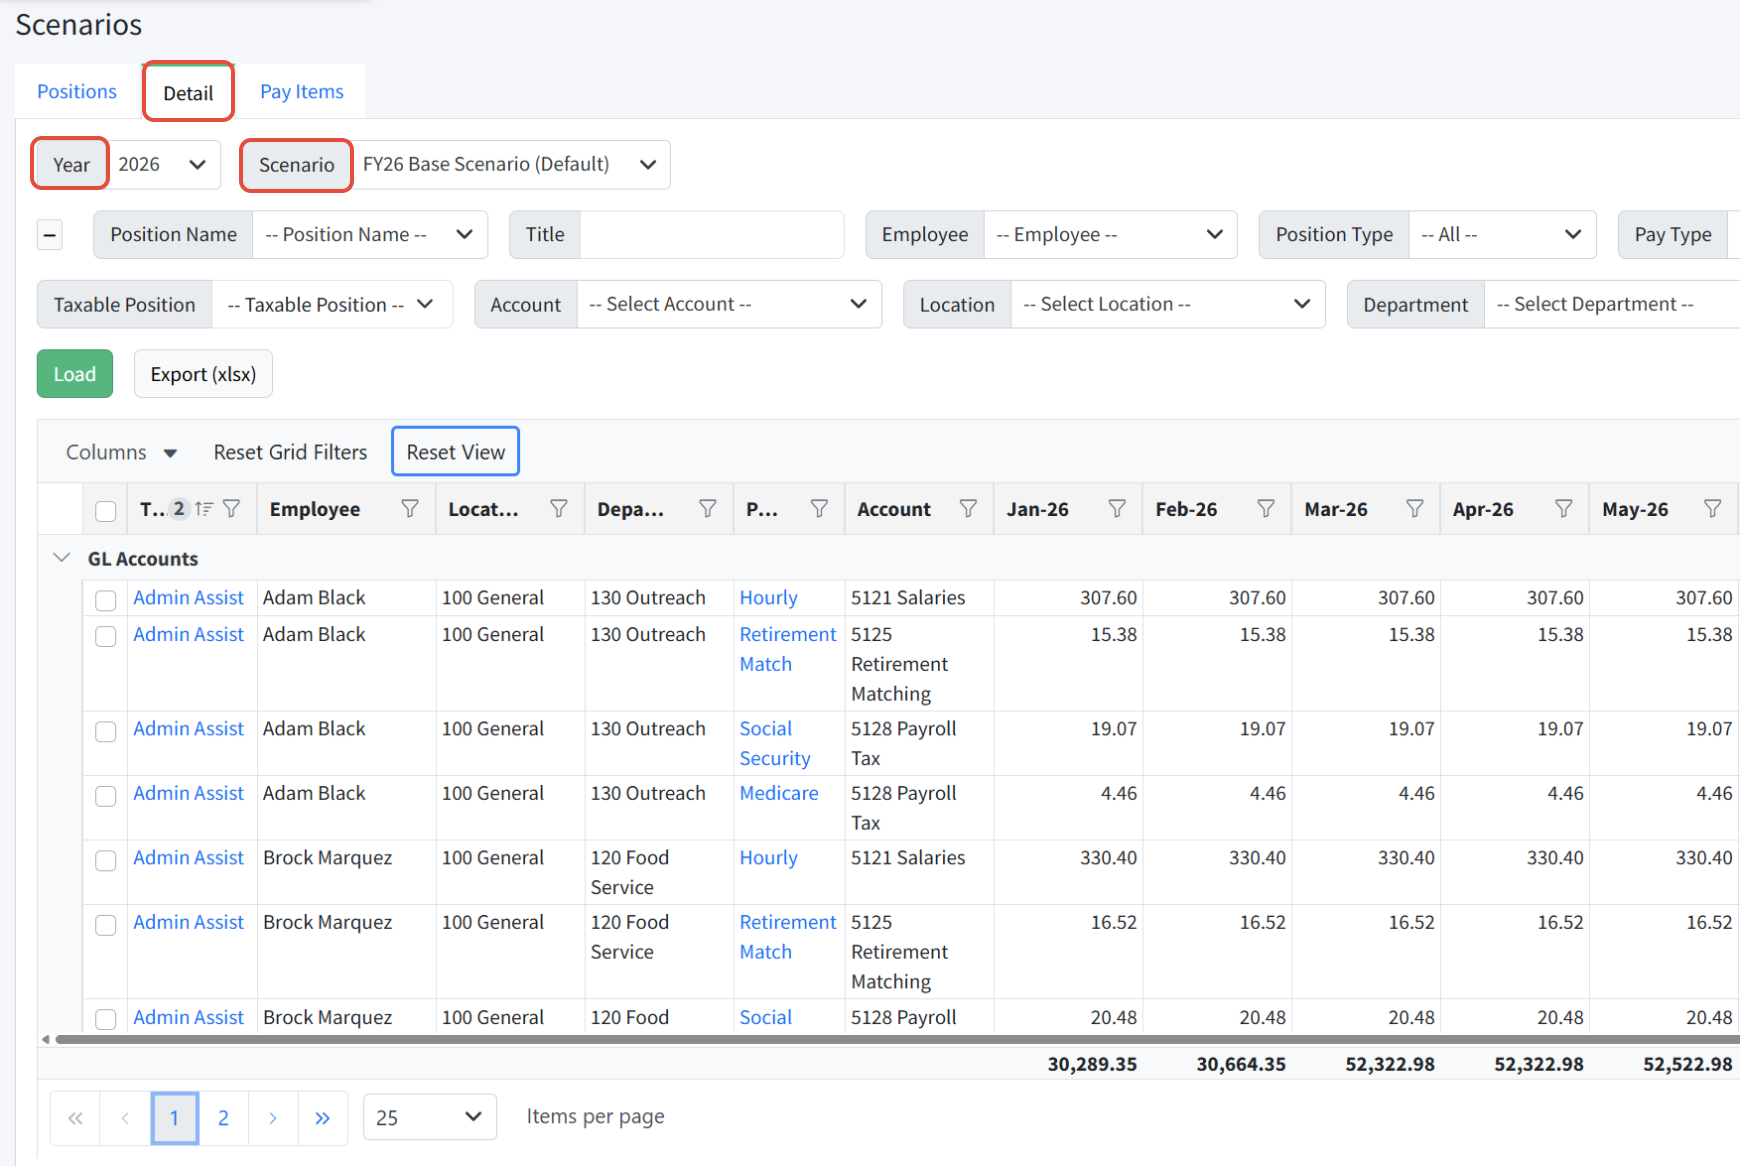
The Detail tab is found in Personnel Budgeting > Scenarios. The scenario selected as the default in Personnel Budgeting > Scenario Setup is automatically loaded. You can change the Year and Scenario selected.
Modified Pay Items
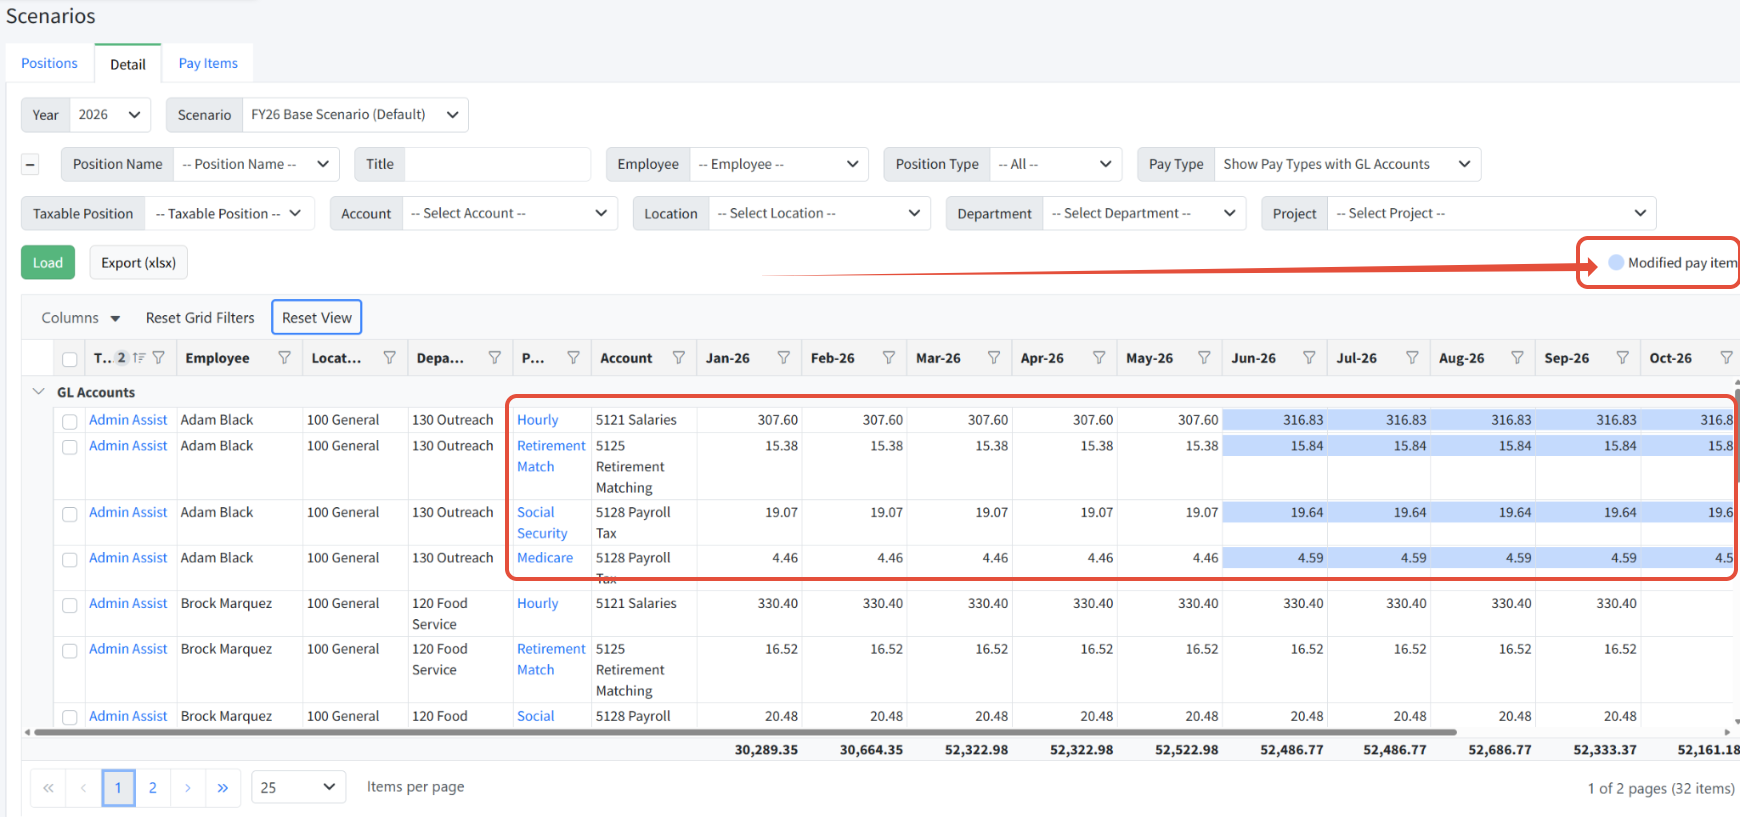
When viewing the Detail screen, you may notice that some cells have been highlighted in blue. This indicates that a change has been made to that month, for that position and pay type, that does not match the base rate or amount for that pay item. This often occurs when a mid-year salary increase, health insurance rate adjustment, or bonus adjustment has been made. Any pay types dependent on the modified pay item will also show in blue. Making these types of adjustments to a scenario is covered in detail below.
Using Page Filters
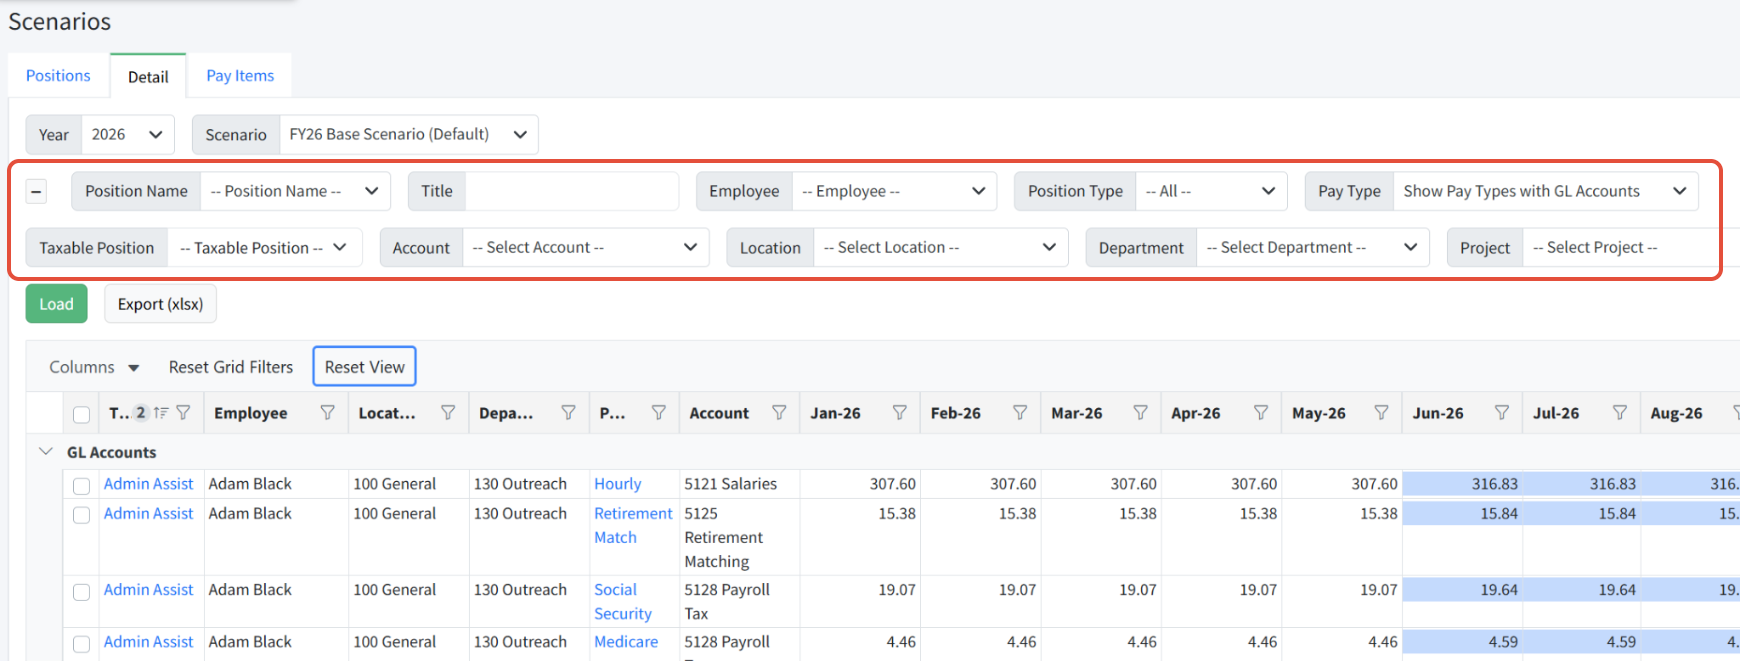
Use page filters to filter available data. Always click Load after changing page filters.
- Position Name - Select a position name from the drop down. Position names are assigned by Martus based on the position Title.
- Title - Search position titles using key words or partial text.
- Employee - Select an employee to filter positions for that employee.
- Position Type - Filter by position type. Position types are customizable and set by the client. They are only used for reporting purposes.
- Pay Type - Select the pay types to display, either by specific pay type or by group:
- Show Pay Types with GL Accounts
- Show Pay Types with Stat Accounts
- Show All Pay Types
- Taxable Position - Filter to taxable (Yes) or non-taxable (No) positions.
- Account - Select an account to filter.
- Dimension Filters - Filter on dimensions in Martus.
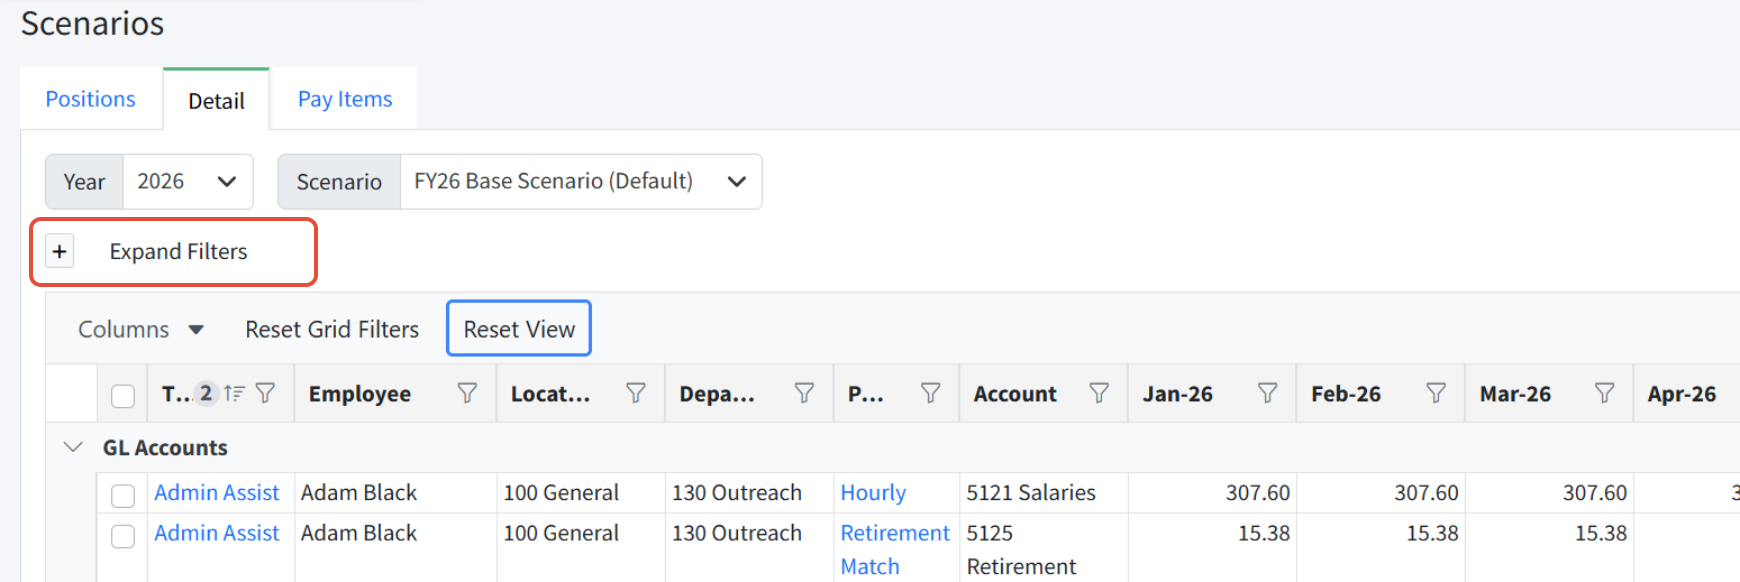
You can also hide the page filters by clicking on the - button in the upper left. Click + to expand the filters again.
Using Grid Filters
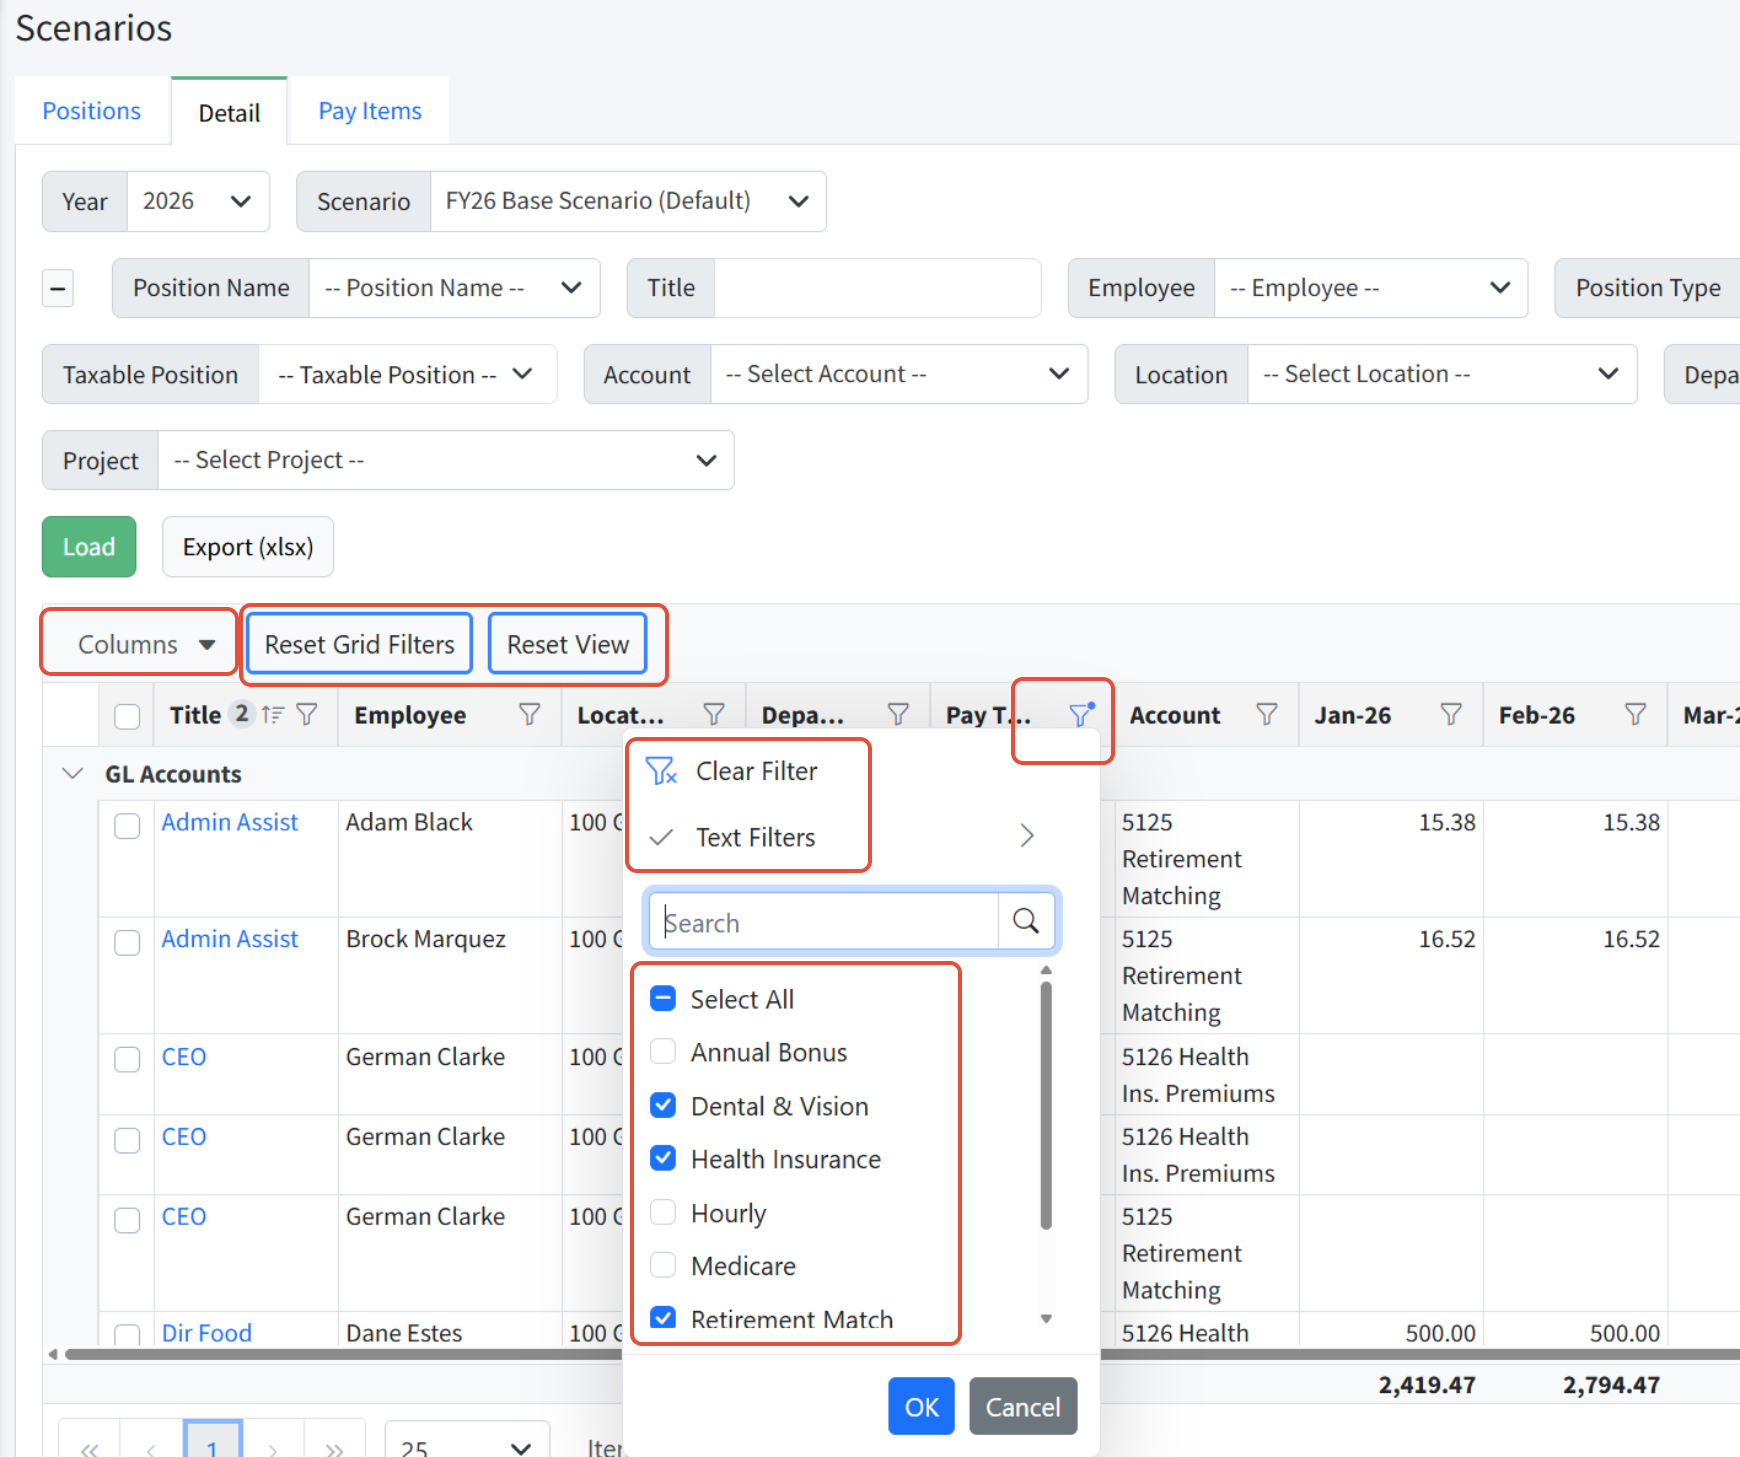
Use grid filters on columns to filter to one or more values in one or more columns. You can drag and drop columns to rearrange the order, and click Columns to show or hide columns. Sort a single column by clicking in the column header. Sort by a second column by clicking CTRL-click in the second column.
- Columns - Show or hide columns.
- Reset Grid Filters - Remove filters currently set and see all data.
- Reset View - Restore columns and sorting and clear filters currently set.
- Filter - Click the filter icon to:
- select all, one, or more values
- click Clear Filter to clear the filters currently set
- click Text Filters to filter text using Equal, Not Equal, Starts With, Ends With, Contains, Does Not Contain, or Custom Filter options
Page Actions
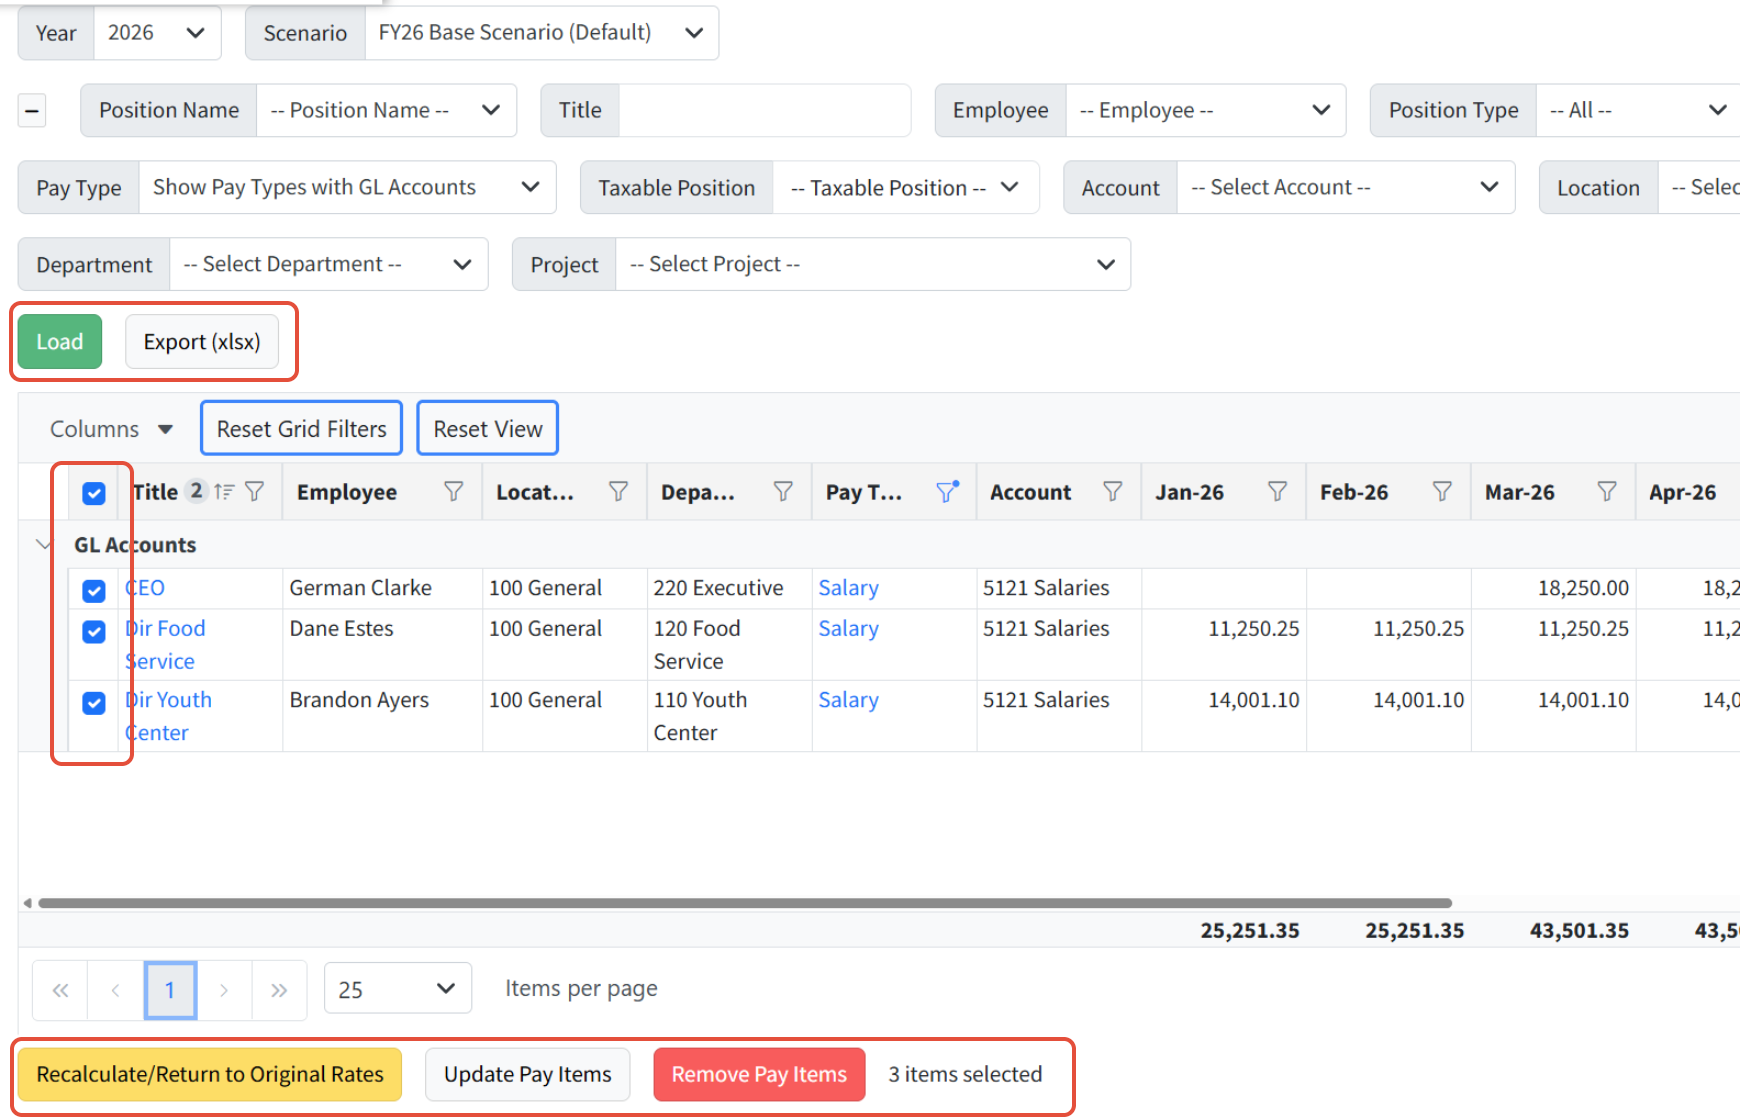
- Load - Load the filters and settings selected.
- Export (xlsx) - Export the view to Excel for review.
- Boxes - Select boxes to the left of a line to select that line, or click the top box to select all records in the view.
- Items per page - Use the option to scroll through pages or select the number of items per page to display.
- Recalculate/Return to Original Rates - Reset the selected lines to the pay type rate, or the pay item rate if the pay type does not have a default rate. Additional information below!
- Update Pay Items - Update the selected pay items. Additional information below!
- Remove Pay Items - Delete the selected pay items. Additional information below!
- Drilldown Links - Links in blue on the Details tab can be used to update additional data related to positions, employees, and pay items.
Managing Pay Items
There are many ways to update pay items on the Details tab.
- Recalculate/Return to Original Rates - If a change is made to the Annual Setup tab, Pay Types or Employees, Martus does not automatically apply that change to any scenario. Changes to employees or pay types must be pulled into the desired scenario using Recalculate/Return to Original Rates in the scenario for which you want the update(s) applied.
- Update Pay Items - Update pay items using one of two methods (described in detail below):
- Fiscal Month Range/Anniversary
- Custom Spread
Pay items are typically adjusted within a scenario using a new set of assumptions. For example, salary and hourly pay items could be recalculated with a 3% COLA. Any pay item can be modified for any portion of the year.
- Remove Pay Items - Select one or more rows and click Remove Pay Items to permanently remove them from the corresponding positions in this scenario. Other scenarios are not impacted.
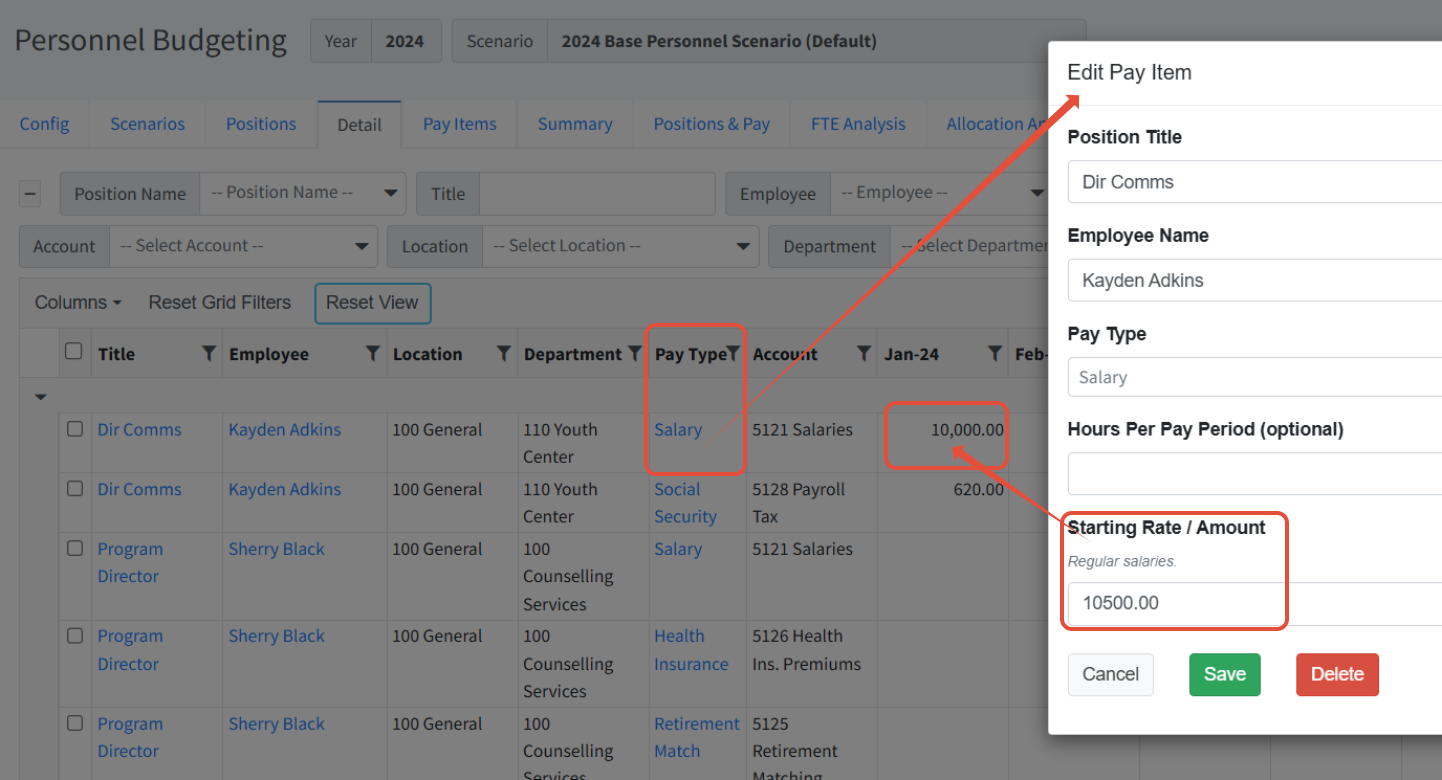
- Pay Type drilldown link - Make full-year changes to a pay item's Hours Per Pay Period and/or Starting Rate/Amount. For example, if an employee's rate of pay changes at the start of the budget year, make the change directly to the pay item by clicking the pay type drilldown link and updating the Starting Rate as shown below.
Recalculate/Return to Original Rates
Use this method whenever a change has been made to the Annual Setup tab, or to Pay Types or Employees records, and the scenario should be updated with the new information. This can also used to reverse previous updates made using the Update Pay Items option and reset the pay item to the original settings.
- Filter to the appropriate pay types.
- Select all appropriate rows using the boxes on the left.
- Click Recalculate/Return to Original Rates.
Update Pay Items by Fiscal Month Range/Anniversary
Use this method whenever a pay item should be updated mid-year, for example, a pay increase, or if an organization is preparing alternate scenarios. This method is best for COLA scenarios or for pay types for insurance rates that increase mid-year.
- Filter to the appropriate pay types.
- Select all appropriate rows using the boxes on the left.
- Click Update Pay Items.
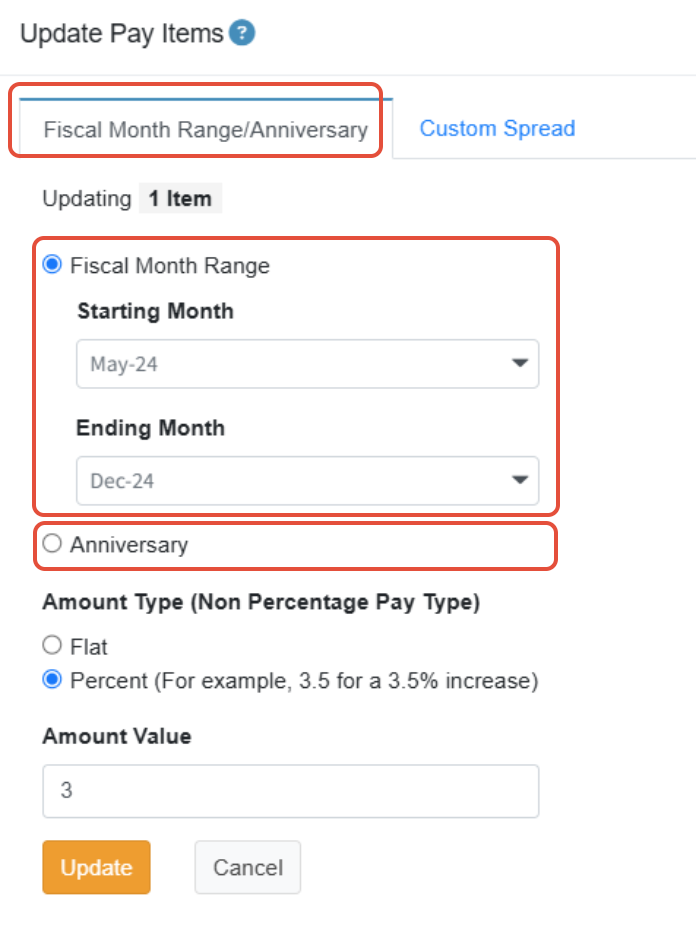
- Choose the type of Update:
- Fiscal Month Range - Apply the increase/decrease to all months or a specific month range.
- Anniversary - Apply the increase/decrease to the position based on the employee's anniversary date. This requires that the position be associated with an employee and that the employee has the Anniversary Date set in Personnel Budgeting > Personnel Budgeting Setup > Employees.
- Enter the Amount Type (Non Percentage Pay Type) to use as the increase/decrease to be applied to any pay type that is not based on a percentage.
- Flat - Enter the total amount to be added or removed per pay period based on the frequency of the pay type.
- Percent* - The total percentage increase/decrease to be applied per month.
- Enter the Amount Value, the flat dollar amount or percent that should be applied.
- Click Update and verify the changes are correct.
*NOTE: When a pay type has a default value, and you set the amount back to 0 -- by using a multiplier of -100% -- it will see the 0 and use the default value. The way around this, and to remove the remaining pennies, is to use -99.9999%. That will set the amounts to a very low value that won't be added to the columns.
Update Pay Items Using a Custom Spread
Apply a custom spread to an existing pay item, where the monthly compensation for the position has already been set. A custom spread is then applied to the calculated full year Starting Rate of the existing pay item to achieve the spread specified. You can find specific examples here: Custom Spread Examples in Personnel Budgeting.
NOTE: When a position or pay type has a start date after the 1st of the month, applying a custom spread will clear out the starting month value on the Detail tab. That month will not be included in custom spread calculations.
- Filter to the appropriate pay types.
- Select all appropriate rows using the boxes on the left.
- Click Update Pay Items.
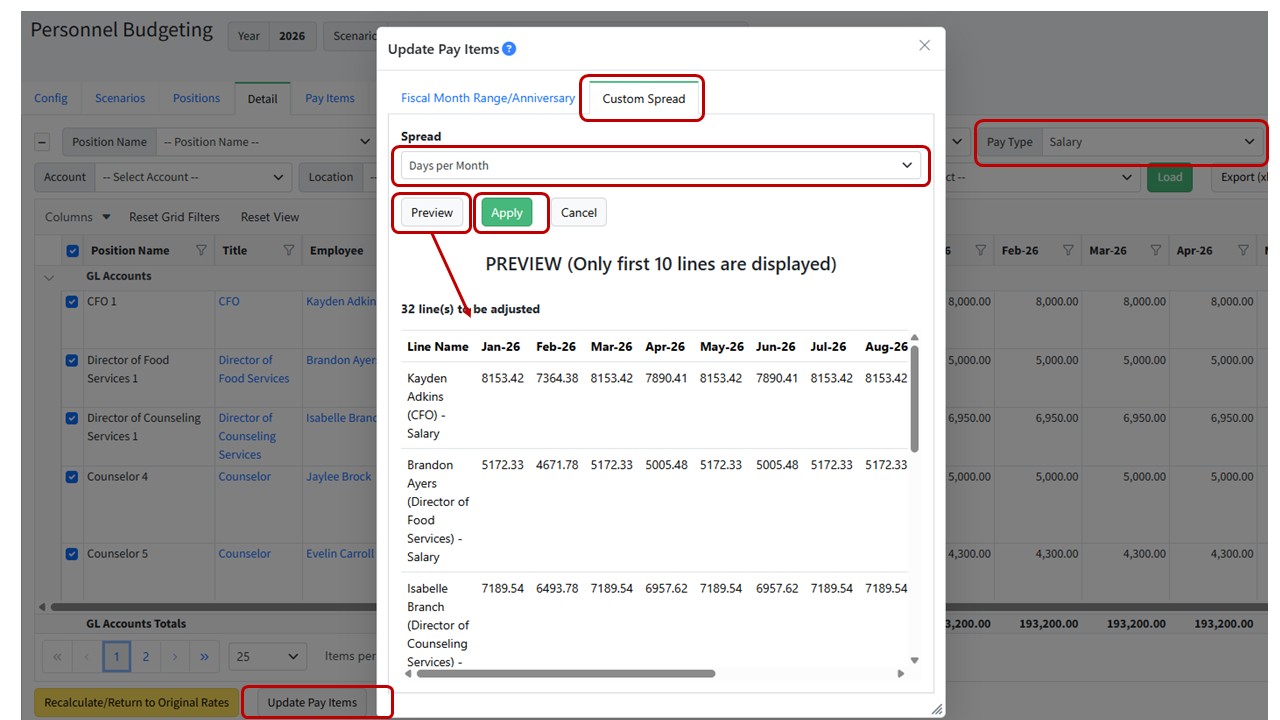
- Change to the Custom Spread tab.
- Select the Spread from the dropdown that you would like to apply. (Custom Budget Spreads are created by an Admin in Setup > Calendar > Custom Spreads.)
- Click Preview to view up to the first 10 lines to be adjusted.
- Click Apply to apply the custom spread as is.
- Click Cancel to not make any changes to the pay items.
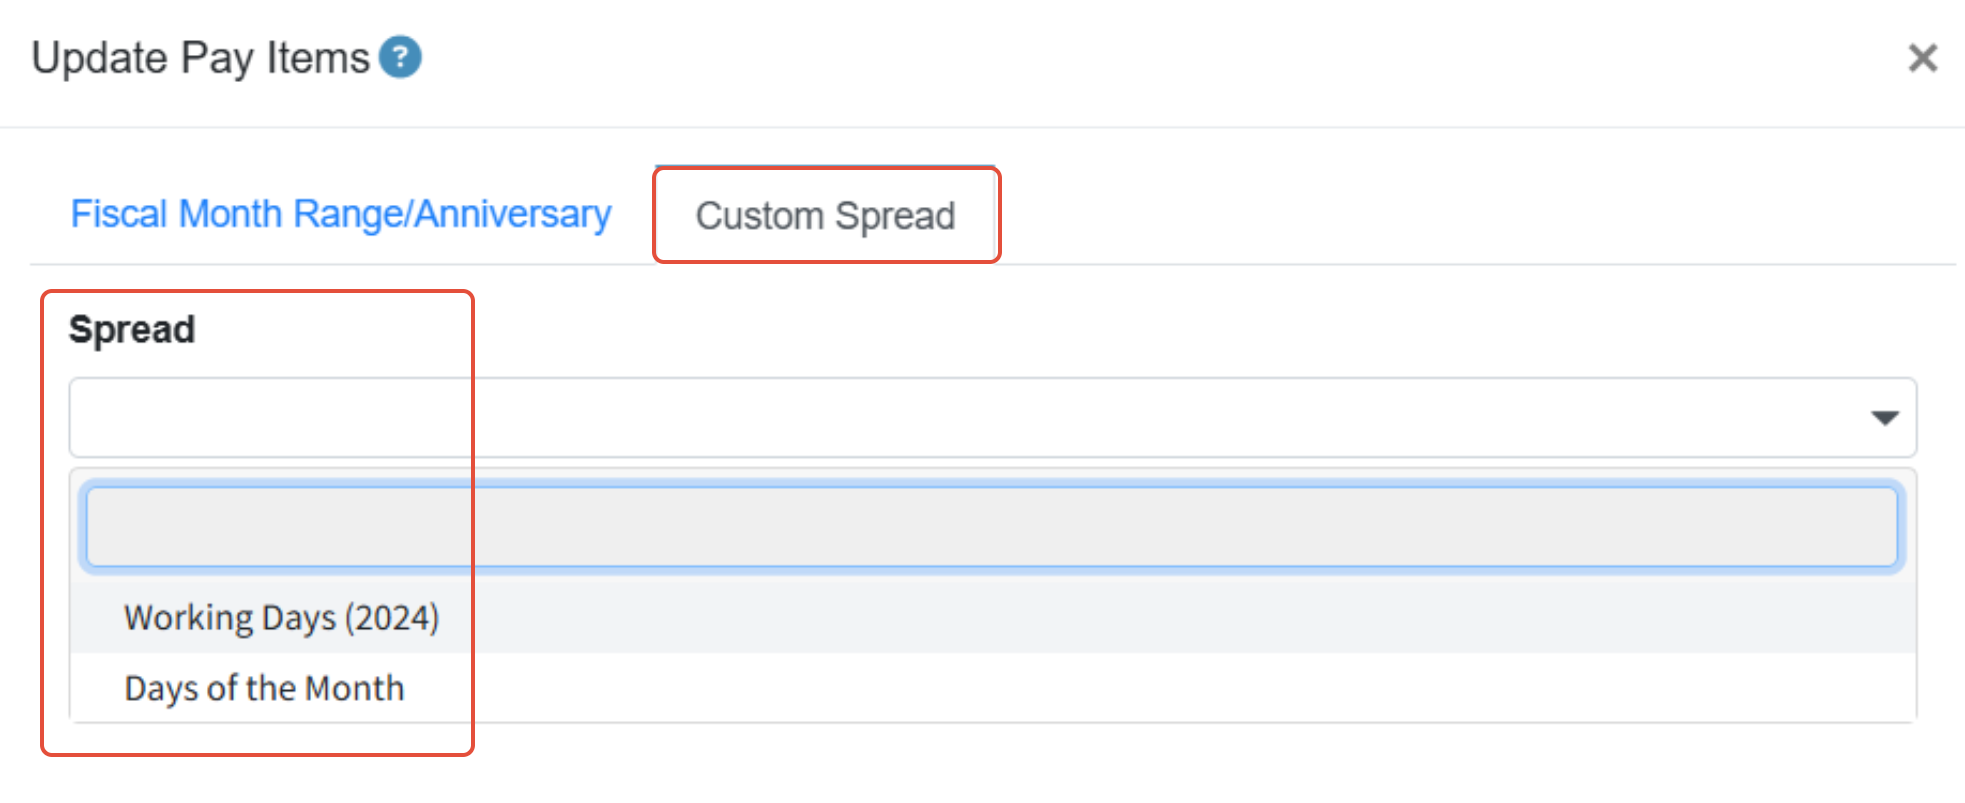
Example Use Case: In the example below, the salary pay type starting rate is $10,000. The frequency is monthly. The custom spread is 1 every other month. Therefore the total salary of $120,000 (10k X 12) is now spread out every other month as $20,000.
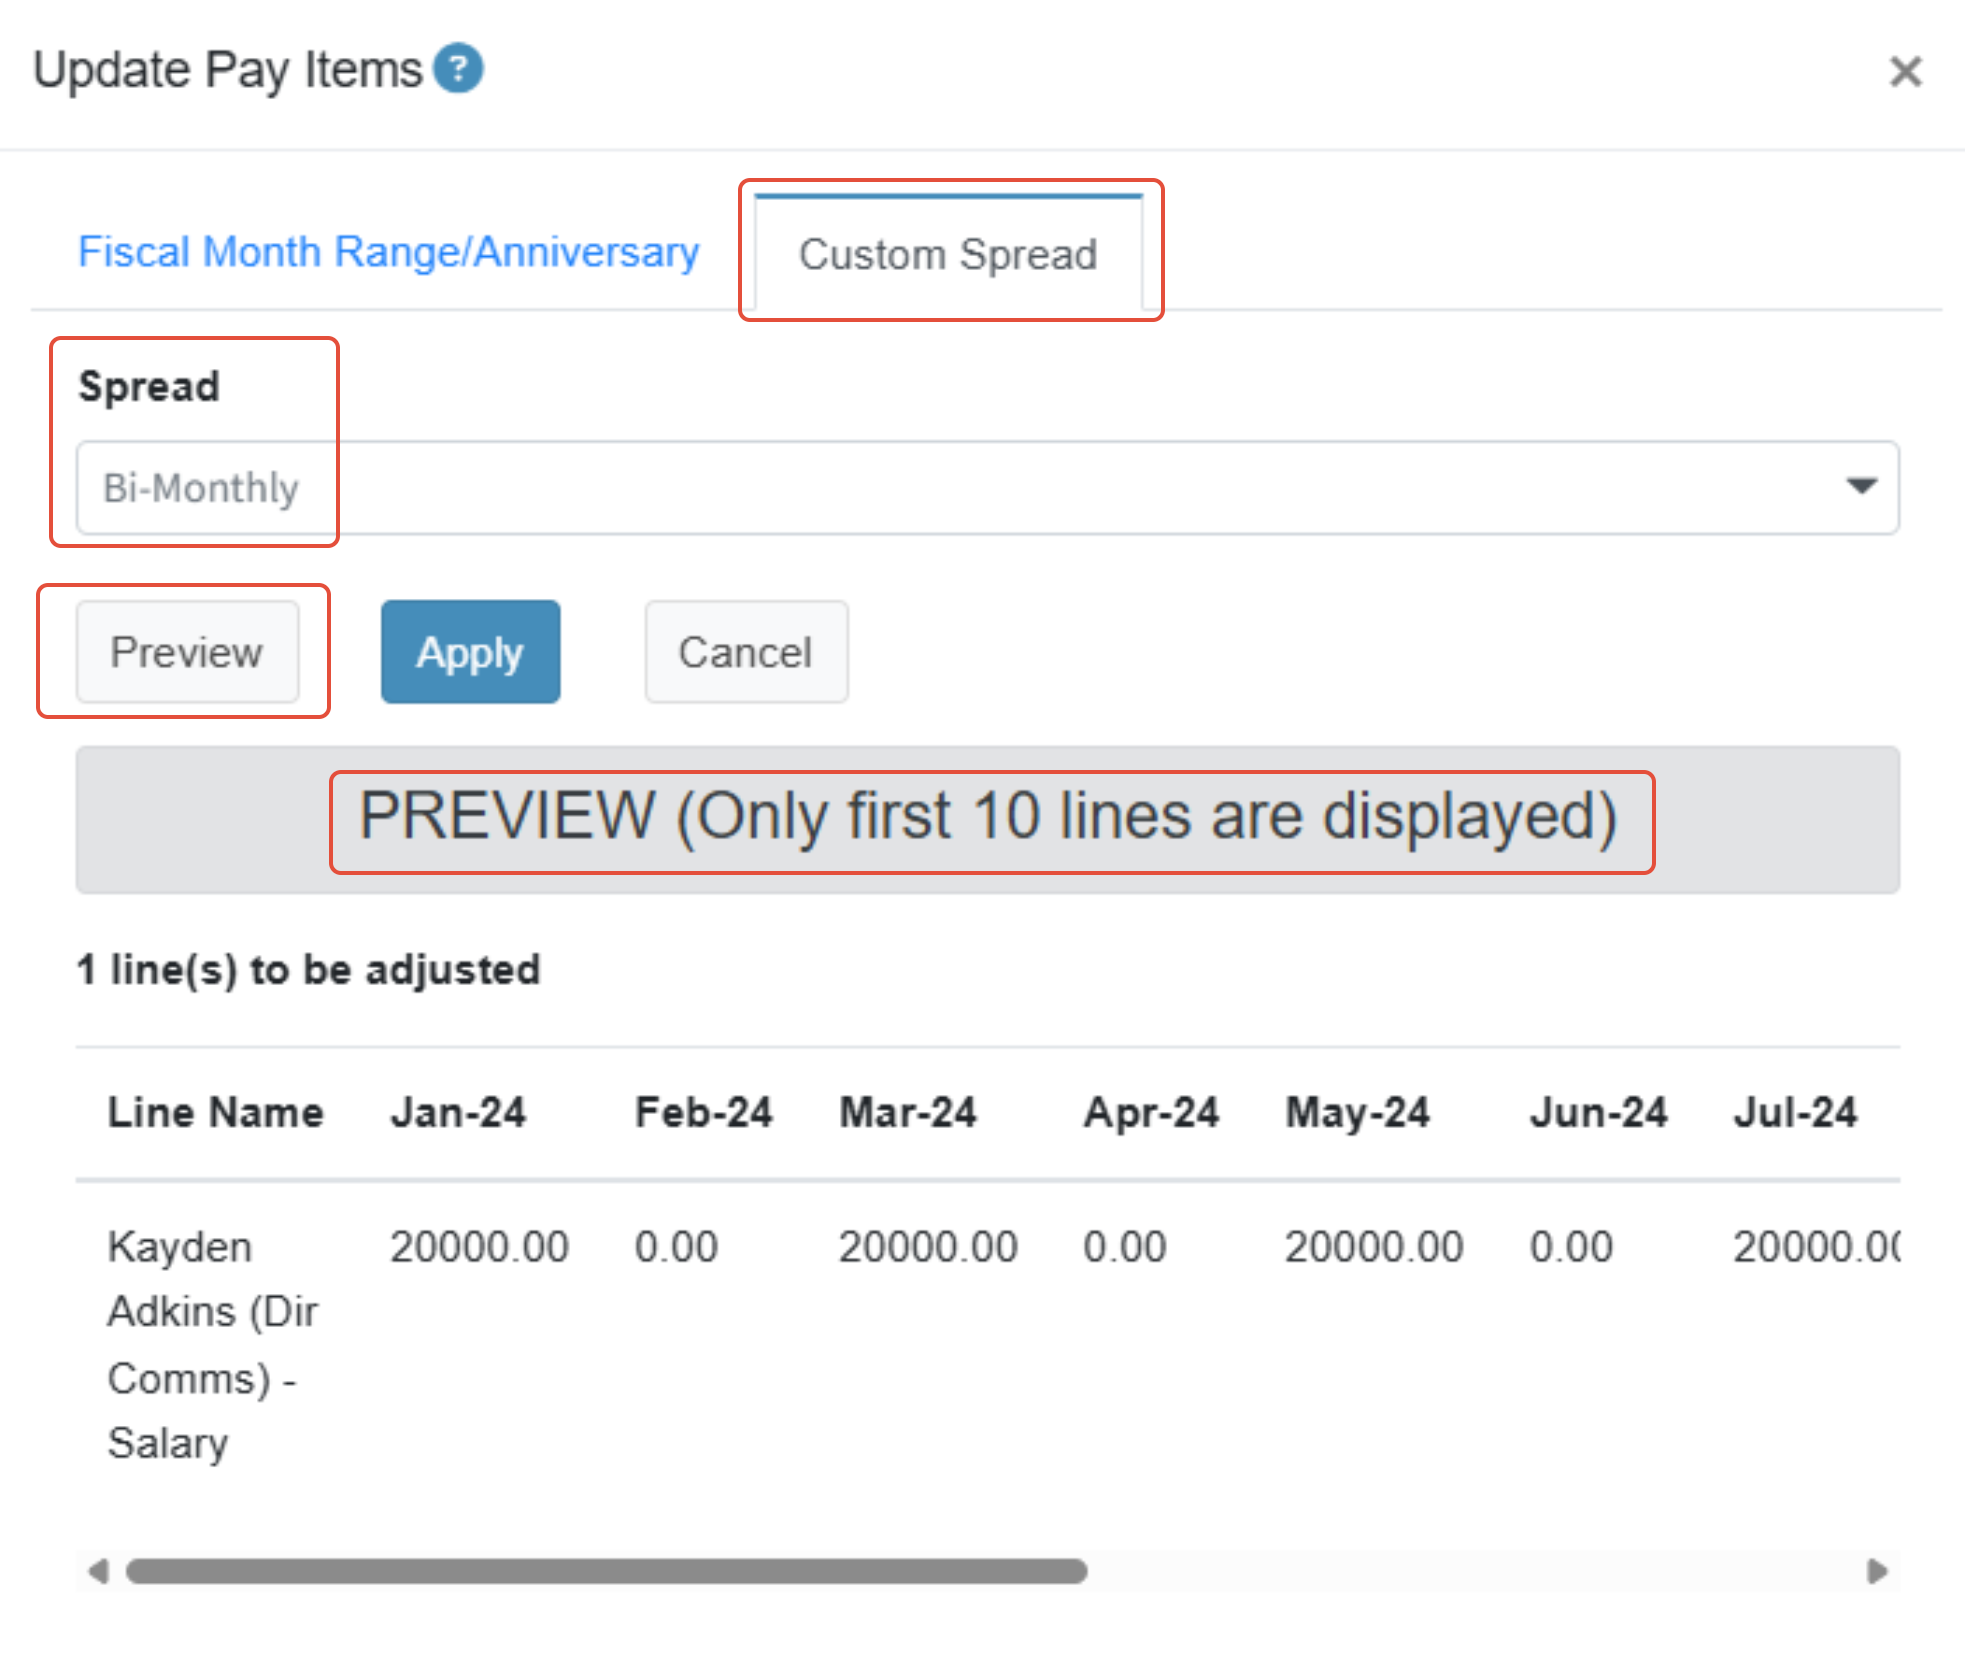
Note: If you need to apply mid-year adjustments, apply the custom spread FIRST, and then the adjustment. If you do the adjustment first, the custom spread takes the new total and allocates it by ratios over the whole year. So the order in which the adjustments are done is important!
Remove Pay Items
Use this method whenever a pay item should no longer be associated with a position. This does not remove the pay type from the Personnel Budgeting > Personnel Budgeting Setup > Pay Types page; rather, it only deletes the selected pay items within the selected scenario. Note that there is no option to reverse deleted pay items - the pay items need to be re-added by editing the position or via import.
- Filter to the appropriate pay types.
- Select all appropriate rows.
- Click Remove Pay Items.
- Click Ok to confirm.
Notes
- If the Detail tab has rows but no amounts in the columns, select all the rows and click Recalculate/Return to Original Rates. This normally occurs because the pay items have been imported or copied and there was an error causing them to be created but not populated with the appropriate values.
The Pay Items Tab
The Pay Items tab displays one row per position, with columns for each pay type. This page allows for simple updates to the base rates for pay items without having to use the export and import process. When making simple changes to pay items, the Pay Items tab is the best option.
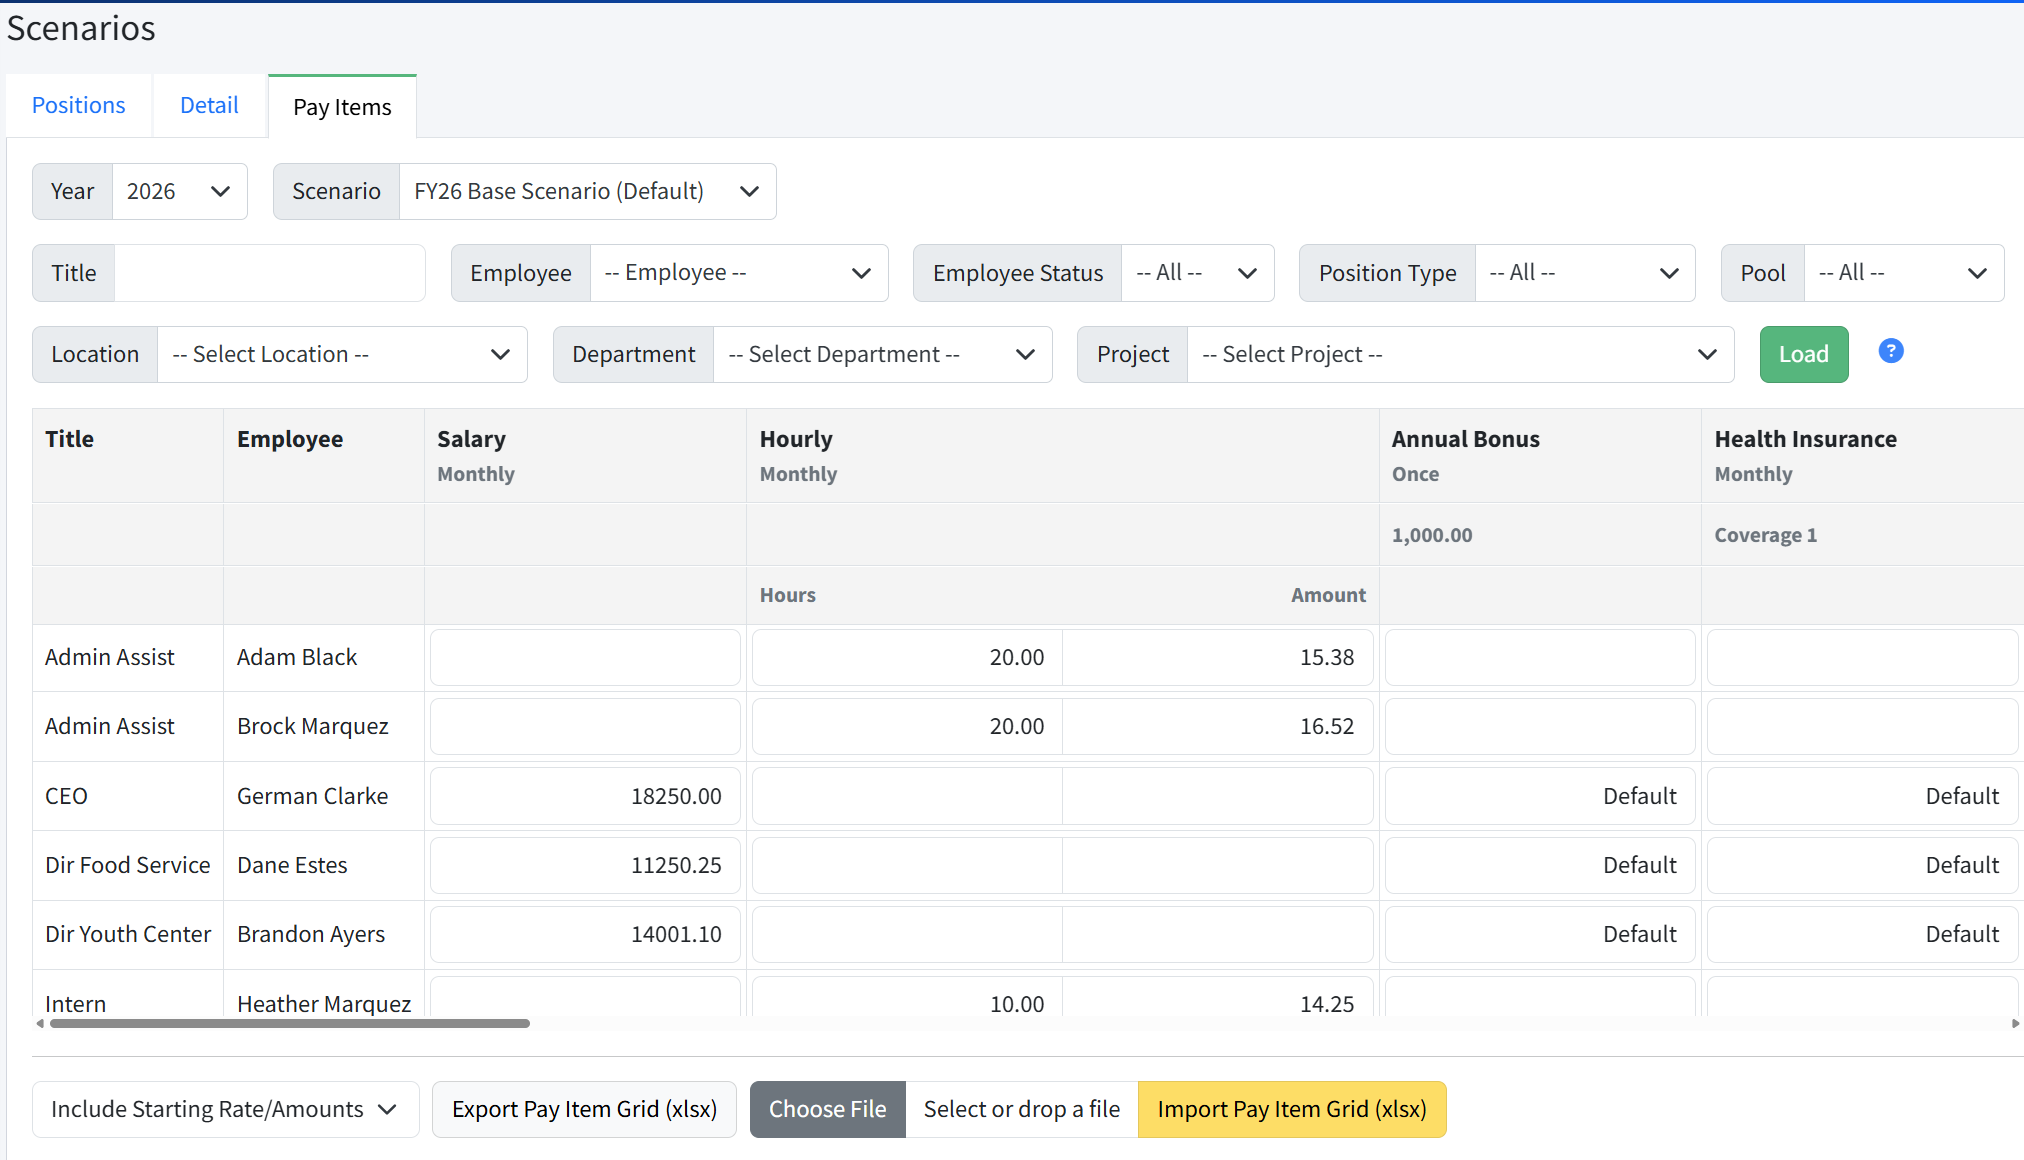
Pay Items Filters and Actions
Navigation
- Columns - You can click in any column header to sort by that column. Pay type columns are arranged in the order presented in Personnel Budgeting > Personnel Budgeting Setup > Pay Types.
- Arrow & Tab keys - Use your arrow keys or tab key to move from cell to cell.
Filters
- Title - Search position titles using key words or partial text.
- Employee - Select an employee to filter positions for that employee.
- Employee Status - Filter to Active, Inactive, or None.
- Position Type - Filter by position type.
- Pool - Filter to Pooled or Not Pooled positions.
- Dimension Filters - Filter on customer-specific dimensions in Martus.
- Load - Load the filters and settings selected.
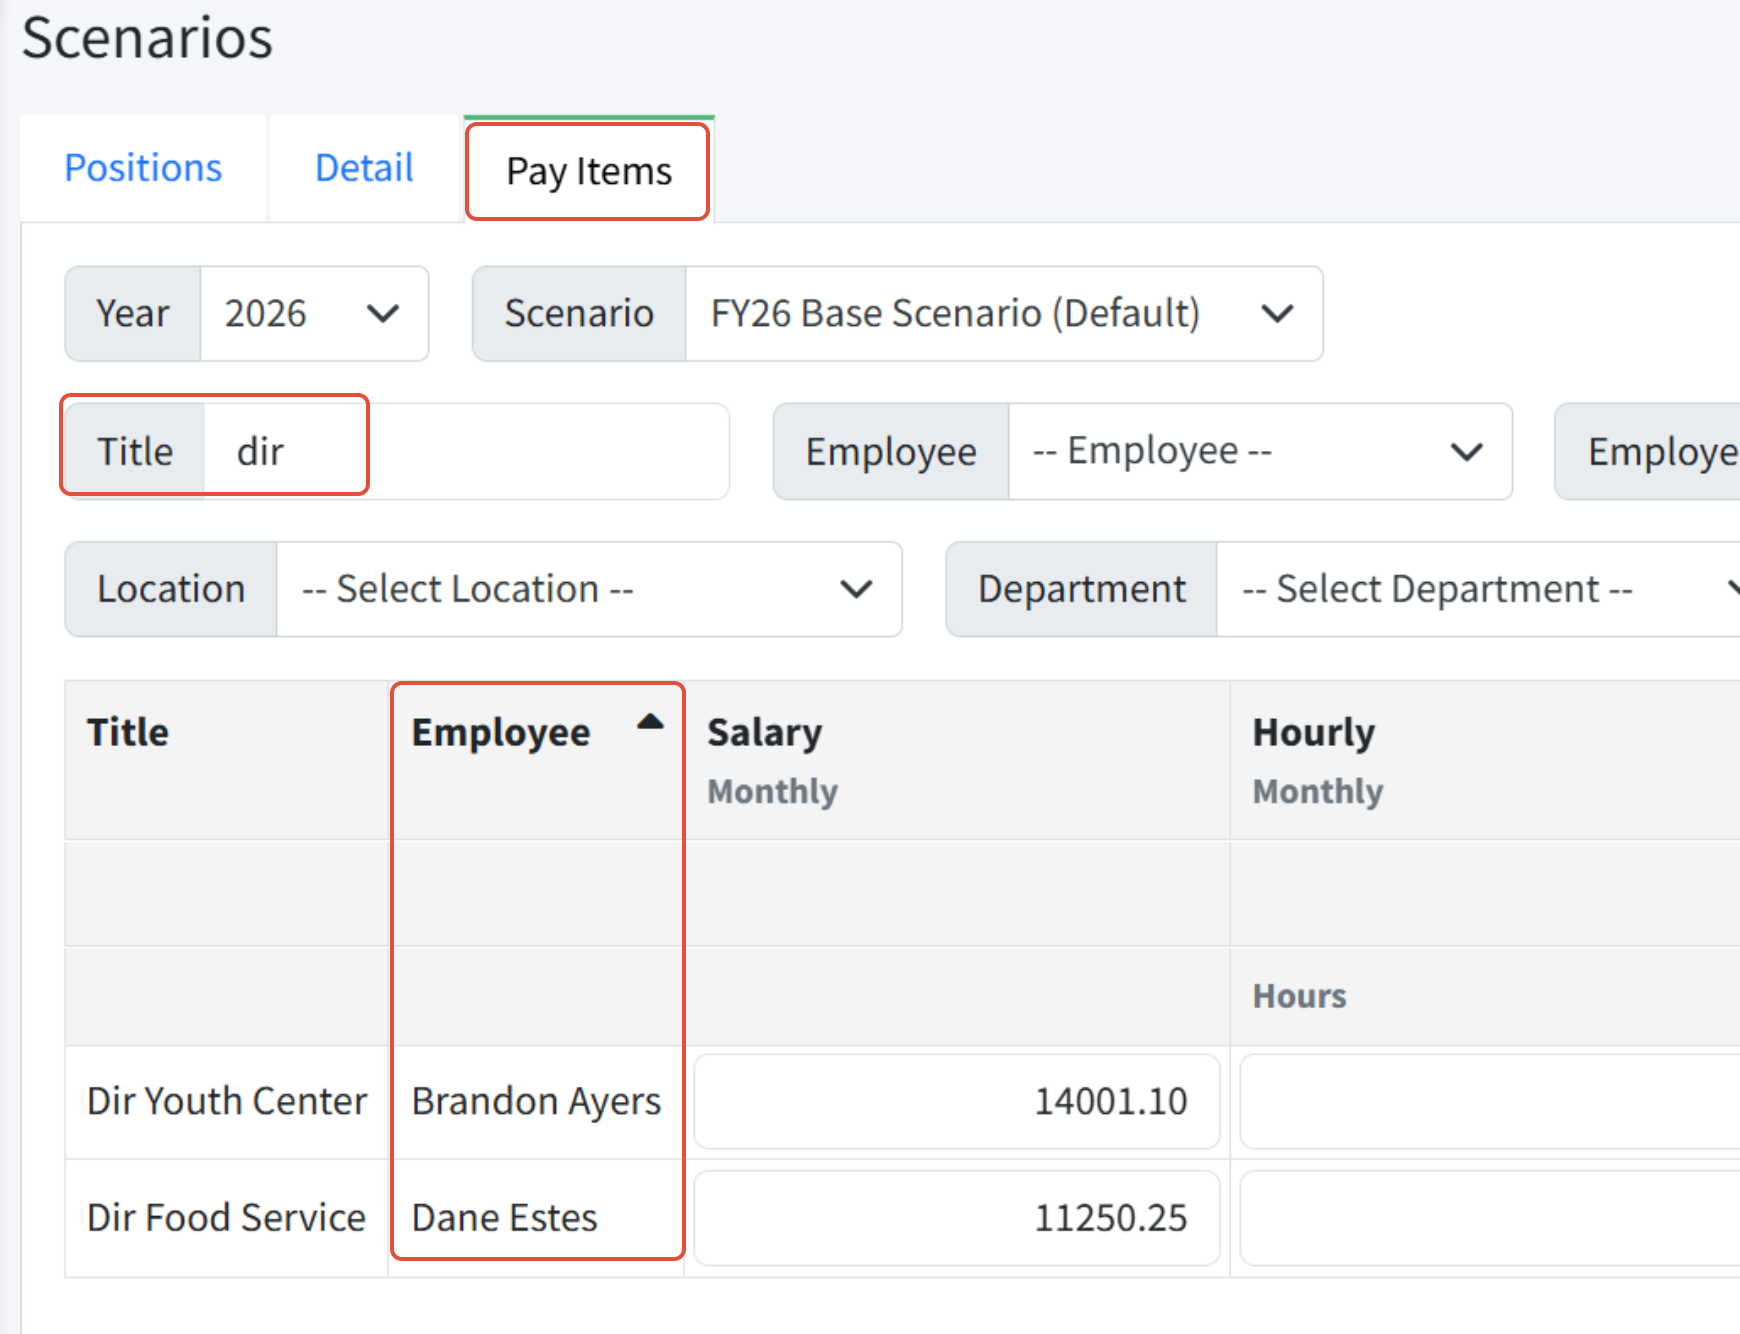
Updating Pay Items
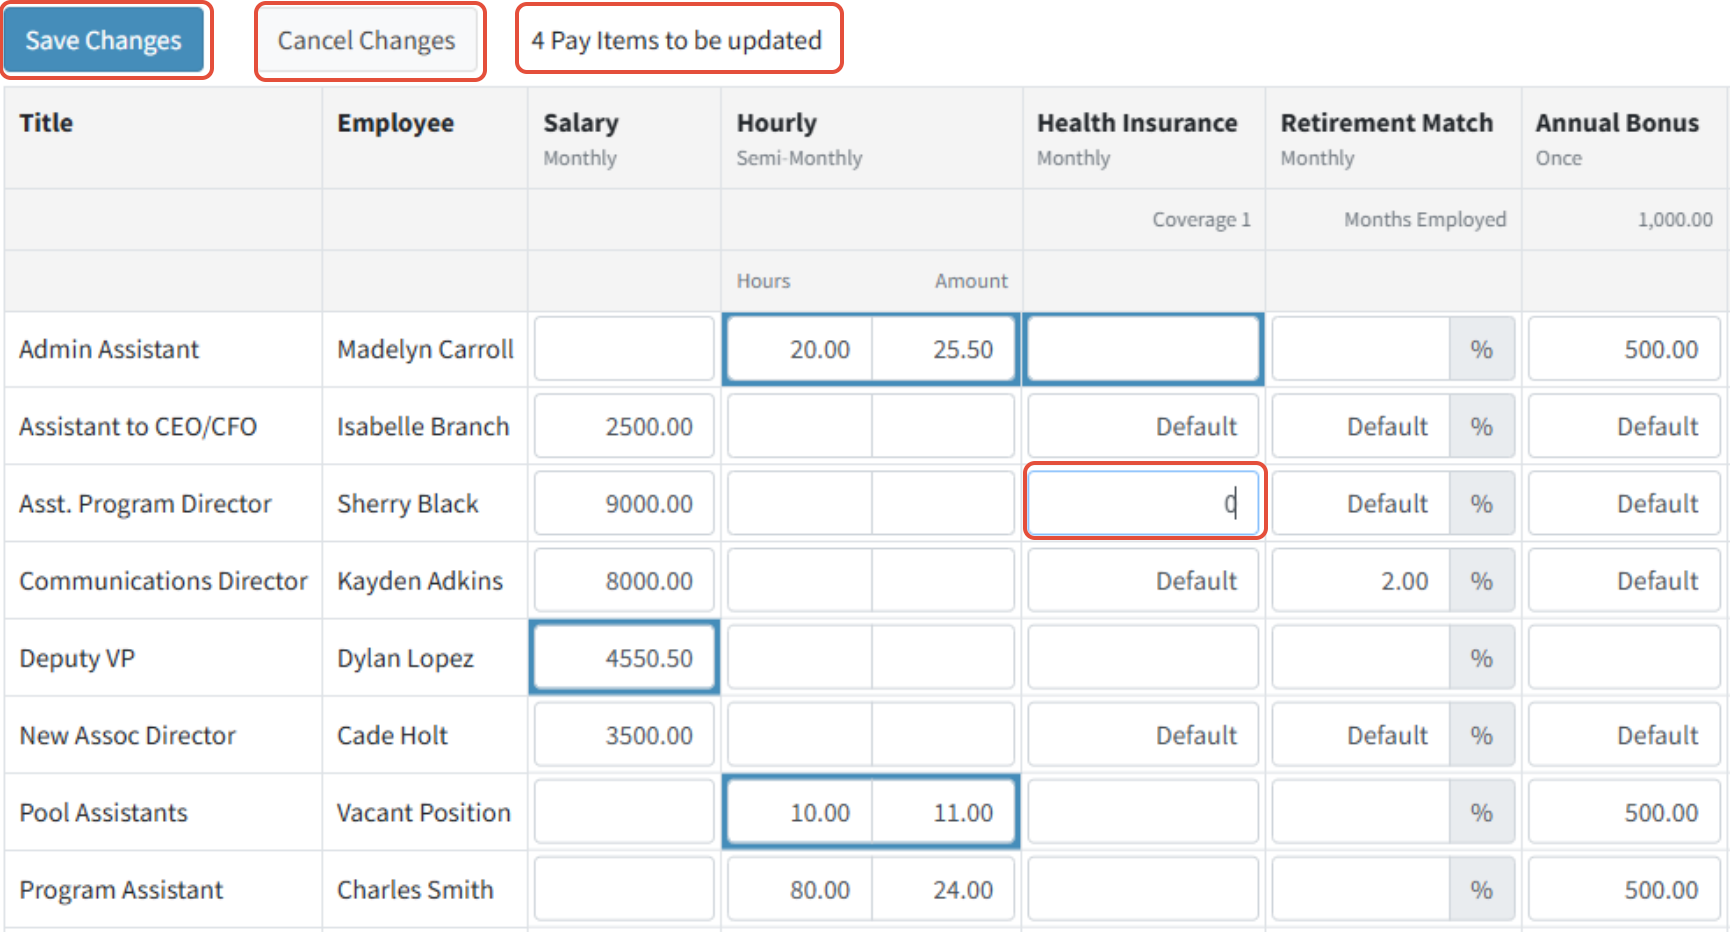
All pay types associated with a position become pay item for that position. Pay items are specific to each scenario, while pay types are utilized with all scenarios to create pay items. Each pay item will be shown on the Pay Item tab as one of the following:
- An amount - Indicates this is an amount specific to this pay item for this position. For example, Life Insurance rates are often age-based and therefore different for each position. Salaries are also specific to the position. Amounts can be used to override the default on the pay type, whether dollar-based or percent-based.
- Default - The default rate set for that pay type in Personnel Budgeting > Pay Types is used. For example, a Cell Phone Allowance may be $50 per pay period for all positions. A 0 is initially used to indicate the default will be accepted. Amounts can be used to override the default on the pay type, whether dollar-based or percent-based.
- Blank - The pay type is not associated with that position. For example, not all positions will opt in to Dental Insurance.
- Position Notes - Add or update text regarding the position in the last column on the right if desired.
Steps to Update Pay Items
- To edit any pay item, click in the cell.
- Enter an amount, or 0 to indicate using the default rate. Leave a cell blank if that pay type is not associated with that position.
- Tab or click to the next cell. Updated cells will have a blue outline indicating a change has been made.
- After one or more updates, be sure to click Save Changes.
Save Changes - Saves updates made to the pay items and position notes, if applicable. Pay Items will be recalculated.
- Cancel Changes - Cancel any updates made to pay items and position notes.
- X Pay Item(s) to be updated - Indicates the number of changes made that will be either saved or cancelled.
Updating Pay Items via Export/Import
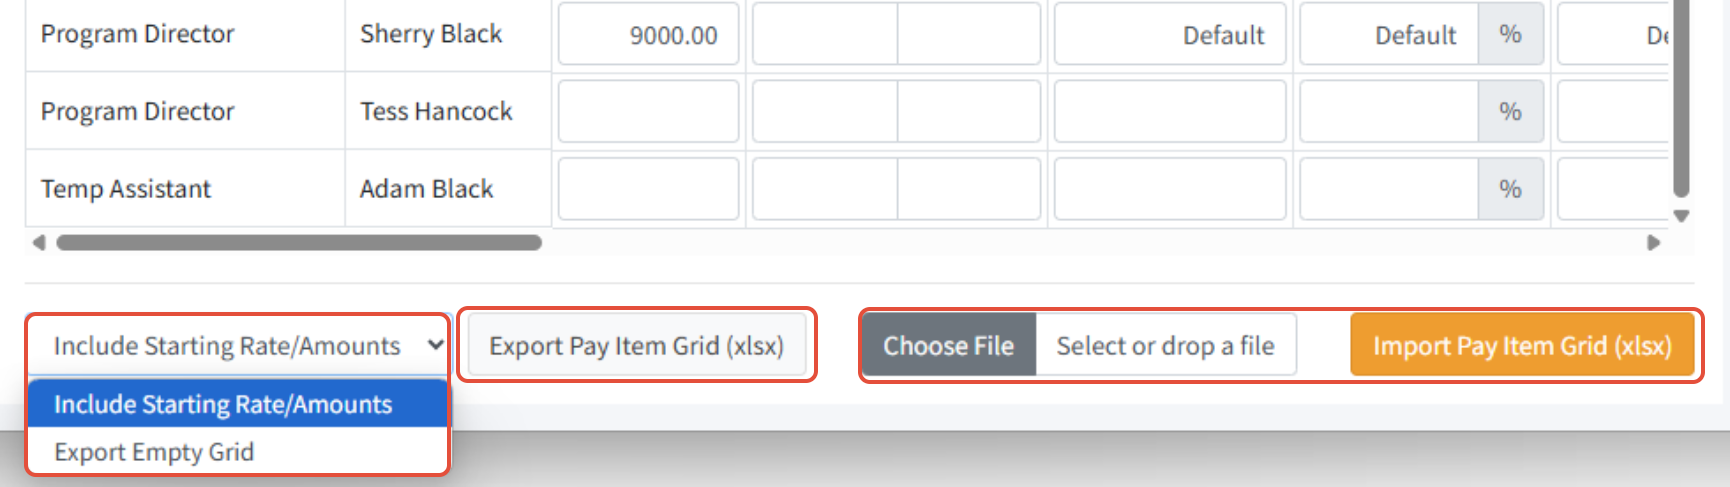
You can export the pay item grid, update it in Excel, and then import it back into Martus.
Export Pay Item Grid (xlsx) - Export the pay items and notes.
Include Starting Rate/Amounts - Use the existing rates in the pay items.
Export Empty Grid - Exclude the existing rates in the pay items.
- Choose File - Choose the file to import.
- Import Pay Item Grid (xlsx) - After selecting the file to import, click Import Pay Item Grid (xlsx).
Notes
- Changes to the Pay Item tab will override any adjustments made via the Detail tab including any mid-year adjustments.
- If planning on making many changes, be sure to download the Pay Data file prior to starting as a backup in case changes are made by mistake.
- You cannot make changes to a locked scenario.
The Attachments Tab
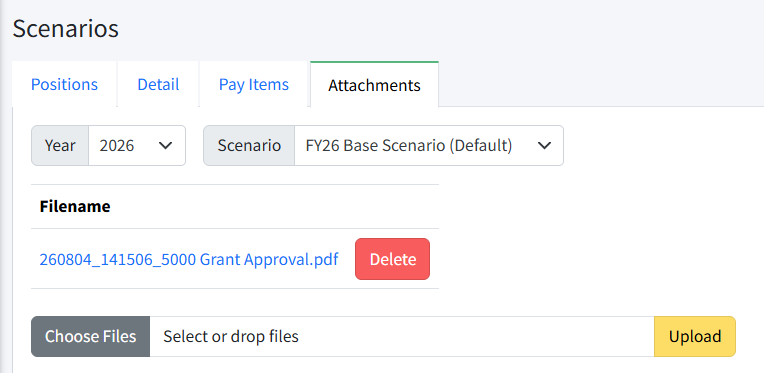
Attachments can be added to a scenario. This would include any supporting documentation. Attachments are copied from scenario to scenario. Attachments are not exported, and cannot be imported.
To add an attachment:
- Navigate to Personnel Budgeting > Scenarios > Attachments.
- Click Choose Files or drag and drop files to select the files you want to upload.
- Click Upload.
How to Use the Pay Item Grid (Excel)
The Personnel Budgeting > Scenarios > Pay Items page displays one line per position in rows, with pay types in columns. You can update items directly on the screen or via the Pay Item Grid Excel export, which is formatted with one line per position in rows, and columns for each pay item.
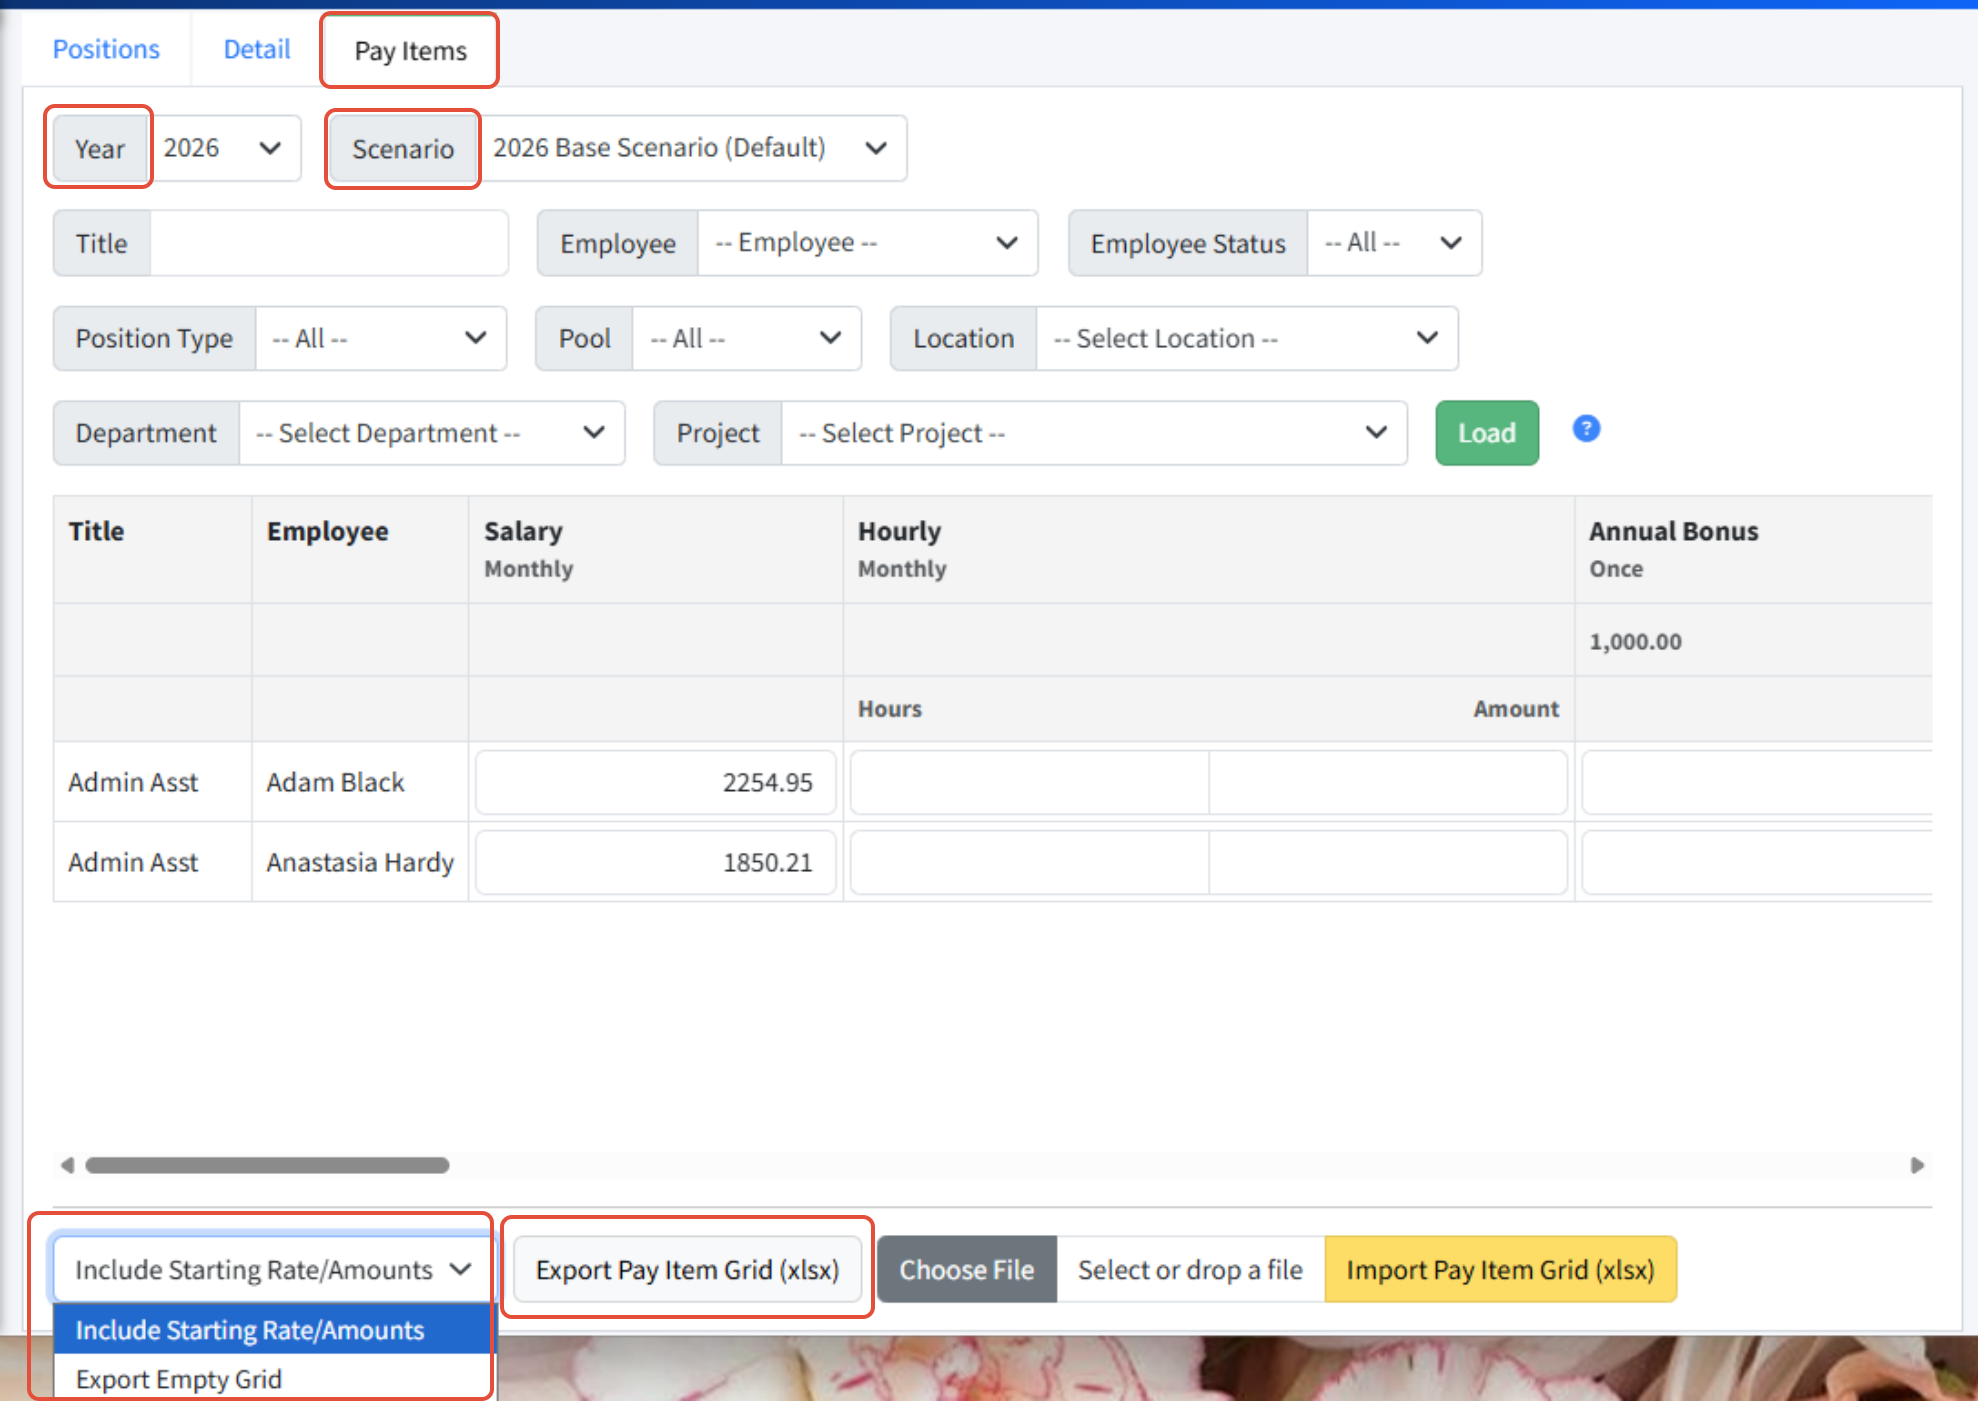
Exporting the Pay Item Grid to Excel
- Go to Personnel Budgeting > Scenarios > Pay Items.
- Select the Year and Scenario.
- Choose whether or not to Include Starting Rates/Amounts (includes the values on the screen) or Export Empty Grid (includes no values).
- Click Export Pay Item Grid (xlsx).
Updating the Pay Item Grid in Excel
The first three columns in this file serve as reference for the positions in the scenario. Martus only supports changes to the pay type columns. Do not adjust the first three columns in this file and attempt to re-import, as these must match exactly what is currently in Martus.
- Position Name: This is for reference only; do not update.
- Title: This is for reference only; do not update.
- Employee: This is for reference only; do not update.
- Pay Type Columns: The columns following the first three columns will be dictated by the pay items that are set up within your system. Each customer will have a different set of columns. Navigate to Personnel Budgeting > Personnel Budgeting Setup > Pay Types to view the pay types' frequency, type, and any default values. The following are general rules for utilizing these columns:
- Hourly Pay Types: Enter the hourly rate (amount) for each position and the hours per pay period in the pair of columns. If the position does not get the pay type, leave the cell blank.
- Salary Pay Types: Enter the rate using the frequency defined on the pay type (for example, Weekly, Bi-weekly, Semi-monthly, etc.). If the position does not get the pay type, leave the cell blank.
- Percentage Pay Types: Enter a 0 to use the default percent or enter the percentage that should be applied to that position if different from the default. Note: You can only overwrite the default percentage to be lower than the default. If the position does not get the pay type, leave the cell blank.
- Regular Pay Types: Enter a 0 to use the default amount set on the Pay Type in Martus or enter the appropriate amount based on the frequency of the Pay Type. If the position does not get the pay type, leave the cell blank.
- Tiered Pay Types: For pay types based on tiers, use the default amount by entering a 0 in the cell. If the position does not get the pay type, leave the cell blank.

Import Guidelines
- Martus will add new pay items or update existing pay items with the import file. Martus will not remove pay items even if they are removed from the Pay Item Grid.
- Do not adjust or remove the Position Name, Title, or Employee columns.
- Only enter a value or a 0 in cells where the position is associated with that pay type. If the position does not get the pay type, leave the cell completely blank.
- Be sure to update the pair of columns asociated with each hourly pay type.
Importing to Martus
- Go to Personnel Budgeting > Scenarios > Pay Items.
- Ensure the appropriate scenario is selected.
- Click Choose File to select the appropriate Excel file to import.
- Click Import Pay Item Grid (xlsx).
TIP! Recalculate the pay items on the Detail tab to populate the pay item rates if they are blank!
Making Mid-Year Adjustments
There is often a need to change pay item rates mid-year, affecting only certain months. Examples include:
- A planned cost of living (COLA) increase
- An increase to insurance premiums
- An employee receives a salary increase
To make mid-year adjustments in Personnel Budgeting > Scenarios> Detail, filter to the appropriate pay type(s), select the pay item lines to be adjusted, and use Update Pay Items to apply the changes. (Full-year changes can be made on the Pay Items tab directly or by using the Pay Item Gr Export/Import.)
Changes made via the Details tab do not affect the underlying Starting Rate/Amount, or base rate, for the position's pay item - they are essentially overlaid on top and can be removed by using the Recalculate/Return to Original Rates option explained below. Updates to the same pay item are cumulative.Updating Pay Items
- Navigate to Personnel Budgeting > Scenarios > Detail. Be sure the selected year/scenario is the one you want to change, and create a copy of the scenario as a backup first if desired.
- Filter to the appropriate Pay Type(s), using the dropdown or grid filters.
- Select all appropriate pay item lines using the check boxes on the left.
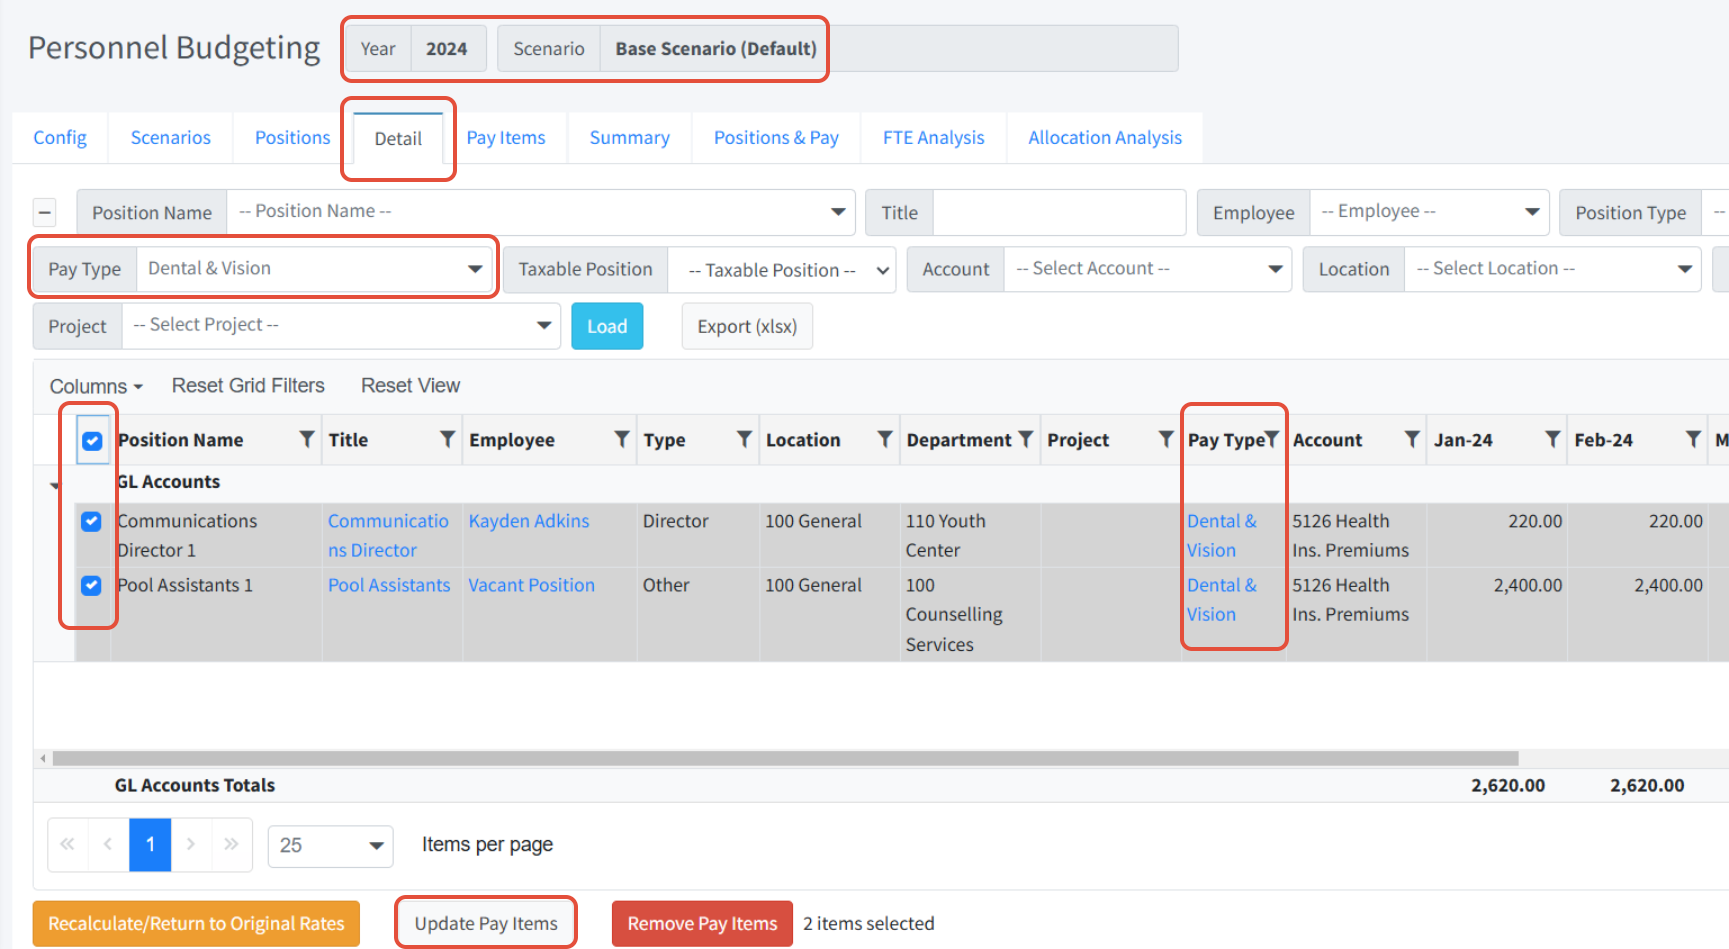
- Click Update Pay Items from the options at the bottom.
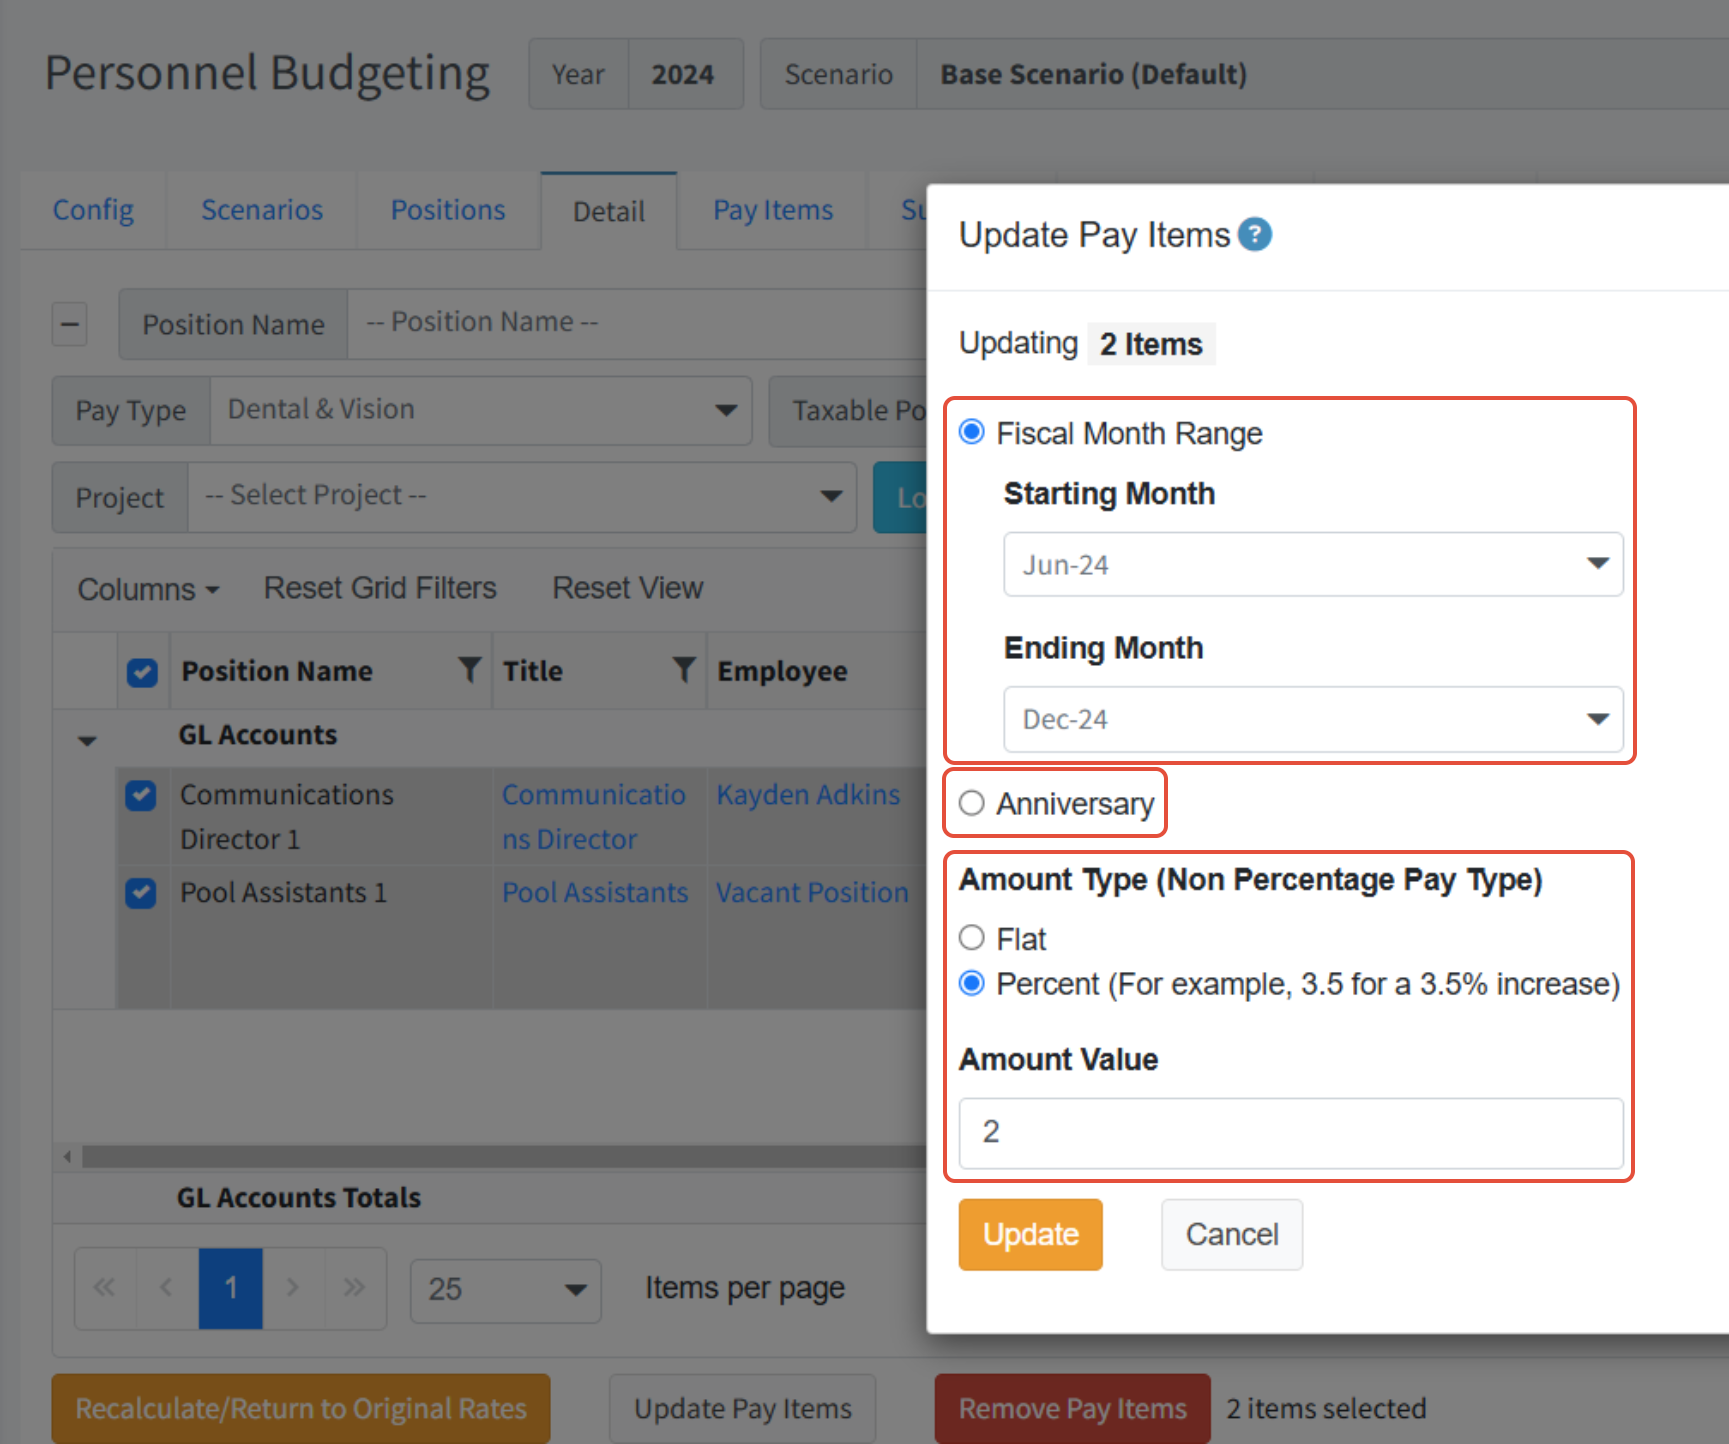
- Choose the type of update.
- Fiscal Month Range - Apply the increase to all or a specific date range.
- Anniversary - Apply the increase based on the employee's Anniversary Date associated with this Position. (The Employee record must have the Anniversary Date field completed in Personnel Budgeting > Employees).
- Choose the Amount Type setting to be applied for the selected pay items. (Pay Types cannot be based on a Percentage.)
- Flat - Applies the Amount Value to selected month(s). NOTE: The value can be positive or negative, and increases or decreases the total amount per pay period based on the frequency of the pay type.
- Percent - Applies the Amount Value to selected month(s). NOTE: The value can be positive or negative, and increases or decreases the total amount per pay period based on the frequency of the pay type.
- Enter the Amount Value - a flat dollar amount or percent - that should be applied.
- Click Update.
Pay Type Category and Frequency Impact
The Pay Type Category (Regular, Hourly, or Percentage) and Frequency (Weekly, Bi-Weekly, Monthly, etc.) impact how pay items are updated.
- Adjustments to Regular and Hourly pay types can be either flat or percentage-based.
- Adjustments to Regular pay types are additive. The requested adjustments are added to the Starting Rate/Amount, or base rate, not necessarily the monthly total. Negative adjustments can be made. The resulting monthly budgeted amount can be negative.
- Adjustments to Hourly pay types are additive, and affect the hourly rate (not monthly totals).
- Adjustments to Percentage pay types can only be flat, and they replace the original value. Adjustments to Percentage pay types cannot be made to zero, or to the default rate.
- Rate updates can be made to pay items with different pay types, but Percentage pay types cannot be updated in the same group with Regular and Hourly pay types, and vice versa. Percentage pay types can be updated in combination only with other Percentage pay types.
- For Percentage pay types, the default rate is the maximum that can be used in calculating the amount to be budgeted. If the new rate is greater than the default rate (i.e., if the default rate is 4% and the new rate is 6%), the budgeted amount will be calculated at the max rate of 4%. For negative percentages, the same rule applies. For example, if the default rate is -2% and the new rate is set to -5%, the budgeted amount will be calculated at the max rate of -2%.
- Updates are cumulative, based on previous updates to the same pay item. Reset any pay item to the Starting Rate/Amount, or base rate, using Recalculate/Return to Original Rates.
Recalculate/Return Pay Items to Original Rates
You can remove all changes previously made using the Update Pay Items option, resetting the pay item to the Starting Rate/Amount, or base rate.
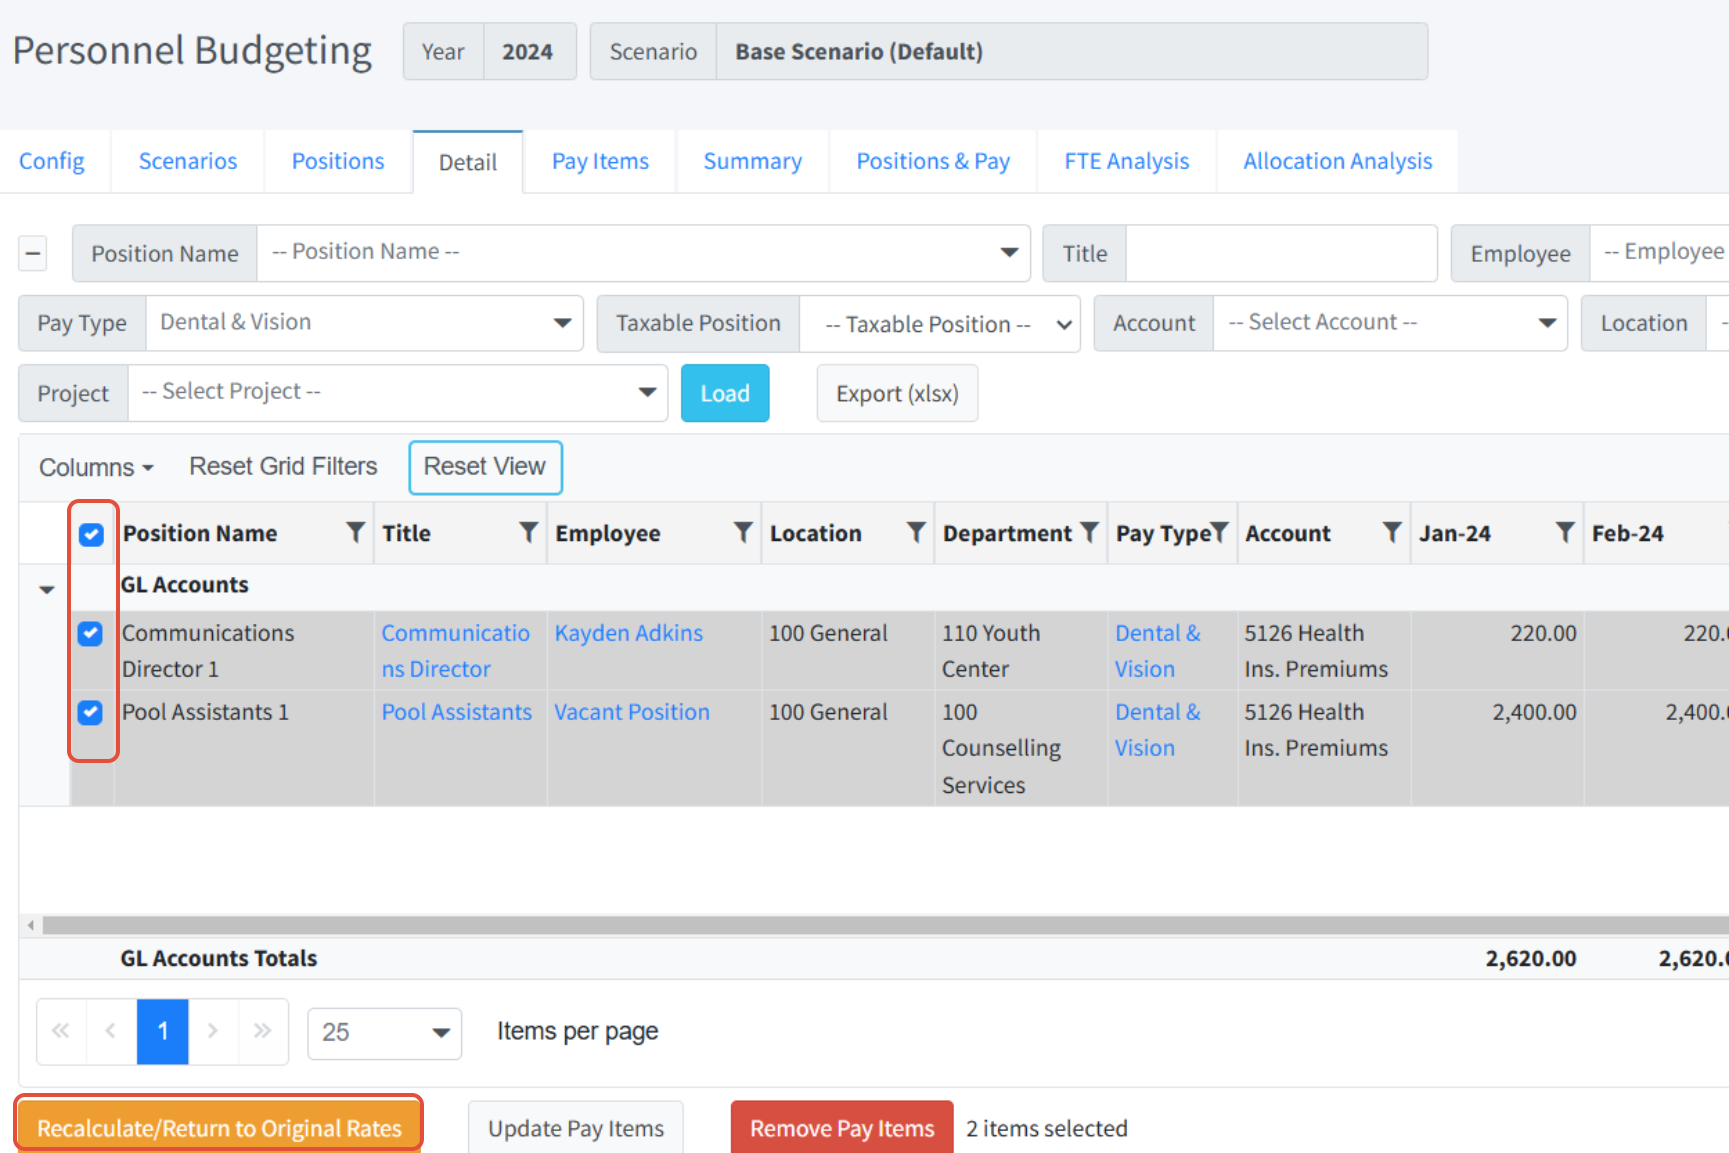
- Navigate to Personnel Budgeting > Scenarios > Detail. Be sure the selected year/scenario is the one you want to change, and create a copy of the scenario as a backup first if desired.
- Filter to the appropriate Pay Type(s), using the dropdown or grid filters.
- Select all appropriate pay item lines using the check boxes on the left.
- Click Recalculate/Return to Original Rates.
Pay Item Updates via Export/Import
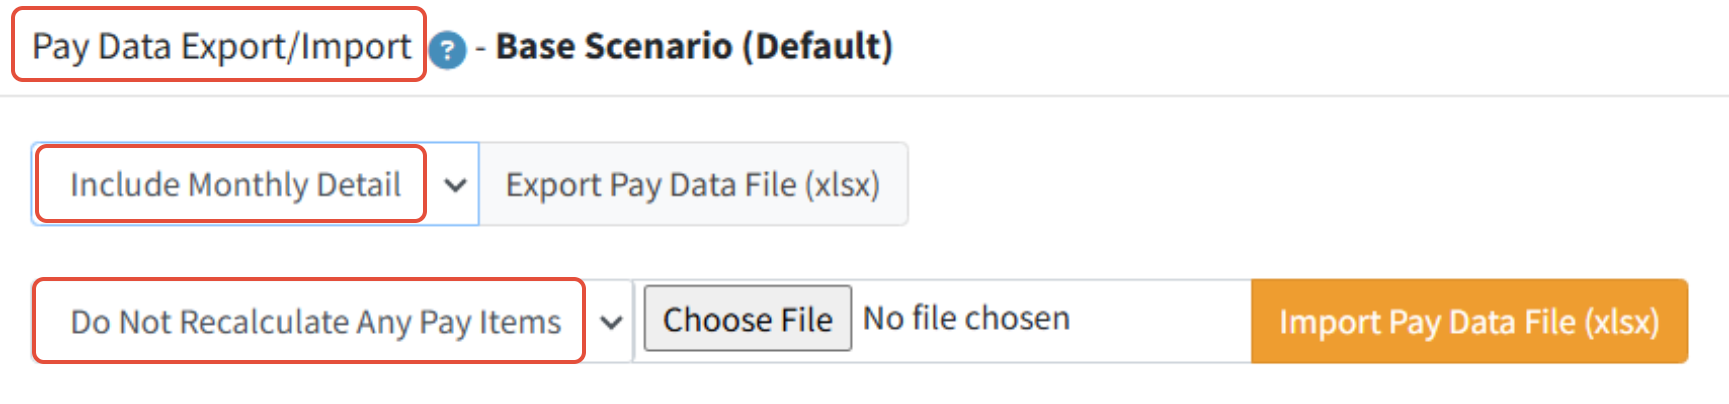
To make changes via an Excel file, use the Pay Data Export/Import.
- Navigate to Personnel Budgeting > Scenarios.
- Select the appropriate year/scenario.
- Select to Include Monthly Detail in the Pay Data Export/Import area. This will use the current monthly totals, not the Starting Rate/Amount on the pay item.
- Click Export Pay Data File.
- Make the desired changes - see the field list below - and then import the pay data file selecting Do Not Recalculate Any Pay Items.
Changing The Pay Items Tab
Navigate to the Pay Items tab in the Excel file. This is the only tab that needs to be updated and re-imported. All other tabs can be deleted.
- Id: Defined by Martus - leave as is.
- PositionName: Defined by Martus - leave as is.
- PositionTitle: The title of the position, matching exactly what is in Martus - leave as is.
- Employee: The employee for the position, matching exactly what is in Martus - leave as is.
- PayTypeName: The name of the pay type, matching exactly what is in Martus - leave as is.
- Hours: For Hourly pay types, the number of hours per pay period for this position is required. Otherwise, leave this blank.
- Amount: The rate or amount for this pay type.
- For hourly pay types, it is the hourly rate of pay.
- For regular pay types, it is the rate to be budgeted per the frequency of the pay type.
- For percentage pay types, this is usually set to zero (so that it will use the applicable default percentage), but it can be set to an position-specific percentage.
- Month 1 - Month 12: All months in the fiscal year are listed and are filled in with the applicable monthly rate.

Mid-Year Adjustment Examples
The following are specific examples of changes that can be made on the Detail tab of Personnel Budgeting and the steps to accomplish them.
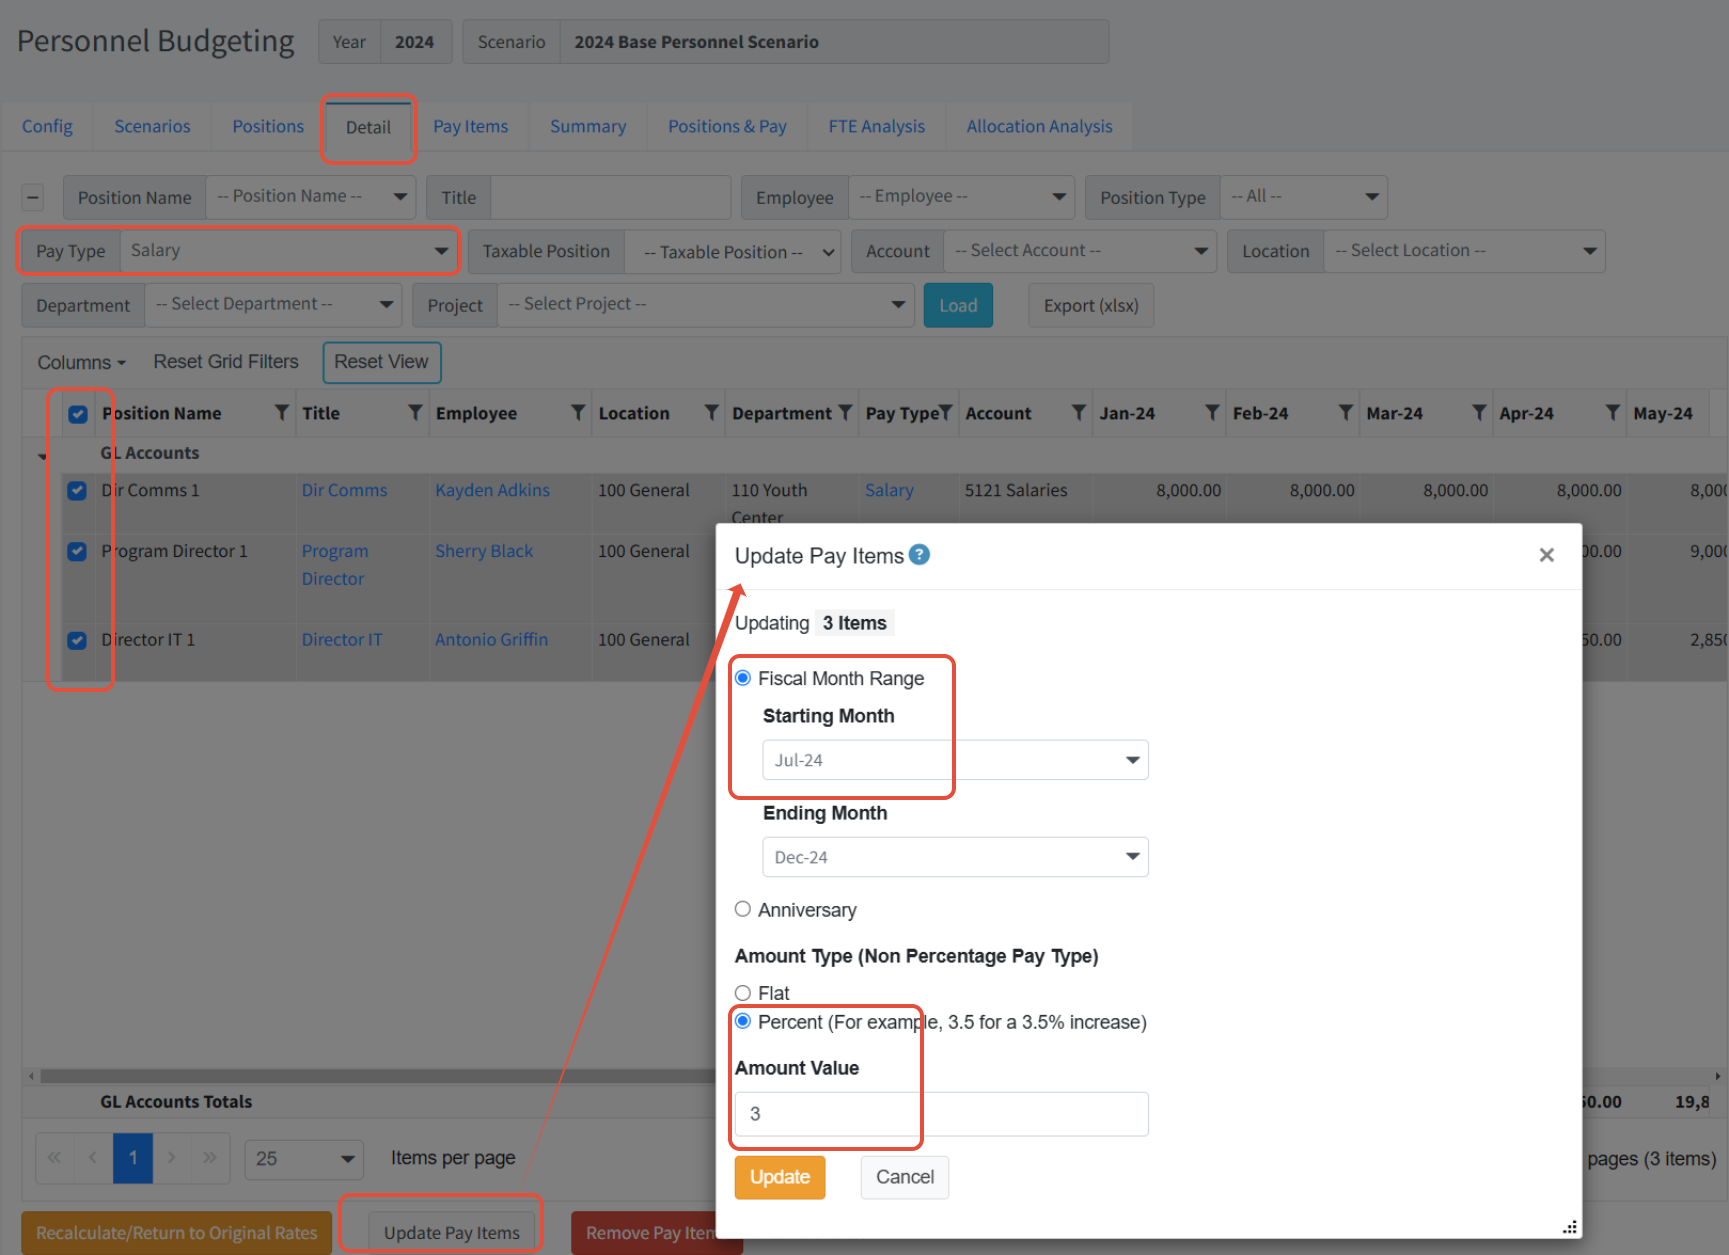
Example 1 - Adding a mid-year Cost of Living Adjustment (COLA)
In this example, there is a need to apply a 3% COLA increase in July of the calendar year.
- Go to Personnel Budgeting > Scenarios.
- Ensure the appropriate scenario is Selected or set as the Default.
- Go to the Detail tab.
- Filter to the appropriate pay items such as the hourly and/or salary pay items.
- Select all records.
- Click Update Pay Items.
- Adjust the starting month to July.
- Enter 3 for the percentage.
- Click Update.
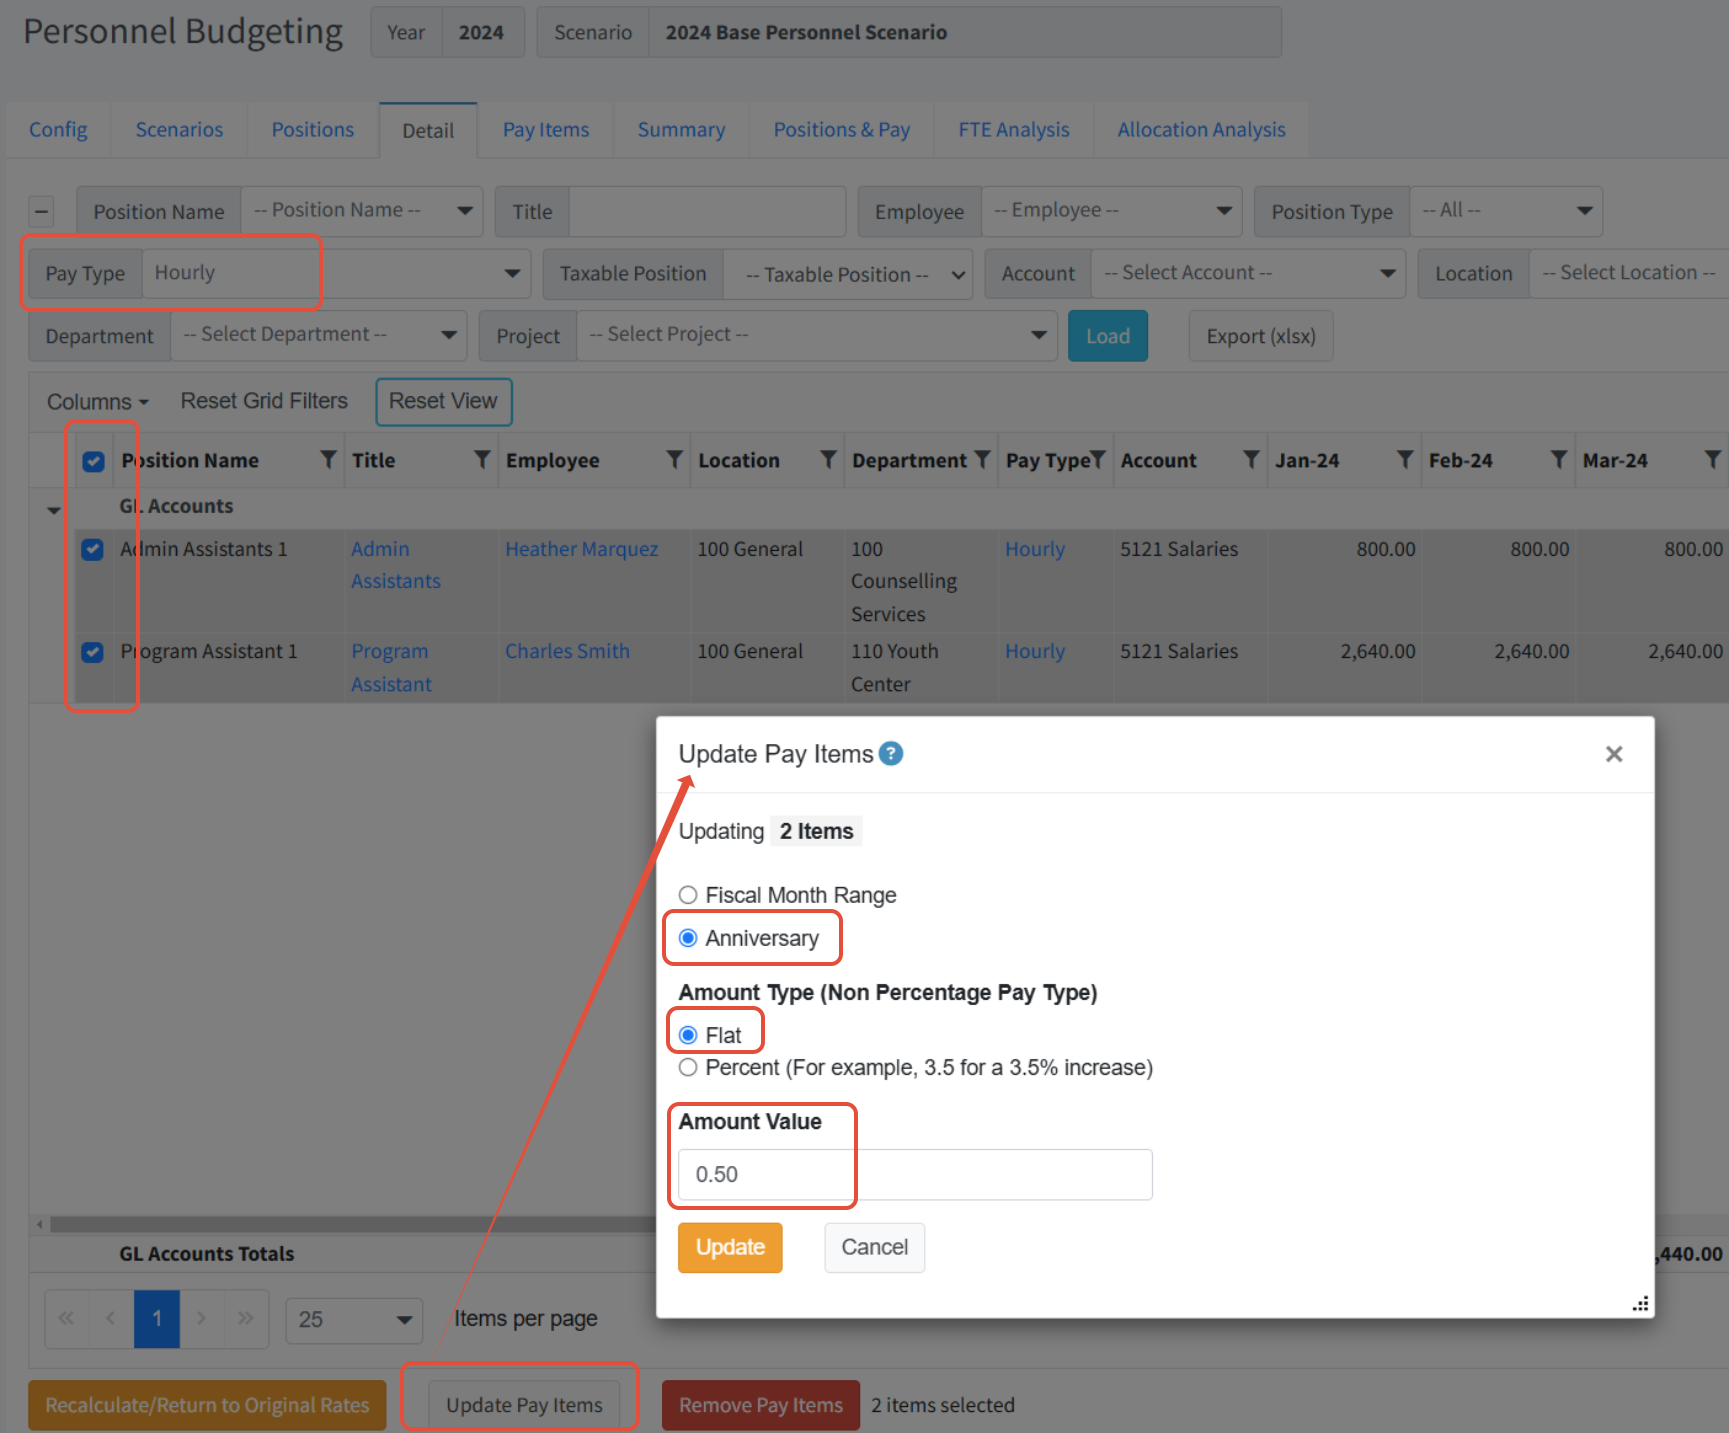
Example 2 - Increasing Hourly pay by fifty cents an hour
In this example, there is a need to increase all hourly employees' pay rates by .50 beginning on their anniversary.
- Go to Personnel Budgeting > Scenarios.
- Ensure the appropriate scenario is Selected or set as the Default.
- Go to the Details tab.
- Filter to the appropriate pay items such as the hourly pay items.
- Select all records.
- Click Update Pay Items.
- Choose the option to start on the employee's Anniversary.
- Choose the option for a flat rate adjustment.
- Enter .50.
- Click Update.
Custom Budget Spread Examples in Personnel Budgeting
The following are specific examples of changes that can be made on the Detail tab of Personnel Budgeting using the Custom Budget spread options and the steps to complete them.
To create a Custom Spread, see this article: Custom Budget Spreads
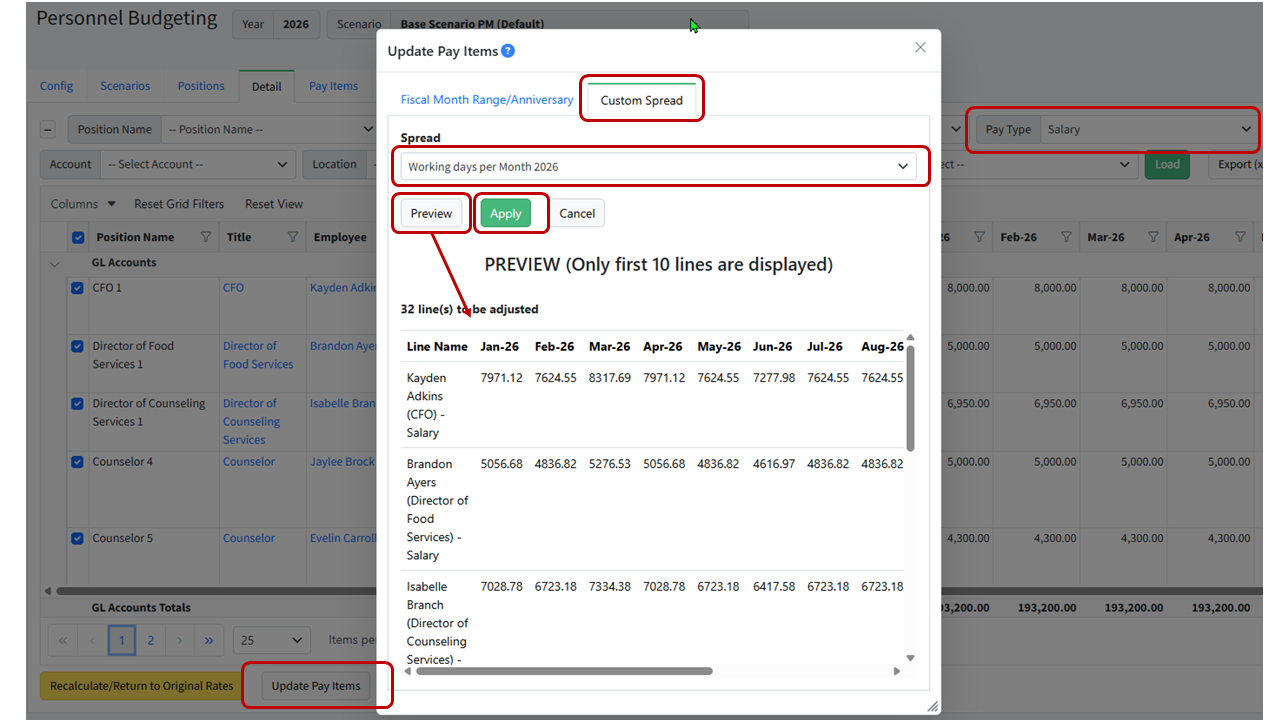
Example 1 - Allocate by working days per month
In this example, there is a need to apply a 3% COLA increase in July of the calendar year.
- Navigate to Setup > Calendar.
- Go to the Custom Spread tab.
- Add a spread with the working days per month.
- Navigate to Personnel Budgeting > Scenarios.
- Ensure the appropriate scenario is Selected or set as the Default.
- Go to the Detail tab.
- Filter to the appropriate pay items such as the hourly and/or salary pay items.
- Select all records.
- Click Update Pay Items.
- Click on the Custom Spread tab.
- Choose the appropriate spread from the dropdown.
- Click Preview to see the impact of the spread on the first 10 lines.
- Click Apply.
Example 2 - Adjust the number of pay periods per month
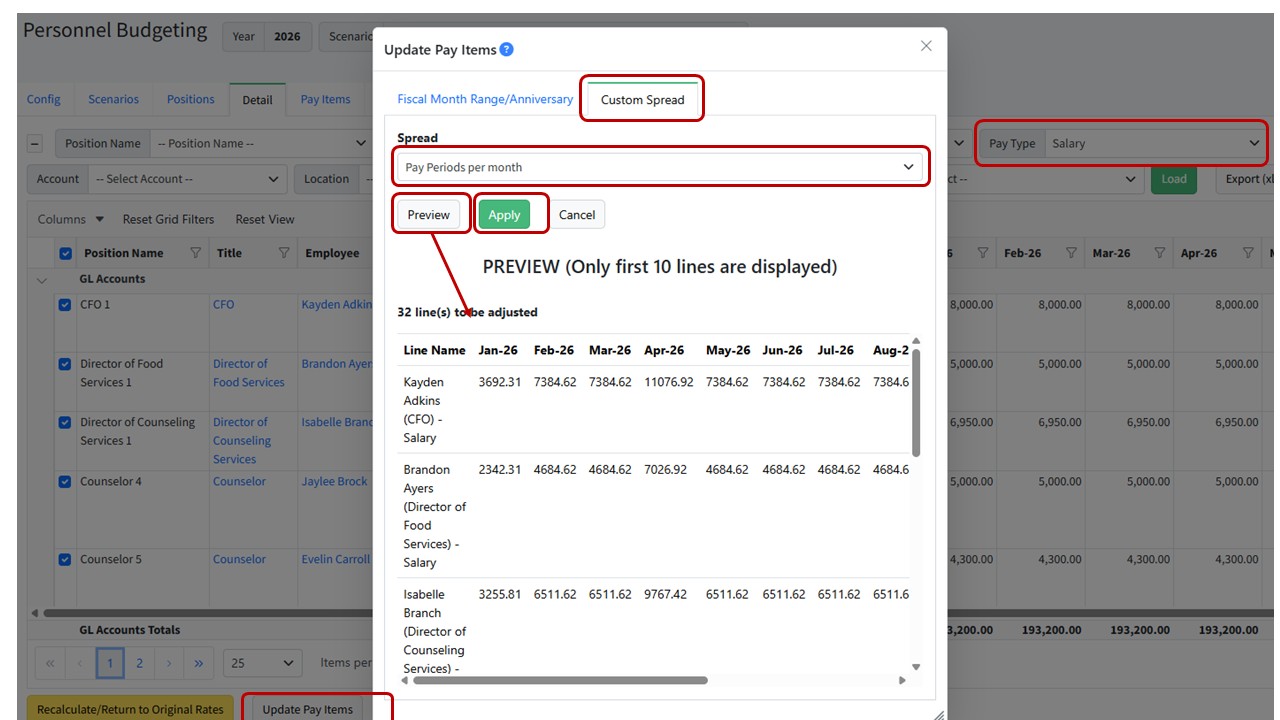
Depending on how you accrue the pay periods, you may want to remove a pay period from the beginning of the year and add it to the end. This can be accomplished by putting into the custom spread the amount of pay periods you would like per pay period.
- Navigate to Setup > Calendar.
- Go to the Custom Spread tab.
- Add a spread with the number of pay periods per month. Ensure the total number of pay periods matches the pay type frequency (for example, if the Pay type frequency is bi-weekly, that is 26 pay periods, if it is bi-monthly, it is 24 pay periods)
- Navigate to Personnel Budgeting > Scenarios.
- Ensure the appropriate scenario is Selected or set as the Default.
- Go to the Detail tab.
- Filter to the appropriate pay items such as the hourly and/or salary pay items.
- Select all records.
- Click Update Pay Items.
- Click on the Custom Spread tab.
- Choose the appropriate spread from the dropdown.
- Click Preview to see the impact of the spread on the first 10 lines.
- Click Apply.
Example 3 - Adjust the number of days per month
If you need to adjust the total annual salary by the number of days per month, use the following method:
- Navigate to Setup > Calendar.
- Go to the Custom Spread tab.
- Add a spread with the number of days per month.
- Navigate to Personnel Budgeting > Scenarios.
- Ensure the appropriate scenario is Selected or set as the Default.
- Go to the Detail tab.
- Filter to the appropriate pay items such as the hourly and/or salary pay items.
- Select all records.
- Click Update Pay Items.
- Click on the the Custom Spread tab.
- Choose the appropriate spread from the dropdown.
- Click Preview to see the impact of the spread on the first 10 lines.
- Click Apply.
Add Pay Type Mid-Year
The steps outlined below are used to add a Pay Type to an individual position mid-way through the year.
This process follows the normal steps of adding a Pay Item to a Position with an additional step to zero out the months that shouldn't be applied to the Position. Note: this is to add a Pay Type to a position, to add a new Pay Type to Personnel, see Pay Types.
Determine Coverage
- Determine if the pay item we are adding a mid year adjustment to has a coverage added to it
- Go to Personnel Budgeting > Personnel Budgeting Setup > Pay Type
- Click the pencil icon for the pay item we need to add to the employee mid year
- Make note if it says 'Coverage 1' or 'Coverage 2' under 'Tiers Based On'
- Make note of the coverage tiers as we will apply a coverage tier to an employee
- If the pay type does not have a coverage added to it you can skip the next step and move on to the last step.
Example: 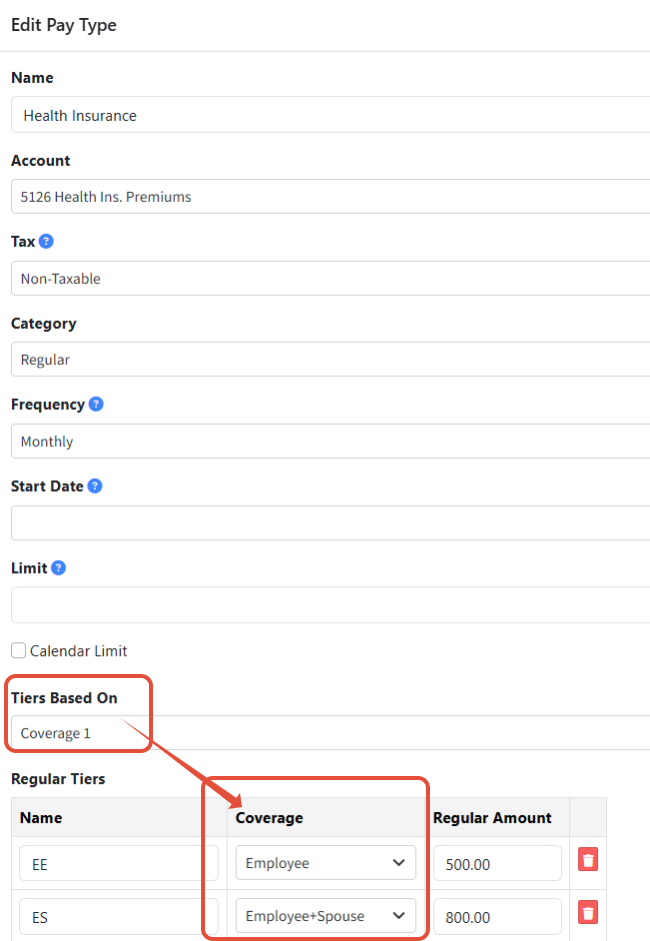
If Coverage Is Used - Update Employees Coverage
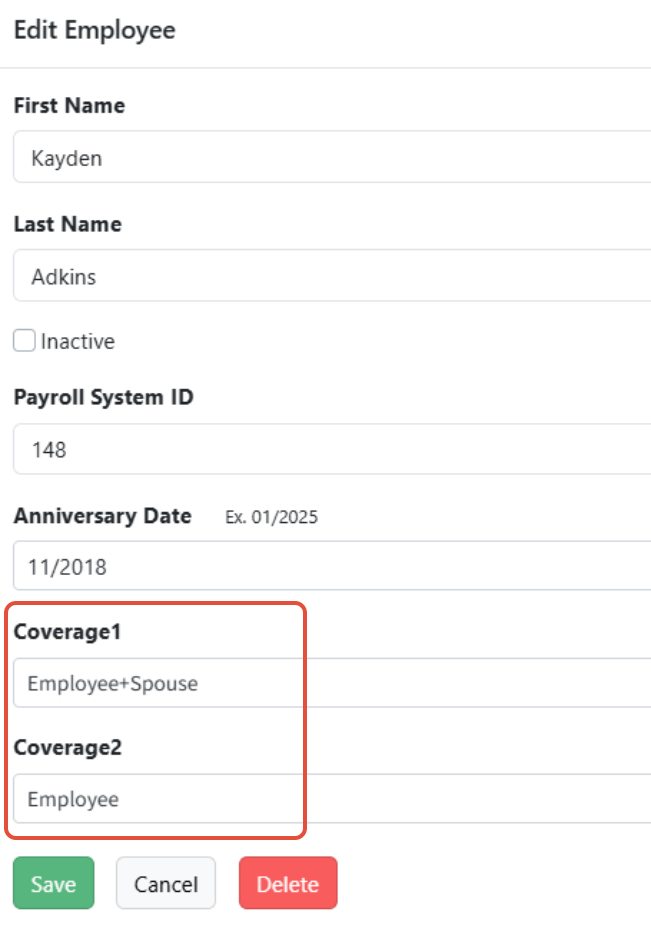
- If there is a coverage - you must update the employees coverage
- Go to Personnel Budgeting > Personnel Budgeting Setup > Employees > Edit
- Update the 'Coverage' of the applicable coverage level this employee has with the tier of coverage the employee is signed up for
For example:
Add The Pay Type to the Employee
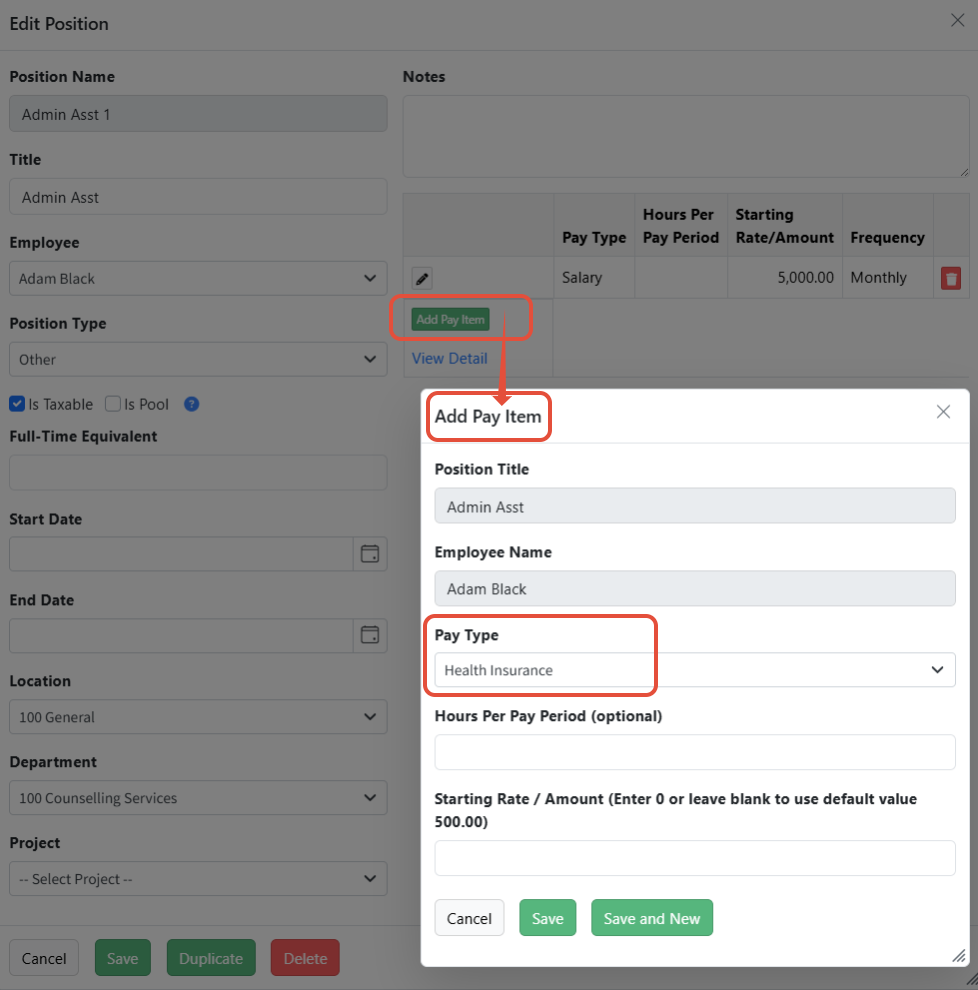
- Go to Personnel Budgeting > Scenarios > Positions tab
- Click the pencil icon of the employee you need to edit
- Click Add 'Pay Type'
Note: If the Pay Type doesn't exist, it will first need to be added via the Pay Types page. - Choose from the drop down
- You will see if there is a 'default' amount that it will automatically pull the cost of the coverage in for you - you can leave that area blank if the starting value is correct
- edit any areas needed
- Hit 'Save'
Example:
Zero Out Certain Months That An Employee Did Not Have Pay Type
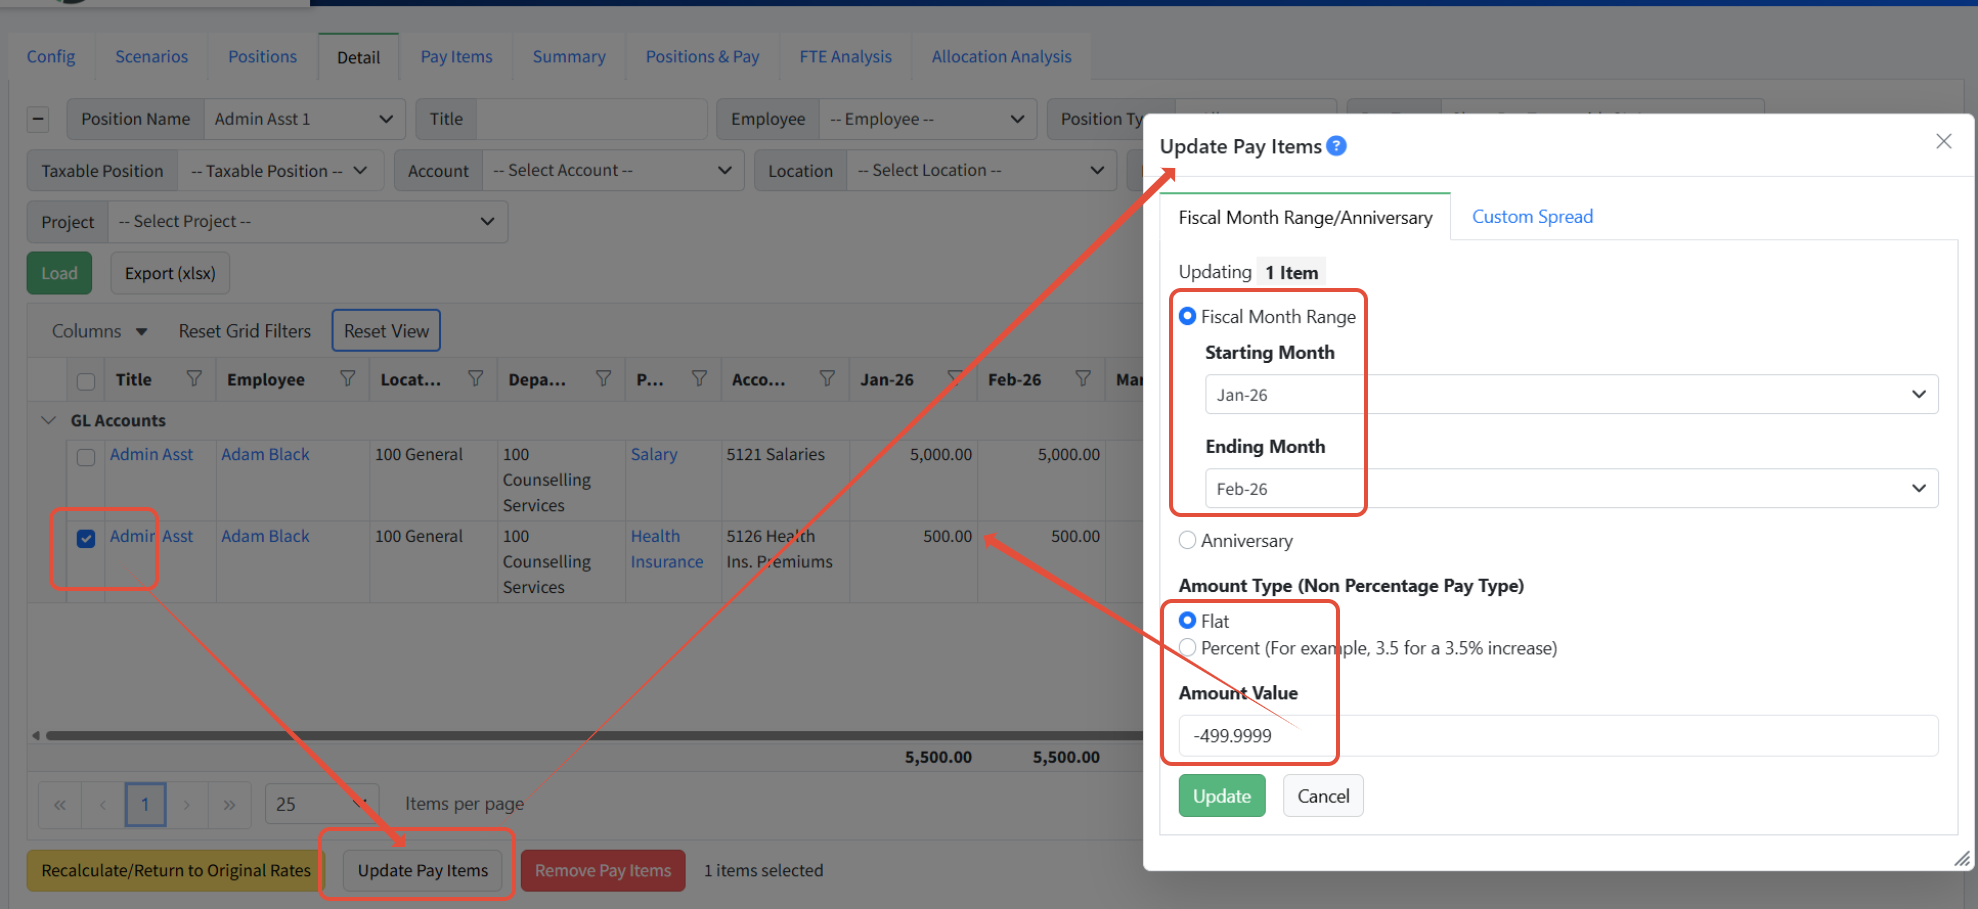
To 'zero out' the months that the employee did not have this pay type
- Click the 'Detail' tab
- Filter for the position that was updated
- Check the box on the left for the line we need to update
- Click 'Update Pay Items'
- Change the fiscal month range to the time frame in which this employee did not have that pay type
- Choose 'Flat' under 'Amount Type'
- In the 'Amount Value' add the per month amount cost as a negative number going out to 5 decimal points and then click 'Update'
- You have now zerod out the months in which the employee did not have this pay type
Choose the time frame the employee should not have had health insurance and then choose 'Flat' and we are going to add the original month amount as a negative number going out to 5 decimal places and then click 'Update'
Example:
Budgeting for Pooled Positions
Included on Positions in Personnel Budgeting is a setting for creating pooled positions: “Is Pool”.
When set, the FTE value of that position will be multiplied by the compensation indicated in the assigned pay items to determine the total compensation for that position. A special note under the list of pay items reminds you that compensation for this position is based on the FTE value assigned.
Keep in mind with each 'Pooled Positions' you make the hourly rate and the hours worked will stay the same amount.
If you have multiple pooled positions where they are paid different rates or hours you would have to create multiple pooled positions.
Additionally if a pooled position is using a pay type of 'Overtime' then the overtime pay period will not take the FTE into account. You would want the hours per pay period to be the full amount of overtime as a sum for all the pooled positions. Example: If you had 5 pooled postions and you budgeted 2 hours of overtime a month for each position the number you would put in the 'Hours Per Pay Period' would be 10.
Create A Pooled Position
- Go To Personnel Budgeting > Scenarios > Positions Tab
- Click the pencil icon of the position you want to make pooled
- Check 'Is Pooled'
- Enter the FTE value of the position
- Add their pay type and determine their hours per pay period and starting rate
What is my FTE?
- Your FTE will be the number of employees that are in this pool
- For example if I have 3 interns my number will be 3
How Does Martus Calculate This?
- Martus will multiply the starting rate and the hourly rate together and then apply that number to the frequency of the pay rate as determined. It will then take that number and multiply it by the FTE to give the monthly budget number for all 3 positions
- Example:
The intern is paid 100.00 an hour and works 10 hours per paid period - which is 2 weeks
((100.00)(10))*(2) = 2,000
We have 3 interns so (2,000)*(3)= 6,000 - We budget for these 5 positions 6,000 a month.
Example:


NOTE: If you use a pay item with a limit for your social security tax, you will want to use a separate pay item, with no limit, for pool positions.
Use the filter on the Positions list to select only Pool positions for review.
