Personnel Budgeting Setup
Set up the building blocks for your personnel scenarios.
Employees (Video)
Employees in Martus are linked to a Position within a Scenario to calculate certain Pay Types. While the Employee field is optional on a position, most organizations add their employees to Martus for better reporting. Users can manage Employees in Personnel Budgeting > Personnel Budgeting Setup > Employees.
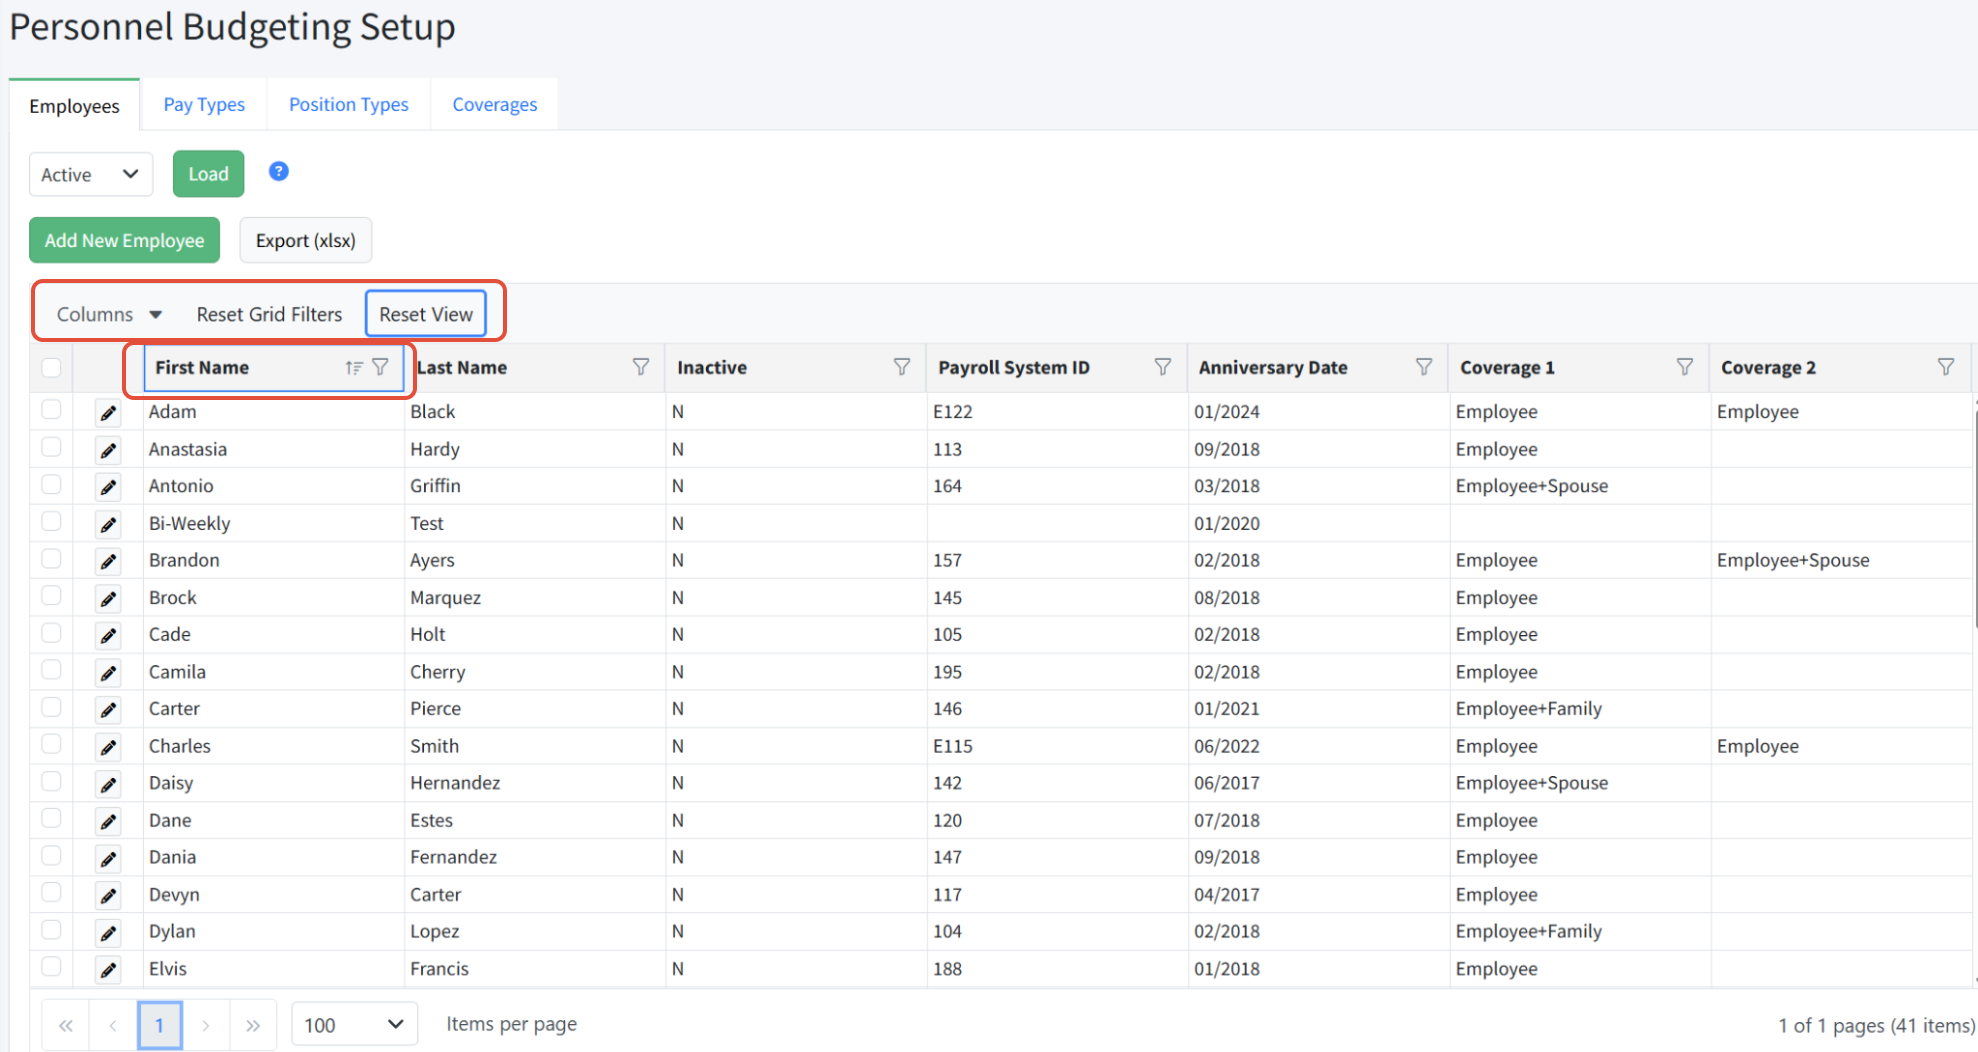
Navigating the Employees Page
- The Employees page is found in Personnel Budgeting > Personnel Budgeting Setup > Employees.
- Click Columns to choose which columns to display. Sort columns by clicking on the header. Columns can also be dragged and dropped to different locations in the grid.
- Use Filters (the funnel) to search in any column. Click Reset Grid Filters to clear all filters.
- Click Reset View to clear all changes to sorting, filtering, column selections and ordering.
Employee Page Actions
- Click Add New Employee to add a new employee.
- To Edit an employee, click the pencil icon.
- To Activate, Inactivate, or Delete multiple employees, select the records first and then use the buttons at the bottom of the screen. NOTE: You cannot delete an employee associated with a position in any scenario.
Employee Record Fields
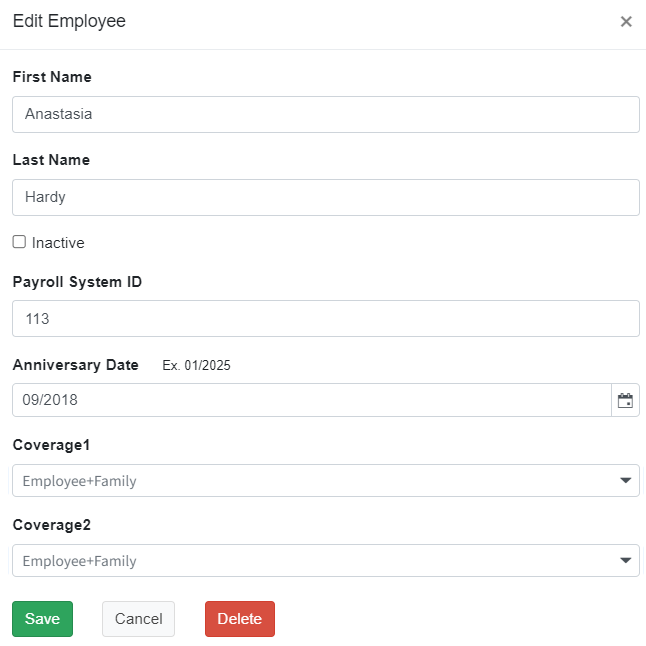
- First Name - First name of the employee
- Last Name - Last name of the employee
- Inactive - Checked for inactive employees
- Payroll System ID - The Payroll System ID for this employee - useful when updating information via export/import
- Anniversary Date - The hire date (mm/yyyy) of the employee within the organization - used for calculating pay types such as tenure bonuses or retirement matching following a waiting period
- Coverage 1 - Normally used with medical insurance pay types to calculate the rate to budget
- Coverage 2 - Normally used with dental and vision insurance combined as a pay type to calculate the rate to budget
Employee Record Actions
- Click Save to save changes.
- Click Cancel to close without saving changes.
- Click Delete to delete the employee. NOTE: You cannot delete an employee associated with a position in any scenario.
Notes on Employees
- The employee record must be linked to a position in Personnel Budgeting > Scenarios > Positions to have any impact on the scenario.
- The employee is optional within a position, but it is needed if a pay item within the position relies on the Anniversary Date or Coverage 1 or Coverage 2.
- It is best practice to create at least one "Vacant Position" employee to be used for vacant, future, or seasonal positions. Create a placeholder for pooled positions if used.
- Each combination of First Name, Last Name, and Payroll System Id must be unique. If you aren't using the Payroll System Id, you can add a middle initial to the First Name.
- Employees can be imported via the Pay Data File.
Pay Types (Video)
Pay Types represent each form of compensation that you want to budget on a per-position basis. Pay types are applied to positions as appropriate. For example, some positions may include salary, medical insurance, 401k matching and FICA pay types, while other positions may only include hourly pay and FICA pay types.
Pay Types & Pay Items
Pay types are defined at the organizational level and are applied individually at the position level. When applied to a position, a pay item is created to control the details of that Pay Type/Position relationship. For example, while many positions may use a salary pay type, each pay item will hold the salary amount for that specific position.
Common Pay Types
Some common forms of compensation include:
- Hourly pay
- Salary pay
- Overtime pay
- Year-end bonus
- Anniversary bonus
- Health insurance
- Cellphone reimbursement
- Employer’s retirement contribution
- FICA
- Worker's comp
- Life insurance
- STD & LTD
- Housing allowance
The Pay Types Tab
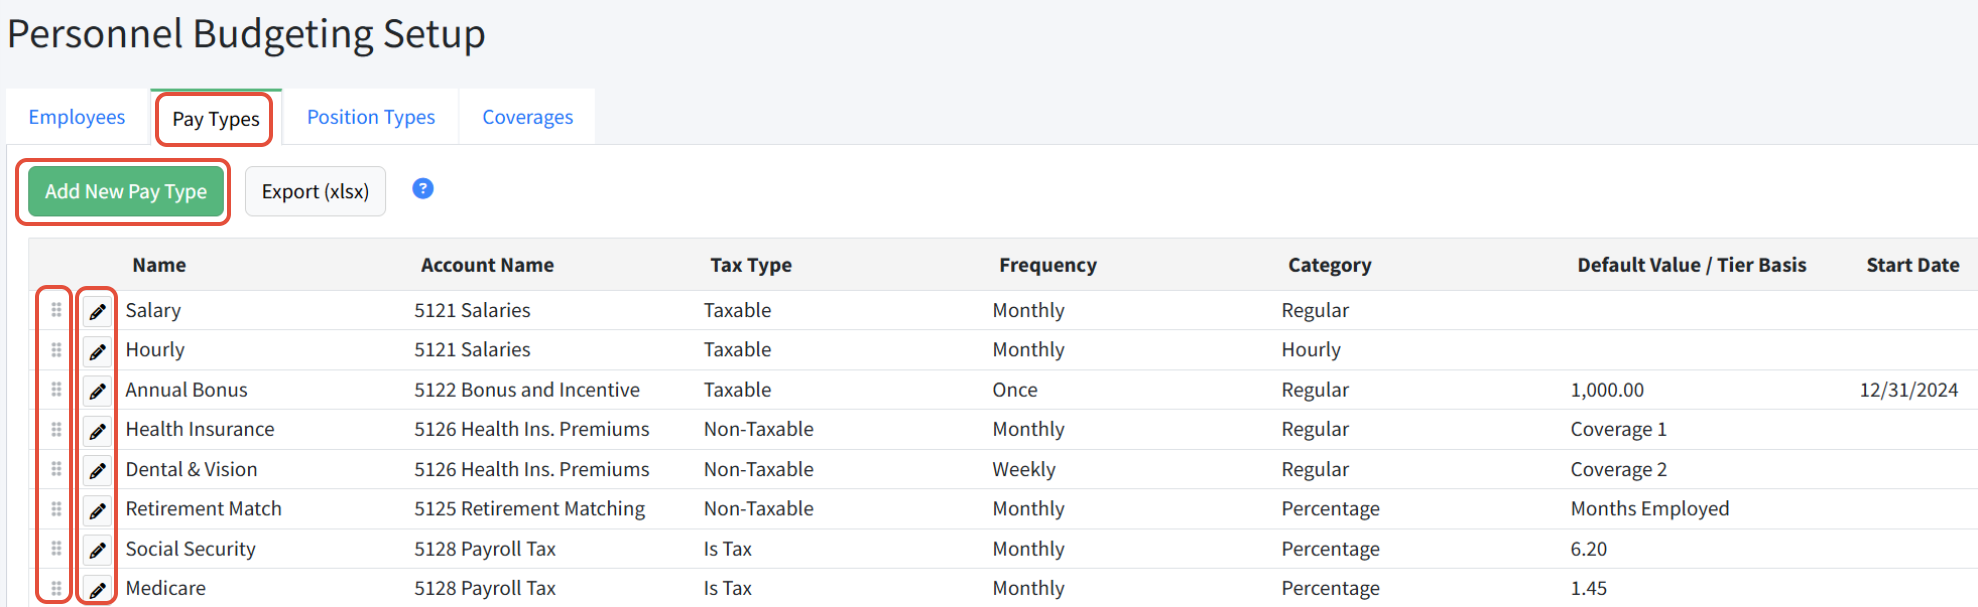
Navigate to Personnel Budgeting > Personnel Budgeting Setup > Pay Types. The Pay Types tab provides an overview of all pay types as well as key details.
Pay Types Page Actions
- Add New Pay Type - Click to add a new pay type.
- Export (xlsx) - Click to export the list of pay types to Excel for viewing.
- Drag and Drop - Use the grab (domino) icon to re-order pay types. This is helpful when viewing the Scenarios > Pay Items tab, which shows each pay type as a column.
- Edit (pencil icon) - Click the pencil icon to edit an existing pay type.
The Pay Type Record
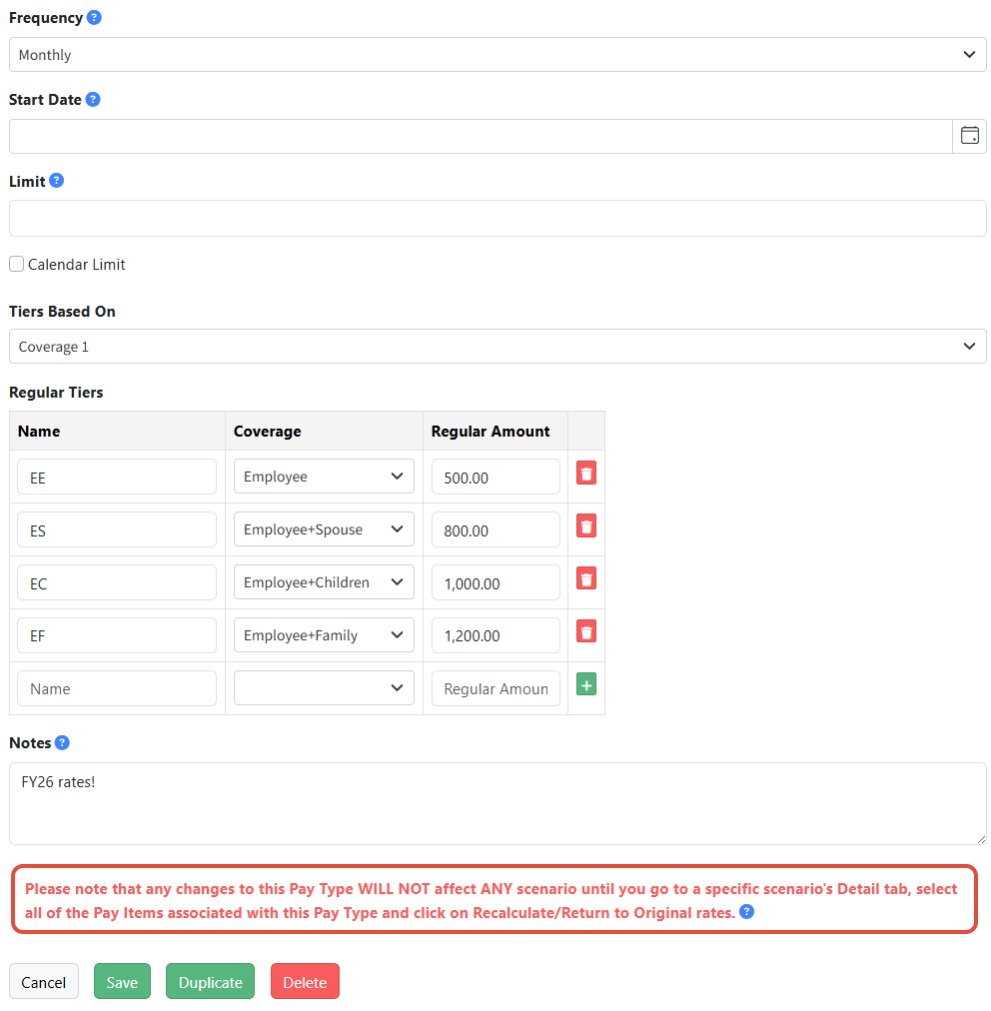
Each pay type is defined by the following fields, some of which present based on other options selected.
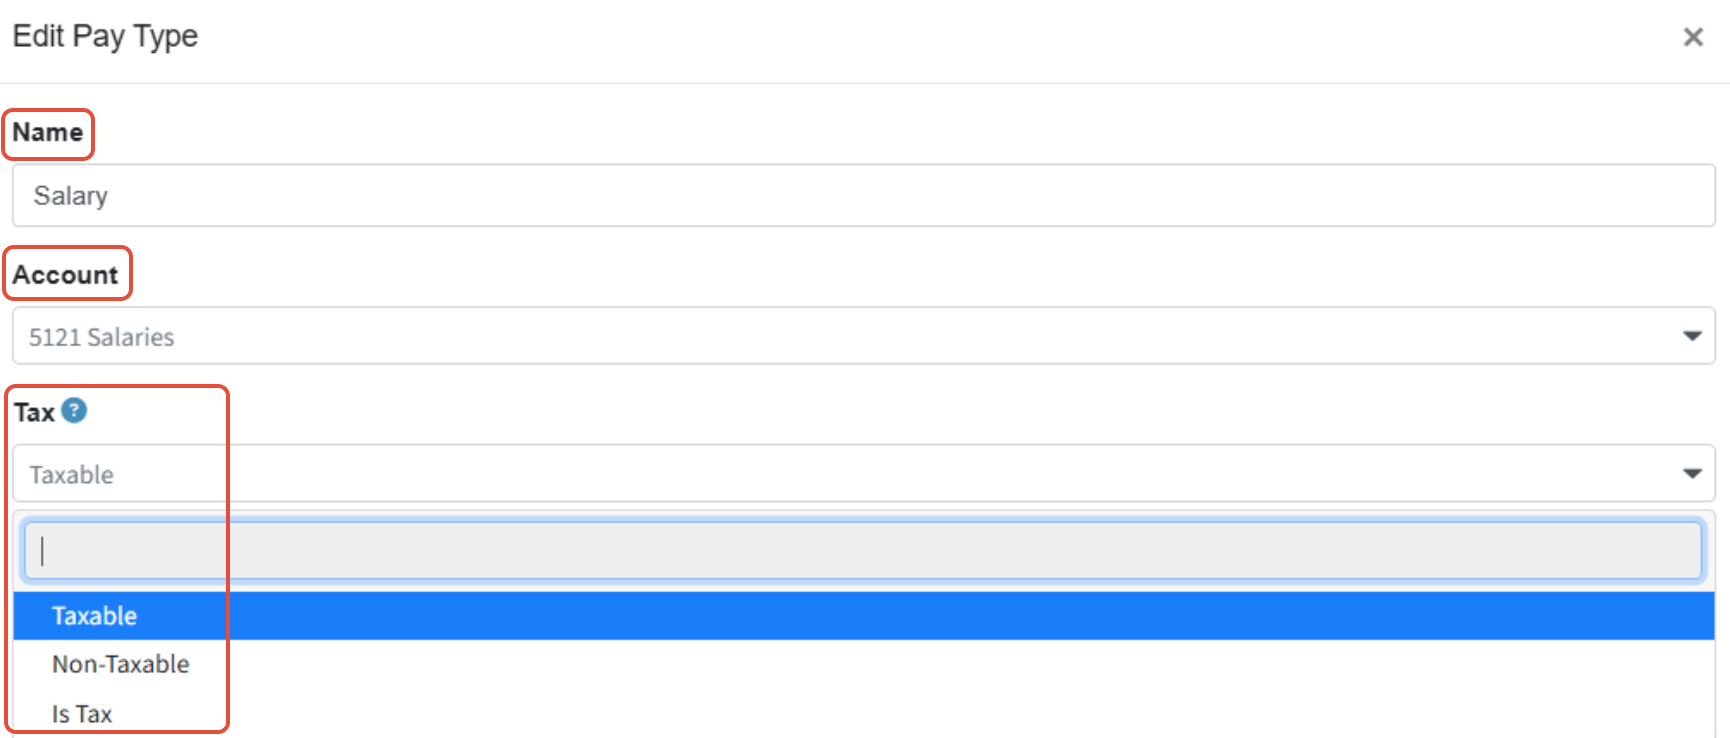
- Name - The unique name for this pay type.
- Account - The account associated with this pay type. Statistical accounts can be assigned to pay types in order to calculate statistical costs. Examples include square footage occupied, number of FTEs represented, etc. Pay types using statistical accounts must be Non-Taxable.
- Tax - The taxable status of this pay type.
- Taxable - Pay types subject to regular employer payroll taxes. This applies only to taxes calculated on the basis of the Config setting (in other words, if the FICA rate is defined on the Config screen).
- Non-Taxable - Pay types that are never subject to employer payroll taxes, including certain health benefits, retirement contribution matching, housing allowances, and salaries for clergy. This applies only to taxes calculated on the basis of the Config setting (in other words, if the FICA rate is defined on the Config screen).
- Is Tax - Used to budget for payroll taxes. The pay types subject to this tax must be specified as "Source Pay Types" below. Amounts calculated by these pay types can be included and excluded from the scenario's Summary screen with the Show Taxes checkbox.
- Taxable - Pay types subject to regular employer payroll taxes. This applies only to taxes calculated on the basis of the Config setting (in other words, if the FICA rate is defined on the Config screen).
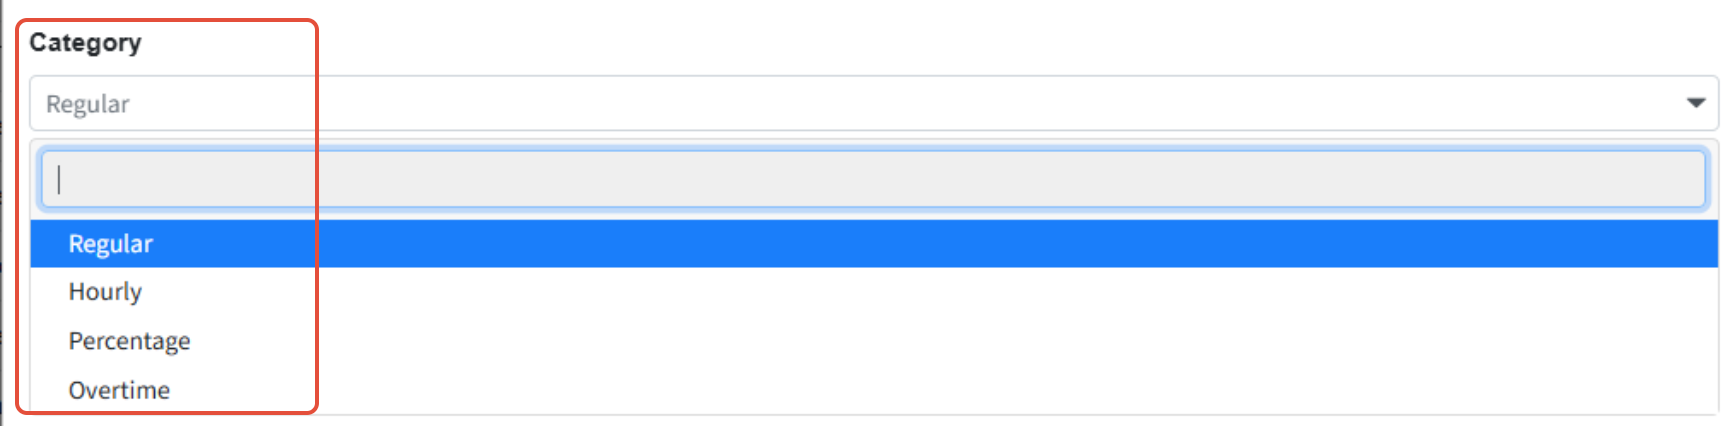
- Category - The way the pay type will be calculated.
- Regular - Martus will multiply the Regular Amount (a default in the pay type or the amount specified in the pay item) by the Frequency.
- Hourly - Martus will multiply the Hourly Amount (a default in the pay type or the amount specified in the pay item) by the Hours Per Pay Period (specified in the pay item) by the Frequency.
- Percentage - Martus will use the percentages specified and the Source Pay Types. Percentage requires additional information.
- Overtime - Martus will multiple the hourly rate on the position, by the percentage indicated, by the hours per pay period on the position. NOTE: This should only be used with Hourly pay types. NOTE: Mid-year adjustments made to Hourly pay types will not apply to Overtime pay types. Overtime pay types will always use the Hourly base rate.
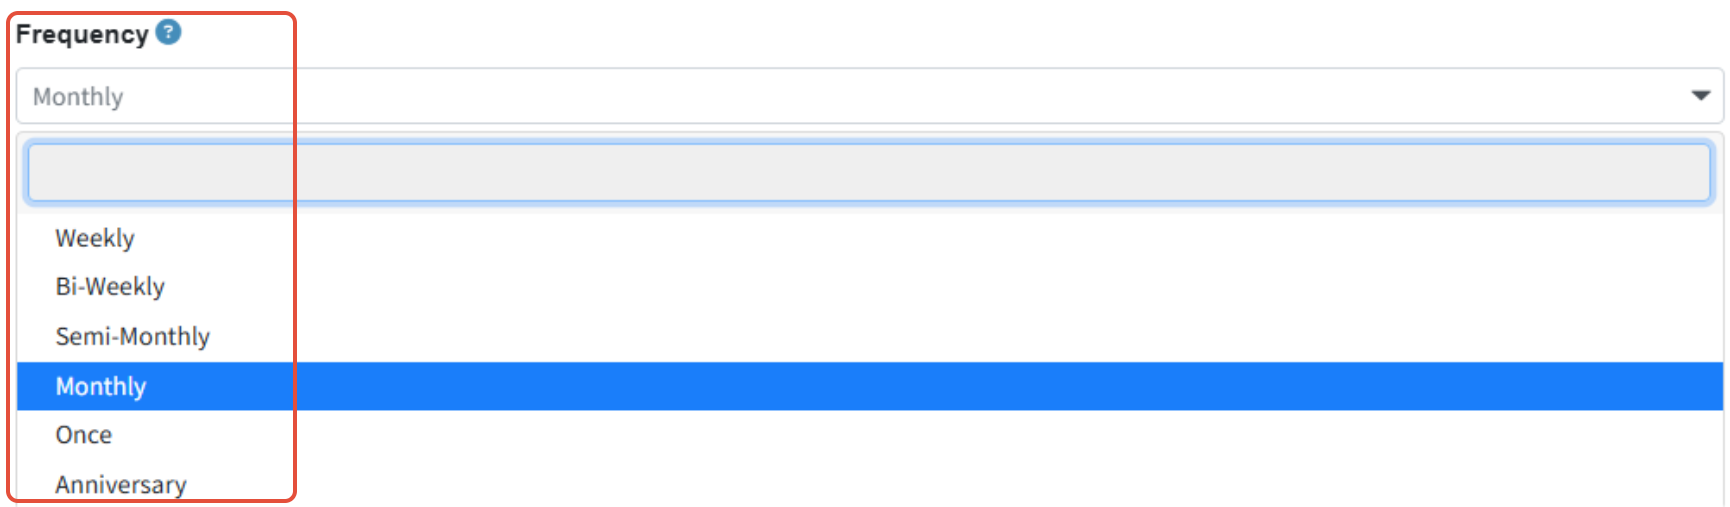
- Frequency - How often the pay type will be calculated.
- Monthly - The amount entered is a full monthly amount, whether using the default Regular Amount on the pay type or the specific amount on the pay item.
- Semi-Monthly - The amount entered is a half the monthly amount, whether using the default Regular Amount on the pay type or the specific amount on the pay item.
- Bi-Weekly - The amount entered is a bi-weekly amount, whether using the default Regular Amount on the pay type or the specific amount on the pay item. Martus will use the bi-weekly start date on the scenario's Config tab to determine which months will have two periods and which will have three.
- Weekly - The amount entered is a weekly amount, whether using the default Regular Amount on the pay type or the specific amount on the pay item. Martus will use the weekly start date on the scenario's Config tab to determine which months will have four periods and which will have five.
- Once - Use the Start Date to apply the amount in one month per year.
- Anniversary - Use the employee's Anniversary Date to apply the amount on the employee's anniversary; often used for longevity bonuses.
Using the Bi-Weekly or Weekly frequency will result in the budget showing increases in the months with additional pay periods. If the desired budget is flat across all months, use the Monthly or Semi-Monthly frequency and adjust the amount and/or hours appropriately.
- Start Date - Controls the start date for this pay type. Most often used with the Once frequency to determine which month to budget. Use Start Date for pay types that are going to begin mid-year. For all ongoing pay types, leave this blank.
- Limit - The annual limit for this pay type. For example, if the organization will match a retirement contribution up to $6000 per year, enter 6000. Martus will stop budgeting for this pay item once the limit is reached.
- Calendar Limit - Used with the Limit field. If the fiscal year does not start in January, Martus will apply the budgeted amounts starting in January rather than the fiscal year start.

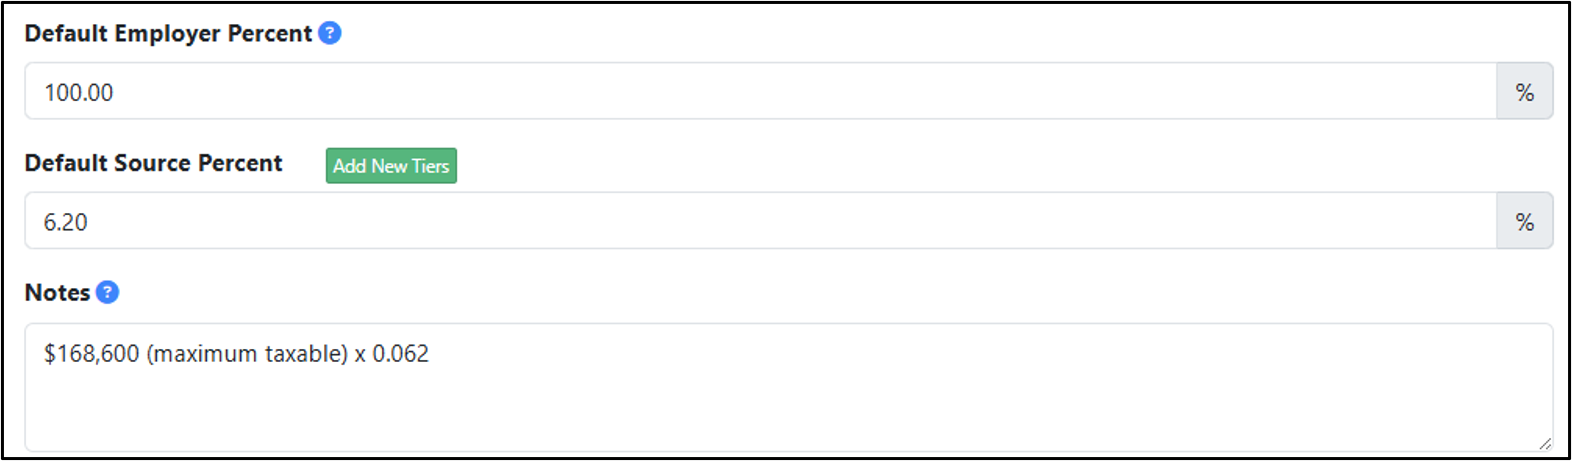
- Employer Percent - The percentage of the Source Percent that the employer is paying. Normally this is set to 100%, but could be less when the employer is not fully responsible for the entire tax or benefit amount.
- Source Percent - The percentage of the total of the applicable Source Pay Types that will be budgeted.
- Notes - Enter applicable notes regarding the pay type. Notes will appear below the Starting Rate/Amount when assigning pay items to a position, in Edit Position > Edit Pay Items.
- Default Regular Amount or Hourly Amount - Used as a default when applied to a Position as a Pay Item. The default can be overridden on the individual pay items as needed. Normally this is used for things such as a cell phone allowance which will be the same for the majority of employees. Leave blank for individualized pay types such as salary or hourly.

- Add New Tiers - Tiers allow for more complex calculations. When Add New Tiers is clicked, the following drop down will appear, and additional details are required, shown below.
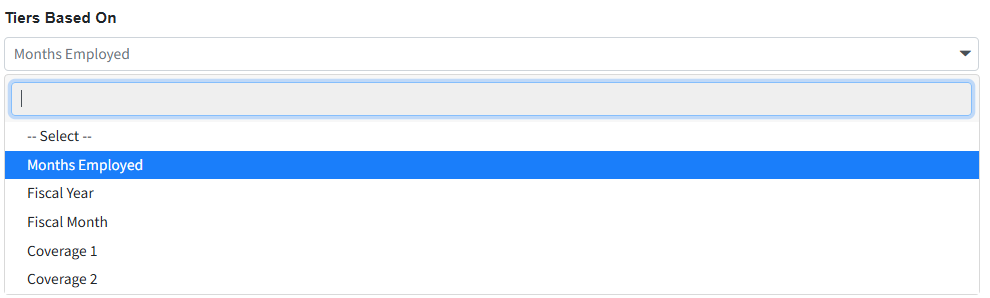
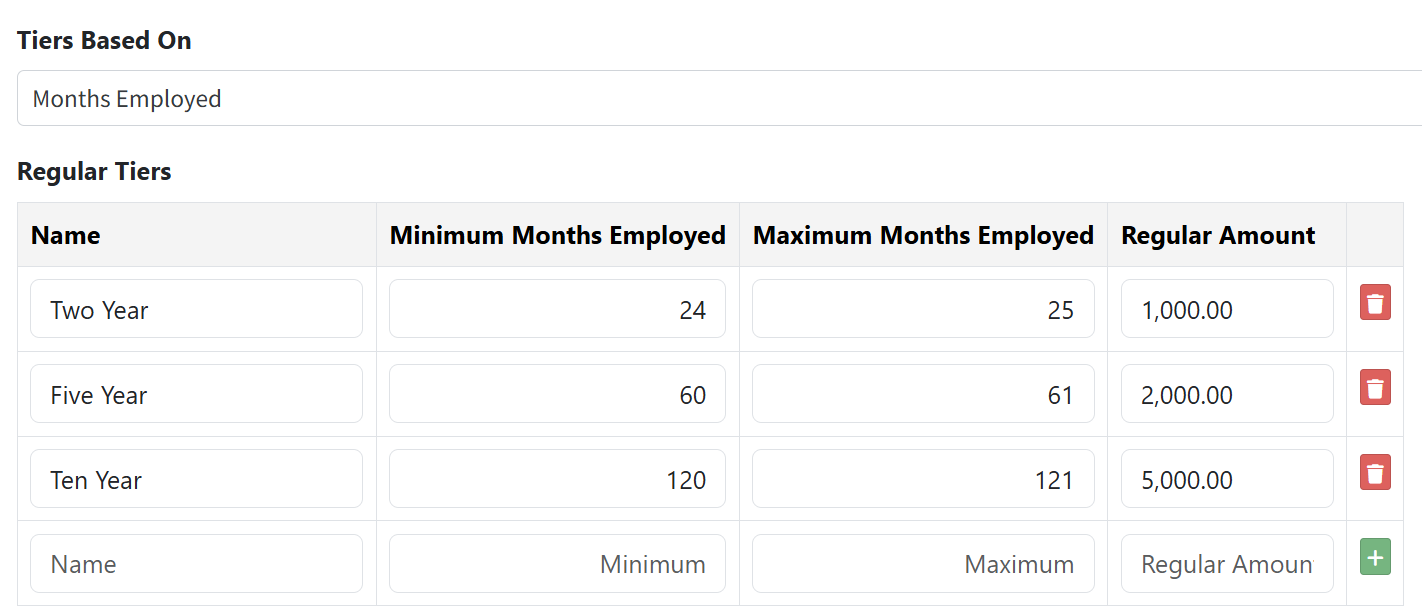
- Months Employed - Allows for default values based on longevity. Uses the employee Anniversary Date to calculate the amount. For example, a longevity bonus may be calculated at the 5, 10, 15, and 20 year mark by using the minimum and maximum months employed and adding lines for 60, 120, 180 and 240 months.
- Name (optional) - The name of the tier.
- Minimum Months Employed - The smallest value used before this pay type should be calculated.
- Maximum Months Employed - The largest value used before this pay type should stop being calculated.
- Regular Amount - The amount to be budgeted.
- Add (+) icon- Used to add a new tier.
- Delete (trashcan) icon- Used to delete a tier.
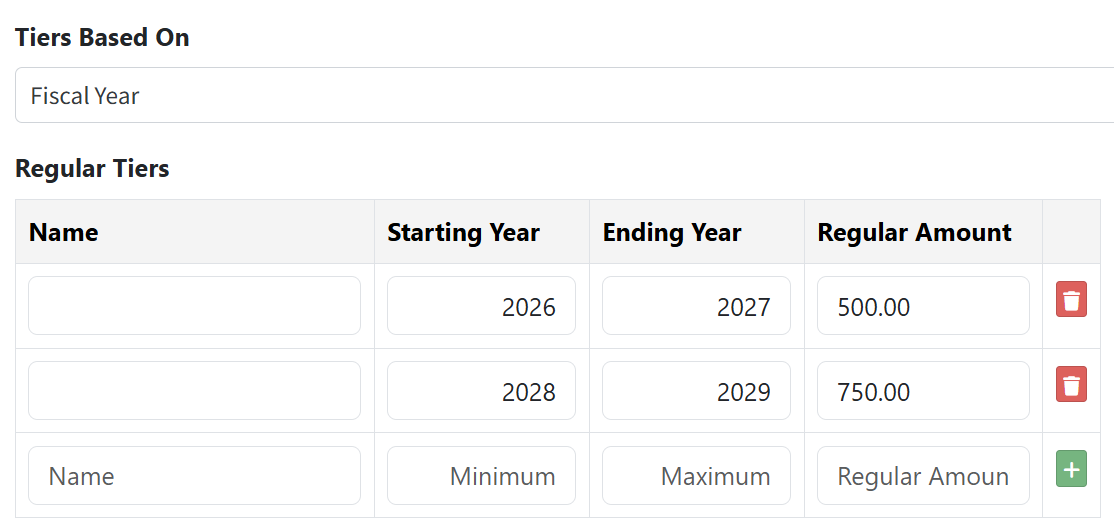
- Fiscal Year- Used when an increase should apply to only one fiscal year that can be tracked from year to year. Use with the Monthly frequency.
- Name (optional) - The name of the tier.
- Starting Year - The smallest value used before this pay type should be calculated.
- Ending Year - The largest value used before this pay type should stop being calculated.
- Regular Amount - The amount to be budgeted.
- Add (+) icon- Used to add a new tier.
- Delete (trashcan) icon- Used to delete a tier.
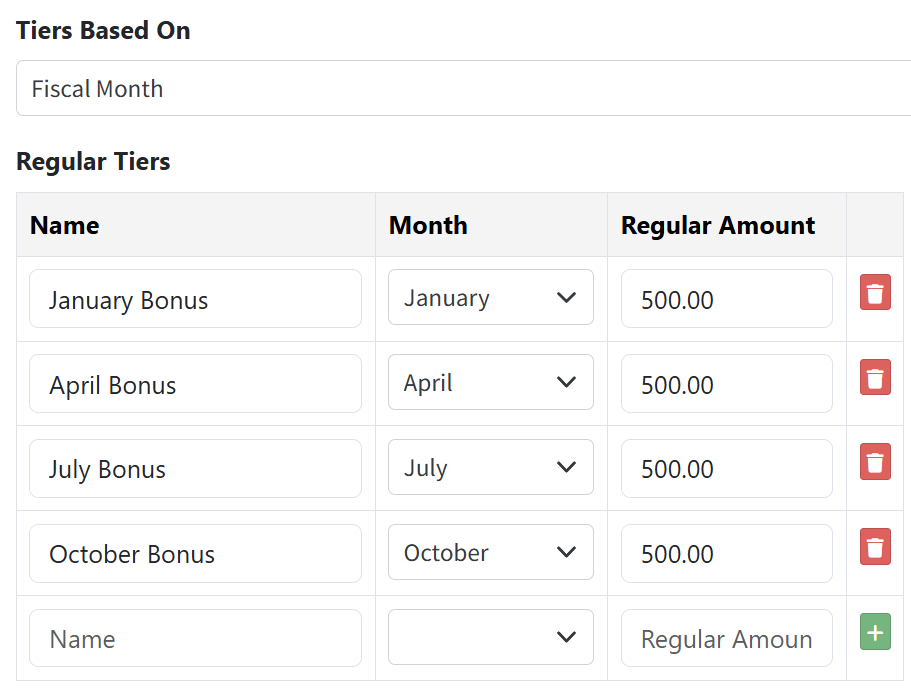
- Fiscal Month- Used when wanting to budget only within certain months, such as quarterly. Use with the Monthly frequency.
- Name (optional) - The name of the tier.
- Month - The month the amount should be budgeted in
- Regular Amount - The amount to be budgeted.
- Add (+) icon- Used to add a new tier.
- Delete (trashcan) icon- Used to delete a tier.
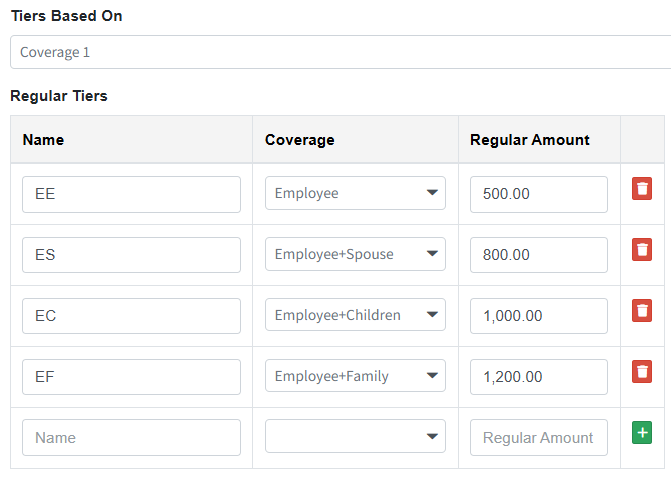
- Coverages - Coverage 1 and Coverage 2 both use the corresponding coverage indicated on the Employee record. Coverage 1 is normally used for medical insurance. Coverage 2 is normally used for Dental AND Vision insurance. Click herefor more information on Coverages.
- Name (optional )- The name of the tier.
- Coverage - The level of coverage for which to budget.
- Regular Amount - The amount to be budgeted.
- Add (+) icon - Used to add a new tier.
- Delete (trashcan) icon - Used to delete a tier.
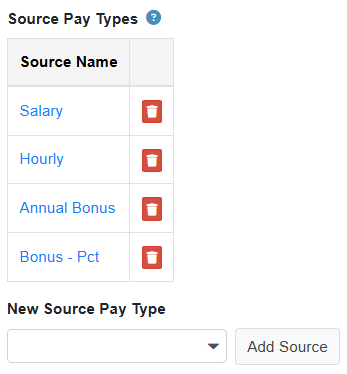
- Source Pay Types - A list of all pay types that will be summed per month from which a percent-based pay type is calculated. Use the Delete (trashcan) icon to remove a source.
- New Source Pay Type - Select an additional source to add and click Add Source.
Adding a New Pay Type
- Navigate to Personnel Budgeting > Personnel Budgeting Setup > Pay Types.
- Click Add New Pay Type.
- Fill out the fields appropriately.
- Click Save or click Cancel to cancel.
Editing an Existing Pay Type
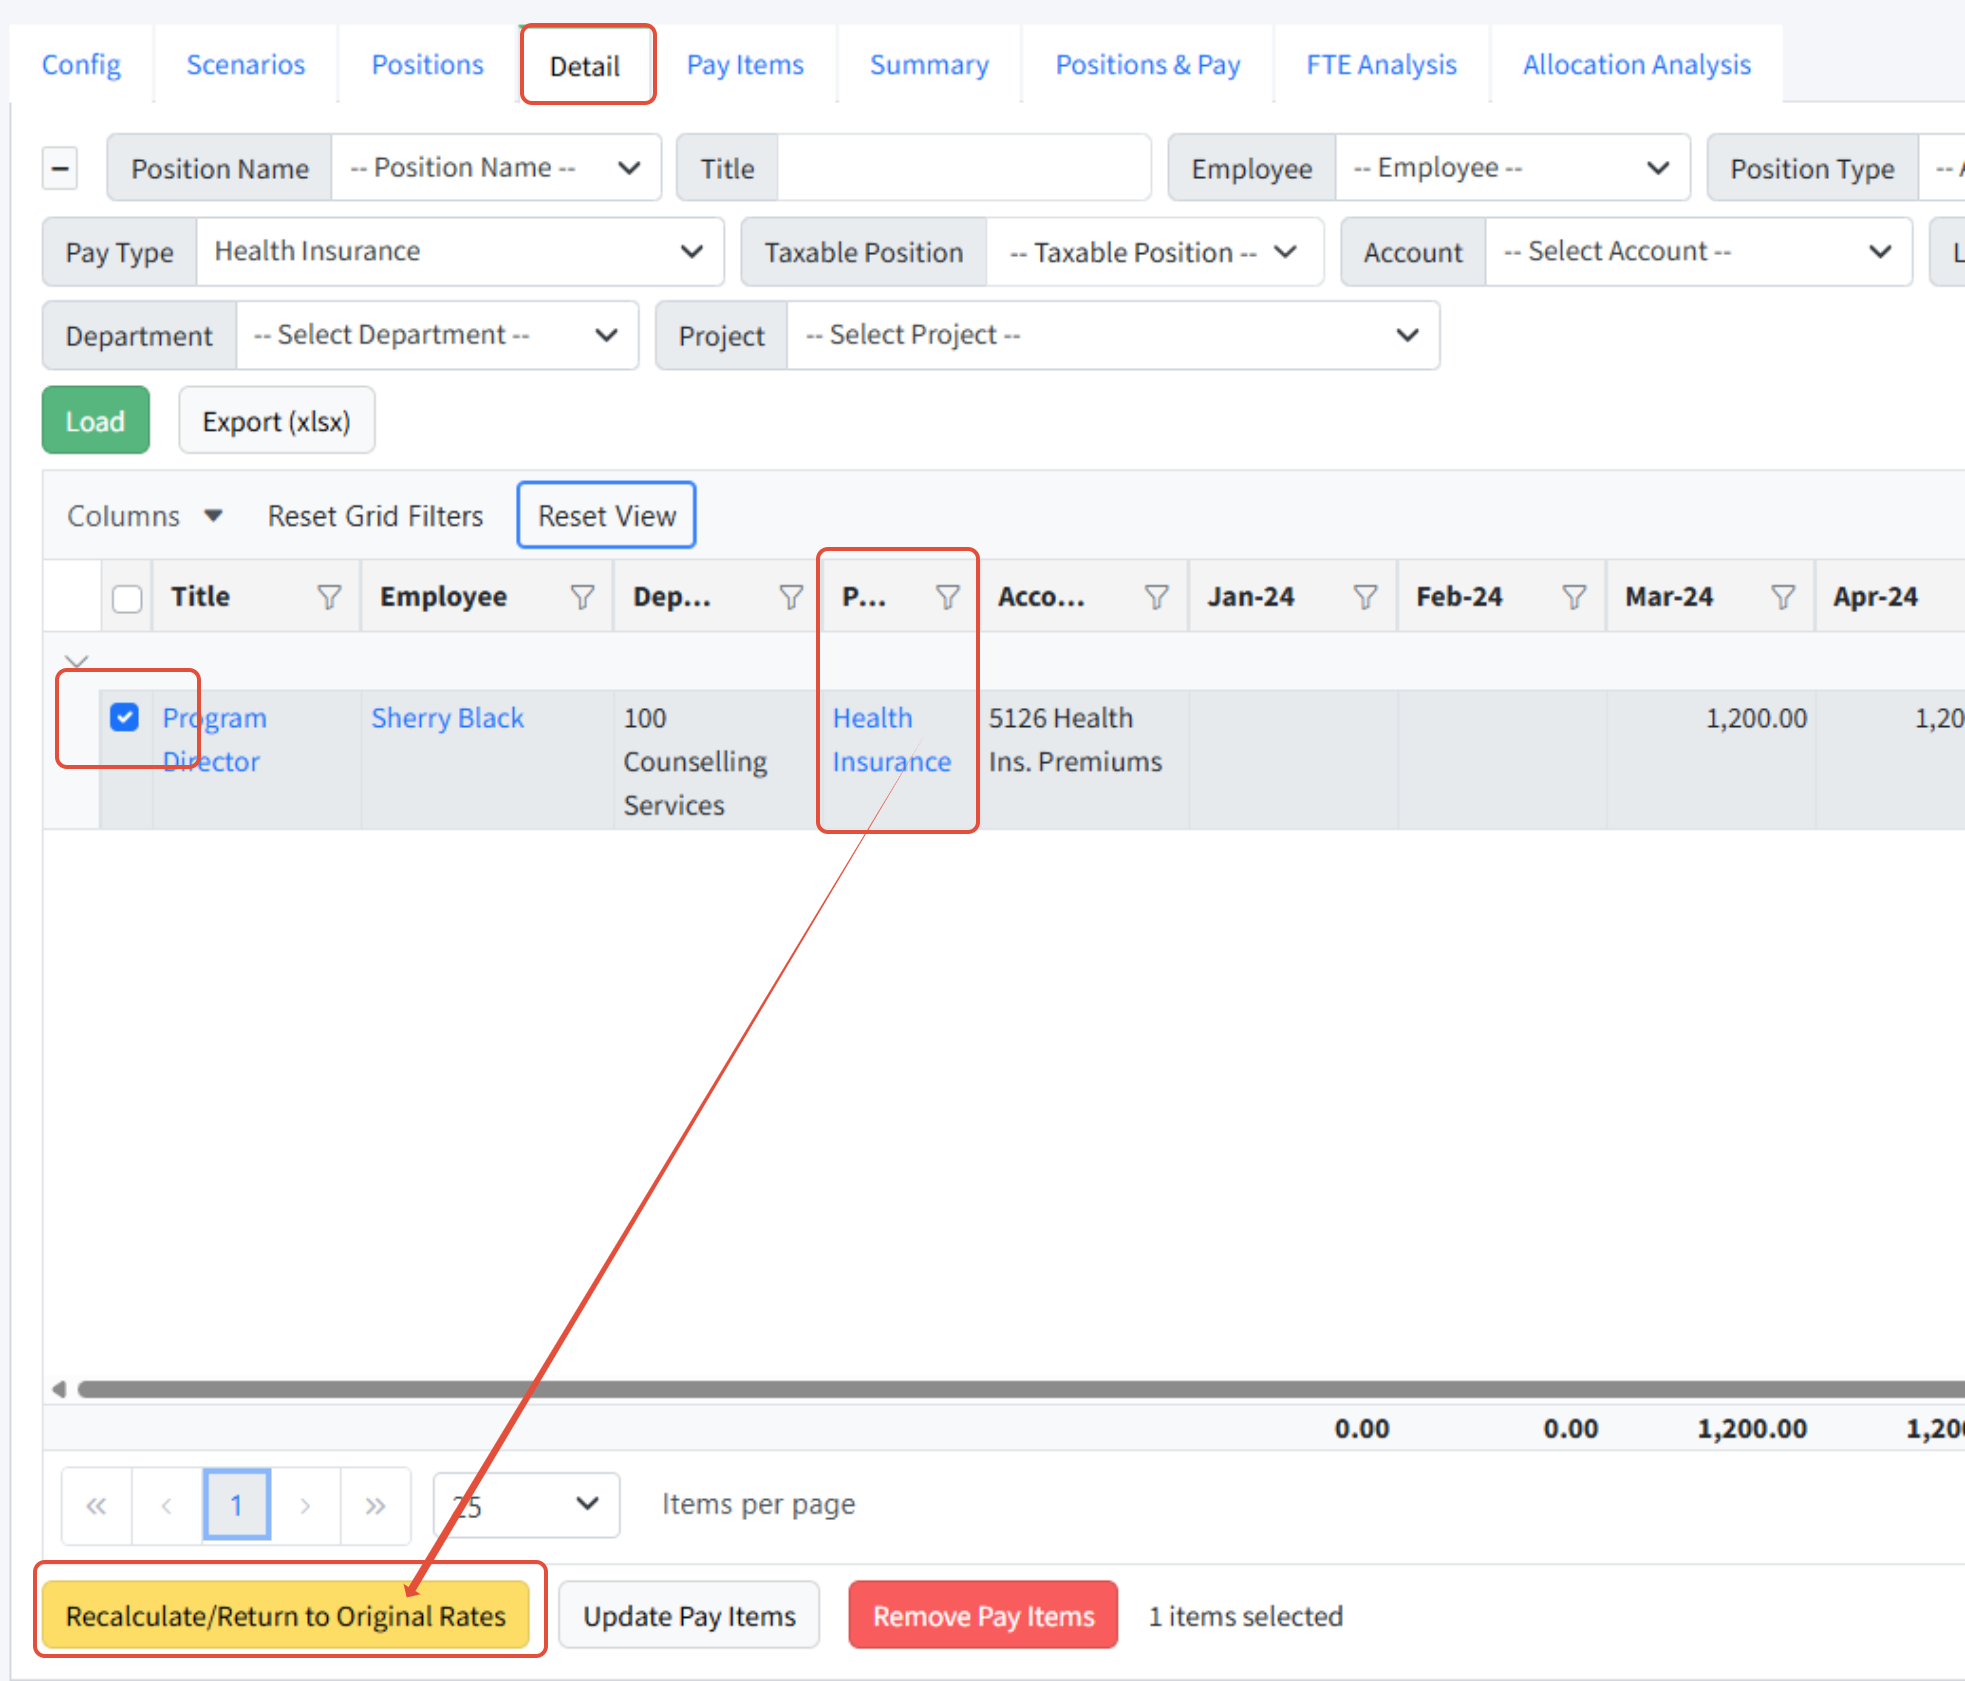
Edit an existing pay type by clicking the Edit (pencil) icon. After you edit an existing pay type, those changes are not immediately applied to any scenario. You must go to the Personnel Budgeting > Scenarios > Detail tab for that scenario, select the pay item rows for that pay type, and then click Recalculate/Return to Original Rates.
In the Details tab, you will need to apply the pay type you just updated to the lines for that pay type. Select the pay type using the dropdown or grid filters, select the lines, and then click Recalculate/Return to Original Rates. This will apply the pay type change to the selected lines.
Copying an Existing Pay Type
Copying a pay type can be very helpful when there are multiple, similar pay types, such as Medicare and Social Security taxes.
- Click the Edit (pencil) icon to open a pay type record similar to what you need.
- Scroll down to the bottom of the modal.
- Click Duplicate.

- The copy will open in edit mode and have the word "COPY" in the name.

- Adjust the name and any other details as appropriate.
- Click Save.
Deleting Pay Types
If a new pay type has been added by mistake, it can be deleted as long as it has not been assigned to any position. If a pay type has been used in a scenario, it cannot be deleted. Best practice is to rename the pay type to indicate it is no longer in use and drag it to the bottom of the sort order on the Pay Types page.
- Navigate to Personnel Budgeting > Personnel Budgeting Setup > Pay Types.
- Click Edit next to the appropriate pay type.
- Click Delete to remove it.
Notes about Pay Types
- Each pay type must be unique; two pay types cannot have the same name.
- Pay types are global; they apply to all years and all scenarios.
- A change to a pay type will not change any scenario until a user goes to the Detail tab, selects the corresponding pay items, and clicks Recalculate/Return to Original Rates.
- The best way to assign a pay type to every Position is to use the Pay Item Grid Export/Import process.
Pay Type Examples
Some common and not-so-common pay type examples can be found here.
Pay Type Examples
Below are some typical pay type examples.

Salary
Tax - Taxable
Category - Regular
Frequency - Choose as appropriate
Start Date - Leave blank
Limit - Leave blank
Regular Amount - Leave blank

Hourly
Tax - Taxable
Category - Hourly
Frequency - Choose as appropriate
Start Date - Leave blank
Limit - Leave blank
Regular Amount - Leave blank
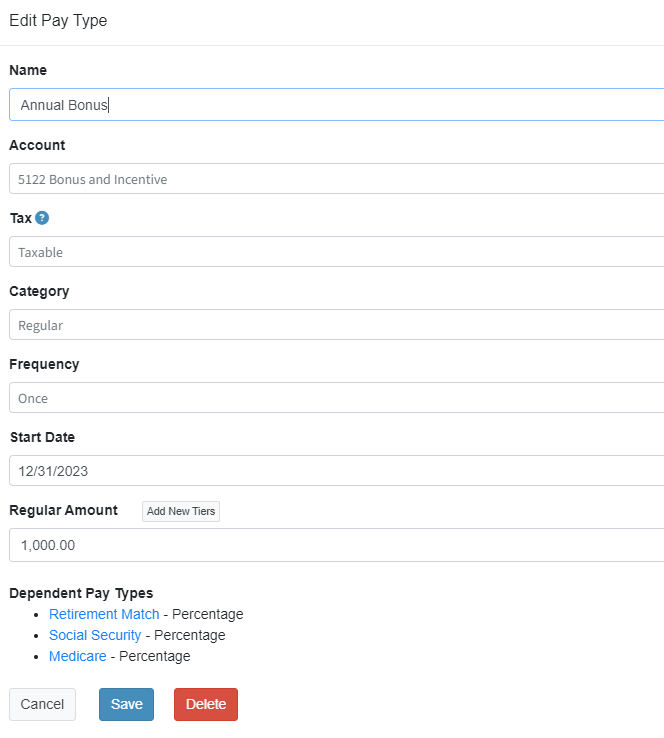
Bonus - Annual
Tax - Taxable
Category - Regular
Frequency - Once, for bonuses that are all paid in the same month
Start Date - Designate a month to hit the budget
Regular Amount - Leave blank to enter the bonus amount on the pay item for each position, or enter a default amount here for all positions

Bonus - Anniversary
Tax - Taxable
Category - Regular
Frequency - Anniversary for bonuses paid according to the employee's Anniversary Date
Start Date - Leave blank
Regular Amount - Leave blank to enter the bonus amount on the pay item for each position, or enter a default amount here for all positions
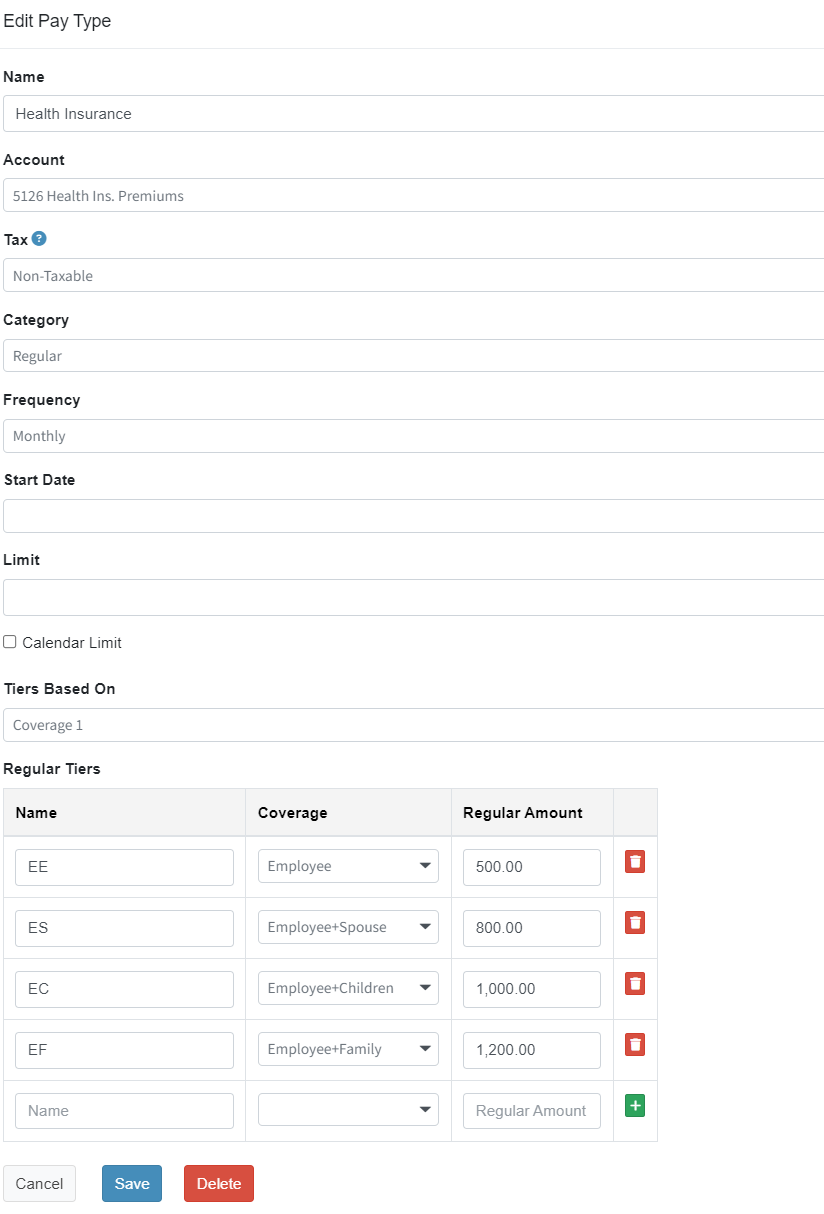
Health Insurance
Add one pay type per insurance plan you offer employees if the account or rates differ.
Tax - Non-Taxable
Category - Regular
Frequency - Usually Monthly
Start Date - Leave blank
Limit - Leave blank
Tiers - Change to Coverage One. Add a tier for each level of coverage, and the appropriate amount for each level.
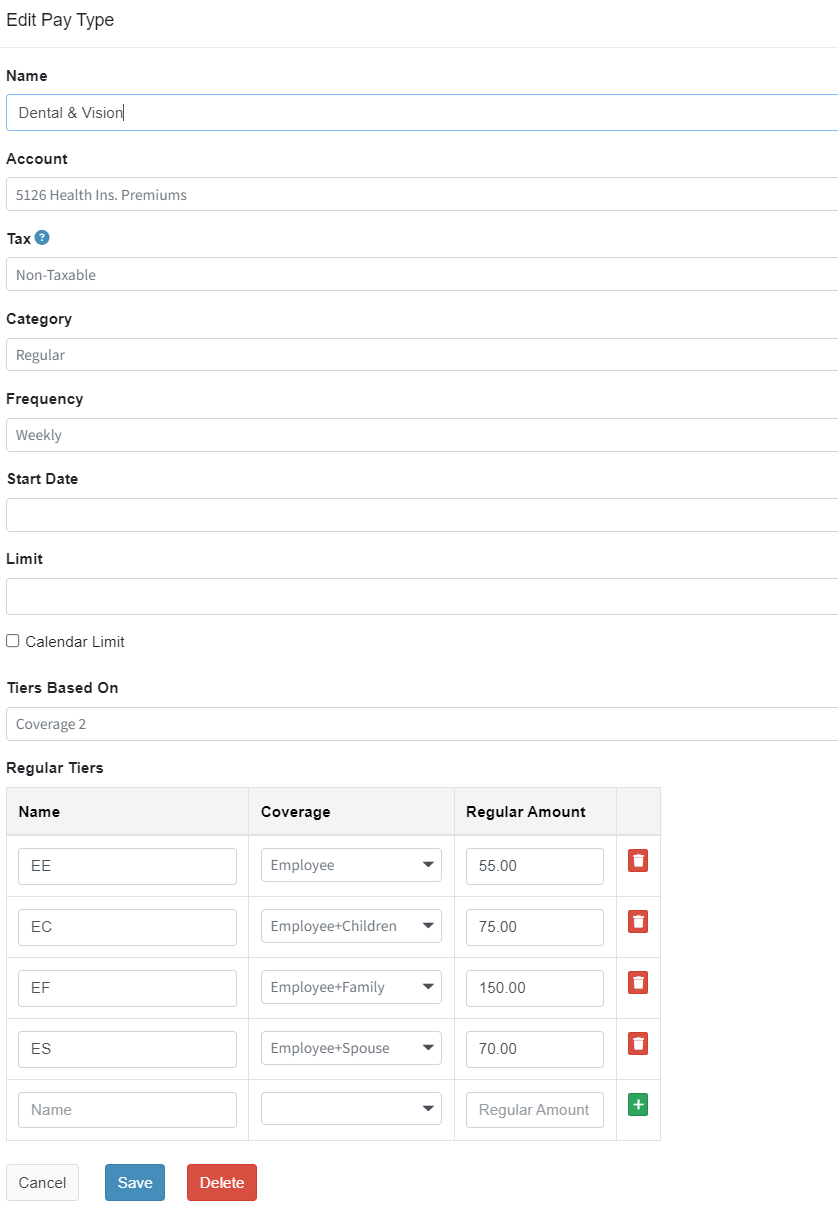
Dental & Vision Insurance
Add one pay type per insurance plan you offer employees.
Tax - Non-Taxable
Category - Regular
Frequency - Usually Monthly
Start Date - Leave blank
Limit - Leave blank
Tiers - Change to Coverage Two. Add a tier for each level of coverage, and the appropriate amount for each level.
 Retirement Match
Tax - Non-Taxable
Category - Percentage
Frequency - Usually Monthly
Start Date - Leave blank
Limit - Leave blank unless there is a limit on the total amount that the organization will match. (For example, if the organization contributes 5% of the first $100,000 of salary, the limit would be $5,000.)
Employer Percent - 100
Regular Amount - The base percentage if all employees are eligible when they start; otherwise, choose Tiers
Tiers - Select Months Employed, and enter the minimum number of months needed to work before this benefit is applicable
Source Percent - Percent organization wants to budget for - often the max available to the employee
Source Pay Types - Add all pay types to sum together as the basis for this pay type
FICA - Social Security & Medicare
FICA can be often be budgeted via the Config tab, but it is necessary to utilize pay types when:
- Separate GL accounts are utilized for the Medicare and Social Security portions of the FICA tax
- There are enough positions that meet the annual cap for Social Security to affect the budget
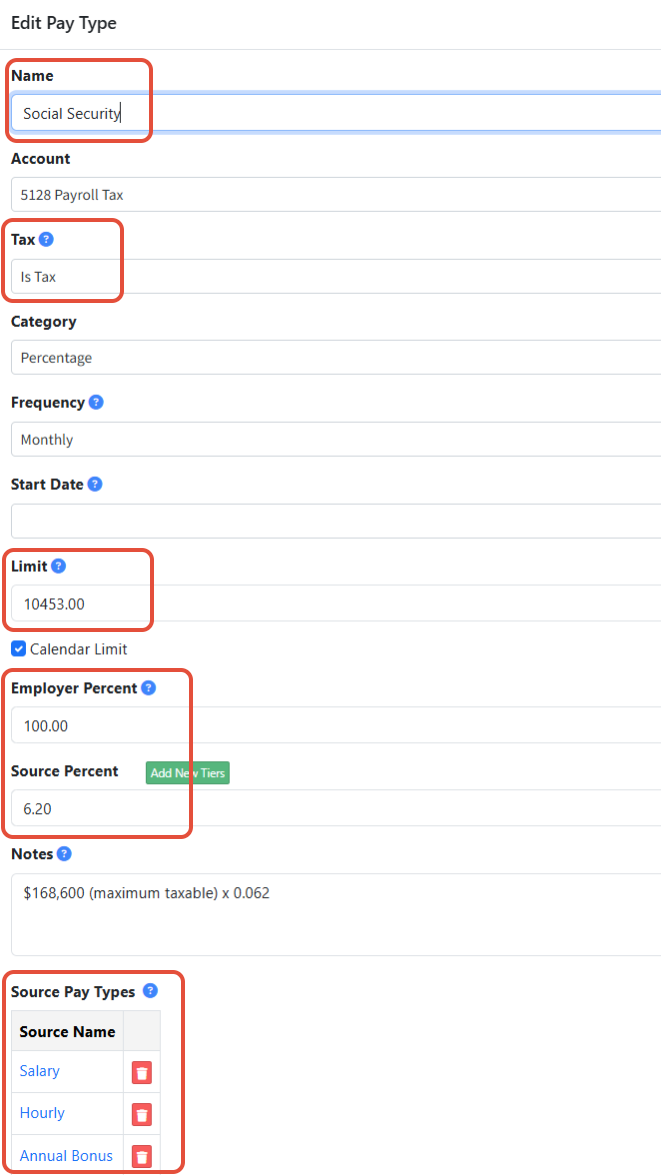
 Social Security
Tax - Is Tax
Category - Percentage
Frequency - Usually Monthly
Start Date - Leave blank
Limit - The Social Security limit for 2026 is 11439.00. (The maximum taxable earnings is $184,500. Therefore, the maximum employee tax is calculated: $184,500*6.2% = $11,439.)
Calendar Limit - Check if your organization does not begin their fiscal year in January
Employer Percent - 100
Source Percent - 6.2
Source Pay Types - Add all pay types to sum together as the basis for this pay type; normally this includes all taxable pay types
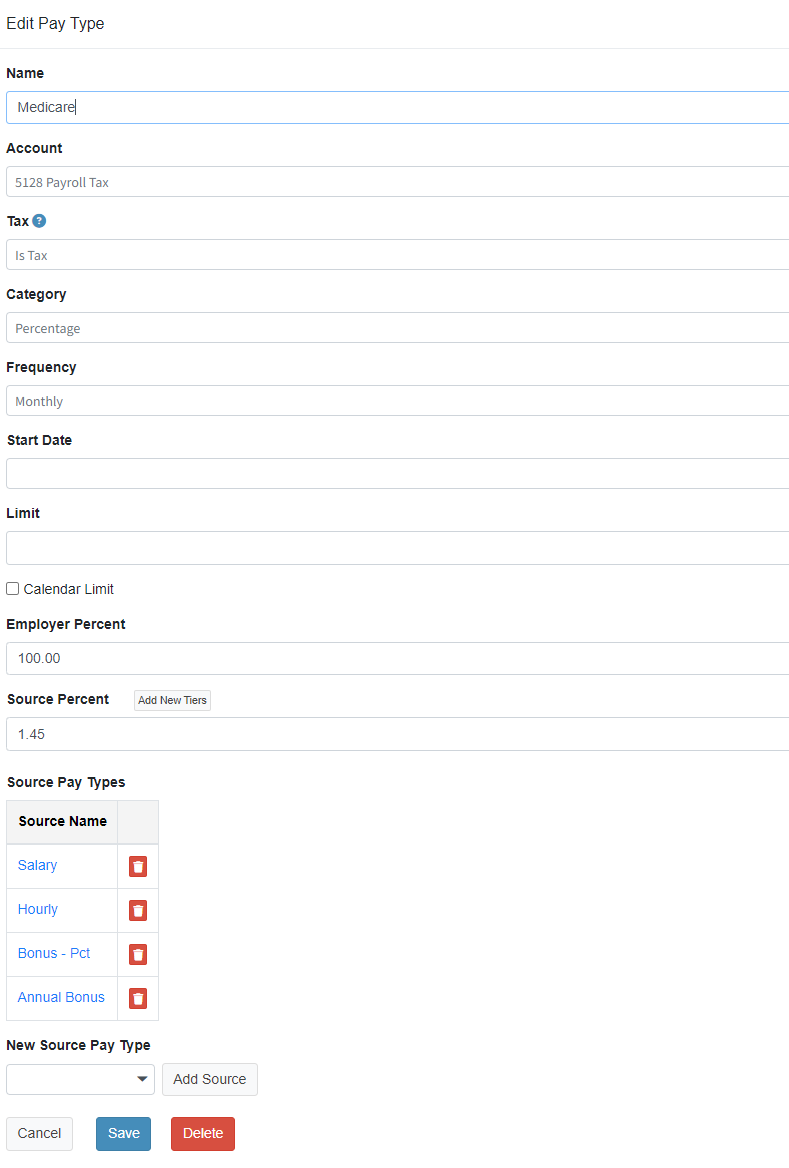
Medicare
Tax - Is Tax
Category - Percent
Frequency - Usually Monthly
Start Date - Leave blank
Limit - Leave blank
Employer Percent - 100
Source Percent - 1.45
Source Pay Types - Add all pay types to sum together for this pay type; normally this includes all taxable pay types
Overtime Pay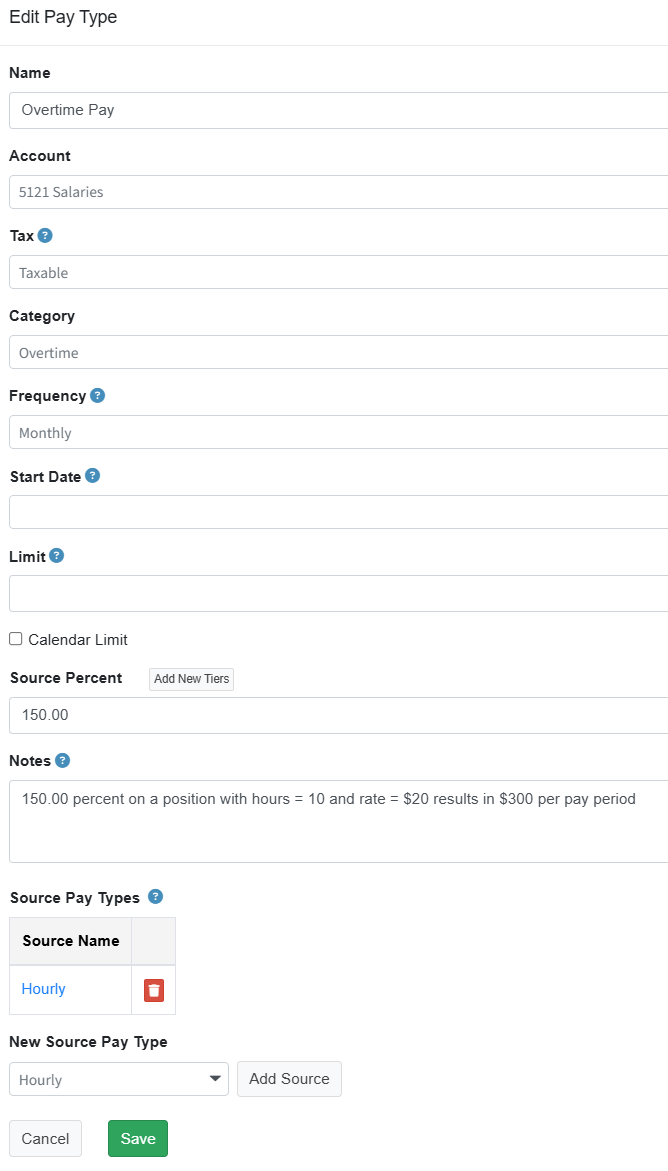
Tax - Taxable
Category - Overtime
Source Percent - The percent to multiply by the number of hours and rate from the hourly pay item for the position
Source Pay Types - Hourly category pay types
Options for Calculating Payroll Taxes
Setting Up Payroll Taxes - Choose the Right Method
There are two methods of calculating the employer responsibility for payroll taxes. Use only one of these methods to avoid doubling the payroll tax.
Use the Annual Setup tab for calculating payroll taxes if both of these are true:
- You use a single GL account for both Social Security and Medicare.
- You have no employees whose compensation is high enough to be affected by the Social Security tax cap, or if the difference that this would make in your budget is minimal enough that you wish to disregard it. (The Social Security tax cap is set by the IRS each year.)
Use Pay Types for calculating payroll taxes if either of these are true:
- You use separate GL accounts for Social Security and Medicare.
- You have employees affected by the Social Security tax cap and you want to budget more precisely for the effect on employer payroll tax.
Note: This document is written from the perspective of US payroll tax requirements. Martus also supports payroll tax methods in other countries. The Annual Setup method is of limited usefulness outside the US, but the pay type method is very flexible and supports a wide variety of payroll tax requirements. Martus Support can help to configure pay types for payroll tax needs in countries outside the US.
Using Annual Setup for Payroll Taxes
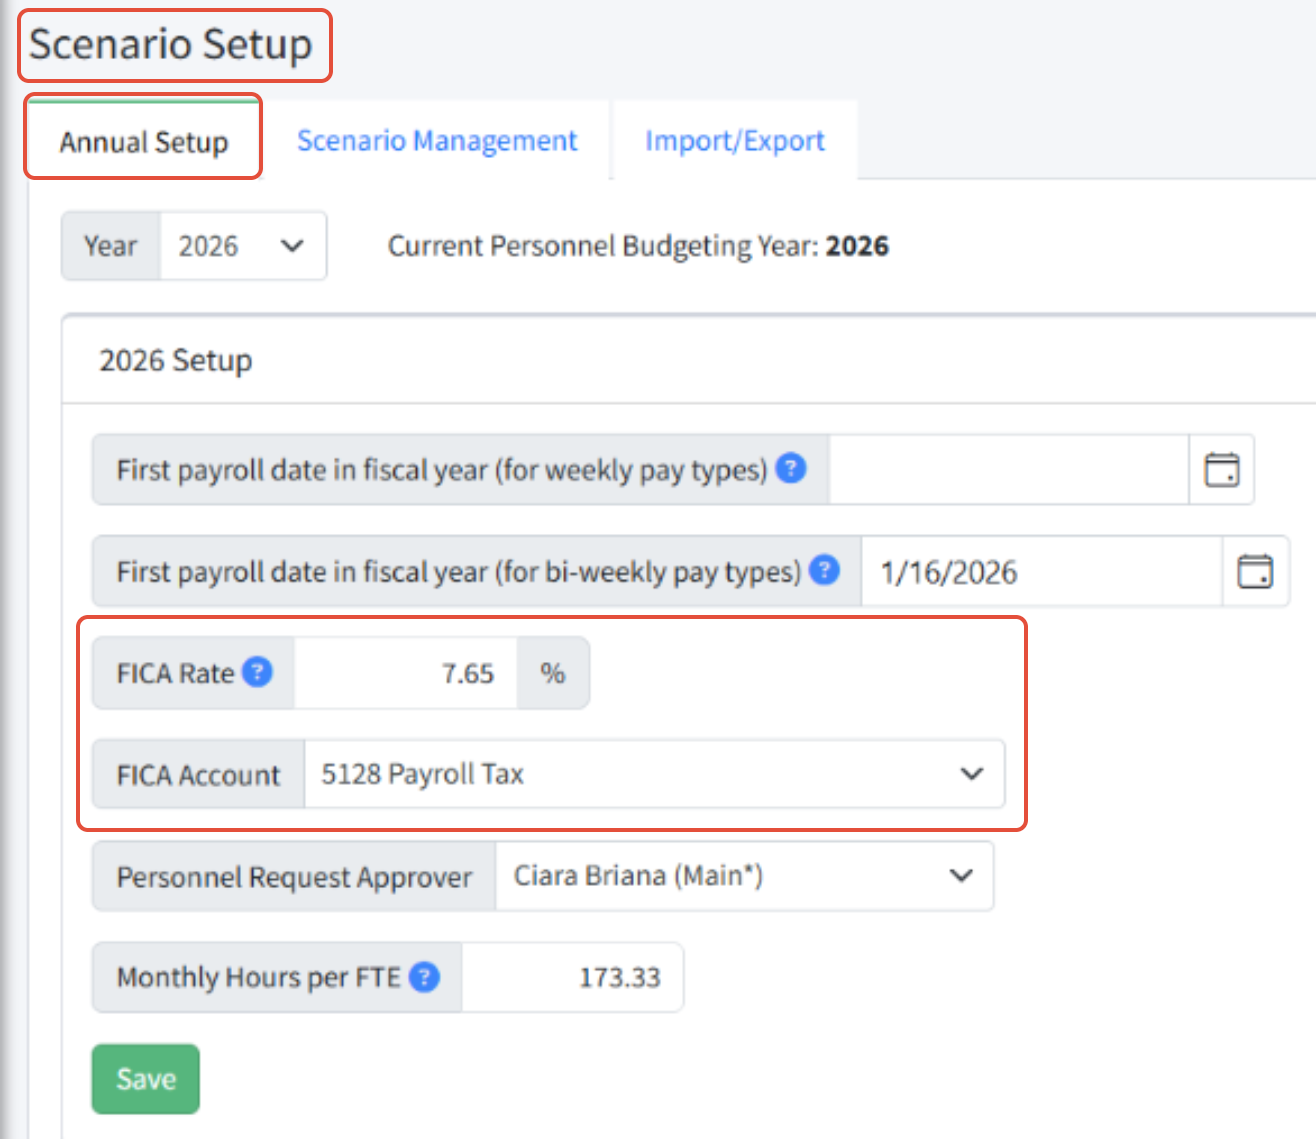
Set the FICA Rate and FICA Account
- Navigate to Personnel Budgeting > Scenario Setup > Annual Setup. Enter the FICA Rate and FICA Account for the fiscal year.
- Slick Save.
Set Pay Types as Taxable
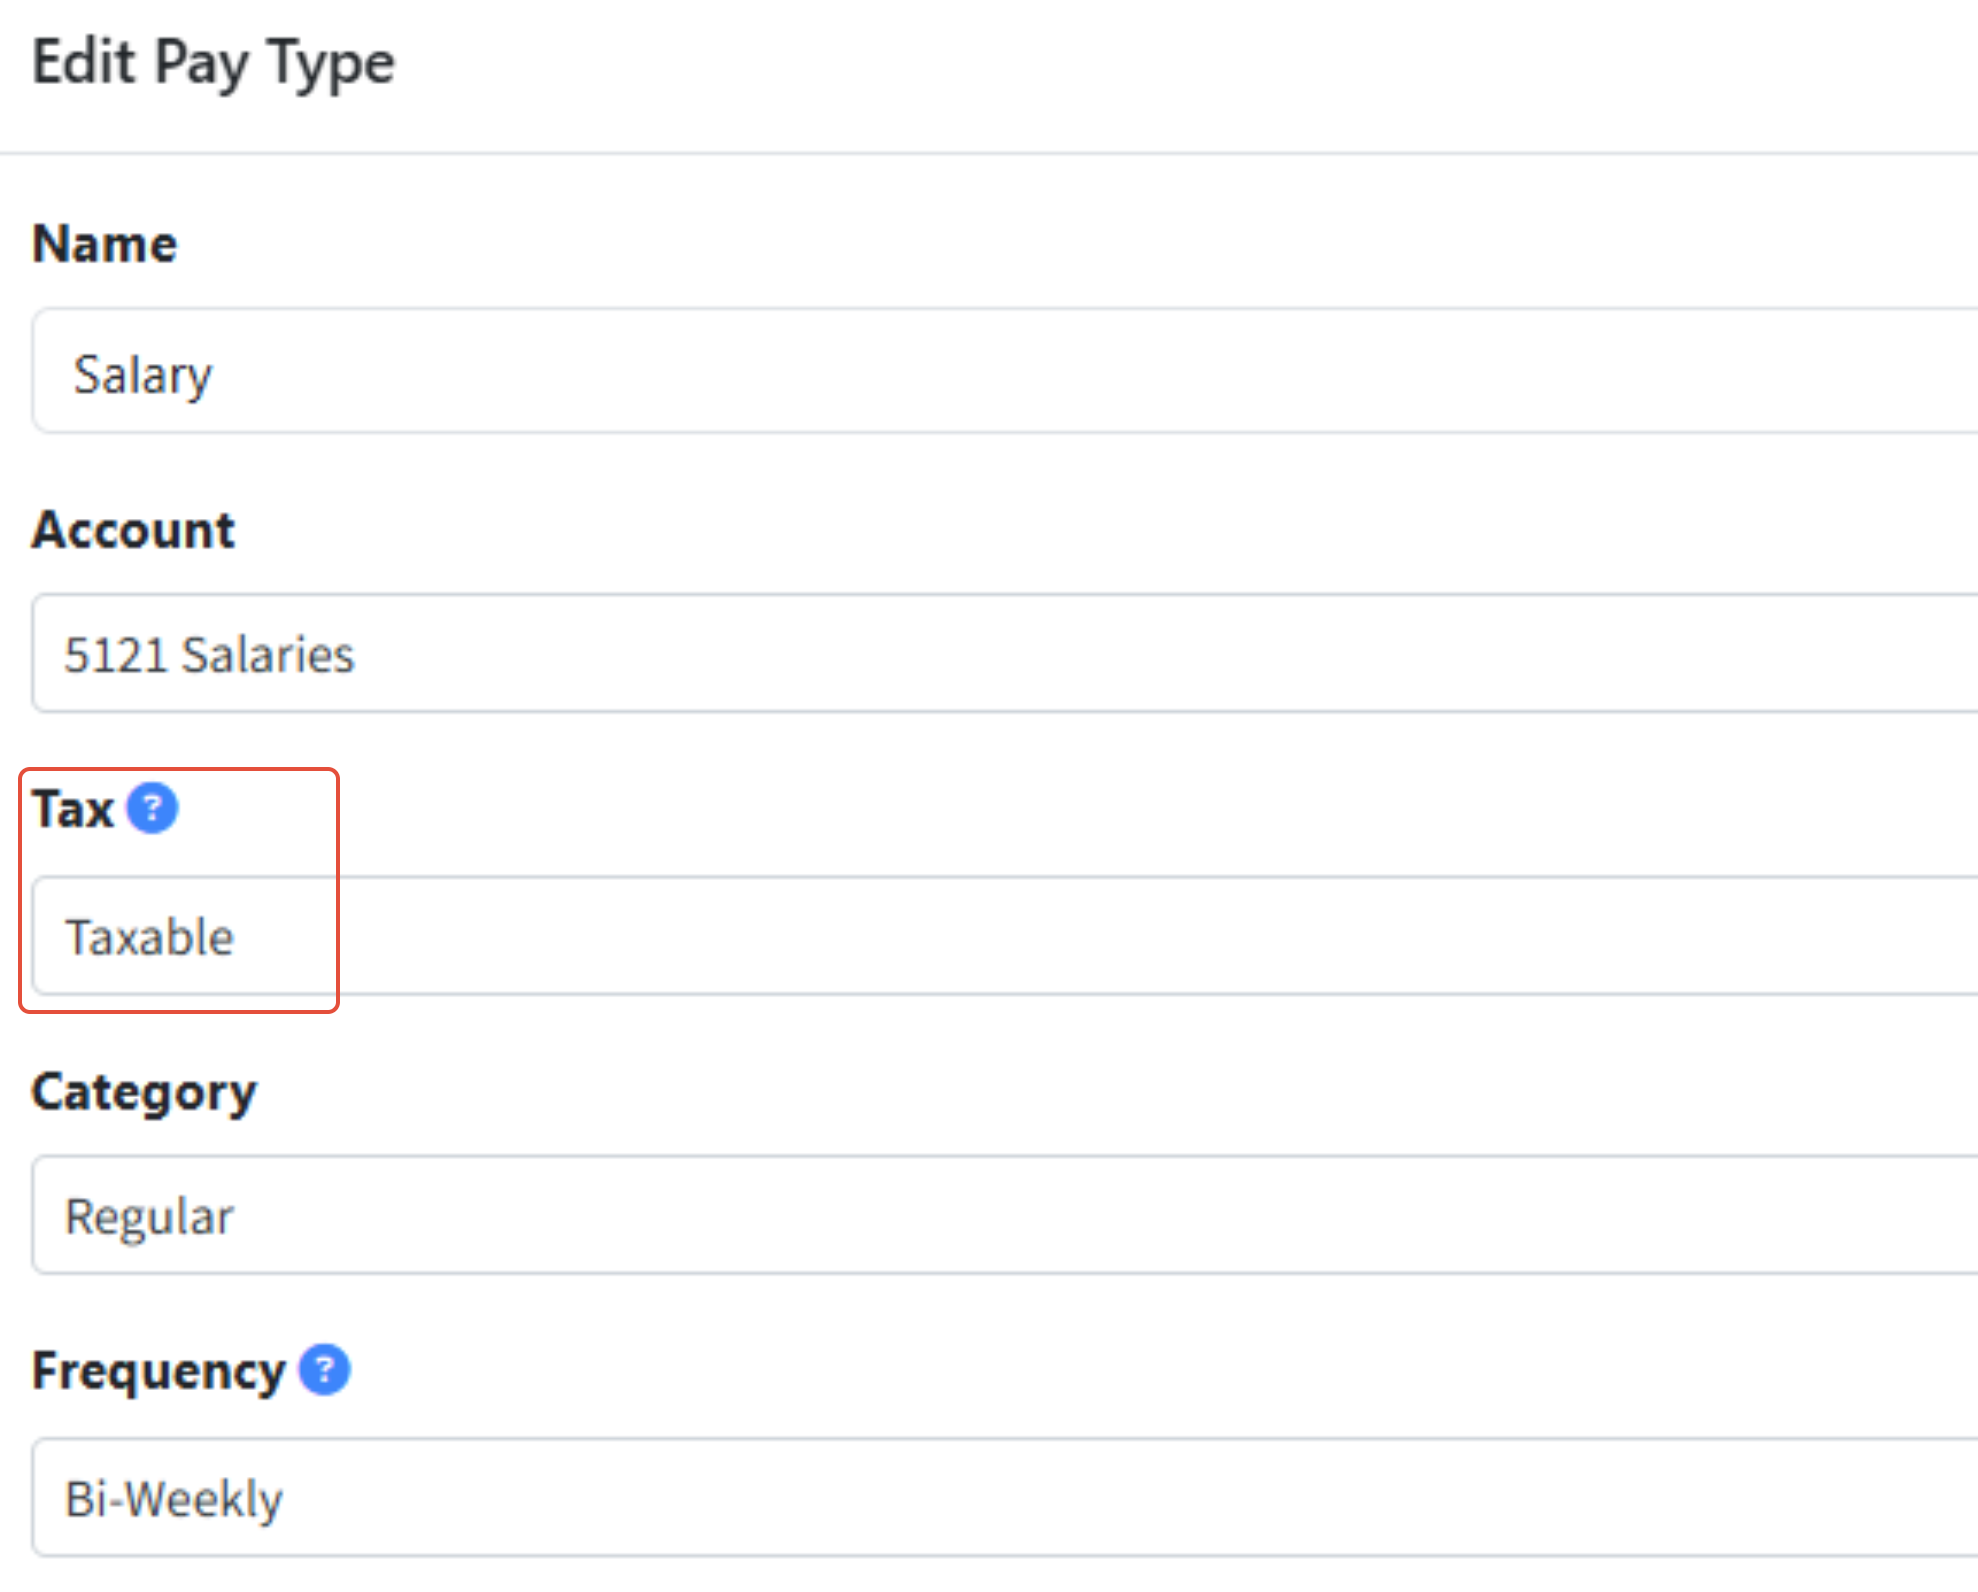
Taxable pay types use the Annual Setup settings to calculate payroll taxes.
- Navigate to Personnel Budgeting > Personnel Budgeting Setup > Pay Types.
- Set the Tax setting on each pay type to Taxable.
Using Pay Types for Payroll Taxes
Separate pay types for Social Security and Medicare are assigned to taxable positions in a scenario.
Each tax pay type is associated with source pay types (such as Salary, Wages, Bonus, etc.) When you assign a payroll tax pay type to a position in a scenario with any or all of these source pay types, the tax amount is calculated automatically. If you change the rate for any of the source pay types on that position, the payroll tax amounts are updated automatically.
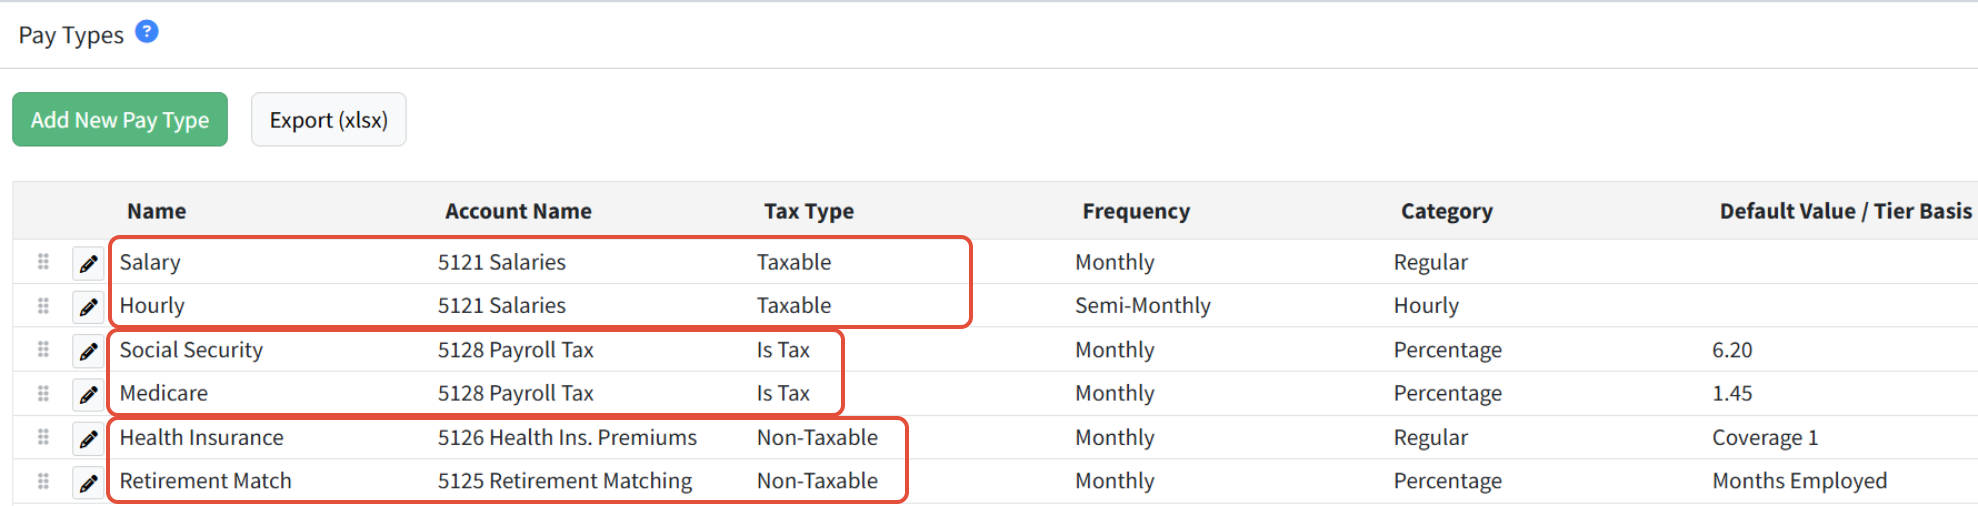
Below is an example pay type for calculating Social Security taxes, using the cap. Additional information on Pay Types can be found in the knowledge base.
Notes:
- When you use the Annual Setup method, payroll taxes are not shown on Positions or Detail in Personnel Budgeting > Scenarios.
- View payroll taxes on the Summary (Post to Budget) report. Use the Show Taxes flag to hide/show taxes.
- When you post a scenario to a budget, payroll taxes are always included.
- When you use pay types for payroll taxes, the Taxable flag on positions is ignored.
- Whether you use either method, be sure to review the accounts, rates and limits each year, in preparation for budget season.
Special Pay Types - Using Stat Accounts
This feature is currently available for Standard Plus, Plus and Premium customers with a Sage Intacct integration.
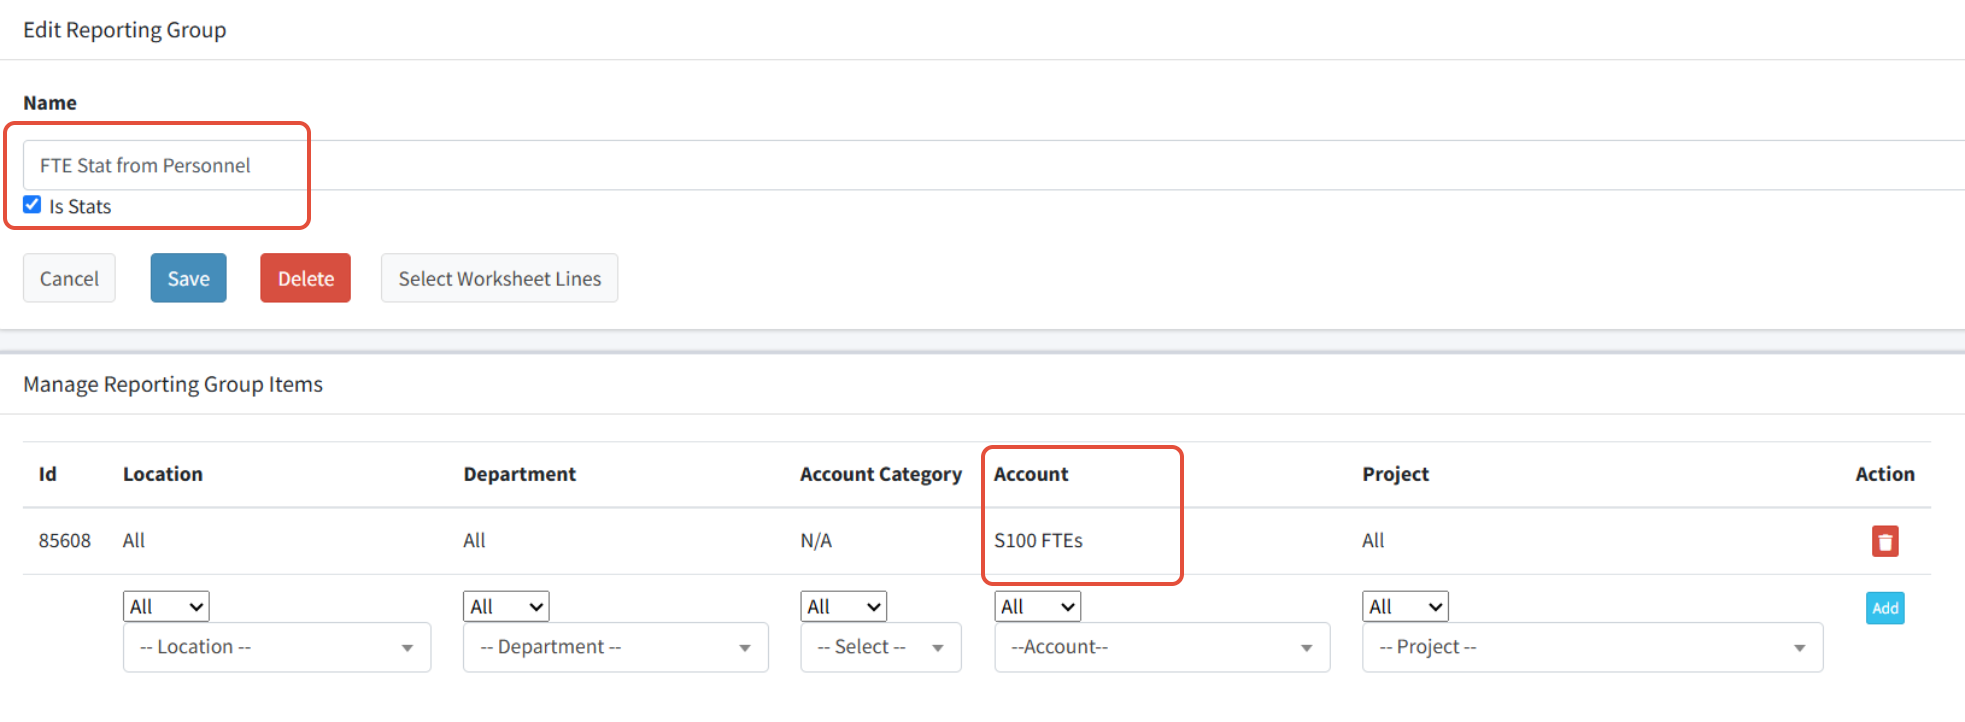
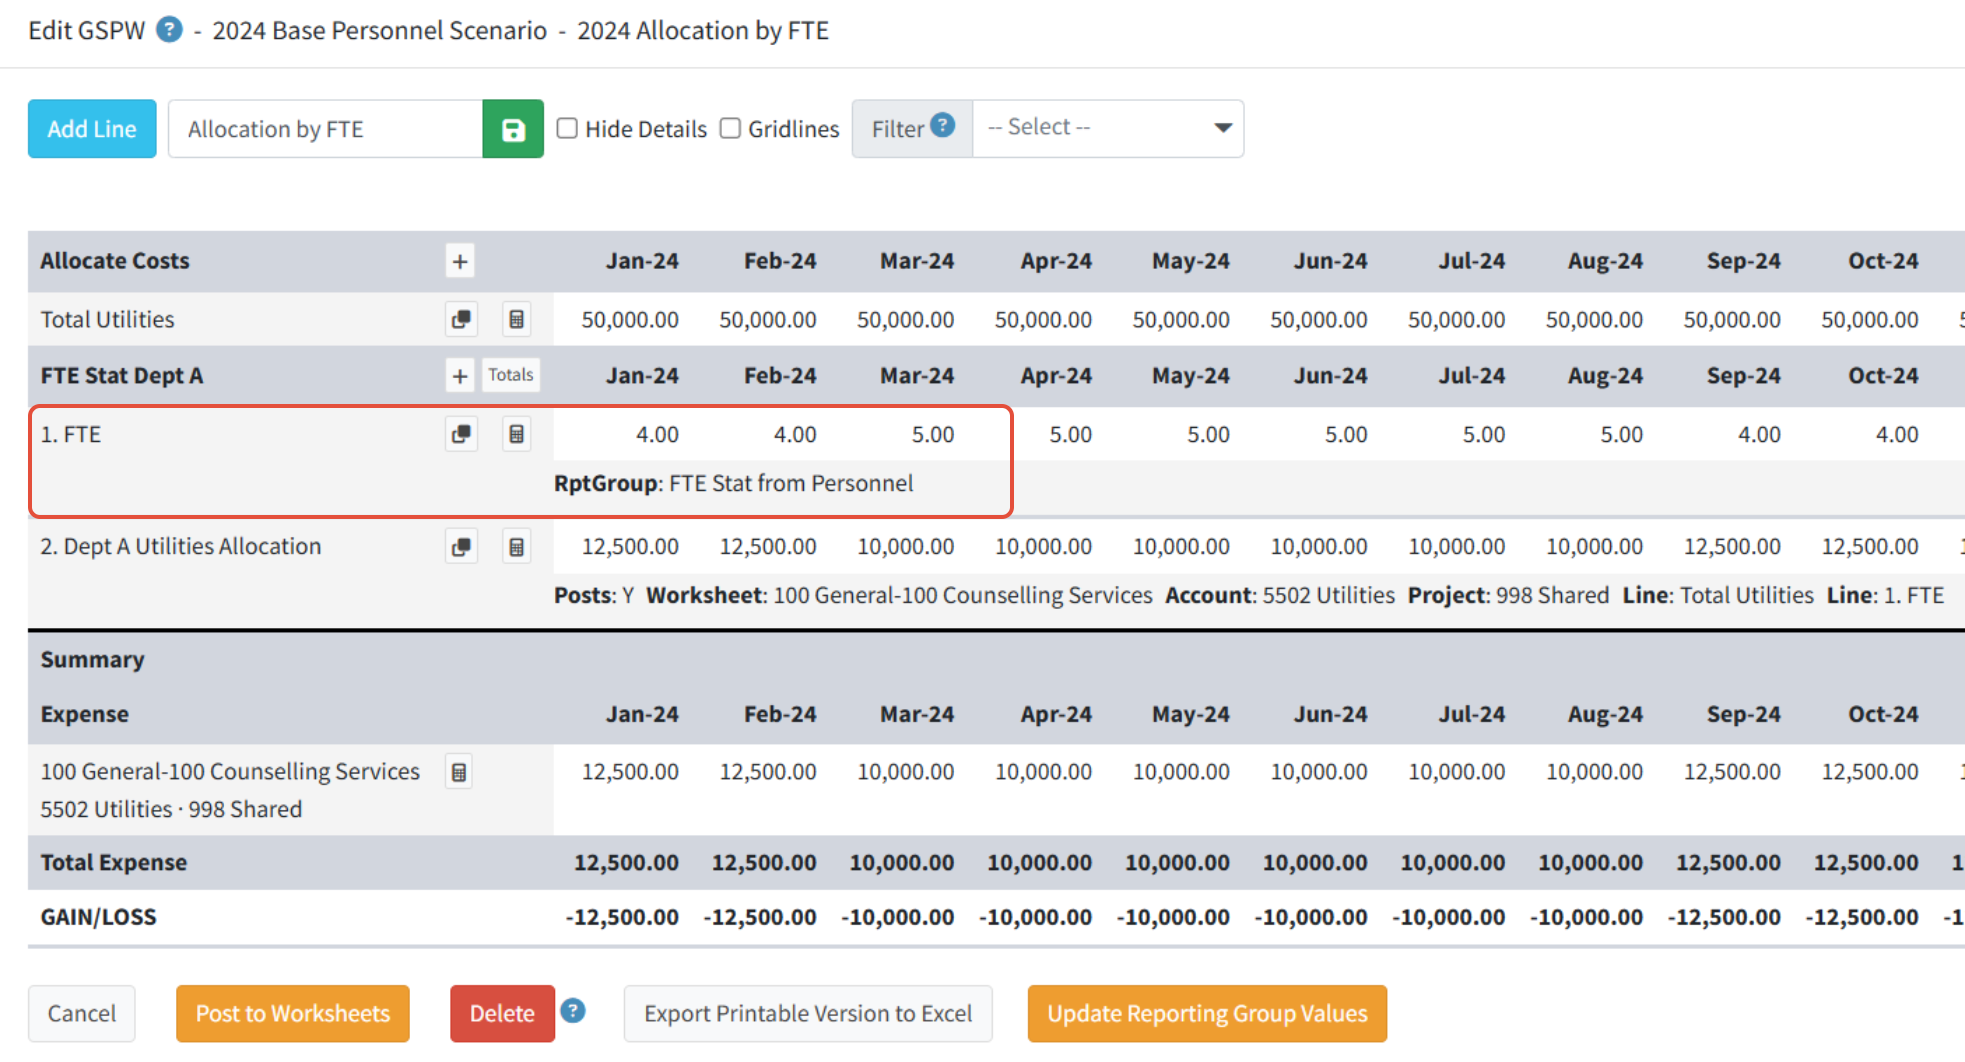
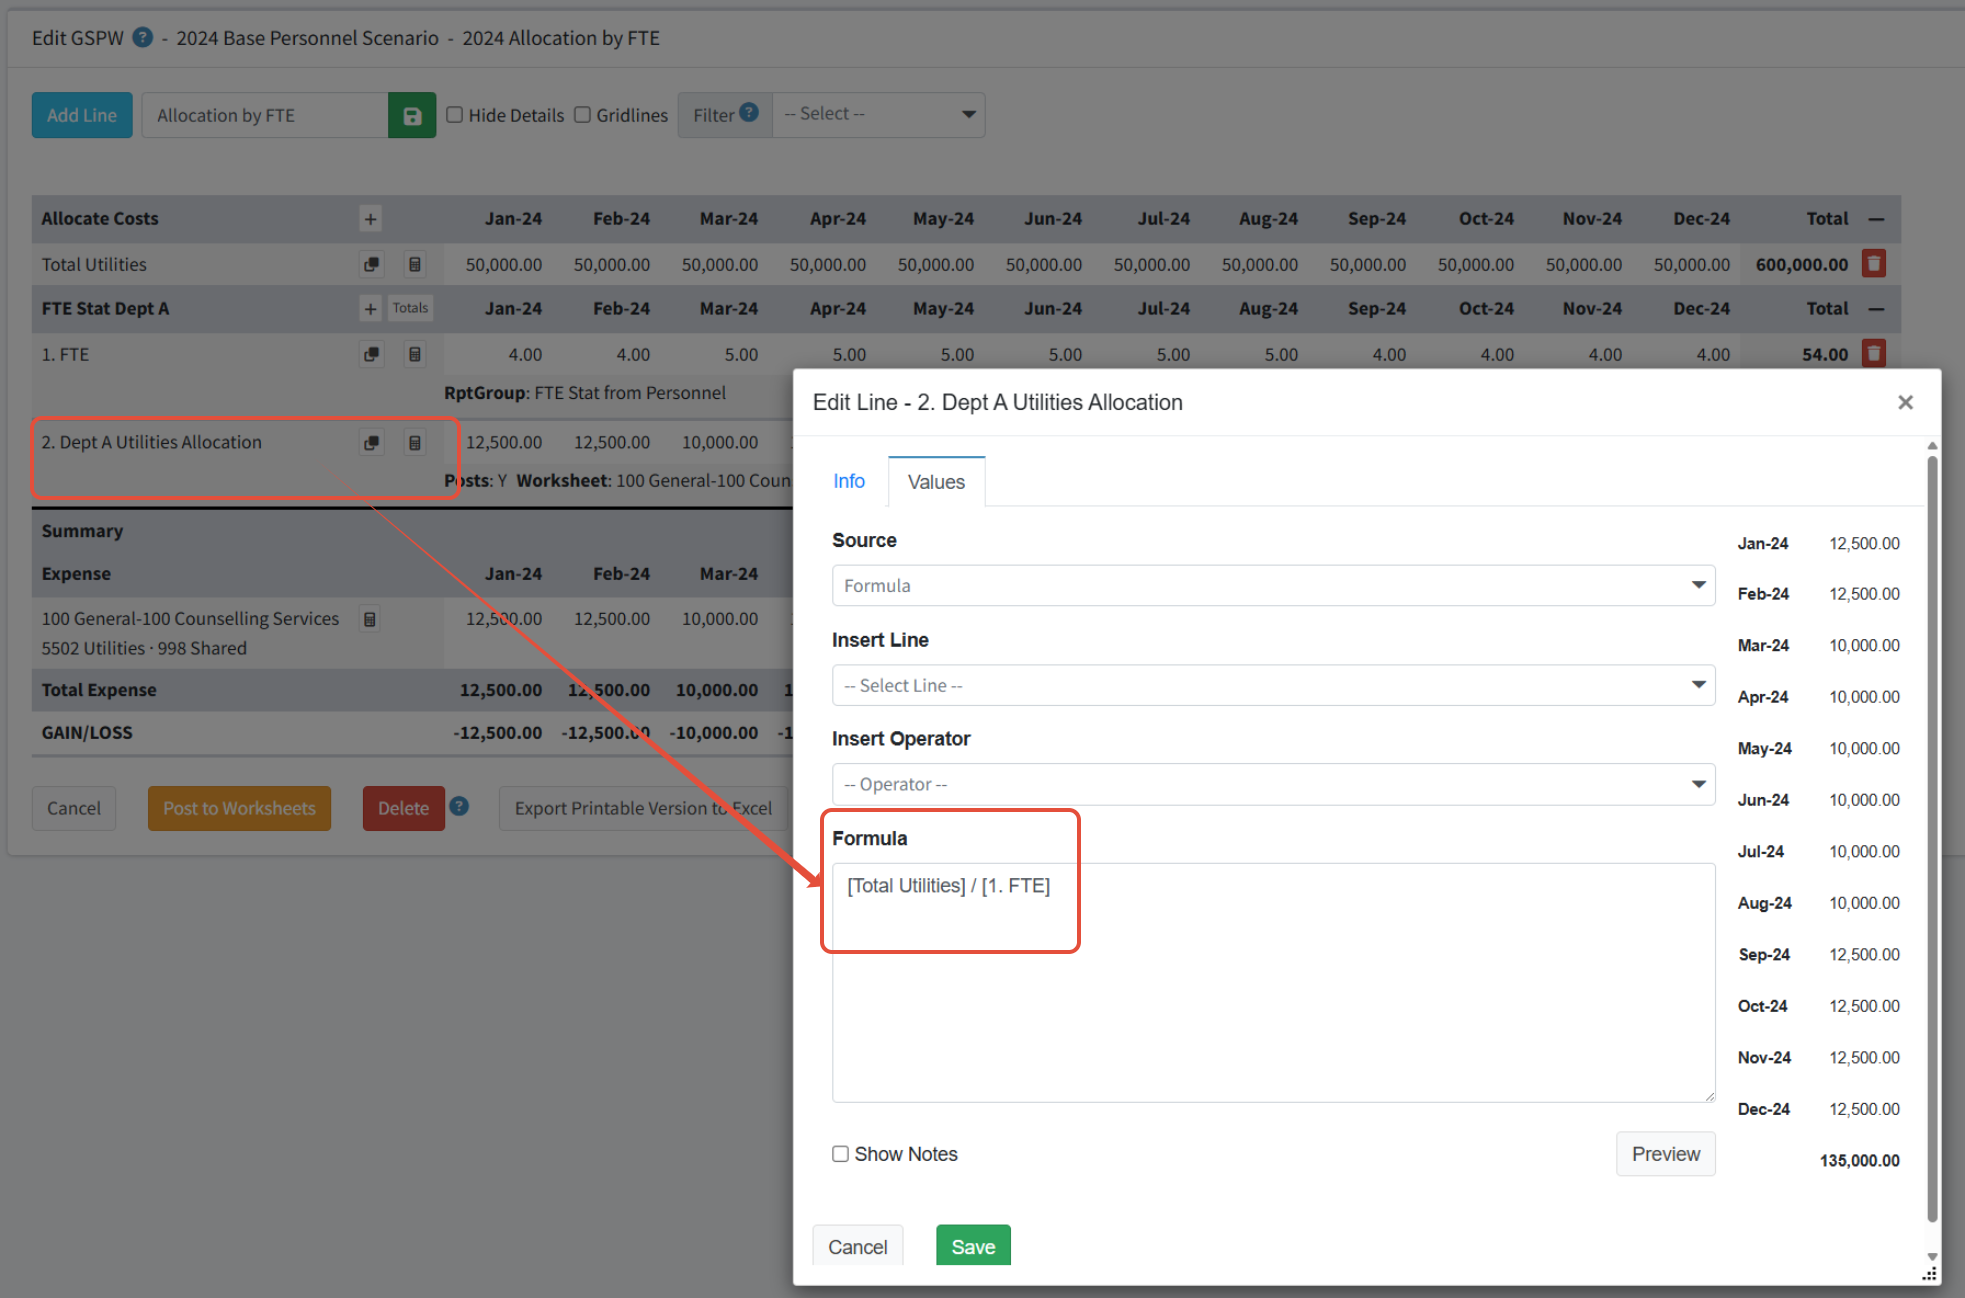
Stat accounts can be used in Personnel Budgeting to allow for staffing information - such as FTEs - to flow from personnel scenarios to the Planner budget worksheets. This information can then be reported on in Planner Summary and Financial reports and also viewed by users in their planner worksheets. Additionally, stat accounts can be used in Reporting Groups (Plus and above subscriptions) to assist in allocations or formulas using FTEs.
It may be beneficial to create multiple stat account pay types if there is a need to distinguish certain types of FTEs or for other uses.
Creating a Pay Type Based on a Stat Account
- Go to Personnel Budgeting Setup > Pay Types.
- Click Add New Pay Type.
- Enter a Name.
- Choose the appropriate stat Account.
- Set Tax to Non-Taxable.
- Fill out all other fields as appropriate.
- Click Save.

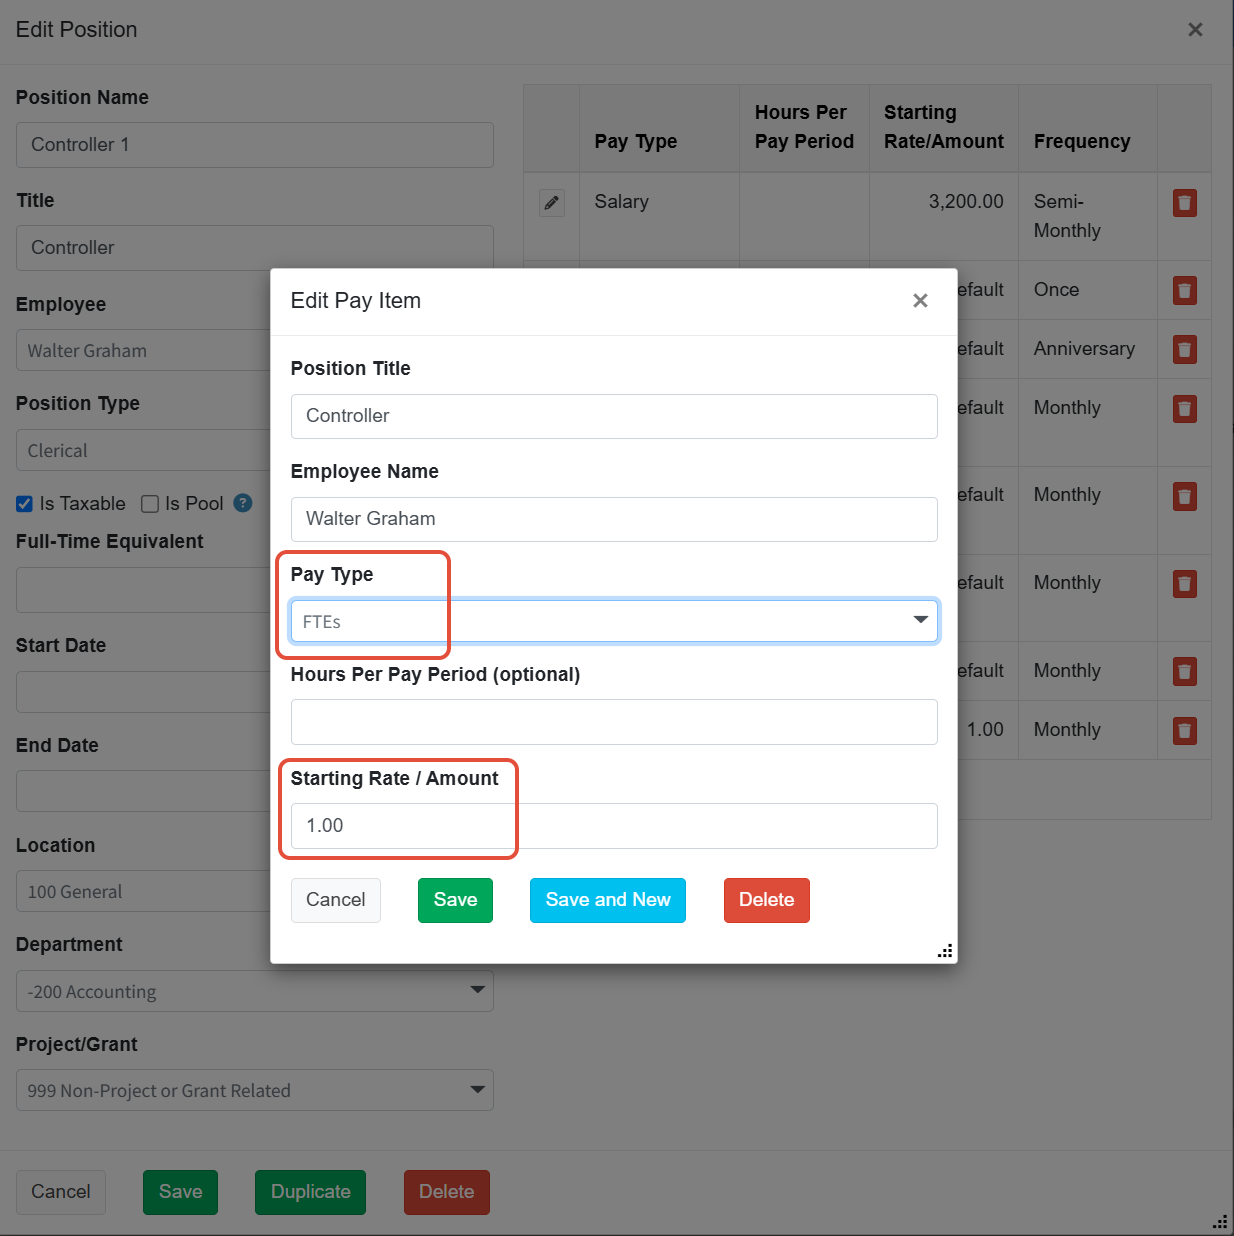
Assigning a Stat Pay Type to Positions
Add a stat pay type to any position as you would any other pay type, via the Position, the Pay Items tab, or import/export.
- Go to Personnel Budgeting > Scenarios.
- Ensure the appropriate year and scenario are selected.
- Click on the Positions tab.
- Click Edit to update a position.
- Click Add Pay Item.
- Choose the appropriate Pay Type.
- Enter the Starting Rate / Amount. (Normally the same number that is in the Full Time Equivalent field.)
- Click Save.
Viewing Stat Accounts in the Scenario
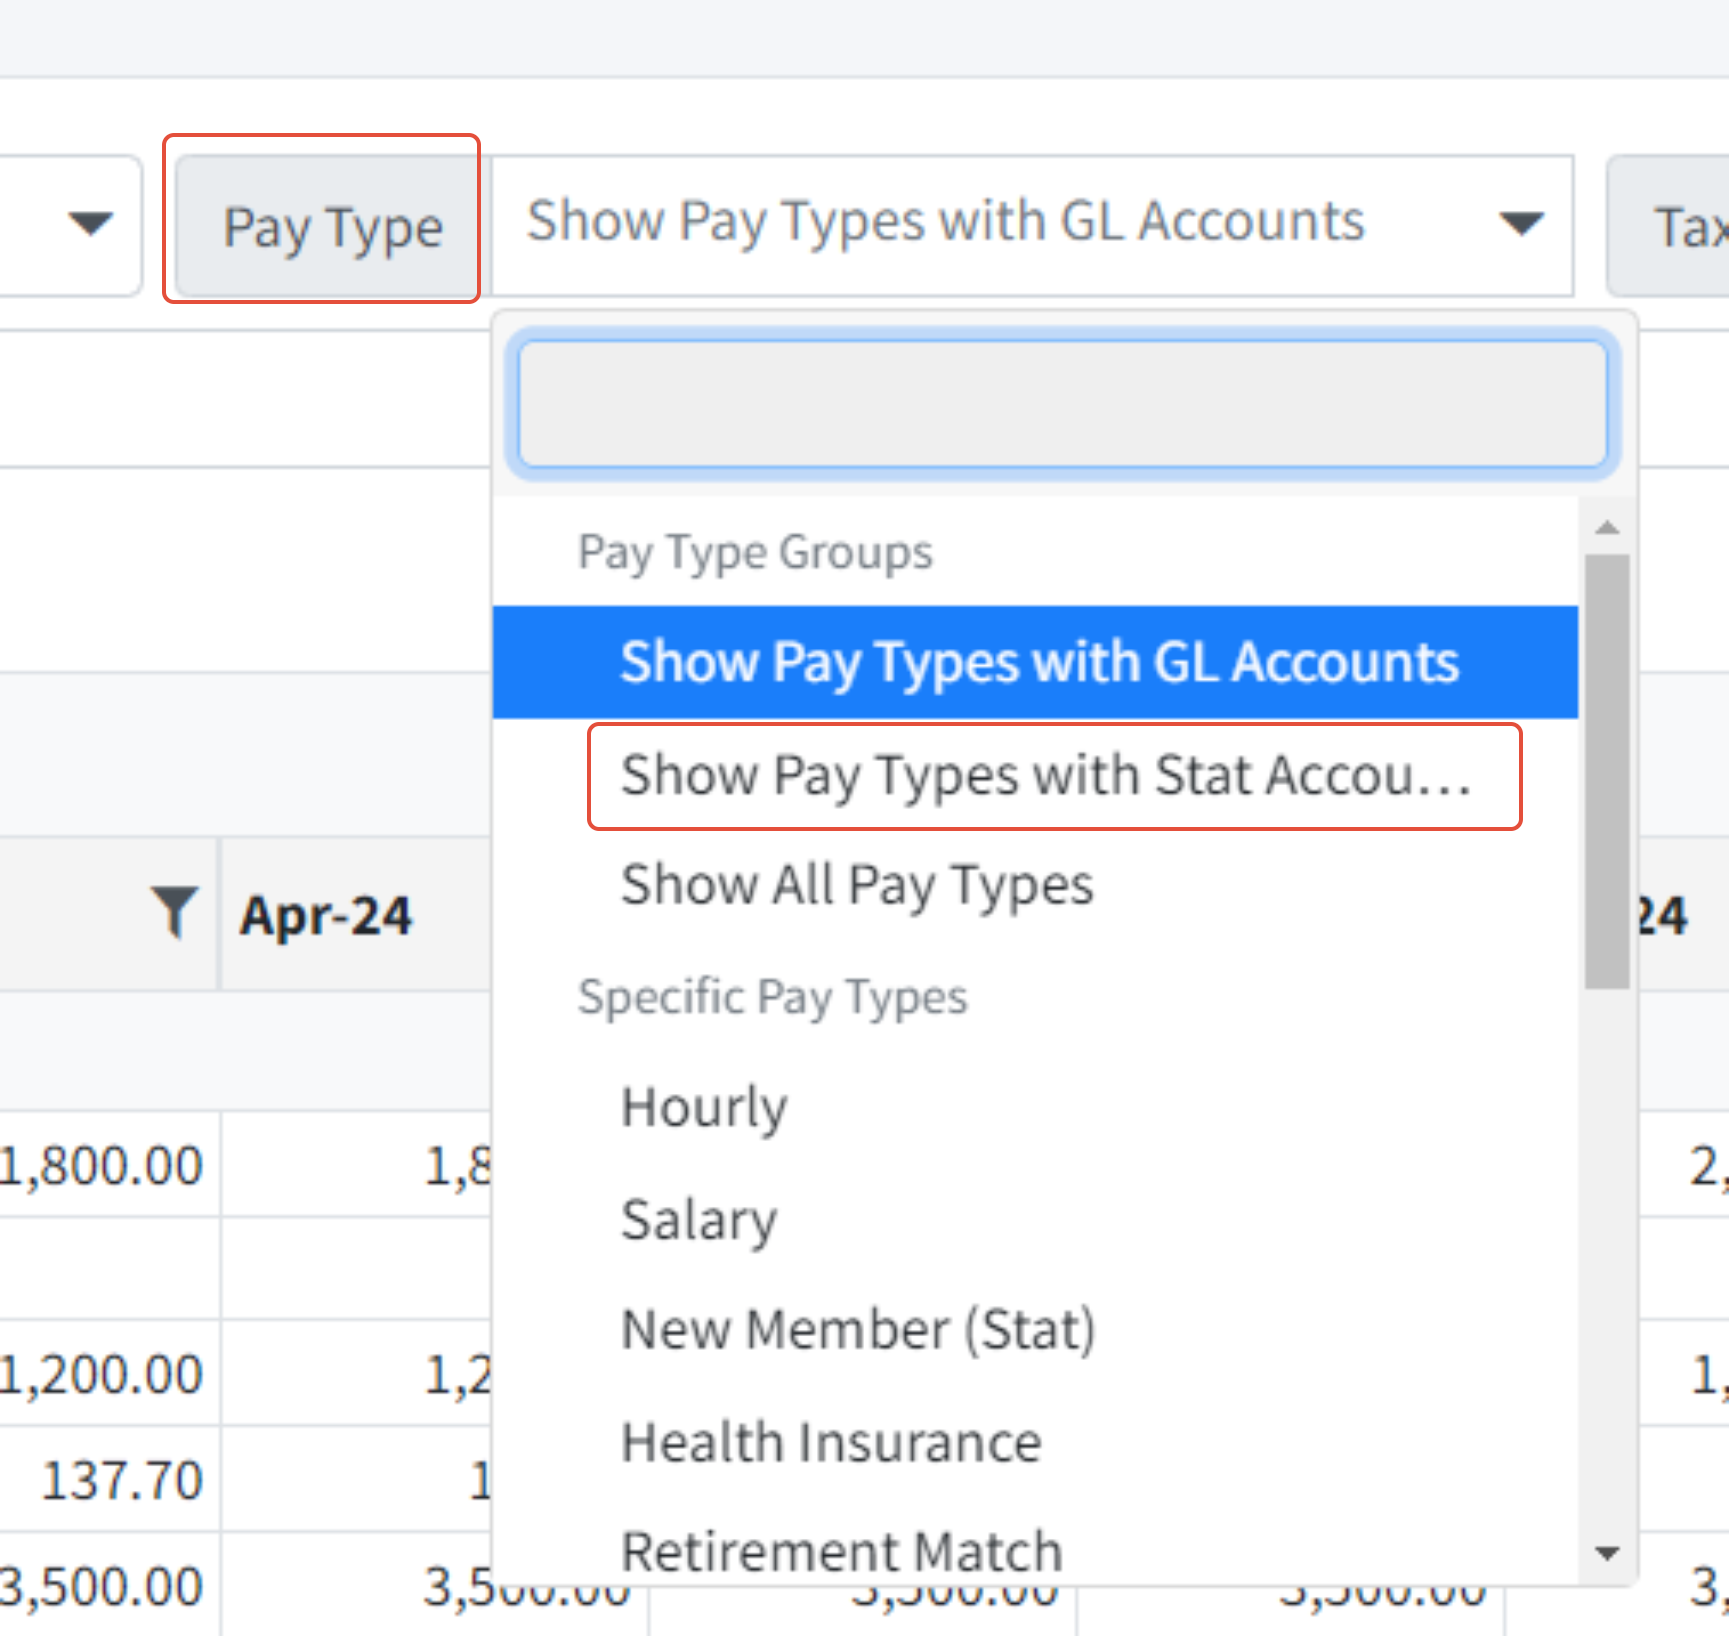
- Go to Personnel Budgeting > Summary (Post to Budget).
- Ensure the appropriate year and scenario are selected.
- Choose the option in the Pay Type filter to Show Pay Types with Stat Accounts.
- Click Load.
Viewing Stat Accounts in the Budget
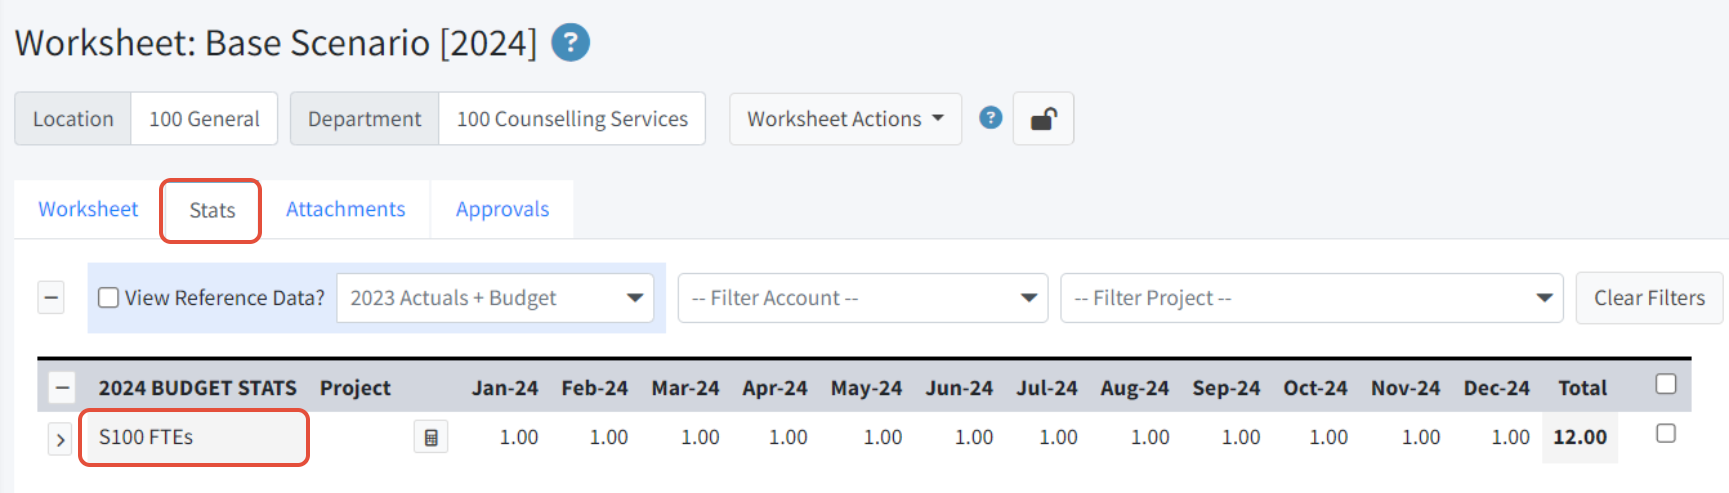
After posting the personnel scenario to the Planner budget, the stat accounts will show on the Stats tab in the budget worksheet.
Creating Reporting Groups for Stat Accounts for Use In SPWs
Use the Stat Account in a reporting group for use in an SPW.
Position Types
Position Types are optional, and are used to group positions to filter or sort various tabs and reports within Personnel Budgeting. Organizations can choose what position types work for them according to their needs.
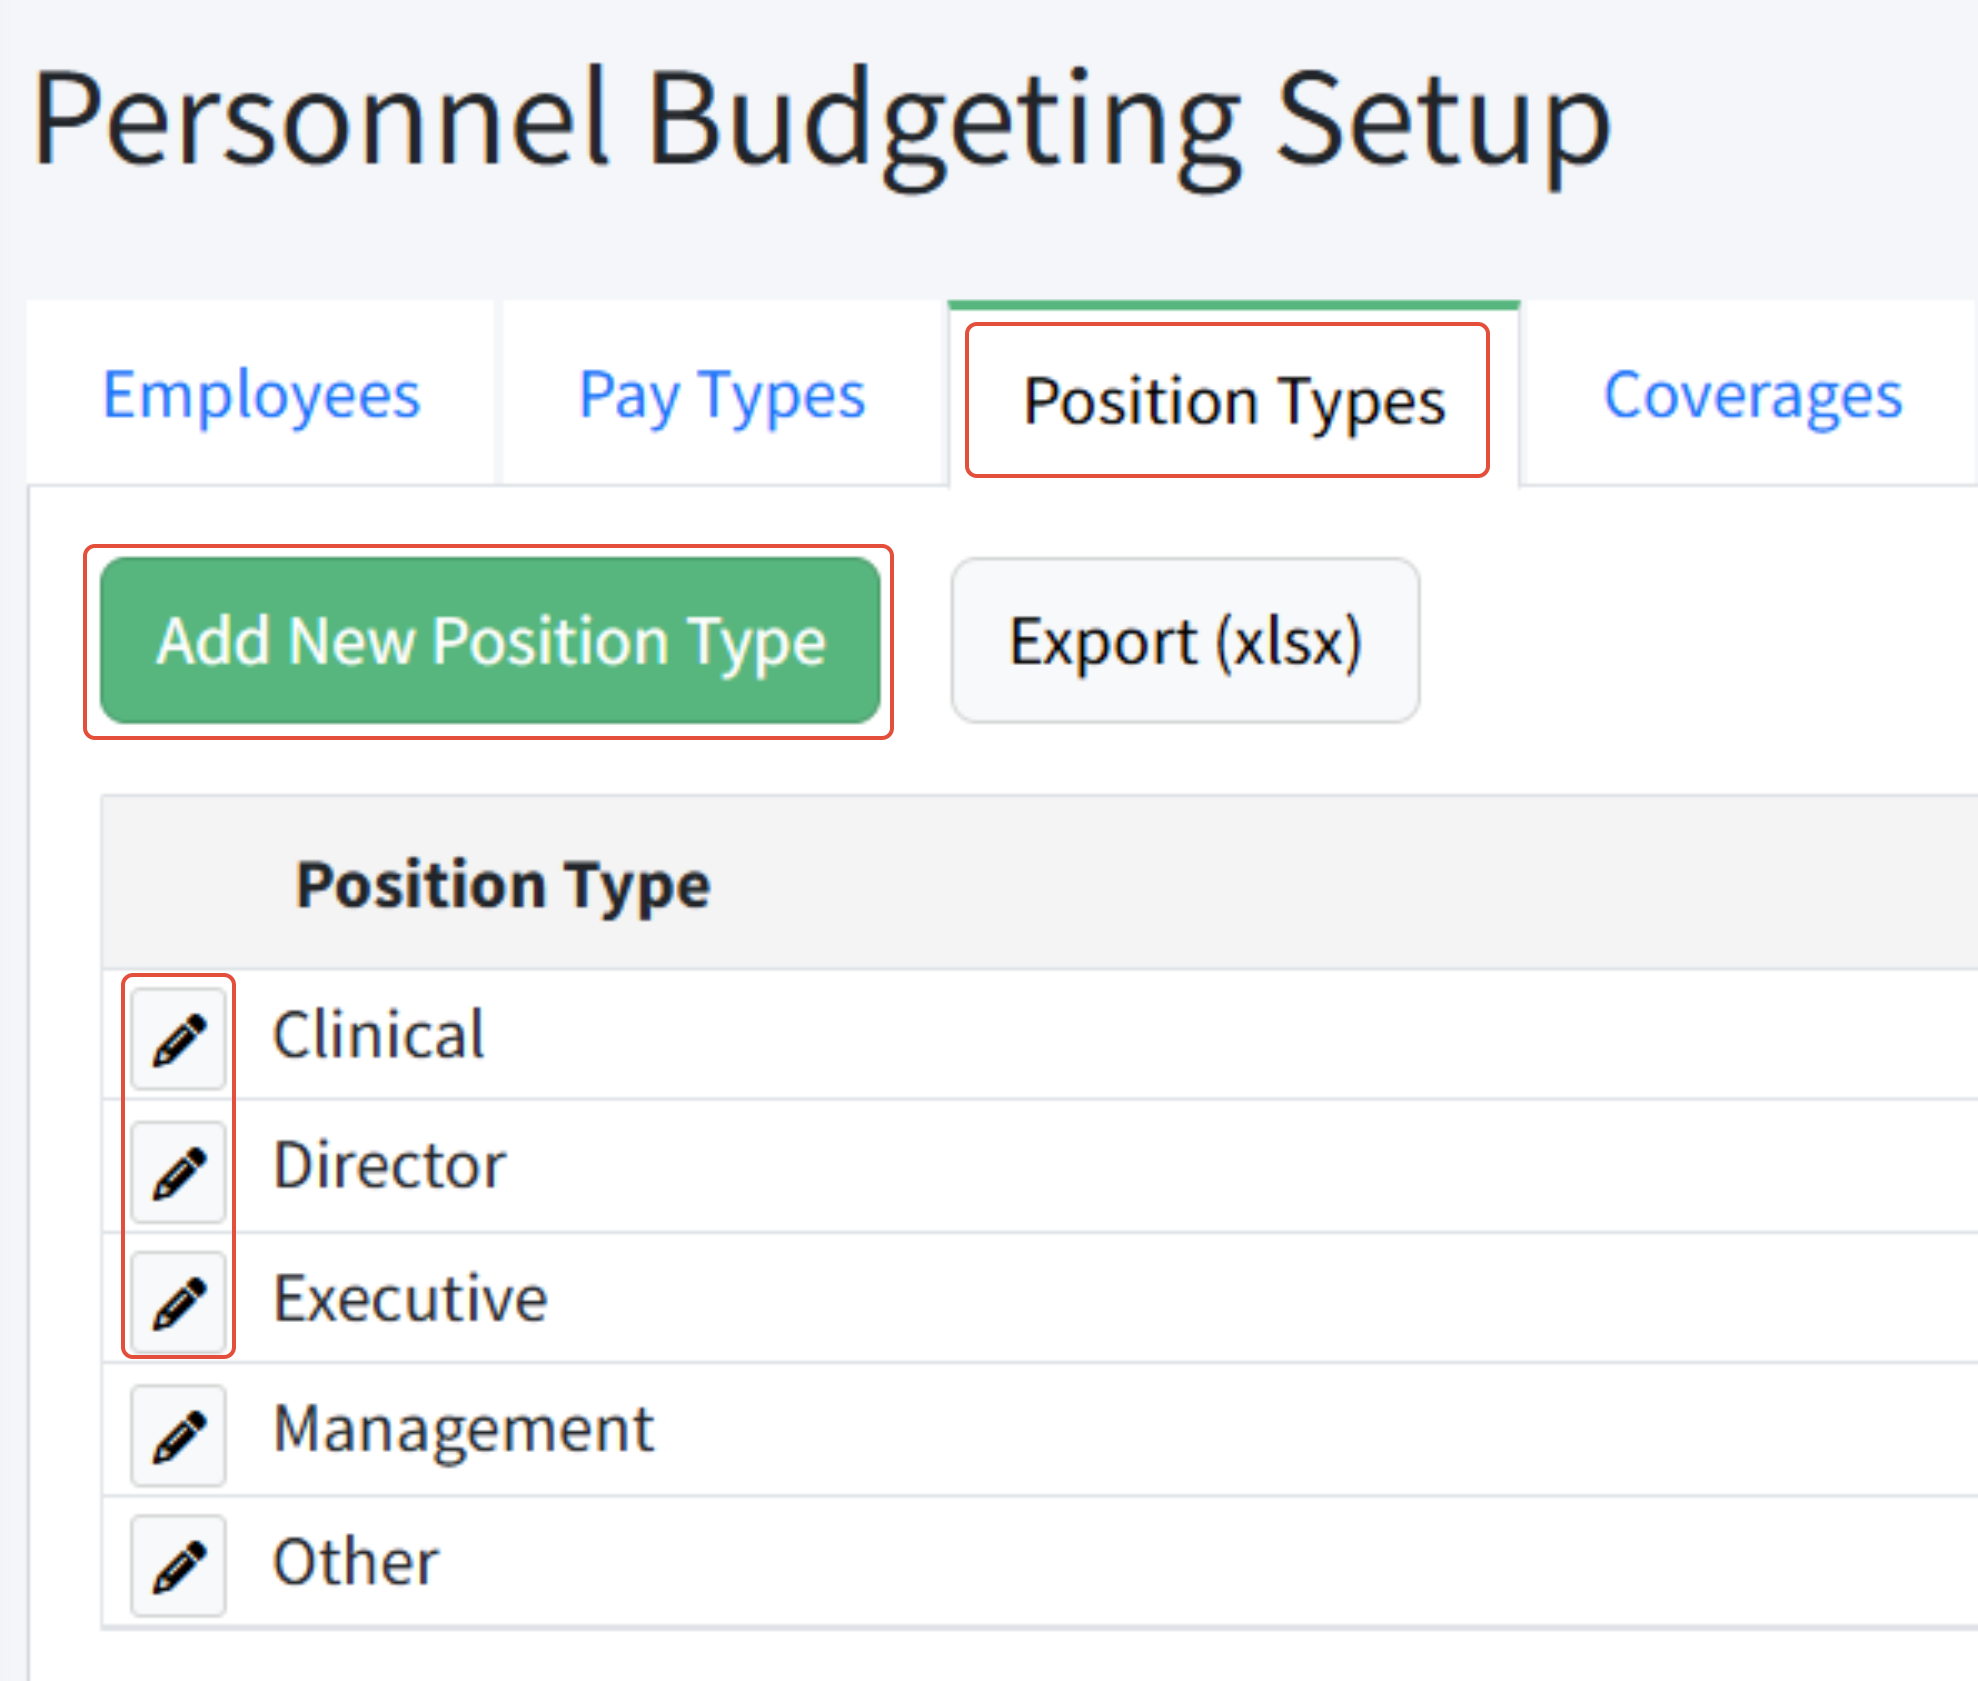
Position types are managed in Personnel Budgeting > Personnel Budgeting Setup > Position Types.
Common examples of position types are below.
Example 1: Employee Status
- Full-Time Salary
- Full-Time Hourly
- Part-Time Hourly
- Seasonal
- Intern
Example 2: Organizational Level
- Executive
- Director
- Manager
- Associate
- Specialist
- Administrative
Adding a Position Type
- Navigate to Personnel Budgeting > Personnel Budgeting Setup > Position Types.
- Enter the Position Type name.
- Click Save to save the new type, or click Cancel to leave without saving.
How To Assign A Position Type
Position types are assigned to positions.
- Navigate to Personnel Budgeting > Scenarios > Positions.
- Click the Edit (pencil) icon for the position for which you want to assign the position type.
- Select the desired Position Type from the dropdown.
- Click Save.
Notes about Position Types
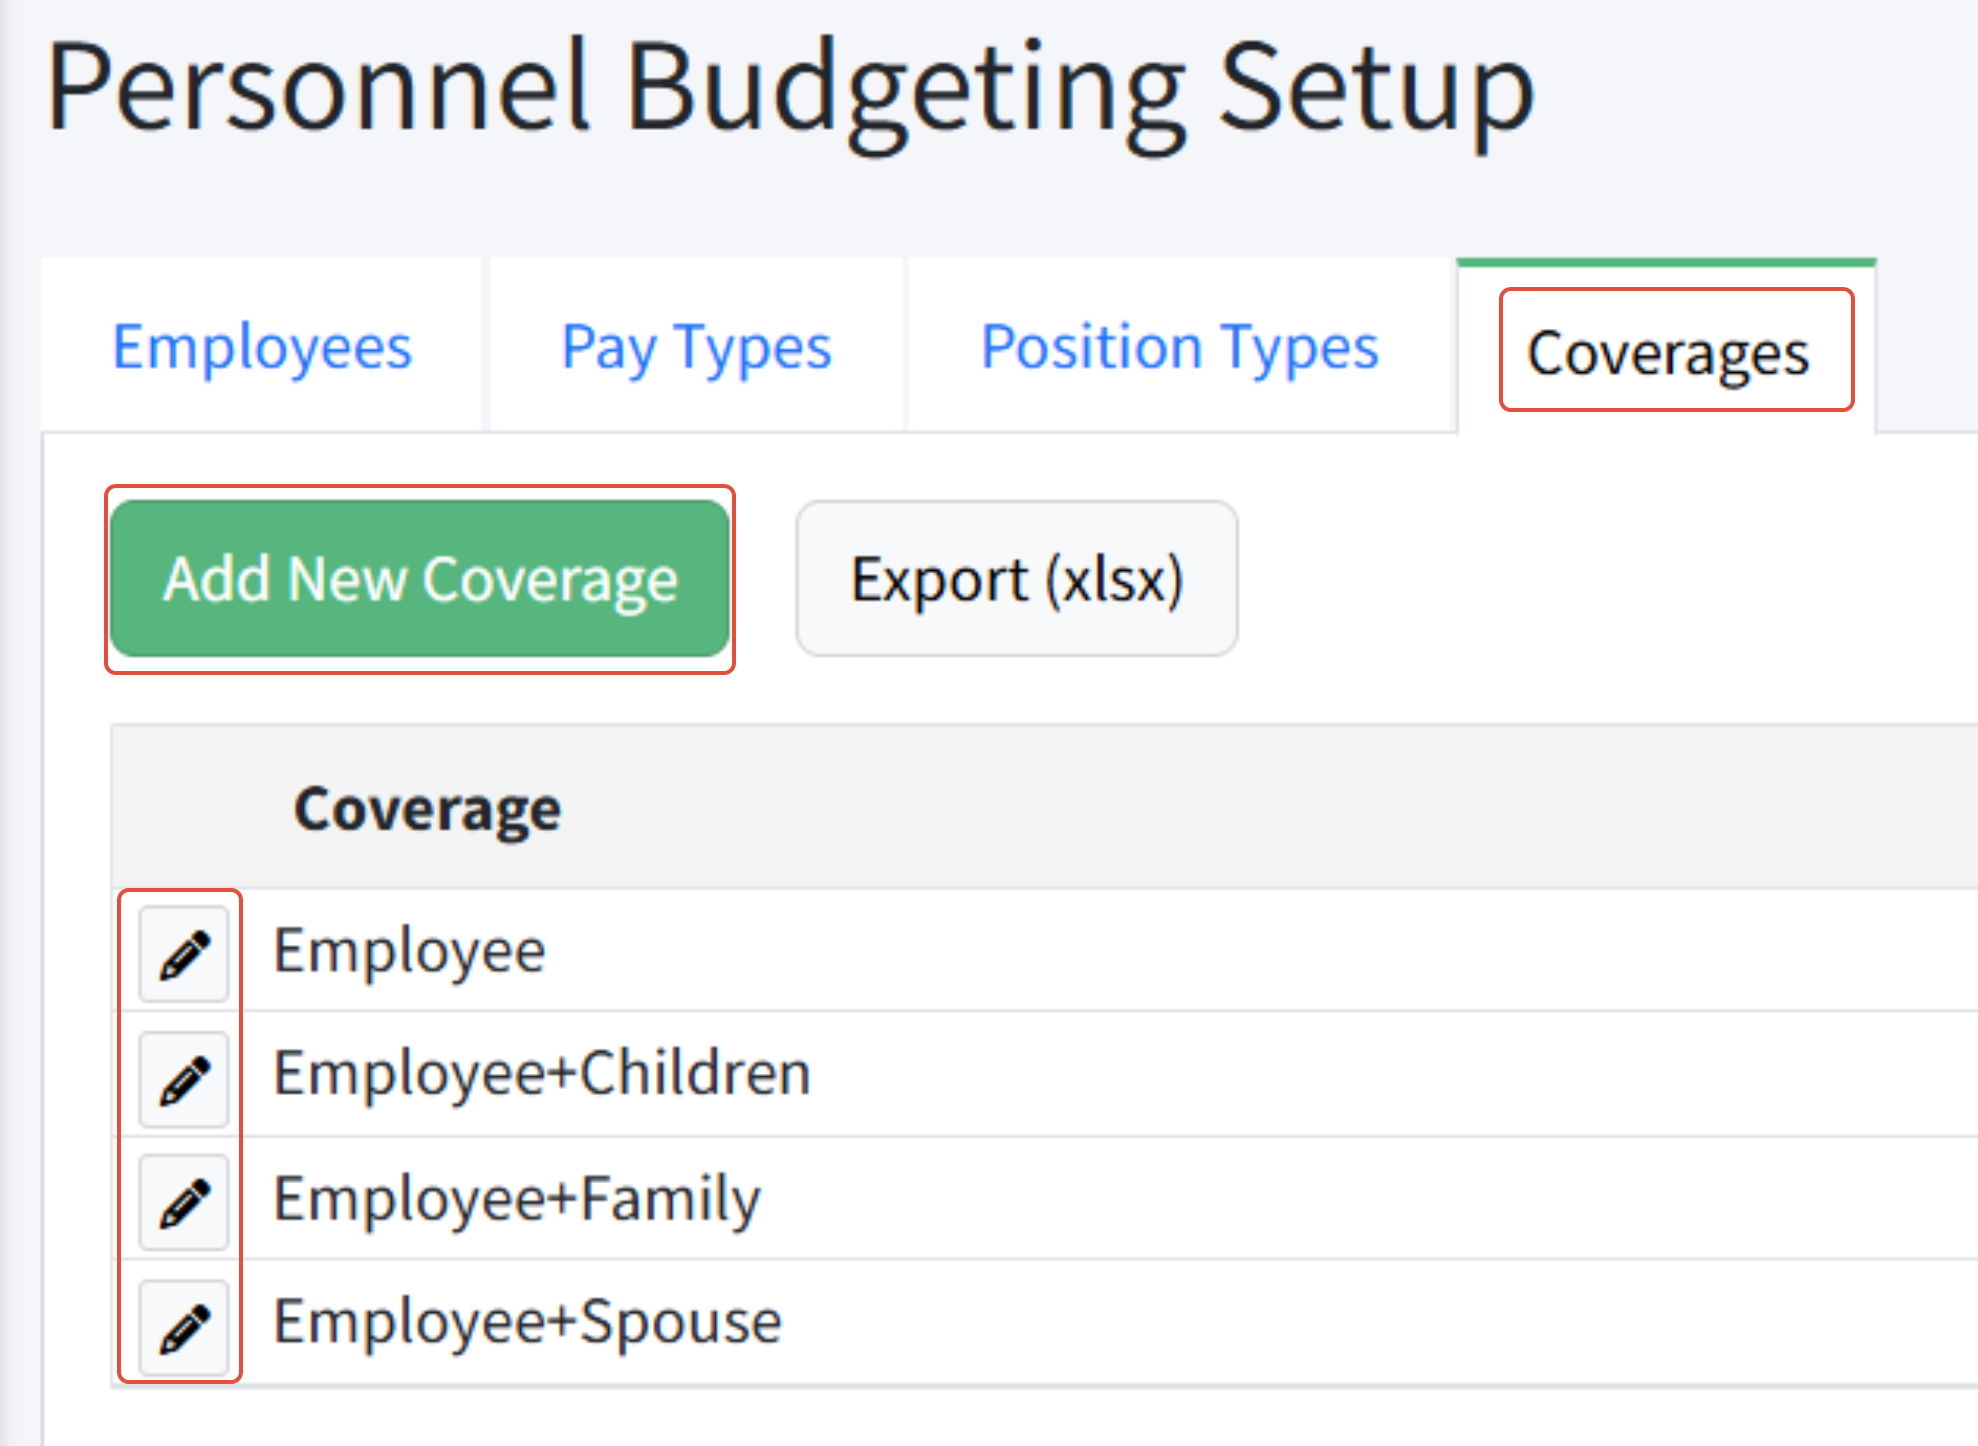
Coverages
Personnel Budgeting uses Coverages. Coverages are levels of coverage, opted into by an employee, utilized with both Employees and Pay Types to determine the rate of a specific pay type at a specific level. The most common use for coverages is for medical insurance.
Coverages will usually be created during implementation, but can be added and adjusted at any time.
The coverage level selected for an employee stipulates what level the employee has opted in to for themselves or their family.
The coverage level on the pay type then stipulates the rate for that employee for that level of coverage.
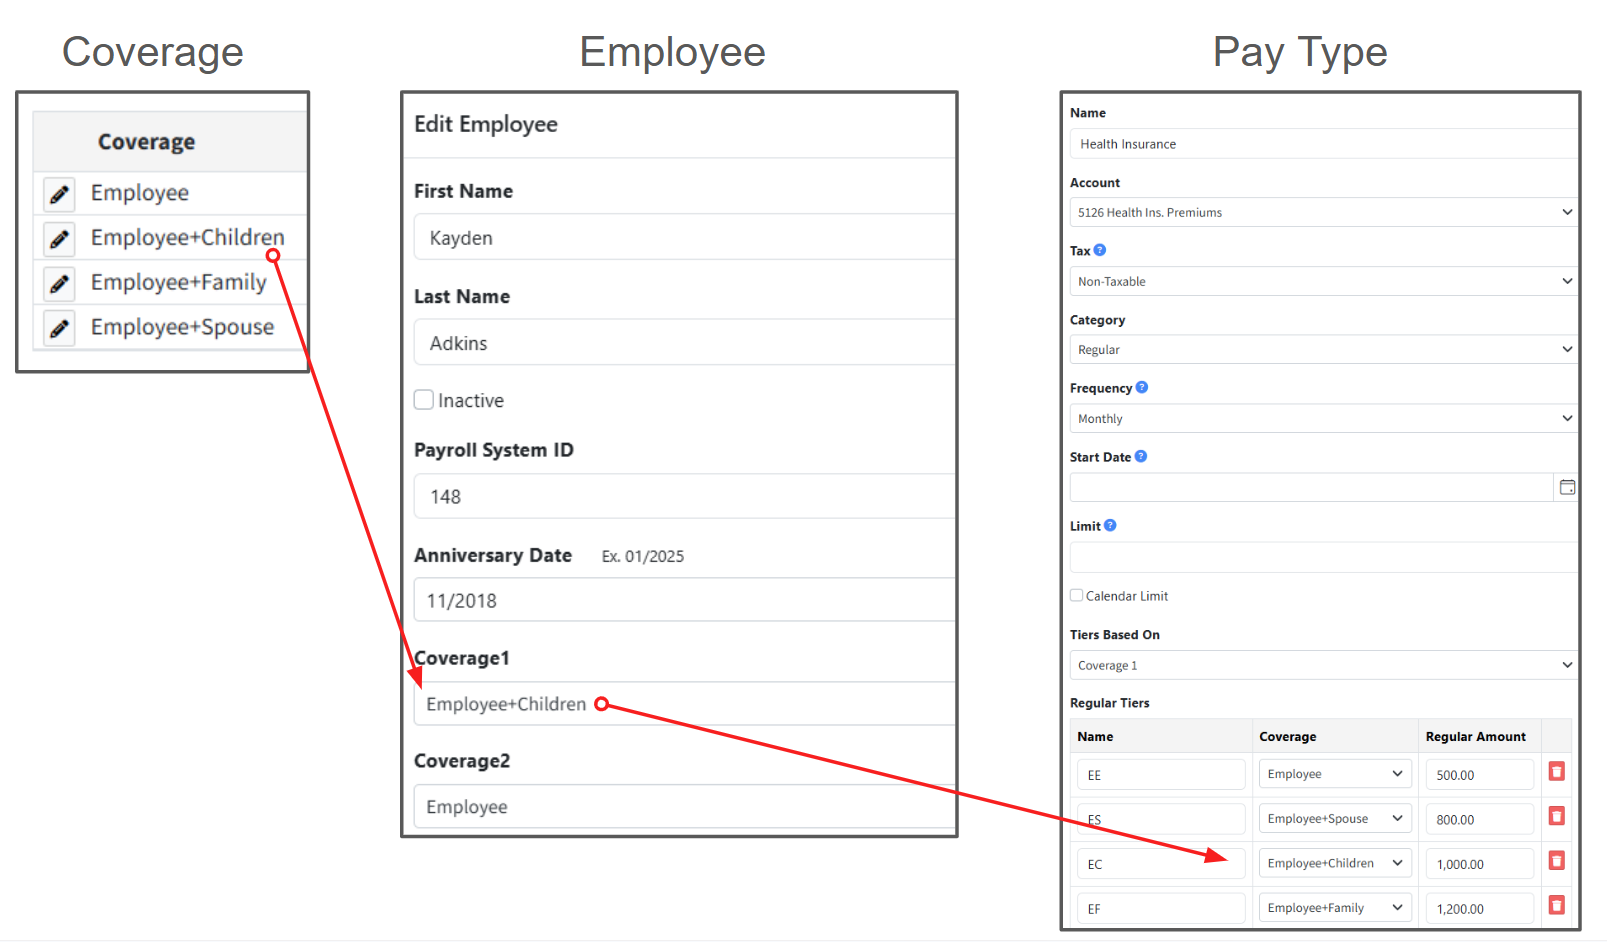
 When a pay type using coverages & rates is added to a position, Martus will look up the employee's level of coverage and match the appropriate rate to budget for that position.
Creating a Coverage Option
- Go to Personnel Budgeting > Personnel Budgeting Setup > Coverages.
- Click Add New Coverage.
- Enter the name of the new coverage.
- Click Add.